Monday, 31 May 2021

How to Get a Google Featured Snippet with Your WordPress Site

Do you want to get a Google featured snippet with your WordPress site?

Featured snippets are the highlighted results for a Google search. Users are more likely to click on a featured snippet than a plain search result.

In this article, we will show you how to get a Google featured snippet with your WordPress site without any technical knowledge.
how to get Google featured snippets for your WordPress website

Here is a quick overview of things we’ll cover in this article:

What are Google Featured Snippets?

Google featured snippets are highlighted results that’s shown at the top of the page above position one that’s why they’re also known as position 0.

In the featured snippet, Google may display a search result in the Answer box or highlight it using microdata from your website.

For example, if Google thinks that your website will answers user’s question adequately, then it will appear on top with relevant text displayed as the description.
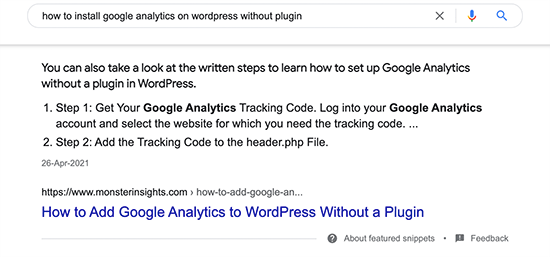
Answer box

Similarly, Google also uses Schema.org metadata to fetch important information from websites and display them in search results at the top. For example, if you search for a local business, then their relevant business information will be at the top.
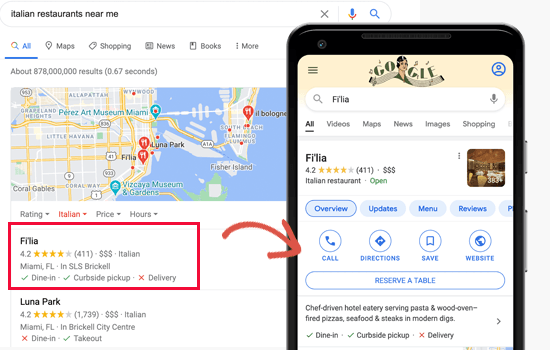
Local search results preview

Featured snippets can enhance product pages for your online store, better showcase your recipes, highlight your real estate listings, and more.

Product results with ratings and reviews

The enhanced search display of featured snippets improves your organic click-through rate and brings more free traffic to your website.

This is why all smart business owners optimize their website, so they can have maximum chances of appearing as featured snippets in Google search.

That being said, let’s take a look at how to get Google featured snippets for your WordPress posts and pages.

Getting Google Featured Snippet using All in One SEO

Google uses Schema.org metadata and their knowledge graph API to display different types of featured snippets.

Schema markup is a special vocabulary that you can use in your content’s HTML code to give search engines more context about your website and individual pages.

In the early days, this used to be hard for small businesses because it involved a lot of coding.

But that’s not the case anymore, thanks to plugins like All in One SEO for WordPress.

It is the best WordPress SEO plugin on the market that’s used by over 2 million websites. They help you easily optimize your website for higher search engine rankings.

AIOSEO automatically adds Schema.org support which helps you provide information for Google Knowledge Graph. It has full WooCommerce SEO support, local SEO, images, news, video optimization, and more.

First, you need to install and activate the All in One SEO for WordPress plugin. For more details, see our step by step guide on how to install a WordPress plugin.

Upon activation, you’ll be asked to run the setup wizard. It is the easiest way to quickly select the best SEO settings for your website.
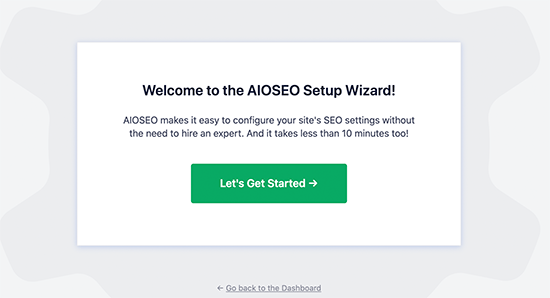
All in One SEO set up wizard

Need help with the setup? See our complete guide on how to install and set up All in One SEO for WordPress.

Now, if you have followed the setup wizard, the basic settings for your website to appear in featured snippets are already set.

But we’ll show you what they do and how to change them if you need to.

Setting up Knowledge Graph Information in WordPress

First, you need to visit All in One SEO » Search Appearance page and scroll down to the Knowledge Graph section.
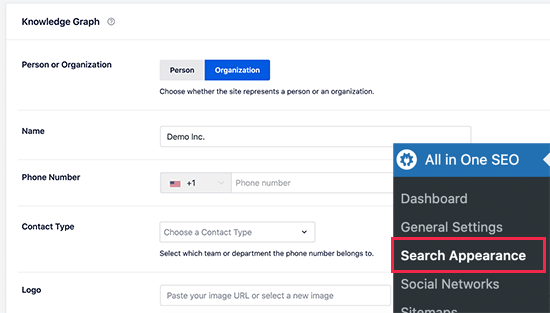
Knowledge graph information

From here, you can tell the search engines who your website represents (i.e. An organization or an individual). After that, you can provide your business phone number, logo, and contact type information.

Don’t forget to click on the Save Changes button to store your settings.

Knowledge Graph information is used by search engines to display knowledge panels. These panels appear when someone searches for an organization or individual person.
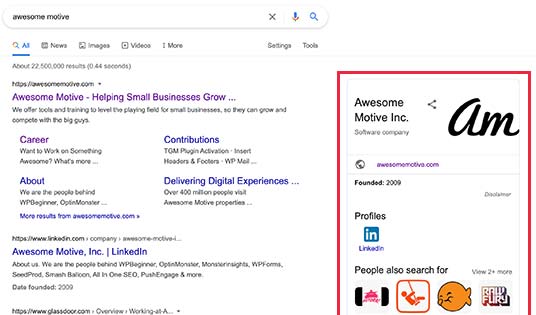
Knowledge panels in Google Search

Adding Local Business Information to Featured Snippets

More than 40% of all searches on the internet have a local intent. Majority of these searches lead to sales as users are looking for directions and things to buy near them.

Many businesses and organizations have retail locations and offices that customers can visit.

You can add this information using All in One SEO and let search engines automatically display it in featured snippets.

Local search results preview

First, go to the All in One SEO » Local SEO page and activate the Local SEO feature.
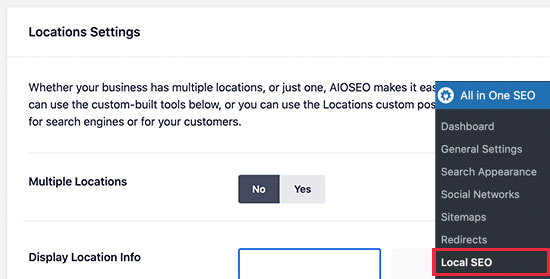
Choose single or multiple locations

Upon activation, you can choose if your organization or business has multiple locations. If you do, then you can go ahead and start adding those locations otherwise you can scroll down to add your business information.
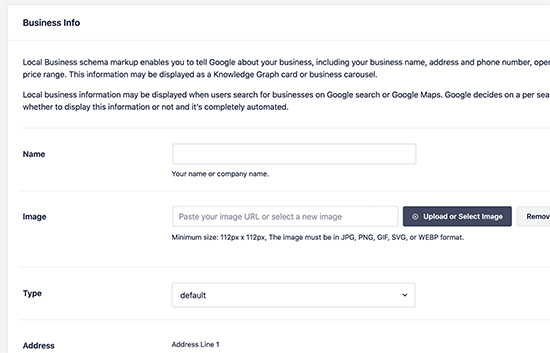
Business information

After that, switch to the Opening Hours tab to add your business hours.
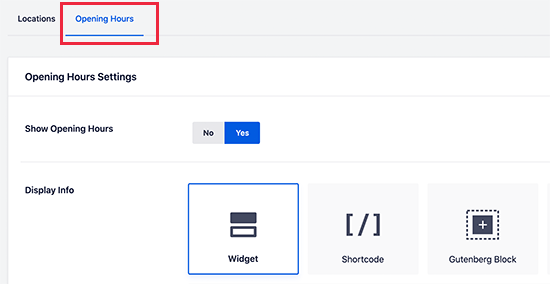
Opening hours for your business

For more details, check out our article on how to add business hours in WordPress.

Finally, you need to connect and verify your business using Google My Business website. This gives you more control over your business’s appearance in Google search results and improves your chances appearing more often in featured snippets.

Add SEO Schema Markup in WordPress Posts / Pages

All in One SEO automatically adds the correct Schema markup for your content. However, you can review these settings and change them if needed.

Simply go to All in One SEO » Search Appeaerance page and switch to the content types tab. From here, you’ll see all your post types listed (posts, pages, products).

You need to click on the ‘Schema’ for a post type to change its default settings.
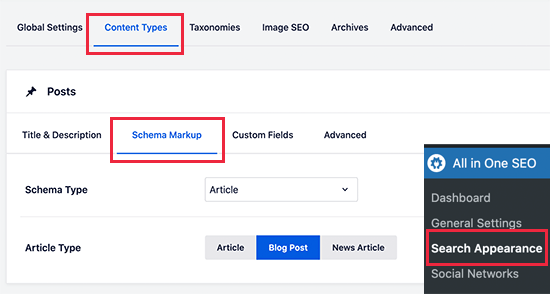
Default schema settings

What if you didn’t want to change schema type for all posts? Well, AIOSEO let’s you change Schema markup for individual posts, pages, and other post types as well.

Simply edit the post or page you want to change and scroll down to the AIOSEO settings box below the post editor.
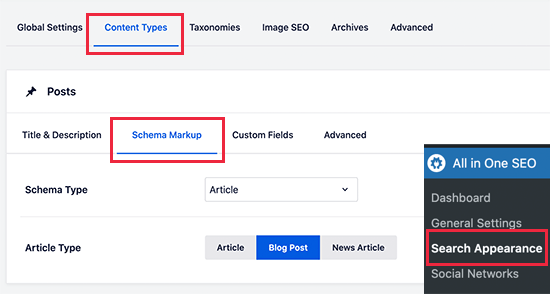
Default schema settings

This feature is particularly useful for businesses that use Pages to sell products with or without using an Ecommerce plugins. You can then simply edit your product landing page and change its schema type to Product.
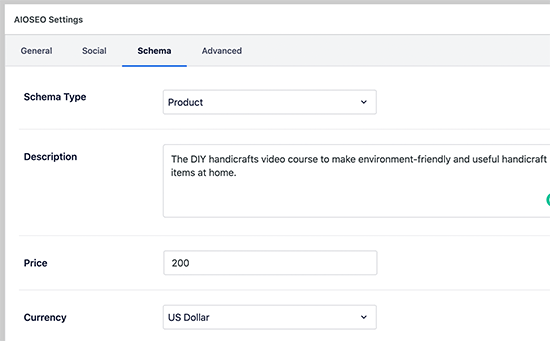
Changing any page schema to a product in WordPress

Another way to turn your search listing into a more enhanced featured snippet is by using Breadcrumb navigation.

Breadcrumb navigation tells users where they are on a website relative to the homepage. It is then displayed as a trail of links and would also appear in search results.
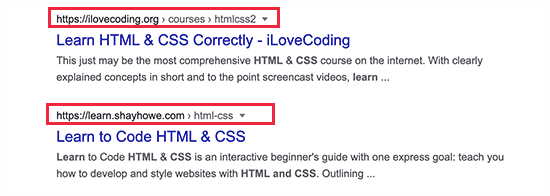
Breadcrumb navigation in search results

You can also display the breadcrumb navigation trail on your website. This allows users to go up and down, browse categories, and discover more products and content.

Breadcrumbs on a WooCommerce store product page

For search engines, All in One SEO automatically adds the required markup to your website’s HTML code. However, if you want to display breadcrumbs on your site too, then you can go to All in One SEO » General Settings page and switch to the Breadcrumbs tab.
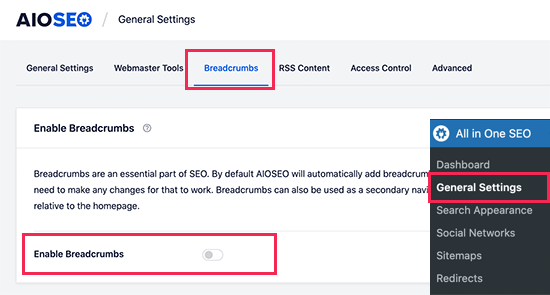
Enable breadcrumbs display in All in One SEO

From here, you need to Enable Breadcrumbs and then use one of the available methods to display the links. For more details, check out our article on how to add breadcrumb navigation links in WordPress.

Get Site Links for WordPress in Google Search

Site Links are the additional links that Google may show below a particular search term. They usually appear for brand and website names, but they may appear for other types of searches as well.
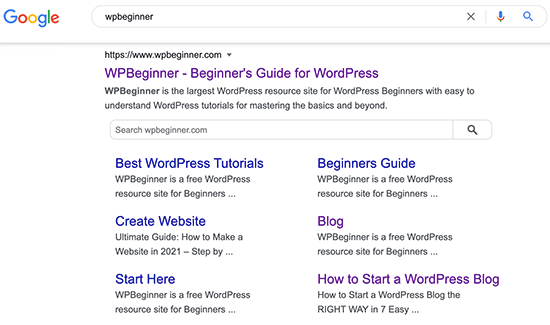
Site Links

To get site links, you need to add your website to Google Search Console and submit your XML sitemap.

Add sitemap to Google Search Console

You can increase your chances of getting site links by creating a proper website structure. This includes adding all the important pages for your website and use categories to properly organize your website structure.

Appear in The Answer Box for Google Search

What’s better than ranking #1 for a keyword?

Ranking #0 in the answer box.

Answer boxes are the search results that appear on the top and Google considers them to be answering user’s search intent.

Answer box

Answer boxes have an average click-through rate of 32% which makes them highly lucrative. Particularly for keywords with a purchase intent Answer boxes can lead to sales and boost conversions.

The only way to appear in the answer boxes is to improve the quality of your content. Make sure it is comprehensive and answers users’ questions from different angles.

See our detailed tutorial on how to appear in the Google Answer boxes with your WordPress posts and pages.

We hope this tutorial helped you get featured snippets with your WordPress site. You may also want to see our guide on how to get more traffic to your website with proven tips, and our comparison of the best email marketing services.

If you liked this article, then please subscribe to our YouTube Channel for WordPress video tutorials. You can also find us on Twitter and Facebook.

The post How to Get a Google Featured Snippet with Your WordPress Site appeared first on WPBeginner.


from WPBeginner https://ift.tt/3fYVcYQ
More links is https://mwktutor.com
Friday, 28 May 2021

7 Best WordPress Accordion Plugins (2021)

Are you looking for the best WordPress accordion plugins?

An accordion is a neat web design technique which allows you to display content in a collapsible tab layout.

In this article, we will share the best WordPress accordion plugins that you can use on your WordPress website.

Best WordPress accordion plugins

Why Do You Need to Add Accordions in WordPress?

Accordions allow you to display more content on your posts and pages without adding long scrolls. If you want to shrink the length of a page, then you should consider using an accordion element on your site.

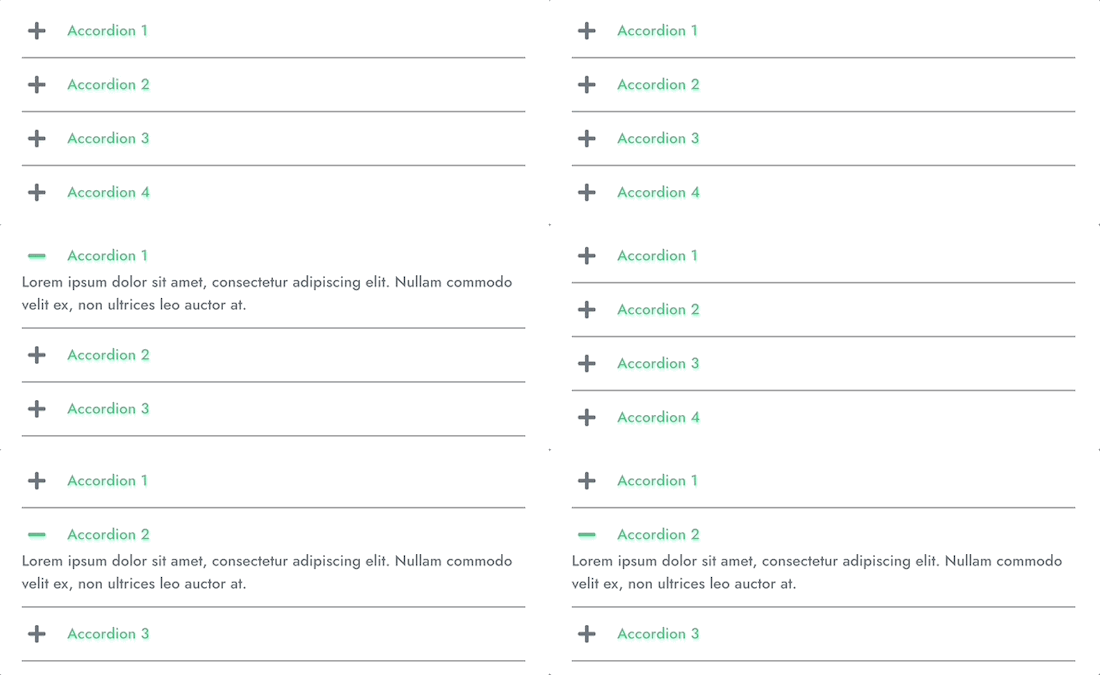
You can add vertical or horizontal accordions with the text inside each tab. When users click or mouseover on the tab, it expands to reveal the content.

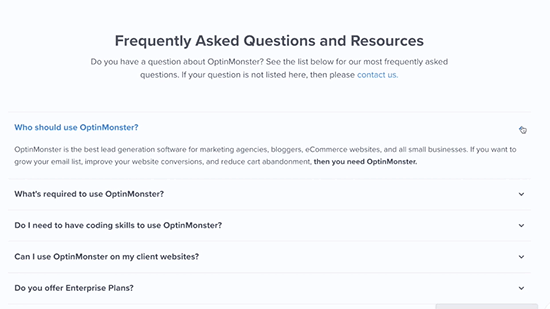
Example of accordion used on a website

Accordions are most commonly used to add a frequently asked questions (FAQs) section, by displaying questions as tabs. However, you can use them to add any kind of content where you want to save users from scrolling.

That being said, let’s take a look at some of the best WordPress accordion plugins that you can use on your WordPress website.

1. Accordion

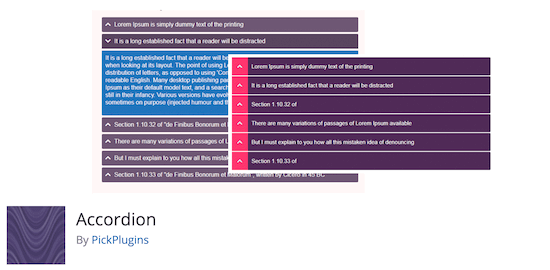
Accordion plugin

Accordion is a handy WordPress plugin which allows you to add beautiful accordions in your pages, posts, template files, and anywhere on your site using shortcodes.

It has a responsive design and displays your content beautifully on all devices.

Accordion has Font Awesome icon font support which allows you to use beautiful icons in your accordion tabs.

You can add unlimited accordions on your site using this plugin. It allows you to change styles for the opened and closed accordion, hide the accordion without deleting, text alignment for content, and more.

2. SeedProd

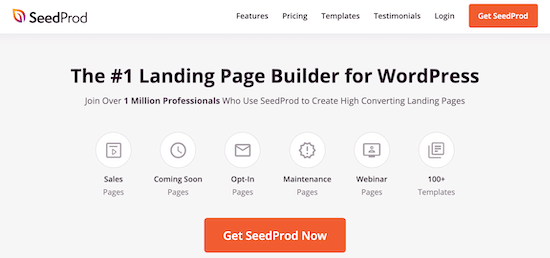
SeedProd plugin

SeedProd is the best drag and drop WordPress page builder in the market used by over 1 million websites. It allows you to create any kind of landing page with no coding required.

It includes an accordion block that lets you add text sections that expand and collapse to any part of your page.

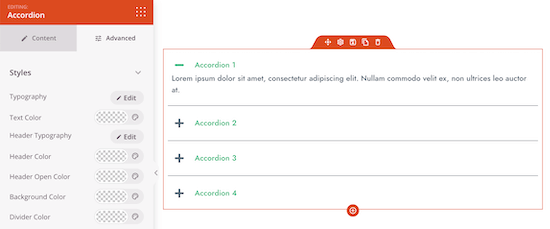
SeedProd accordion click

All you have to do is drag and drop the accordion block onto your page and start customizing.

You have full control over the number of text sections and can add a unique drop down icon.

SeedProd accordion settings

You can even customize the typography, color, text spacing, and more to match your website’s design fully.

For more details, see our guide on how to create a landing page with WordPress.

3. Accordion FAQ

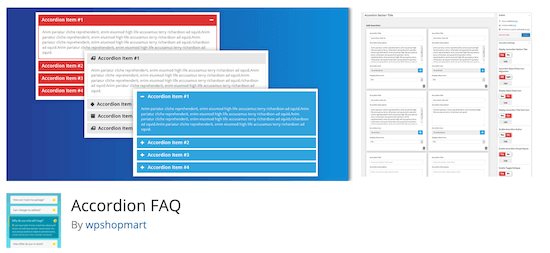
Accordion FAQ plugin

Accordion FAQ is another accordion plugin for WordPress sites. It has a drag and drop builder that helps you easily add accordions anywhere on your WordPress blog.

You can sort the accordions and manage their placement by dragging them up or down in the backend.

It has multiple templates, unlimited color options, Font Awesome icons support, bootstrap framework for responsive design, and more. Accordion FAQ loads fast which is great for search engine rankings of your site.

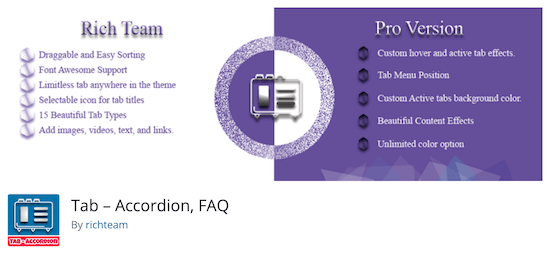
4. Tab – Accordion, FAQ

Tab Accordion FAQ plugin

Tab, Accordion and FAQ is a WordPress plugin that allows you to add beautiful animated tabs and accordions in WordPress.

You can easily add responsive horizontal, vertical, animated, and other accordions to WordPress posts, pages, and sidebar widget areas.

It has multiple transition effects, different layouts, drag and drop functionality for sorting tabs, and more.

5. Arconix Shortcodes

Arconix Shortcodes plugin

Arconix Shortcodes is a multipurpose WordPress plugin that has different style shortcodes to add tabs and accordions on your site. It displays your content in accordions and appears neatly on all mobile devices.

You can create unlimited accordions and add them anywhere with the help of shortcodes. The plugin also comes with a compatibility mode which allows you to prevent shortcode name conflicts.

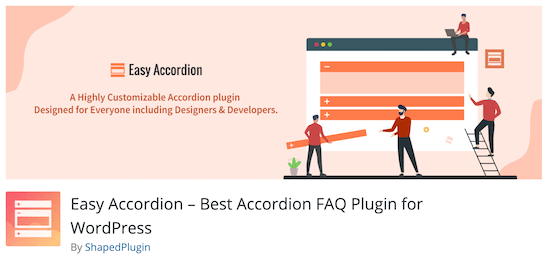
6. Easy Accordion

Easy Accordion plugin

Easy Accordion is another WordPress accordion plugin that allows you to set up unlimited accordions and add them on your pages, posts, widget areas, and template files.

If you buy their premium version, then it comes with additional features like advanced shortcode system, accordions from WordPress categories and custom taxonomies, themes, unlimited colors support, and more.

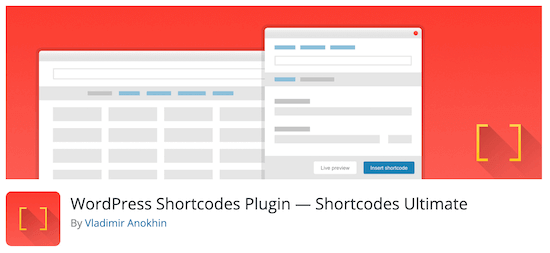
7. Shortcodes Ultimate

Shortcodes Ultimate plugin

Shortcodes Ultimate is a comprehensive WordPress plugin that comes with a set of shortcodes to add multiple features. You can use this plugin to add accordions on your site with its 1-click shortcode insertion and live preview.

It has a custom widget that you can use to add the accordion in any widget area of your WordPress site. Shortcodes Ultimate is easy to use and functions smoothly with modern WordPress themes.

We hope this article helped you find the best WordPress accordion plugins. You may also want to see our picks of the best email marketing services, and our expert list of the must have WordPress plugins for business websites.

If you liked this article, then please subscribe to our YouTube Channel for WordPress video tutorials. You can also find us on Twitter and Facebook.

The post 7 Best WordPress Accordion Plugins (2021) appeared first on WPBeginner.


from WPBeginner https://ift.tt/3c0n2Th
More links is https://mwktutor.com
Thursday, 27 May 2021

How to Move a Site from WordPress Multisite to Single Install

Do you want to move a site from WordPress multisite to a single install?

If you run a WordPress multisite network, then sometimes you may need to move one of the websites to its own separate WordPress install.

In this article, we’ll show you how to easily move a site from WordPress multisite to its own single install while preserving SEO rankings and all your content.

Splitting a site from WordPress multisite to single install

Step 1: Getting Started

To move a website from a WordPress multisite network, you’ll need a domain name.

If you already have a domain name where you want to install the single site, then you are good to go.

If you don’t have a separate domain name, then you’ll need to register a new domain name and add it to your hosting account. For more details, see our article on how to register a domain name.

Alternately, you can buy a separate hosting account and domain name for your fresh WordPress install.

We recommend using Bluehost. They are offering a free domain name with a generous discount on hosting. Basically, you can get started for $2.75 per month.

After getting your domain name and hosting, the next step is to install WordPress. See our step by step WordPress installation tutorial if you need help.

Important: Since you are going to do some serious changes to your WordPress multisite, it is necessary to create a complete WordPress backup before you do anything else.

Now that everything is set up, let’s move a site from WordPress multisite network to its own single install.

Step 2: Exporting a Single Site in WordPress Multisite Network

The built-in WordPress import/export functionality works the same way in multisite as it does on a single site install. We will be using the default tools to export the data from a site on WordPress multisite network.

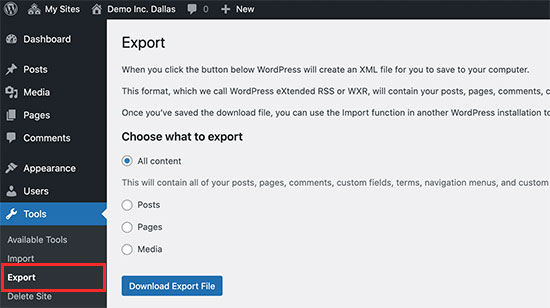
First, you need to login to the dashboard of the single site you want to move, and then click on Tools » Export. Next, you want to make sure that all content is checked and click on the Download Export File button.

Exporting a single site from a WordPress multisite network

WordPress will now create an XML file containing all your data and send it to your browser for download. Save the file on your computer because you will need it in later steps.

Step 3: Importing Child Site to New Domain

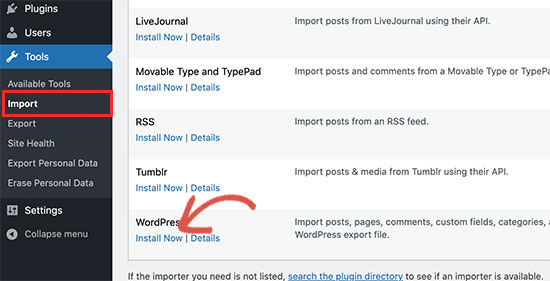
Login to the WordPress admin area on the new location where you want to move your child site and then go to Tools » Import. On the import screen, WordPress will show you a number of import options.

Import WordPress

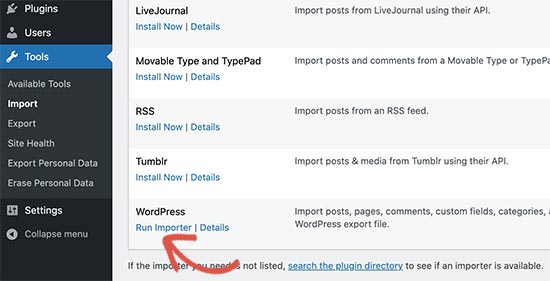
You need to click on the ‘Install Now’ link below ‘WordPress’. Wait for the importer to be installed and then click on the ‘Run Importer’ link.

Run WordPress Importer

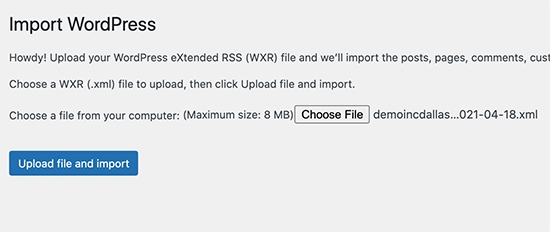
On the next screen, you will be asked to upload the WordPress export file you downloaded earlier from WordPress multisite.

Upload the import file

Click on the Choose file button to select the file from your computer and then click on the ‘Upload file and import’ button.

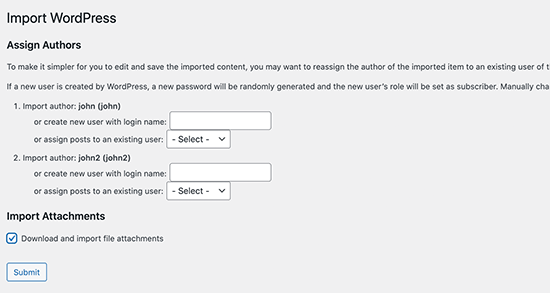
On the next screen, WordPress will ask if you would like to import users as well. If you do nothing, then WordPress will import all users. This is recommended if you do not want to change authors.

You will also see Import Attachments option, and you want to make sure it is checked so that WordPress can download images from your posts and pages (Don’t worry if it misses out some or most of your images. You can import them separately afterwards).

Review import settings

Click on the ‘Submit’ button to continue.

WordPress will now start importing your content. This will take a few minutes depending on how much content you have. Once it is done, you will see an ‘All done, Have fun’ notification.

Import finished

That’s all. You have successfully imported data from a multisite network child site to an individual WordPress install. There are still a few things left to do.

Step 4: Setting up Redirection

If you were using custom domains for each site in your WordPress multisite network, then you don’t have to setup any redirection.

However, if you were using subdomains or directory structure in your WordPress multisite, then you need to setup redirection so that users coming to your old URLs are redirected to your new site.

There are two ways to do this. You can set up a redirect using a WordPress plugin (recommended) or you can add some code to your WordPress .htaccess file.

We’ll show you both methods, you can choose one that best suits you.

Note: Make sure that your old site on the multisite network and the site on the new domain both are using the same permalink structure.

Method 1. Setting up Redirects using Redirection Plugin

First, you need to install the Redirection plugin on your WordPress Multisite.

You can Network Activate a plugin or you can login as Super Admin on your child site and activate the Redirection plugin for that particular site alone.

After that, you need visit the admin dashboard of the child site for which you want to set up the redirect.

Redirecting from Subdomain to New Domain

Redirection plugin makes it super easy to point a domain name to a different domain name.

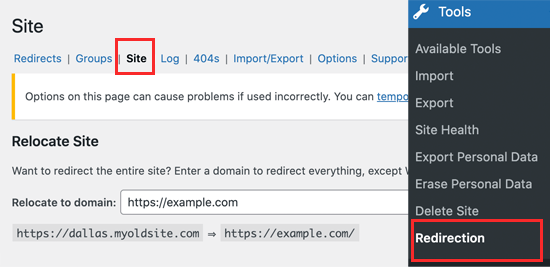
Simply go to Tools » Redirection page and switch to the ‘Site’ tab.

Point to new domain name

Simply enter your new domain name and then click on the ‘Update’ button to save your settings.

The plugin will start redirecting all your site users to your new domain name with correct permalink structure.

The advantage of this method is that you can still login to the admin area of your subdomain

Redirecting from Directory to New Domain

If your multisite uses a directory based URL structure, then Redirection plugin makes it easy to redirect it properly to your new domain.

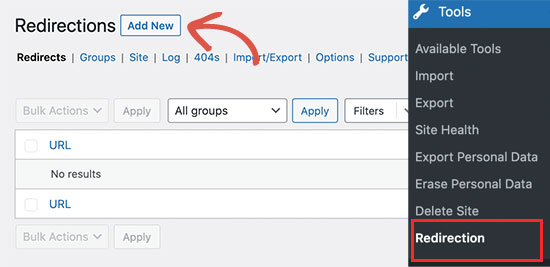
Simply go to Tools » Redirection page on your sub-site, and then click on the Add New button at the top.

Adding new redirection rule

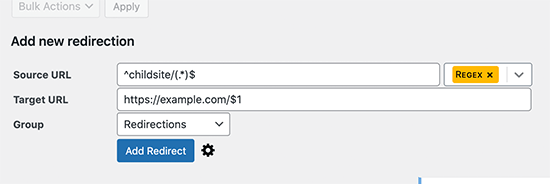
This will take you to Redirect set up form. Here is how you need to fill in that form:

Source URL: ^childsite/(.*)$
Target URL: https://example.com/$1

Don’t forget to change ‘URL Options / Regex’ to Regex and click on the Add Redirect button to save your settings.

Directory to root redirection

You can now visit your sub-site to see the redirects in action.

Method 2. Setting up Redirects Using .htaccess file

For this method, you need to add redirect rules to your the .htaccess file in your WordPress hosting account for your multisite network.

Subdomain to New Domain Redirect

For subdomain installs, you need to use this code in the .htaccess file of your WordPress multisite.

Options +FollowSymLinks
RewriteEngine on
RewriteCond %{HTTP_HOST} ^subdomain.example.com$ [NC]
RewriteRule ^(.*)$ http://www.example.net/$1 [L,R=301]

This code redirects visitors coming to any page on subdomain.example.com to http://www.example.net. The $1 sign at the end of the destination URL ensures that your users land on the same page they requested.

Redirecting From Directory to New Domain

For directory-based multisite installs, you will need to paste the following code in the .htaccess file of your WordPress multisite.

Options +FollowSymLinks
RewriteEngine On
RewriteRule ^childsite/(.*)$ http://example.net/$1 [R=301,L]

This code simply redirects any users coming on http://www.example.com/childsite/ to http://example.net. The $1 makes sure that your users land on exactly the same page or post they requested.

Don’t forget to replace childsite and example.net with the name of your sub-site and its new location.

Step 5: Troubleshooting the Migration

Moving a site is not a routine task, so it is likely that you will come across some issues. But don’t worry, there is solution for every issue that you may come across.

If your WordPress export file is too large, then you can split large XML file into smaller pieces.

If your images didn’t import correctly, then you can try importing them as external images.

See other common WordPress errors and how to fix them.

We hope this article helped you move a site from WordPress multisite to a single install. You may also want to review our WordPress SEO checklist for your new install or try these essential WordPress plugins on your fresh site.

If you liked this article, then please subscribe to our YouTube Channel for WordPress video tutorials. You can also find us on Twitter and Facebook.

The post How to Move a Site from WordPress Multisite to Single Install appeared first on WPBeginner.


from WPBeginner https://ift.tt/34jYuk3
More links is https://mwktutor.com
Wednesday, 26 May 2021

How to Check if Your Website is SEO Optimized (2 Easy Ways)

Do you want to check if your website is SEO optimized?

By analyzing your WordPress website’s on-page SEO setup, you can easily find and fix SEO errors, so you can improve your search engine rankings and get more traffic.

In this article, we’ll show you how you can check if your WordPress website is SEO optimized, step by step.

How to check if your website is SEO optimized (2 easy ways)

Why Check if Your Website is SEO Optimized?

By checking if your website is SEO optimized, you’ll know if there are any improvements that you can make to grow your search engine traffic.

Since search engines are often the largest source of website traffic, this can be very valuable to your WordPress business website.

However, when it comes to SEO there’s a lot you need to get right, including a lot of technical SEO jargon that can be confusing for beginners.

Luckily, there are a variety of SEO tools you can use to see if your website is SEO optimized and the steps you can take to improve your SEO.

With that said, let’s look at two ways you can check if your website is SEO optimized.

Method 1: Use AIOSEO to Check and Optimize Your WordPress SEO

All in One SEO is the best WordPress SEO plugin in the market used by over 2 million users. It lets you easily improve your search engine rankings and optimize your site without having to learn the ins and outs of SEO.

First thing you need to do is install and activate the plugin. For more details, see our step by step guide on how to install a WordPress plugin.

Note: there is a free version of AIOSEO available, but we’ll use the pro version since it gives us even more SEO optimization features.

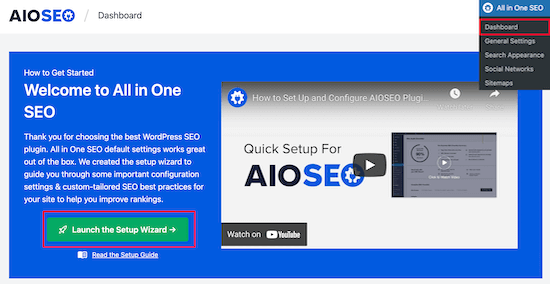
Upon activation, you’ll have a new menu item called ‘All in One SEO’. You need to go toAll in One SEO » Dashboard, and it will take you to the main settings panel.

After that, click the ‘Launch the Setup Wizard’ button.

AIOSEO launch setup wizard

This will walk you through the process of setting up the plugin for your website.

For more details, see our guide on how to setup All in One SEO for WordPress correctly.

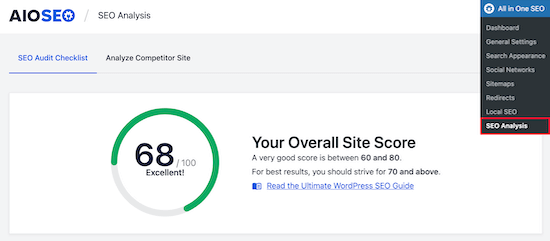
Once the plugin is set up, navigate to All in One SEO » SEO Analysis.

The ‘SEO Audit Checklist’ tab will give you a breakdown of your overall SEO score.

AIOSEO score

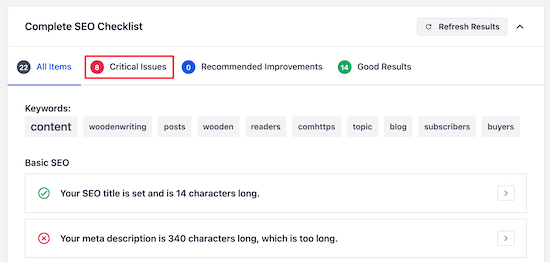
Under that, you’ll see the ‘Complete SEO Checklist’.

You can think of this as your checklist for properly optimizing your WordPress website.

Complete SEO checklist

The ‘Critical Issues’ are what you need to fix first because they will have the biggest impact on your SEO score.

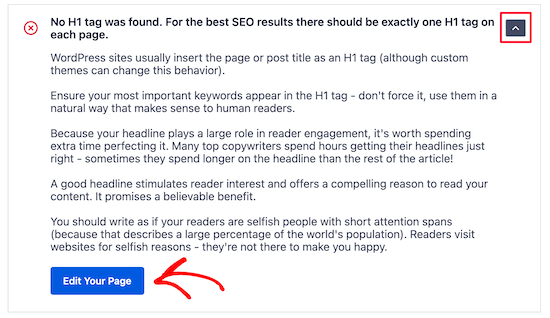
Simply click the ‘Arrow’ to the right of an SEO issue, and a box will drop down that explains the problem, and what you can do to fix it.

Expand critical issues section

In this case, clicking the blue ‘Edit Your Page’ button will take you to the page where the change needs to be made.

After you make the changes, you need to navigate back to the ‘SEO Analysis’ page and click the ‘Refresh Results’ button.

Refresh your SEO results

This will update your results and reflect the positive SEO improvements you have made.

You can see here the red ‘Critical Issue’ has now changed into a green ‘Checkbox’.

Critical issue change

Now, you need to follow the same steps for any of the ‘Critical Issues’ found by the plugin and make the ‘Recommended Improvements’ if there are any suggestions.

Check the SEO of Any Competitor Website

Another great feature is the competitor analyzer that will show you how SEO optimized are your competitor’s websites.

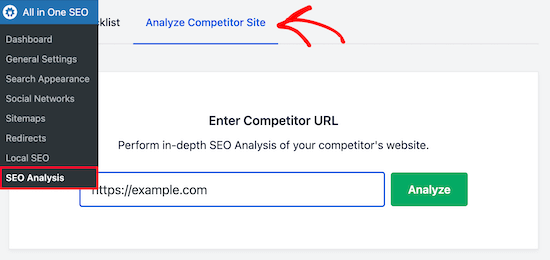
To use this, you need to go to All in One SEO » SEO Analysis and click the ‘Analyze Competitor Site’ menu item.

Simply enter the competitor URL into the box and click ‘Analyze’.

Check competitor website SEO

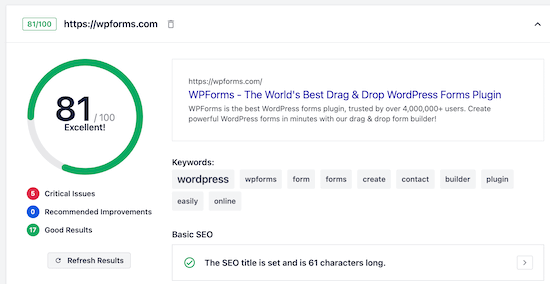
The results you’ll get for your competition are similar to the SEO analysis results for your website.

By seeing what they’re doing right and wrong, you can easily outrank your competition in the search engine results pages.

Competitor website SEO results

Improve Your Individual Page SEO with TruSEO

Now that you’ve made changes to your website to improve your onsite SEO and fix any errors, the next step is to use the TruSEO analysis feature to see how well your posts and pages are SEO optimized.

Simply open up the post or page that you want to optimize and scroll down to the bottom of the content editor. There you will see the SEO settings area.
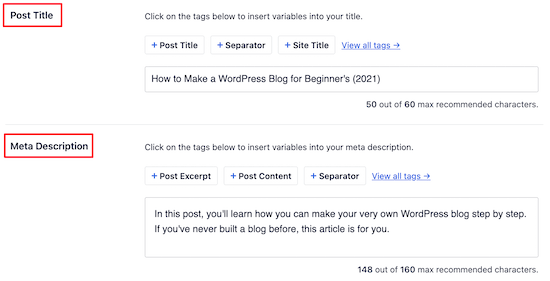
Headline and meta description

First, you can optimize your ‘Post Title’ and ‘Meta Description’. This is what will display in the search results.

There’s a built-in headline analyzer that will help you maximize your click through rates to get more traffic.

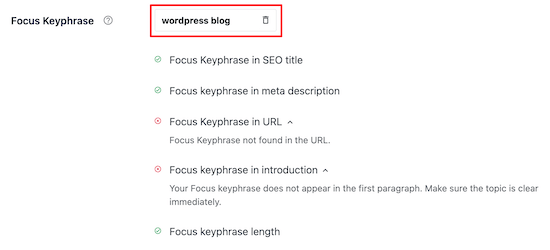
Next, you can enter your ‘Focus Keyphrase’ into the box.

Enter focus keyword

This keyword is what you want the post or page to rank for.

After you enter the keyword, the plugin will analyze your content and give you tips to improve.

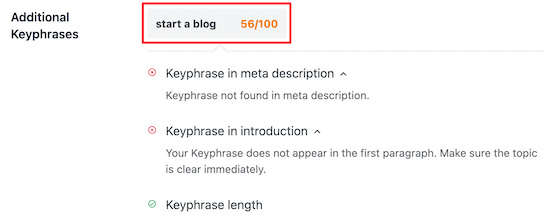
You can also enter multiple keywords into the ‘Additional Keyphrases’ box.

Enter additional keywords

This lets you optimize your content for multiple keywords and bring in even more traffic.

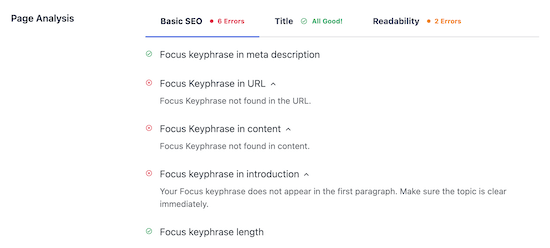
After that, you’ll get a detailed ‘Page Analysis’ that will tell you how well your page is SEO optimized.

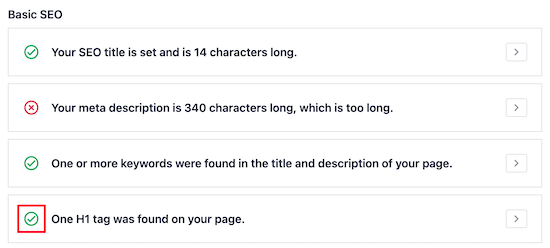
The ‘Basic SEO’ tab will tell you how well your content is optimized for common SEO guidelines.

Page analysis basic SEO

The ‘Title’ tab will tell you how well your title is optimized for the search engines.

Click this tab to see how well your title is performing.

Page analysis title

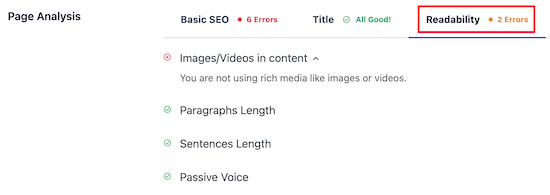
Next, you have the ‘Readability’ tab.

This gives you a detailed breakdown of how easy your content is to read. It offers you suggestions to improve your content and tells you what you’re doing well.

Page analysis readability

After you’ve finished making changes to optimize your content, make sure you click ‘Update’ or ‘Publish’.

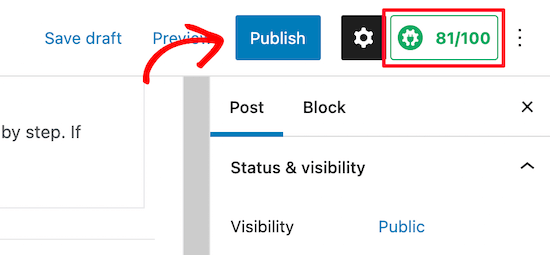
You’ll also notice your TruSEO score in the upper right corner of the page. The higher this number, the better your content is optimized for the search engines.

TruSEO score

Method 2: Use SEMRush to Get Advanced WordPress SEO Data

SEMRush is one of most popular SEO tools, and they offer the best keyword research tool in the market.

This is the tool that we use for WPBeginner and our other companies. You have to use it along with a WordPress plugin like AIOSEO.

With the help of SEMRush, you can see how well your SEO strategy is working.

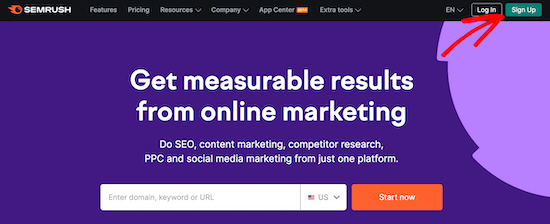
First thing you need to do is visit the SEMRush website and click ‘Sign Up’ to create an account.

You can create a free account that will give you a limited amount of website SEO data. You will need to sign up for a paid SEMRush subscription to get all the features (it’s totally worth it).

SEMRush sign up

Next, you’ll be asked to provide an email address, password, and phone number.

After that, you’ll be taken to your SEO Dashboard, where you can start checking if your WordPress site is optimized.

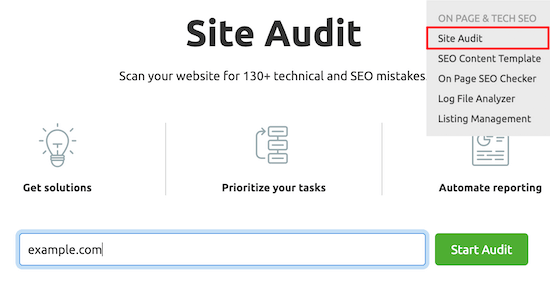
The first tool we’ll use is the ‘Site Audit’ feature. This will give you a detailed breakdown of any SEO errors that exist on your website or WordPress blog.

Click on ‘Site Audit’ under the On Page & Tech SEO menu option and then enter your website domain name and click ‘Start Audit’.

SEMRush site audit

The report will run automatically.

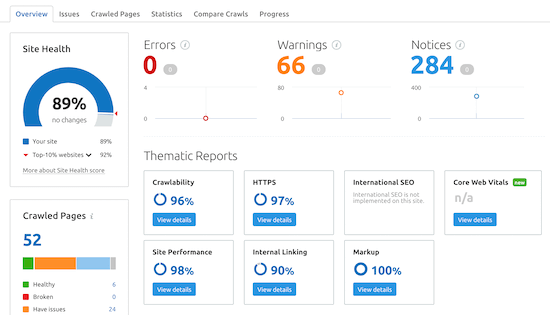
After it’s complete, you’ll get a detailed breakdown of any SEO errors your site has.

SEMRush site audit report

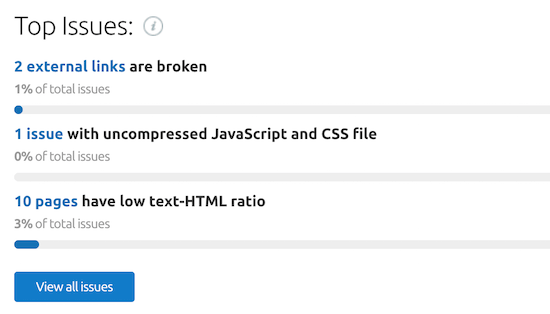
Scroll down until you see the ‘Top Issues:’ category, and this will show you the main issues your website has.

You can click to expand any of these areas, and it will show you all the pages that have that issue.

Top SEO issues

For example, on this website, 2 external links are broken.

If you’re not sure what the problem is or how to fix it, then click the ‘Why and how to fix it’ link.
Top issues more information

This will bring up a popup that’ll describe the issue in-depth.

It’s important to fix all of the ‘Errors’ and ‘Warnings’ that your site has. Fixing these issues alone will go a long way towards improving your SEO.

Uncover Your Backlinks and Advanced Website Analytics

Beyond helping you find and fix technical SEO errors, SEMRush is one of the best backlink checker tools.

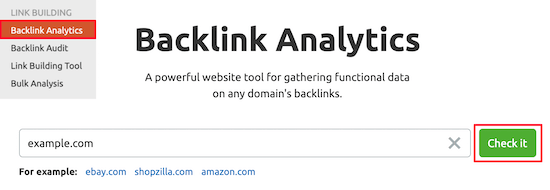
To use this feature, select ‘Backlink Analytics’ from your SEMRush dashboard and then enter your website URL and click ‘Check it’.

SEMRush backlink analytics

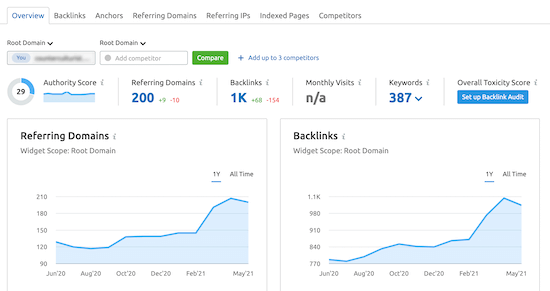
This will bring up lots of information about your domain name and your backlinks.

In general, the more high-quality relevant backlinks you have pointing towards your website, the higher you will rank in the search engines.

SEMRush backlink report

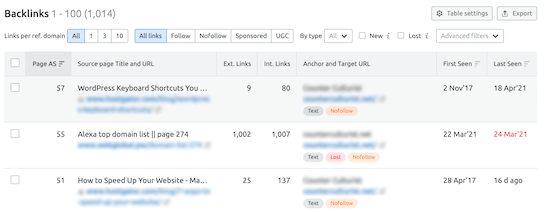
If you click the ‘Backlinks’ menu option, then you’ll see a detailed breakdown of the domain names that are linking to your website.

This can be useful because it can help you pinpoint any issues, such as low quality links.

You can see the total number of links that a page linking to you has. If it has hundreds of links, then it could be a spammy website.

SEMRush list of backlinks

Track Your Traffic and Keyword Rankings Over Time

Another very useful tool is the keyword rank tracking feature. This will let you know if your SEO optimization changes are helping you get more traffic.

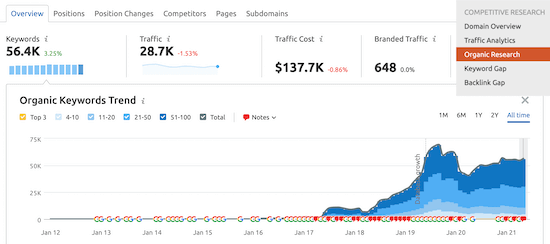
Navigate to ‘Organic Research’ in the Competitive Research section of your SEMRush dashboard.

Then, enter your domain name and click ‘Search’.

This screen will give you detailed information about the performance of your website.

SEMRush organic research

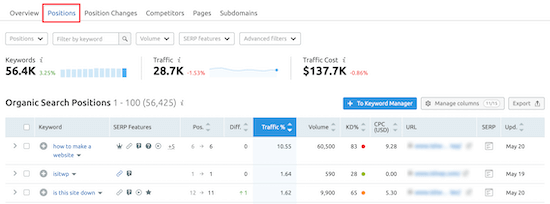
You can click on the ‘Positions’ tab to get an overview of what keywords bring your website the most traffic.

These keywords are the most valuable to your website.

SEMRush keyword overview

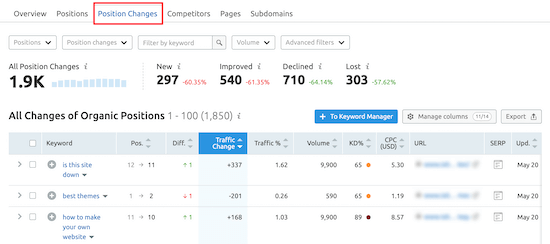
As you optimize your WordPress SEO, you’ll want to pay attention to the ‘Position Changes’ tab.

This will tell you the changes that are happening in the organic search results. As you optimize your website, you should see your website ranking higher for certain keywords and getting more traffic.

SEMRush keyword changes

One final useful SEO tool from SEMRush is called the SEO Writing Assistant.

This can help you write SEO optimized content, format your articles, write in a casual tone, and more.

For more details, see our guide on how to use the SEO Writing Assistant in WordPress to improve SEO.

We hoped this article helped you check if your website is SEO optimized. You may also want to see our expert picks of the must have WordPress plugins for business websites, and the best drag and drop page WordPress builders to create custom pages.

If you liked this article, then please subscribe to our YouTube Channel for WordPress video tutorials. You can also find us on Twitter and Facebook.

The post How to Check if Your Website is SEO Optimized (2 Easy Ways) appeared first on WPBeginner.


from WPBeginner https://ift.tt/3oQPYCo
More links is https://mwktutor.com