Thursday, 31 October 2019

How to Stop and Prevent a DDoS Attack on WordPress

WordPress is one of the most popular website builder in the world because it offers powerful features and a secure codebase. However, that does not protect WordPress or any other software from malicious DDoS attacks, which are common on the internet.

DDoS attacks can slow down websites and eventually make them inaccessible to users. These attacks can be targeted towards both small and large websites.

Now, you may be wondering how can a small business website using WordPress prevent such DDoS attacks with limited resources?

In this guide, we will show you how to effectively stop and prevent a DDoS attack on WordPress. Our goal is to help you learn how to manage your website security against a DDoS attack like a total pro.

Stopping and preventing a DDOS attack on a WordPress site

What is a DDoS Attack?

DDoS attack, short for Distributed Denial of Service attack, is a type of cyber attack that uses compromised computers and devices to send or request data from a WordPress hosting server. The purpose of these requests is to slow down and eventually crash the targeted server.

DDoS attacks are an evolved form of DoS (Denial of Service) attacks. Unlike a DoS attack, they take advantage of multiple compromised machines or servers spread across different regions.

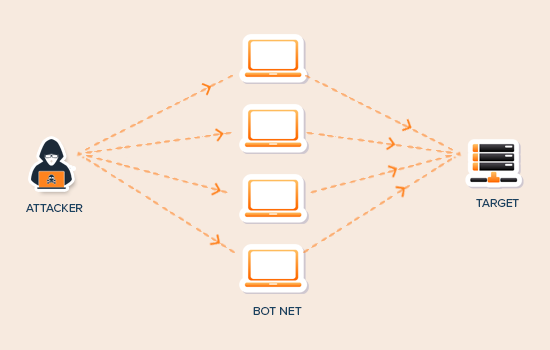
These compromised machines form a network, which is sometimes called a botnet. Each affected machine acts as a bot and launches attacks on the targeted system or server.

This allows them to go unnoticed for a while and cause maximum damage before they are being blocked.

DDoS attack diagram

Even the largest internet companies are vulnerable to DDoS attacks.

In 2018, GitHub, a popular code hosting platform, witnessed a massive DDoS attack that sent 1.3 terabytes per second traffic to their servers.

You may also remember the notorious 2016 attack on DYN (a DNS service provider). This attack got worldwide news coverage as it affected many popular websites like Amazon, Netflix, PayPal, Visa, AirBnB, The New York Times, Reddit, and thousands of other websites.

Why DDoS Attacks Happen?

There are several motivations behind DDoS attacks. Below are some common ones:

  • Technically savvy people who are just bored and find it adventurous
  • People and groups trying to make a political point
  • Groups targeting websites and services of a particular country or region
  • Targeted attacks on a specific business or service provider to cause them monetary harm
  • To blackmail and collect ransom money

What is the difference between a Brute Force Attack and a DDoS Attack?

Brute force attack

Brute Force Attacks are usually trying to break into a system by guessing passwords or trying random combinations to gain unauthorized access to a system.

DDoS attacks are purely used to simply crash the targetted system making it inaccessible or slowing it down.

For details see our guide on how to block brute force attacks on WordPress with step by step instructions.

What damages can be caused by a DDoS attack?

DDoS attacks can make a website inaccessible or reduce performance. This may cause bad user experience, loss of business, and the costs of mitigating the attack can be in thousands of dollars.

Here is a breakdown of these costs:

  • Loss of business due to inaccessibility of website
  • Cost of customer support to answer service disruption related queries
  • Cost of mitigating attack by hiring security services or support
  • The biggest cost is the bad user experience and brand reputation

How to Stop and Prevent DDoS Attack on WordPress

DDoS attacks can be cleverly disguised and difficult to deal with. However, with some basic security best practices, you can prevent and easily stop DDoS attacks from affecting your WordPress website.

Here are the steps you need to take to prevent and stop DDoS attacks on your WordPress site.

Remove DDoS / Brute Force Attack Verticals

The best thing about WordPress is that it is highly flexible. WordPress allows third-party plugins and tools to integrate into your website and add new features.

To do that WordPress makes several APIs available to programmers. These APIs are methods in which third-party WordPress plugins and services can interact with WordPress.

However, some of these APIs can also be exploited during a DDoS attack by sending a ton of requests. You can safely disable them to reduce those requests.

Disable XML RPC in WordPress

XML-RPC allows third-party apps to interact with your WordPress website. For example, you need XML-RPC to use the WordPress app on your mobile device.

If you’re like a vast majority of users who don’t use the mobile app, then you can disable XML-RPC by simply adding the following code to your website’s .htaccess file.

# Block WordPress xmlrpc.php requests
<Files xmlrpc.php>
order deny,allow
deny from all
</Files>

For alternate methods, see our guide on how to easily disable XML-RPC in WordPress.

Disable REST API in WordPress

The WordPress JSON REST API allow plugins and tools the ability to access WordPress data, update content, and/or even delete it. Here is how you can disable REST API in WordPress.

First thing you need to do is install and activate the Disable WP Rest API plugin. For more details, see our step by step guide on how to install a WordPress plugin.

The plugin works out of the box, and it will simply disable the REST API for all non-logged in users.

Activate WAF (Website Application Firewall)

Website Application Firewall (WAF)

Disabling attack vectors like REST API and XML-RPC provides limited protection against DDoS attacks. Your website is still vulnerable to normal HTTP requests.

While you can mitigate a small DOS attack by trying to catch the bad machine IPs and blocking them manually, this approach is not very effective when dealing with a large DDoS attack.

The easiest way to block suspicious requests is by activating a website application firewall.

A website application firewall acts as a proxy between your website and all incoming traffic. It uses smart algorithm to catch all suspicious requests and block them before they reach your website server.

Website application firewall

We recommend using Sucuri because it is the best WordPress security plugin and website firewall. It runs on a DNS level which means they can catch a DDoS attack before it can make a request to your website.

Pricing for Sucuri starts from $20 per month (paid yearly).

We use Sucuri on WPBeginner. See our case study on how they help block hundreds of thousands of attacks on our website.

Alternately, you can also use Cloudflare. However, Cloudflare’s free service only gives limited DDoS protection. You’ll need to signup for at least their business plan for layer 7 DDoS protection which costs around $200 per month.

See our article on Sucuri vs Cloudflare for a detailed side-by-side comparison.

Note: Website Application Firewalls (WAFs) that run on an application-level are less effective during a DDoS attack. They block the traffic once it has already reached your web server, so it still affects your overall website performance.

Finding Out Whether it’s Brute Force or DDoS Attack

Both brute force and DDoS attacks intensively use server resources, which means their symptoms look quite similar. Your website will get slower and may crash.

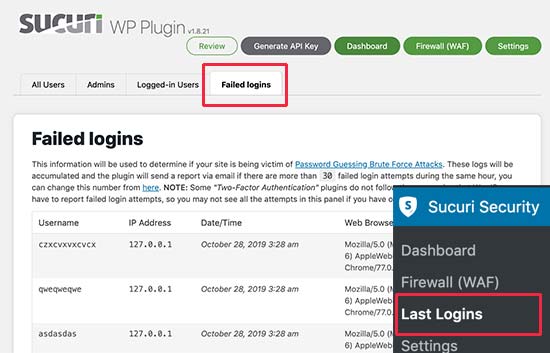
You can easily find out whether it is a brute force attack or a DDoS attack by simply looking at Sucuri plugin’s login reports.

Simply, install and activate the free Sucuri plugin and then go to Sucuri Security » Last Logins page.

Failed logins

If you are seeing a large number of random login requests, then this means your wp-admin is under a brute force attack. To mitigate it, you can see our guide on how to block brute force attacks in WordPress.

Things to Do During a DDoS Attack

DDoS attacks can happen even if you have a web application firewall and other protections in place. Companies like CloudFlare and Sucuri deal with these attacks on regular basis, and most of the time you will never hear about it since they can easily mitigate it.

However in some cases, when these attacks are large, it can still impact you. In that case, it’s best to be prepared to mitigate the problems that may arise during and after the DDoS attack.

Following are a few things you can do to minimize the impact of a DDoS attack.

1. Alert your team members

If you have a team, then you need to inform co-workers about the issue. This will help them prepare for customer support queries, look out for possible issues, and help out during or after the attack.

2. Inform customers about the inconvience

A DDoS attack can affect user experience on your website. If you run a WooCommerce store, then your customers may not be able to place an order or login to their account.

You can announce through your social media accounts that your website is having technical difficulties and everything will be back to normal soon.

If the attack is large, then you can also use your email marketing service to communicate with customers and ask them to follow your social media updates.

If you have VIP customers, then you might want to use your business phone service to make individual phone calls and let them know how you’re working to restore the services.

Communication during these tough times make a huge difference in keeping your brand’s reputation strong.

3. Contact Hosting and Security Support

Get in touch with your WordPress hosting provider. The attack you may be witnessing could be part of a larger attack targetting their systems. In that case, they will be able to provide you latest updates about the situation.

Contact your Firewall service and let them know that your website is under a DDoS attack. They may be able to mitigate the situation even faster and can provide you with more information.

In firewall providers like Sucuri, you can also set your settings to be in Paranoid mode which helps block a lot of requests and make your website accessible for normal users.

Keeping Your WordPress Website Secure

WordPress is quite secure out of the box. However, as the world’s most popular website builder it is often targeted by hackers.

Luckily, there are many security best practices that you can apply on your website to make it even more secure.

We have compiled a complete step by step WordPress security guide for beginners. It will walk you through the best WordPress security settings to protect your website, and its data against common threats.

We hope this article helped you learn how to block and prevent a DDoS attack on WordPress. You may also want to see our guide on the most common WordPress errors and how to fix them.

If you liked this article, then please subscribe to our YouTube Channel for WordPress video tutorials. You can also find us on Twitter and Facebook.

The post How to Stop and Prevent a DDoS Attack on WordPress appeared first on WPBeginner.


from Tutorials – WPBeginner https://ift.tt/2JAGaJc
More View at https://mwktutor.com

How to Find and Fix Broken Links in WordPress (Step by Step)

Everyone agrees that broken links are bad for user experience. But did you know that broken links can significantly hurt your WordPress SEO rankings?

Yes, it’s proven that having broken internal links on your website negatively impacts SEO rankings.

In this article, we will show you how to easily find and fix broken links in WordPress, so you can improve your user experience and SEO rankings.

Finding and fixing broken links in WordPress

What is a Broken Link?

A broken link, also known as dead link, is a link that no longer works. Broken links can happen for many reasons, but the most common reason is when a page is either deleted or moved to a different location which causes the server to show a 404 not found error.

On WordPress sites, broken links typically occur when moving a site to new domain name, or when deleting a post or page without proper redirection.

Sometimes broken links can also happen due to a typo, and they can go unnoticed for months if not years.

This is why it’s extremely important to regularly monitor broken links on your site and fix them, so you can keep them from hurting your SEO rankings.

In this guide, we will share top four methods to find broken links in WordPress. After that, we will show you an easy way to fix those broken links.

Here’s a table of content for easy navigation:

Ready? Let’s get started.

SEMRush is one of the best SEO tool on the market. It allows you to easily monitor your website’s SEO rankings and overall health.

It also includes a powerful site audit tool that crawls your website to find common errors and prepare a detailed report for you.

First, you’ll need to sign up for a SEMRush account.

It is a paid service, but they do offer a limited free account which allows you to crawl up to 100 pages on one domain name. Paid plan limits start from 100,000 pages a month.

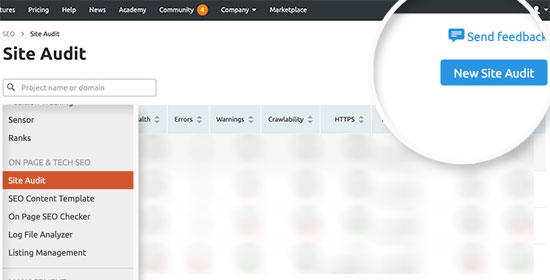
Once you are logged in, you need to click on the ‘Site Audit’ link from the left menu.

This will bring you to the Site Audit page. From here, click on the ‘New Site Audit’ button at the top to add your website.

Adding a new site audit in SEMRush

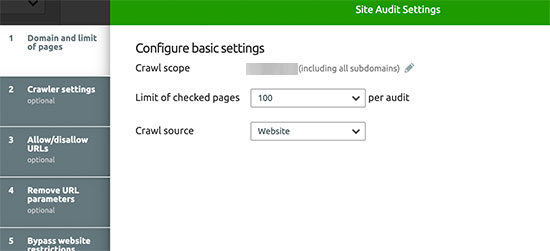
You will be asked to enter your domain name. After that, you will be asked to configure site audit settings. You can select the number of pages to crawl and choose a crawl source.

Site Audit settings

Click on the start crawling button to continue.

SEMRush will now begin crawling your website for the site audit. This may take a few minutes depending on how many pages you selected for the crawl.

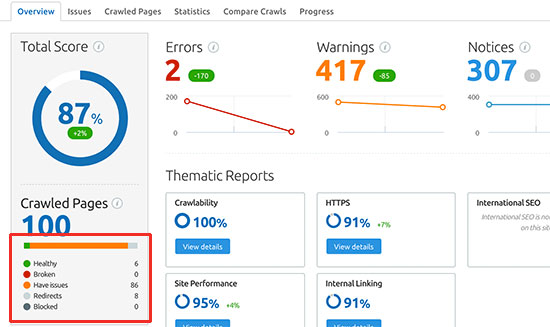
Once finished, you can click on your domain Under the Site Audit section to view your report.

SEMRush broken links

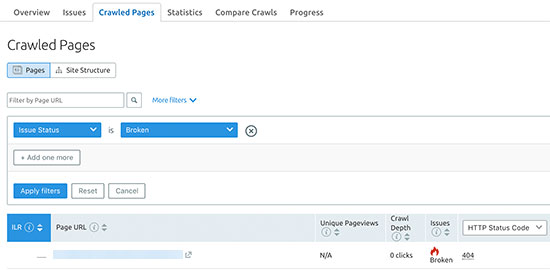
To see the broken links on your site, you will need to click on the ‘Broken’ link under the report overview.

Broken links report in SEMRush

You can now click on the Export button at the top right corner of the screen to download your crawl report. You will need it when fixing broken links on your website (more on this later in the article).

Ahrefs is an excellent all-in-one SEO tool for marketers, businesses, and SEO professionals. It offers detailed SEO insights into your own website or any of your competitors.

You can use it for keyword research, competition analysis, organic and paid keyword ideas, and site health monitoring including broken links.

First, you’ll need to sign up for an Ahrefs account. It is a paid service with plans starting from $99 per month. They also offer a full featured 7 day trial for $7.

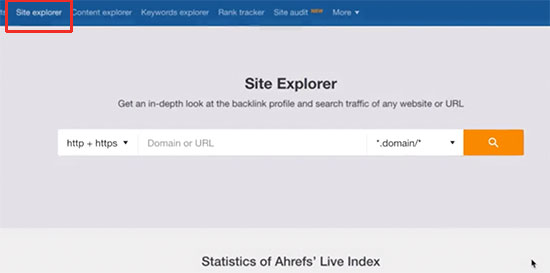
Once you are logged into your Ahref’s dashboard, you need to enter your domain name under the Site Explorer tool.

Ahrefs site explorer tool

Site explorer tool will now crawl your website to prepare reports. This may take some time depending on how much content you have on your website.

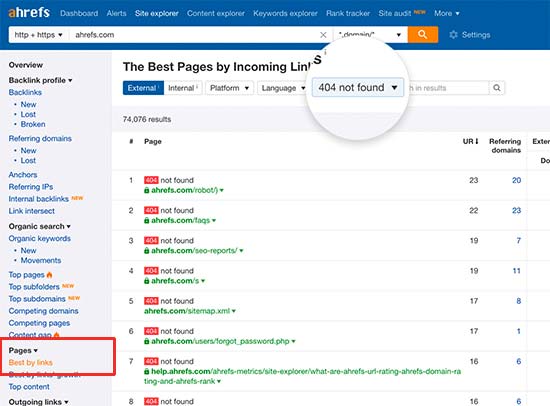
Once finished, you’ll see an overview of your site explorer results. From here, you need to click on the Pages » Best by Links menu and then sort your report by 404 status.

Broken links

You can now export your report in CSV format to fix the broken links on your WordPress site.

Google Search Console is a free tool offered by Google to help webmasters manage their site’s visibility in search results. It also notifies you about errors including 404 errors which are caused by a broken link.

For more details, see our ultimate Google Search Console guide with step by step set up instructions.

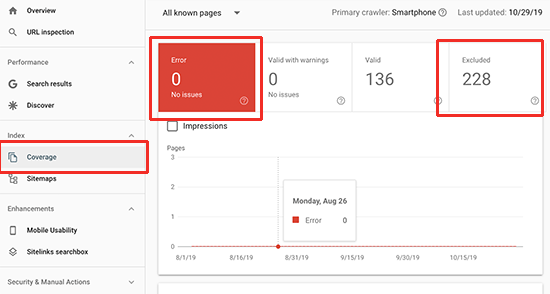
After you have logged in to your Google Search Console account, click on the ‘Coverage’ link from the left menu.

Google Search index coverage report

You’ll find 404 errors either under Errors or Excluded tabs. Clicking on them will show you a list of errors or issues Google encountered while visiting your website.

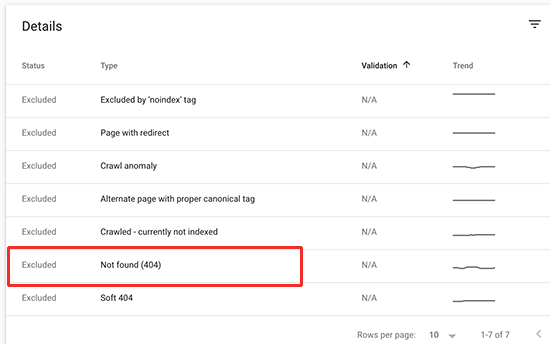
Excluded broken links

Clicking on the 404 error will show you all the links on your website that are broken links and return a 404 error.

You can now click on the download button to get the list of all 404 errors on your website. You’ll need this to fix broken links on your website.

For this method, we’ll be using the Broken Link Checker plugin. However, this method is not recommended because it is resource-intensive and will slow down your website. Managed WordPress hosting companies like WP Engine already block users from installing this plugin on their servers.

The plugin checks for broken links on your website including both internal and external links that are resulting in a 404 error.

First, you’ll need to install and activate the Broken Link Checker plugin. For more details, see our step by step guide on how to install a WordPress plugin.

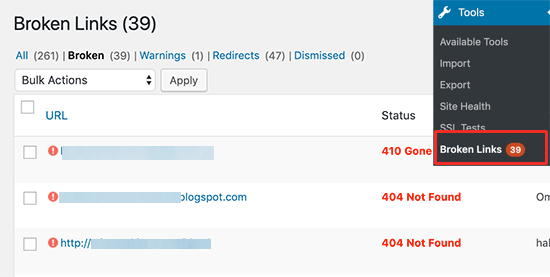
Upon activation, the plugin will start working in the background to find links in your posts, pages, and comments. You can now go to Tools » Broken Links page to view the full report.

Broken Links Report in WordPress

If you have been running your WordPress blog for a long time, then this report will include broken links to third-party websites as well.

You will have to manually sort the list to find broken links on your website.

You will need to keep Broken Link Checker active on your website until you fix broken links. After that, you can deactivate the plugin because it will keep checking for broken links which will slow down your server.

We have shown you four different methods to find broken links in WordPress. Now let’s talk about how to easily fix broken links in WordPress.

The best way to fix a broken link is to redirect it to another page. For example, if you moved the contents of an article to a different address, then you will need to redirect it to the newer article.

Similarly, if an article does not exist anymore, then you would want to point users to a similar page that is closely related to the contents of the old article.

You can do this by setting up 301 redirects.

First, you will need to install and activate the Redirection plugin. For more details, see our step by step guide on how to install a WordPress plugin.

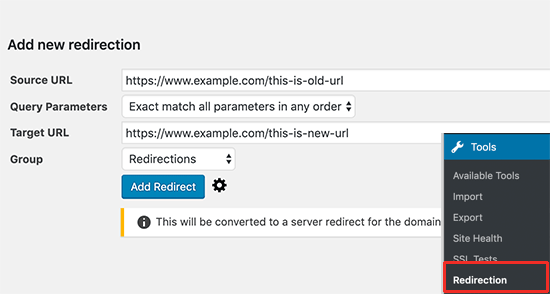
Upon activation, you need to visit Tools » Redirection page to set up redirects. You need to add the old broken link in the ‘Source URL’ field and the new URL in the ‘Target URL’ field.

Set up redirects for broken links

After that, click on the ‘Add redirect’ button to save your changes.

You can now test this by visiting the old broken link, and you’ll be redirected to the new page.

Repeat the process for all broken links on your website.

For more information, see our guide on how to set up redirects in WordPress for beginners.

We hope this article helped you learn how to easily find and fix broken links in WordPress. You may also want to see our actionable tips on how to optimize your images for web, and our pick of the best WordPress membership plugins to create a membership site.

If you liked this article, then please subscribe to our YouTube Channel for WordPress video tutorials. You can also find us on Twitter and Facebook.

The post How to Find and Fix Broken Links in WordPress (Step by Step) appeared first on WPBeginner.


from WPBeginner https://ift.tt/34luPVB
More links is https://mwktutor.com

Wednesday, 30 October 2019

How to Stop and Prevent a DDoS Attack on WordPress

WordPress is one of the most popular website builder in the world because it offers powerful features and a secure codebase. However, that does not protect WordPress or any other software from malicious DDoS attacks, which are common on the internet.

DDoS attacks can slow down websites and eventually make them inaccessible to users. These attacks can be targeted towards both small and large websites.

Now, you may be wondering how can a small business website using WordPress prevent such DDoS attacks with limited resources?

In this guide, we will show you how to effectively stop and prevent a DDoS attack on WordPress. Our goal is to help you learn how to manage your website security against a DDoS attack like a total pro.

Stopping and preventing a DDOS attack on a WordPress site

What is a DDoS Attack?

DDoS attack, short for Distributed Denial of Service attack, is a type of cyber attack that uses compromised computers and devices to send or request data from a WordPress hosting server. The purpose of these requests is to slow down and eventually crash the targeted server.

DDoS attacks are an evolved form of DoS (Denial of Service) attacks. Unlike a DoS attack, they take advantage of multiple compromised machines or servers spread across different regions.

These compromised machines form a network, which is sometimes called a botnet. Each affected machine acts as a bot and launches attacks on the targeted system or server.

This allows them to go unnoticed for a while and cause maximum damage before they are being blocked.

DDoS attack diagram

Even the largest internet companies are vulnerable to DDoS attacks.

In 2018, GitHub, a popular code hosting platform, witnessed a massive DDoS attack that sent 1.3 terabytes per second traffic to their servers.

You may also remember the notorious 2016 attack on DYN (a DNS service provider). This attack got worldwide news coverage as it affected many popular websites like Amazon, Netflix, PayPal, Visa, AirBnB, The New York Times, Reddit, and thousands of other websites.

Why DDoS Attacks Happen?

There are several motivations behind DDoS attacks. Below are some common ones:

  • Technically savvy people who are just bored and find it adventurous
  • People and groups trying to make a political point
  • Groups targeting websites and services of a particular country or region
  • Targeted attacks on a specific business or service provider to cause them monetary harm
  • To blackmail and collect ransom money

What is the difference between a Brute Force Attack and a DDoS Attack?

Brute force attack

Brute Force Attacks are usually trying to break into a system by guessing passwords or trying random combinations to gain unauthorized access to a system.

DDoS attacks are purely used to simply crash the targetted system making it inaccessible or slowing it down.

For details see our guide on how to block brute force attacks on WordPress with step by step instructions.

What damages can be caused by a DDoS attack?

DDoS attacks can make a website inaccessible or reduce performance. This may cause bad user experience, loss of business, and the costs of mitigating the attack can be in thousands of dollars.

Here is a breakdown of these costs:

  • Loss of business due to inaccessibility of website
  • Cost of customer support to answer service disruption related queries
  • Cost of mitigating attack by hiring security services or support
  • The biggest cost is the bad user experience and brand reputation

How to Stop and Prevent DDoS Attack on WordPress

DDoS attacks can be cleverly disguised and difficult to deal with. However, with some basic security best practices, you can prevent and easily stop DDoS attacks from affecting your WordPress website.

Here are the steps you need to take to prevent and stop DDoS attacks on your WordPress site.

Remove DDoS / Brute Force Attack Verticals

The best thing about WordPress is that it is highly flexible. WordPress allows third-party plugins and tools to integrate into your website and add new features.

To do that WordPress makes several APIs available to programmers. These APIs are methods in which third-party WordPress plugins and services can interact with WordPress.

However, some of these APIs can also be exploited during a DDoS attack by sending a ton of requests. You can safely disable them to reduce those requests.

Disable XML RPC in WordPress

XML-RPC allows third-party apps to interact with your WordPress website. For example, you need XML-RPC to use the WordPress app on your mobile device.

If you’re like a vast majority of users who don’t use the mobile app, then you can disable XML-RPC by simply adding the following code to your website’s .htaccess file.

# Block WordPress xmlrpc.php requests
<Files xmlrpc.php>
order deny,allow
deny from all
</Files>

For alternate methods, see our guide on how to easily disable XML-RPC in WordPress.

Disable REST API in WordPress

The WordPress JSON REST API allow plugins and tools the ability to access WordPress data, update content, and/or even delete it. Here is how you can disable REST API in WordPress.

First thing you need to do is install and activate the Disable WP Rest API plugin. For more details, see our step by step guide on how to install a WordPress plugin.

The plugin works out of the box, and it will simply disable the REST API for all non-logged in users.

Activate WAF (Website Application Firewall)

Website Application Firewall (WAF)

Disabling attack vectors like REST API and XML-RPC provides limited protection against DDoS attacks. Your website is still vulnerable to normal HTTP requests.

While you can mitigate a small DOS attack by trying to catch the bad machine IPs and blocking them manually, this approach is not very effective when dealing with a large DDoS attack.

The easiest way to block suspicious requests is by activating a website application firewall.

A website application firewall acts as a proxy between your website and all incoming traffic. It uses smart algorithm to catch all suspicious requests and block them before they reach your website server.

Website application firewall

We recommend using Sucuri because it is the best WordPress security plugin and website firewall. It runs on a DNS level which means they can catch a DDoS attack before it can make a request to your website.

Pricing for Sucuri starts from $20 per month (paid yearly).

We use Sucuri on WPBeginner. See our case study on how they help block hundreds of thousands of attacks on our website.

Alternately, you can also use Cloudflare. However, Cloudflare’s free service only gives limited DDoS protection. You’ll need to signup for at least their business plan for layer 7 DDoS protection which costs around $200 per month.

See our article on Sucuri vs Cloudflare for a detailed side-by-side comparison.

Note: Website Application Firewalls (WAFs) that run on an application-level are less effective during a DDoS attack. They block the traffic once it has already reached your web server, so it still affects your overall website performance.

Finding Out Whether it’s Brute Force or DDoS Attack

Both brute force and DDoS attacks intensively use server resources, which means their symptoms look quite similar. Your website will get slower and may crash.

You can easily find out whether it is a brute force attack or a DDoS attack by simply looking at Sucuri plugin’s login reports.

Simply, install and activate the free Sucuri plugin and then go to Sucuri Security » Last Logins page.

Failed logins

If you are seeing a large number of random login requests, then this means your wp-admin is under a brute force attack. To mitigate it, you can see our guide on how to block brute force attacks in WordPress.

Things to Do During a DDoS Attack

DDoS attacks can happen even if you have a web application firewall and other protections in place. Companies like CloudFlare and Sucuri deal with these attacks on regular basis, and most of the time you will never hear about it since they can easily mitigate it.

However in some cases, when these attacks are large, it can still impact you. In that case, it’s best to be prepared to mitigate the problems that may arise during and after the DDoS attack.

Following are a few things you can do to minimize the impact of a DDoS attack.

1. Alert your team members

If you have a team, then you need to inform co-workers about the issue. This will help them prepare for customer support queries, look out for possible issues, and help out during or after the attack.

2. Inform customers about the inconvience

A DDoS attack can affect user experience on your website. If you run a WooCommerce store, then your customers may not be able to place an order or login to their account.

You can announce through your social media accounts that your website is having technical difficulties and everything will be back to normal soon.

If the attack is large, then you can also use your email marketing service to communicate with customers and ask them to follow your social media updates.

If you have VIP customers, then you might want to use your business phone service to make individual phone calls and let them know how you’re working to restore the services.

Communication during these tough times make a huge difference in keeping your brand’s reputation strong.

3. Contact Hosting and Security Support

Get in touch with your WordPress hosting provider. The attack you may be witnessing could be part of a larger attack targetting their systems. In that case, they will be able to provide you latest updates about the situation.

Contact your Firewall service and let them know that your website is under a DDoS attack. They may be able to mitigate the situation even faster and can provide you with more information.

In firewall providers like Sucuri, you can also set your settings to be in Paranoid mode which helps block a lot of requests and make your website accessible for normal users.

Keeping Your WordPress Website Secure

WordPress is quite secure out of the box. However, as the world’s most popular website builder it is often targeted by hackers.

Luckily, there are many security best practices that you can apply on your website to make it even more secure.

We have compiled a complete step by step WordPress security guide for beginners. It will walk you through the best WordPress security settings to protect your website, and its data against common threats.

We hope this article helped you learn how to block and prevent a DDoS attack on WordPress. You may also want to see our guide on the most common WordPress errors and how to fix them.

If you liked this article, then please subscribe to our YouTube Channel for WordPress video tutorials. You can also find us on Twitter and Facebook.

The post How to Stop and Prevent a DDoS Attack on WordPress appeared first on WPBeginner.


from WPBeginner https://ift.tt/2JAGaJc
More links is https://mwktutor.com

6 Best Beaver Builder Addons 2019

Beaver Builder has definitely cemented its status as one of the best WordPress page builders. But, as functional as the core plugin is, you might still be itching to get even more from your Beaver Builder designs. Thankfully, the Beaver Builder team designed the plugin so that third-party developers can add their own extensions to […]

The post 6 Best Beaver Builder Addons 2019 appeared first on aThemes.


from aThemes https://ift.tt/2BRXhCe
More View at https://mwktutor.com

Tuesday, 29 October 2019

How to Get a Free Email Domain (5 Quick and Easy Methods)

Are you looking for a free email domain? The email domain is part of an email address that comes after the @ symbol.

It is really important to get an email domain for your business instead of using a generic Yahoo, Gmail, or Hotmail email address.

Customers and other business owners are reluctant to trust emails coming from a generic email account. A custom domain email address looks more professional and gives credibility to your business.

In this guide, we will show you few different ways to easily get a free email domain for your business.

Getting a free email domain for your business

What is an Email Domain? (Definition)

An email domain is the web address that comes after the @ symbol in an email address. For example, in an email like syed@companyname.com, “compnayname.com” is the email domain.

Email domains allow you to setup an email address with @company name using your own business / brand name.

You can either buy an email domain, or you can get a free email domain for your business when you create a website.

Since there are multiple ways to get a free email domain for your business, we have covered the best options in this guide:

  1. Bluehost
  2. HostGator
  3. DreamHost
  4. G Suite (Paid but better)
  5. Office 365 (Paid but better)

Ready? Let’s get started.

Method 1. Get Free Email Domain with Bluehost

Normally, a custom domain name would cost you $14.99 per year and email hosting services start from $9.88 per month (usually paid annually).

This is a significant amount of money specially when you are first starting a business website.

Luckily our friends at Bluehost has agreed to offer WPBeginner users free email domain with discounted hosting packages.

Basically, you will get a free email domain with a shared hosting plan and a free SSL certificate for $2.75 per month.

→ Click Here to Claim This Exclusive Bluehost Offer ←

Each account includes webmail, email forwarding, spam protection, and the ability to use any email client on your mobile phone or desktop to send or receive emails.

Here is to get your free email domain with Bluehost.

Step 1. Set up your free email domain

First, you need to visit the Bluehost website and click on the Get Started button.

Bluehost get started

Next, you will see the pricing page where you’ll be asked to select a plan. Basic and Plus plans are popular among businesses looking for an email domain.

Click to select a plan, and you will be taken to the next step. From here, you will choose a free email domain name.
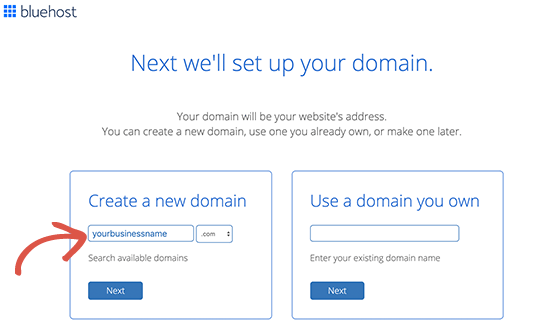
Select your free email domain

After that, click on the next button to continue.

Bluehost will now check the availability of the domain name you entered. If the domain name is unavailable, then it will show you some alternative options to choose from, or you can just enter a new domain name.

For tips on choosing a domain name, see our article on how to choose a domain name for your business.

After you have selected the domain name, you’ll need to enter your account information and finalize the plan details.
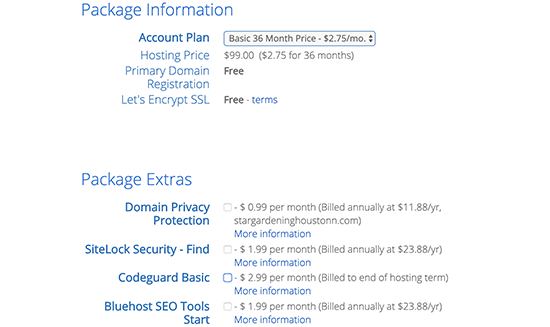
Package details

You’ll notice some optional extras on this page. You can safely uncheck them to keep your costs down.

Lastly, you need to enter your payment information to complete the purchase.

You will now receive an email with details on how to login to your account control panel. This is where you manage everything including email accounts and other settings.

Step 2. Adding email accounts to your domain

Once you log in to your account dashboard, click on the ‘Email & Office’ menu from the left column and then click on the ‘Manage’ button.
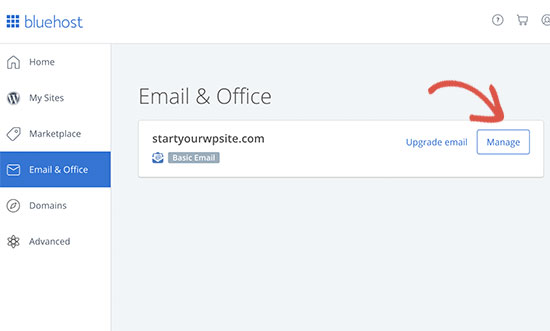
Manage email

This will bring you to an email account management area. From here you need to click on the ‘Create’ button to add a new email account.
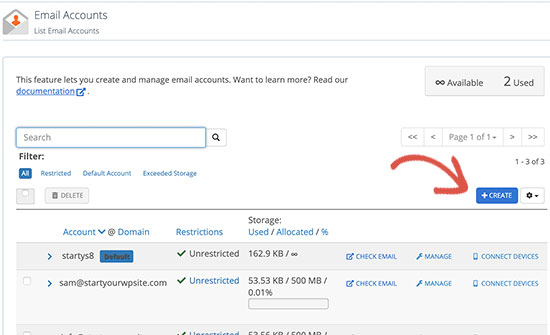
Creating a new email account in Bluehost

Next, you need to enter the email address you want to use and then enter a password. Optionally, you can choose how much storage you want to allow.
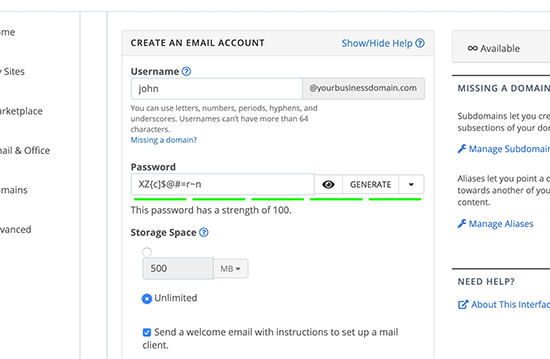
Creating a new email account

After that, click on the create button to save your new email account.

Bluehost will now create your email account, and you will see a success message.

Step 3. Using your custom domain email with Bluehost

Now that you have created your first account on your email domain. Let’s start using it.

There are multiple ways to use your new email account.

1. Webmail

Bluehost provides a neat interface to manage your email under your account using your browser.

Simply go to Email & Office » Manage page and click on the Check Email link next to the account you just created.
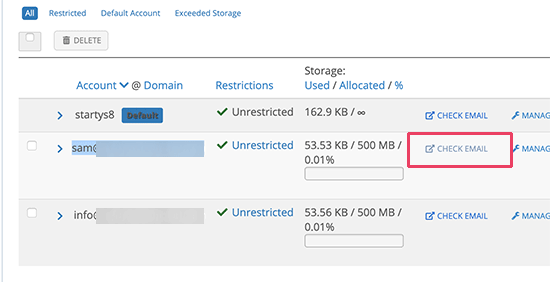
Check email in Bluehost

You’ll be asked to select a default webmail app. They all work the same, but Roundcube has a cleaner interface.

2. Other Devices and Apps

You can also send/receive email using any email app like Outlook, Thunderbird, or another mail app on your phone or computer.

Simply head over to Email & Office » Manage page and then click on the ‘Connect Devices’ icon.
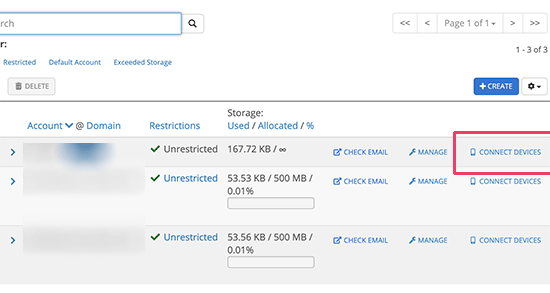
Connect devices

On the next page, you’ll see a list of all popular email apps and devices. Click on the app you want to connect, and you’ll see step by step instructions to connect your email client.
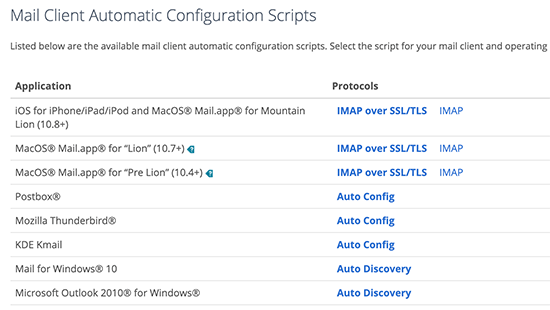
Mail clients

Below the list, you’ll also find manual settings to connect any other device or app that is not already listed.
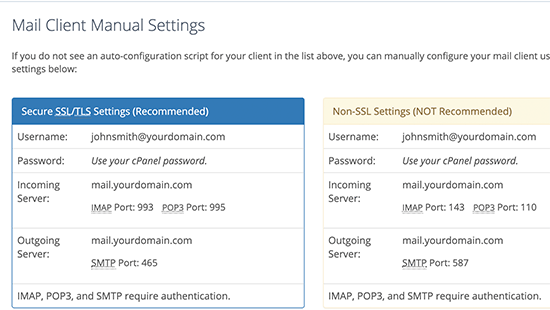
Manual mail settings

3. Use it with Gmail

Gmail not only allows you to send and receive emails to your Google account, but you can also use it as a full-fledged email client to get all your email in one place.

You will be able to send emails using your custom domain email directly from your free Gmail account or mobile app.

Simply log in to your Gmail account and click on the Gear icon to select the Settings page. From here, switch to the ‘Accounts and Import’ tab.
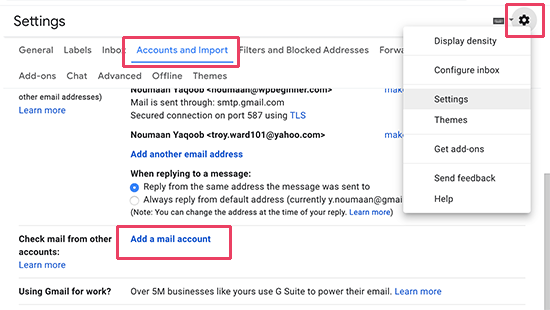
Add mail account

Scroll down to the ‘Check mail from other accounts’ section and click on ‘Add a mail account’ link.

This will bring up a popup where you will need to add your custom domain email address. On the next screen, you will be asked to provide your account details.

Connecting Bluehost email to Gmail

Your username and password will be the complete email address you created earlier and its password. The POP server value will be your domain name with a mail prefix.

You must select ‘Always use a secure connection (SSL)…’ option and then change the port value to 995.

Click on the Add account button to save your settings.

Next, Gmail will ask you if you would want to use that account to send emails. Select ‘Yes’ and then click on the Next button.
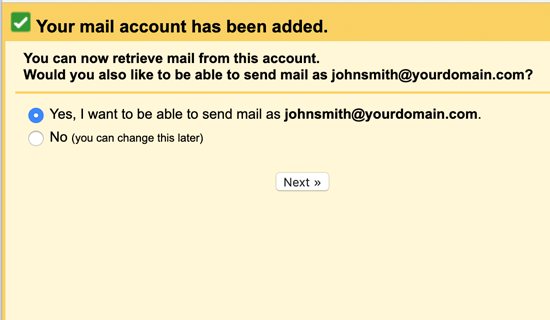
Send email via Gmail

After that, you will be asked to provide a sender name. You can also choose to use this account as an alias.

Basically, an alias is useful when you own two email addresses. For example, an individual’s company email account.

Uncheck the alias box, if you want to keep the ownership of this account separate. For example, if it is your business’s departmental address like support@example.com or info@yourdomain.com.
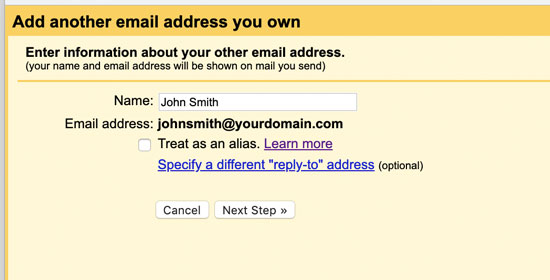
Sender information

Click on the ‘Next Step’ button to continue.

Now, you will need to provide your server’s SMTP information. SMTP (Simple Mail Transfer Protocol) is the industry standard to securely send emails.
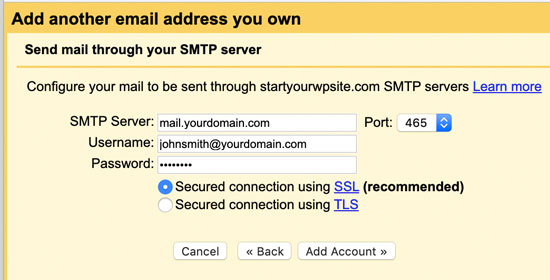
SMTP information

Your SMTP outgoing server will be mail.yourdomain.com (replace yourdomain.com with your actual email domain). After that use your complete email address as the user name and enter the email account’s password.

Click on the ‘Add account’ button to continue.

Gmail will now send a verification code to the email address. Since you have already added that email address, you will get the email directly in your Gmail inbox. Copy the code and enter it to complete the SMTP setup.

That’s all. You can now use your Gmail account to send and receive emails using your custom domain.

Method 2. Get Free Email Domain with HostGator

Another easy way to get a free email domain is by signing up for HostGator’s hosting plan. They are one of the top hosting companies in the world and offer excellent plans for startups and small businesses.

Our founder Syed Balkhi has been a loyal HostGator customer since 2007. In fact, WPBeginner is hosted on their enterprise dedicated server cluster (see our case study of how we made WPBeginner blazing fast).

HostGator is offering WPBeginner users an exclusive discount on WordPress hosting + a free domain name. Basically, you’ll be able to get started for just $2.64 per month.

→ Click Here to Start with HostGator ←

You get free unlimited custom domain email addresses with your account. It also includes webmail, email forwarding, and support to send/receive emails using any email client of your choice.

Step 1. Sign up for a HostGator account

First, you need to visit the HostGator website and click on the ‘Get Started Now’ button.

HostGator get started

Next, you will be asked to select a plan. Hatchling and Baby plans are the most popular among beginners and small businesses.

Click to select a plan and continue.
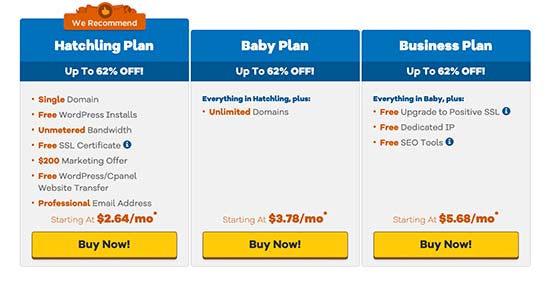
Choose plan

After that, you will be asked to select a domain name. Simply enter the domain you want to register to see if it is available.
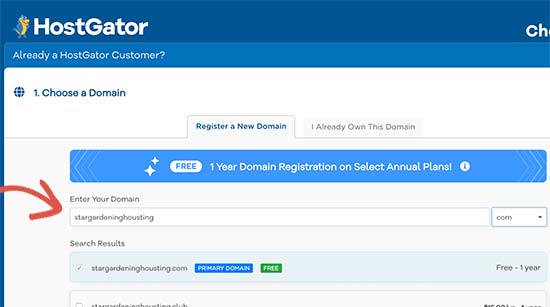
Select domain name

If the domain name is available, then you can click to select it.

Scroll down a little to enter your personal and billing information. After that, you’ll reach the additional services section. We don’t recommend choosing them at this point, and you can add them later if you really need them.
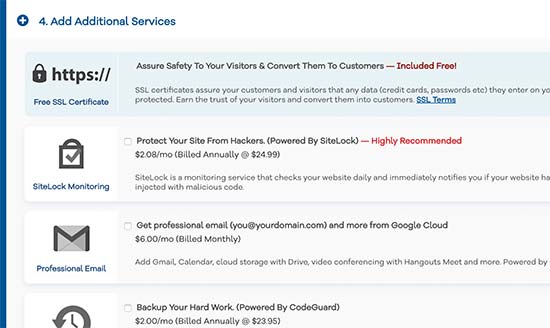
Skip Addons

You can now review your order details and click on the ‘Checkout Now’ button to complete the purchase.

You will now receive an email from HostGator with details on how to login to your hosting dashboard.

Step 2. Create an email acccount

Login to your HostGator hosting dashboard and click on the Email section and then select ‘Email Accounts’.
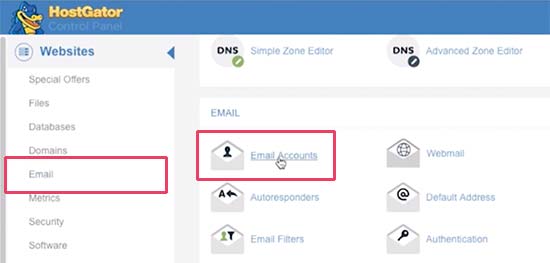
Manage email accounts in HostGator

On the next screen, you will be able to create a new email account by entering an email username and password.
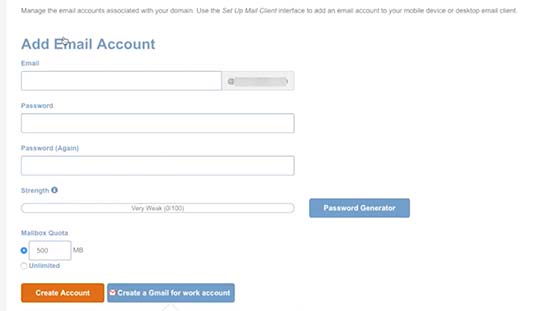
Create email account

Click on the ‘Create Account’ button to save your new email account.

Step 3. Using your custom domain email account on HostGator

HostGator provides the same methods of sending and receiving email as Bluehost above.

1. Webmail

You can view and send emails directly from your HostGator dashboard. Simply visit the webmail by adding /webmail at the end of your website URL. For example, https://ift.tt/31V0L1h
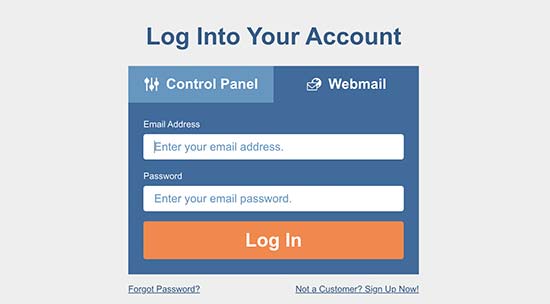
HostGator webmail login

Once on the page, enter your email address and password to login and start using your email account.

2. Send or receive email using other mail clients and apps

You can also access your custom domain email account using third-party mail apps on your computer and phone.

Here is the information you will need to set up email on different devices and email clients.

Pop3:

Username: Your full email address
Password: The password for the address you wish to access.
Mailserver/ Server Hostname: mail.yourdomain.com
Port: 995
SSL: SSL/TLS

SMTP:

Username: Your full email address.
Password: The password for the address you wish to access.
Mailserver/ Server Hostname: mail.yourdomain.com
Port: 465
SSL: SSL/TLS

You will also use the same settings to send or receive emails using Gmail.

Simply log in to your Gmail account and click on the settings button. After that switch to the ‘Accounts and forwarding’ tab and click on ‘Add a mail account link’ next to the ‘Check mail from other accounts’ option.

Add mail account

This will bring up a popup, where you need to follow the on-screen instructions to add your account.

Method 3: Get Free Email Domain with DreamHost

Another easy way to get a free email domain is by signing up with DreamHost. They offer a free domain with all their shared hosting plans.

On top of that, they have agreed to offer WPBeginner users up to 47% discount + free SSL certificate. Your account comes with unlimited email accounts using your own domain name.

→ Click here to start with Dreamhost ←

Follow the instructions below to set up your free email domain with DreamHost.

Step 1. Sign up for a DreamHost account

First, you need to visit the DreamHost website and select a hosting plan.

Select your DreamHost plan

Next, you will be asked to register a domain name. Simply enter a domain name to see if it is available. If it is, then you can continue or look for another domain name.
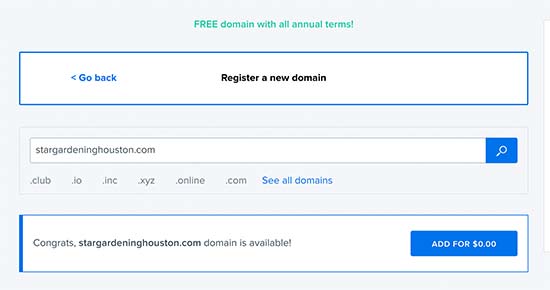
Register your domain name

After that, you need to complete your purchase by entering account and payment information. Don’t forget to uncheck the additional options at left or at the bottom to reduce your costs.
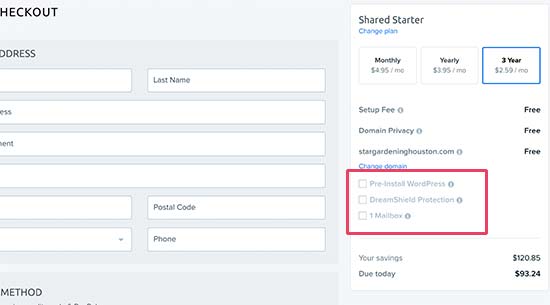
Enter billing details

You can now review your selection and click on the submit order button to finish the purchase.

DreamHost will now send you an email with your login details.

Step 2. Create your custom domain business email

First, you need to login to your DreamHost hosting panel. From here, click on the Mail menu from the left and then click on the ‘Create New Email Address’ button.
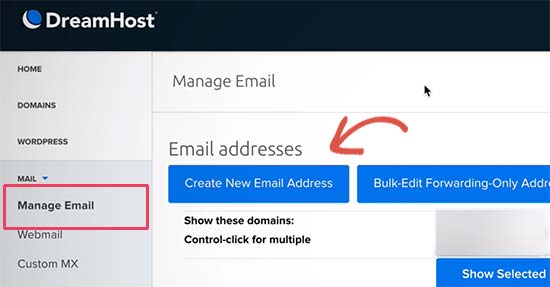
Create new email account

After that, you need to provide a username and password you want to use and then click on the create button to save add your account.

Your custom domain name email account is now ready to be used.

Step 3. Using your custom domain email account

You can use your newly created custom domain email address through webmail or by using any of your favorite email clients.

1. Webmail

Dreamhost provides an easy to use and fully-functional webmail interface. You can check your email by simply adding webmail before your domain name. For example, webmail.yourdomain.com (replace yourdomain.com with your actual domain name).
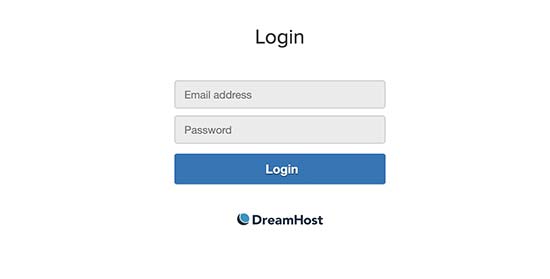
Login to DreamHost webmail

You can login by entering the email address and the password you created earlier.
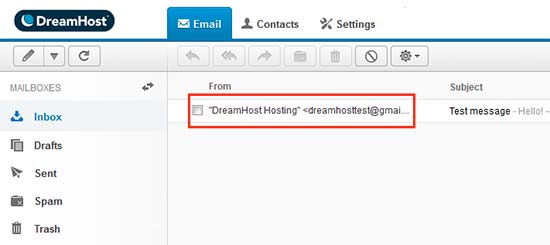
Dreamhost webmail UI

2. Access DreamHost custom domain email using third-party email apps

You can also use your email account with any third-party email clients and apps on your phone. DreamHost has extensive documentation for each individual email client.

Here is the information you’ll need to use your custom domain email with any mail app on your computer or phone.

POP3:

Mailserver: pop.dreamhost.com
Port: 995
username: Your complete email address
password: password for your email address

SMTP:

SMTP server: smtp.dreamhost.cocm
Port: 465
username: Your complete email address
password: password for your email address

Method 4: Create Custom Domain Email with G Suite (Paid Solution)

Email is crucial for the success of any business, which is why we recommend using G Suite.

G Suite is Google’s suite of applications for small businesses. It allows you to use the same Google apps like Gmail, Drive, Docs, Sheets, and Calendar, but with your own domain name.

You also get Google’s powerful spam filtering and security features for your business email. It is much easier to use and works on all your devices.

To get started, you need to visit the G Suite website and select a plan.
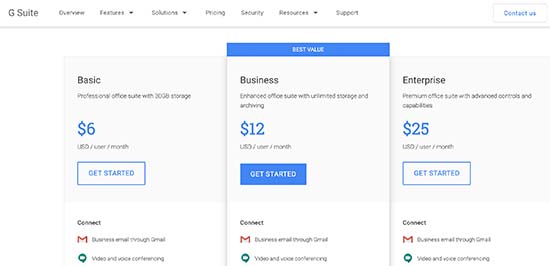
G Suite plan

Their basic plan starts from $6 per user per month with 30 GB of storage. You can also choose the business plan which starts from $12 per month per user and gives you unlimited storage.

Next, you will be asked to enter your company name, size, and country.
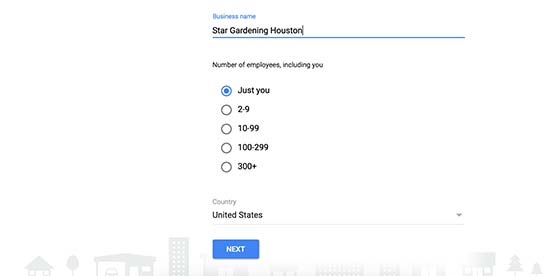
Company information

After that, you need to enter your contact information and click on the Next button.

This will bring you to the domain selection screen.

If you already have a domain name that you would like to use, then you can use that. Otherwise, go ahead and select ‘I’d like to buy a domain name’ option.
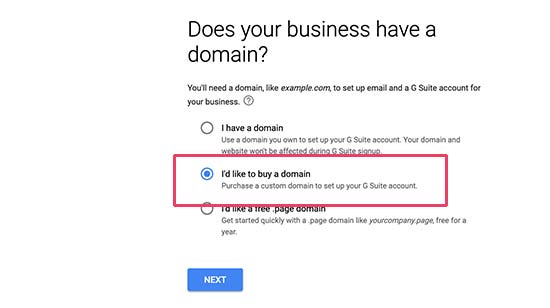
Buy domain name

You can now enter the domain name you want to register and click on the Next button. If your entered domain is available you will see its pricing.
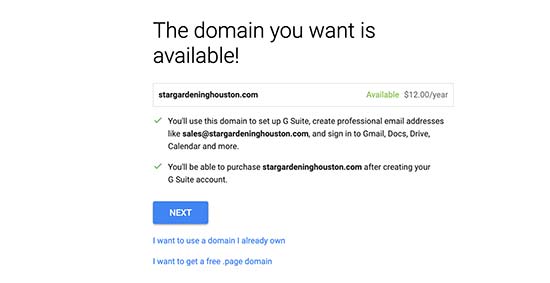
Domain selection

Click on the next button to continue.

After that, you will enter your business information and payment details to finish the process.
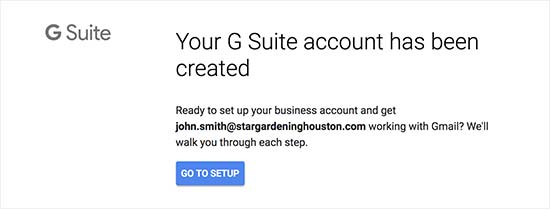
G Suite account created

You can now click on the ‘Go to Set up’ button to start adding email accounts and users.

On the setup screen, you can create your first email account. After that, you can add more accounts for your employees or departments or just click on ‘I have added all user email addresses’ and click on the Next button.
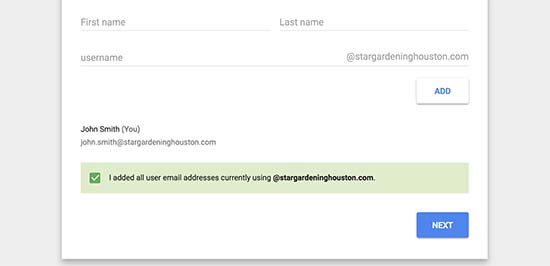
Adding new users

That’s all you can now use your newly created email account in Gmail and use it with your own custom domain.
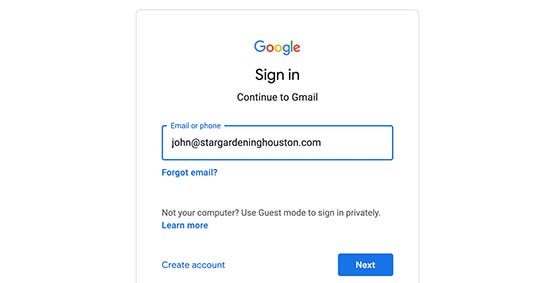
Sign in Gmail with your custom domain email

If you need more detailed instructions, then please see our guide on how to create a professional email with G Suite.

Most business owners do not buy an email domain from G Suite. Instead they start with the free email domain services offered by their web hosting companies and then later switch to G Suite when they can afford it.

We use G Suite for our business because it allows us to better data retention, easy file management, calendar, and tons of other useful apps to grow our business.

Method 5: Create Domain Email with Office 365 (Paid Solution)

Microsoft Office also provides its office suite called Office 365 with support for custom domain email. In terms of features and functionality, it is similar to G Suite.

Want to see compare both platforms, then see our comparison of G Suite vs Office 365 to find out how they stack up against each other.

Here is how you would set up your custom domain email with Office 365.

Step 1. Setting up Office 365 with custom domain email

First, you need to visit the Office 365 website and click on ‘Buy Now’ button under the plan you want to purchase.
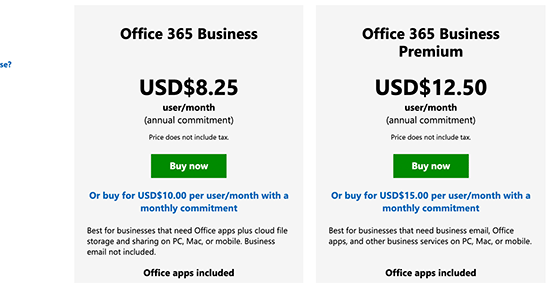
Select a plan

This will bring you the Office 365 sign up page, where you will be first asked to provide an email address.
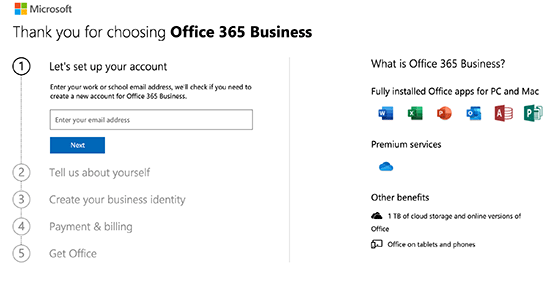
Office 365 signup

After this, you will be asked to provide your personal and business information.

Next, you will be asked to choose a domain name. Microsoft only provides a subdomain, and you will have to purchase and add a custom domain name separately.
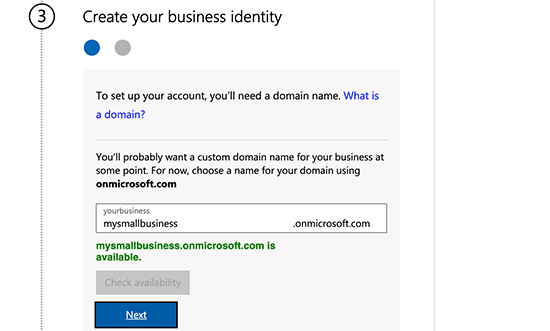
Subdomain

Go ahead and enter a suitable subdomain for your business and click on the Next button.

After that, you will fill in your payment information to complete the sign up process.

Step 2. Add Custom Domain to Office 365

Microsoft does not provide domain registration service, which means you’ll need to separately buy a domain name or use an existing domain name to add in Office 365.

There are a number of domain registrars that sell domain names. We recommend using Domain.com as they are the best domain registrar on the market.

Simply visit the Domain.com website and look for the domain name you want to purchase. WPBeginner users can use our Domain.com coupon code to get additional discount.

Search domain name

If your selected domain name is available, then you can proceed to the billing and complete the purchase.
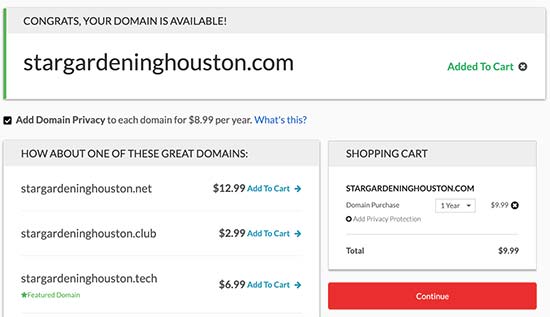
Complete domain registration

Now, let’s add this domain to Office 365.

Head over to your Office 365 admin dashboard and then click on Set up » Domains page.
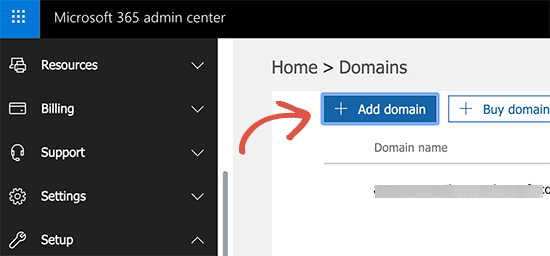
Add domain to Office 365

Next, click on the ‘Add Domain’ button and then add the domain you purchased earlier.

After that, you will be asked to verify your ownership of that domain name and point it to work with Office 365.
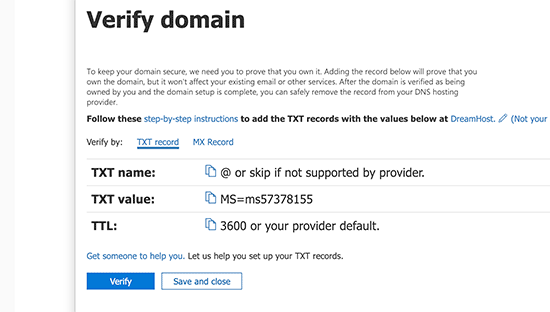
Verify domain name

You will see some DNS records on screen which you need to add to your newly registered domain’s settings.

Switch back to the Domain.com and login to access your domain settings. Select your domain name and then click on the DNS and Nameservers menu.
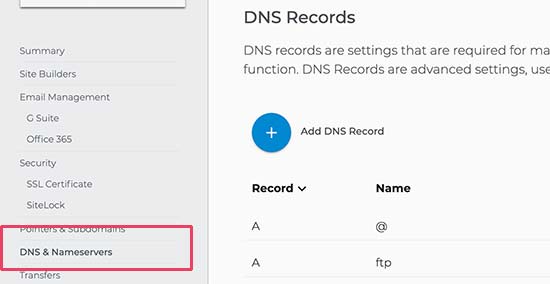
Domain DNS Settings

First, you need to select TXT/SPF record and enter the value shown by Office 365.
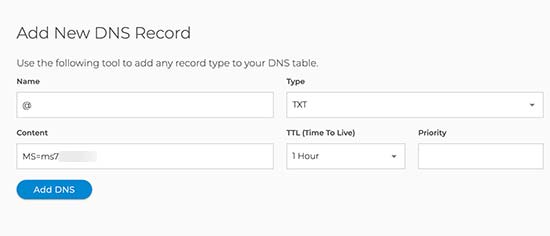
Adding TXT record

Next, click on the ‘Add DNS’ button to save the settings.

After that, you need to switch to MX Records and add MX Records shown on Office 365 settings page.
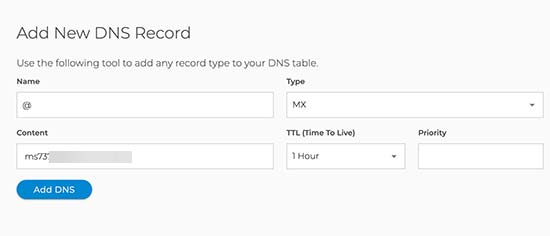
Add MX record

Don’t forget to click on the ‘Add DNS’ button to store your changes.

That’s all, you have successfully added custom domain to your Office 365. If you are using some other domain registerar or need more details, then see the instructions in our guide on how to branded email address with Office 365.

Step 3. Create custom domain email addresses in Office 365

Now that you have added your email domain to Office 365, let’s create a custom business email address.

From your Office 365 dashboard, go to Users » Active Users and then click on Add a user button.

Add user in Office 365

On the next screen, you need to provide the user’s personal information and then choose an email address for them.
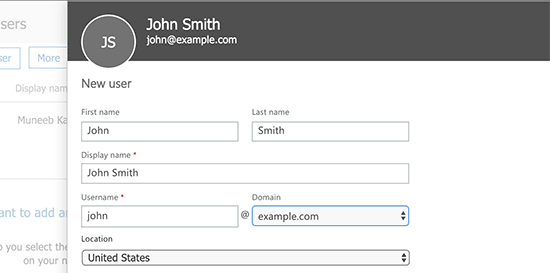
User information and email address

Don’t forget to click on the Add button to save user settings.

Step 4. Using your Office 365 custom domain email account

Microsoft offers a web version of their popular Outlook email software called Outlook.com. From here, you can simply log in using the email address you created earlier.
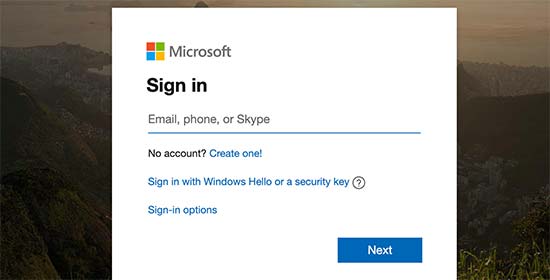
Sign in Outlook

Your Office 365 subscription also allows you to download Microsoft Office apps on your computer. This includes their popular Outlook email client.
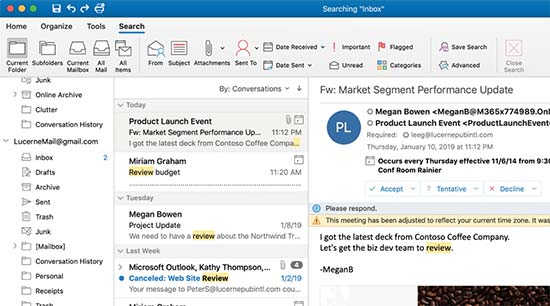
Microsoft Outlook on Mac

You can also use your custom domain email address with Outlook app on your mobile phone.

If you would rather prefer to use another app, then your email address will work with just about any mail client and app without any special configuration.

Which is Truly The Best Free Email Domain Option?

We have shown you three free email domain solutions and two paid ones. All of them would work well for a small business, and even large enterprises.

Most small business owners start with a free custom email domain offered by their web hosting company. This option is extremely affordable because it’s included in a package deal when you build a website.

Companies like Bluehost, HostGator and Dreamhost, give you a free business email address with your own free domain when you use their hosting service to build a WordPress website.

As your business grows and you can afford the extra $6 per month, then you can use G Suite by Google. It gives you the familiar Google apps Gmail, Drive, Calendar, and more with your own business name. It is easy, secure, and comes with the best spam protection in the industry.

We use G Suite in our own business.

But remember, you don’t want to register your domain with G Suite because you likely want to build a website using that domain name too, and Google does not offer a website builder.

Instead you should register your domain name with a proper domain registrar like Domain.com or use a WordPress hosting company like Bluehost to get a domain and build a website.

And after that, you can use this custom domain in your G Suite settings, so you can retain full control over your domain at all times.

We hope this article helped you learn how to get a free email domain for your business. You may also want to see our guide on the best business phone service to help you manage all your business calls, and the best email marketing services to easily send bulk emails to improve communication with your users.

If you liked this article, then please subscribe to our YouTube Channel for WordPress video tutorials. You can also find us on Twitter and Facebook.

The post How to Get a Free Email Domain (5 Quick and Easy Methods) appeared first on WPBeginner.


from WPBeginner https://ift.tt/339O0Be
More links is https://mwktutor.com