Wednesday, 24 December 2025

5 Ways to Use AI in WooCommerce (Save Time & Make Money)

Managing a WooCommerce store can feel like a lot of busy work. I’ve worked with store owners who spent countless hours writing product descriptions, answering the same customer questions, and trying to make sense of sales data, all while packing and shipping orders.

It often felt like there wasn’t enough time in the day to focus on actually growing their businesses.

In this guide, I’ll show you the proven, beginner-friendly ways I recommend using AI to automate tasks, save time, and increase sales in WooCommerce. You don’t need a big budget or a technical degree to get started.

Let’s look at how these tools can free you up to focus on what truly matters.

7 Ways to Use AI in WooCommerce (Save Time & Make Money)

What AI Can Do for Your WooCommerce Store

AI helps you save time and increase revenue by handling repetitive tasks in your online store. It also helps you make smarter decisions based on your WooCommerce data.

You don’t need technical skills or a large budget because today’s AI tools work just like any other WordPress plugin.

Here are the key ways AI can support your online store:

  • Write product descriptions that sell.
  • Automate routine admin work (order messages, product tagging, reminders, etc.)
  • Create and improve product and landing pages.
  • Provide instant customer support with AI chat or helpdesk tools.
  • Analyze sales performance to highlight what’s working and what needs attention.
  • Optimize products for SEO without hiring an SEO expert.
  • Create marketing content at scale for email, social media, and ads.

For small WooCommerce stores, this is especially valuable. Hiring extra help isn’t always possible, and doing everything manually can slow your growth.

AI acts as an affordable assistant that works around the clock, allowing you to focus on the important parts of your business, including strategy, customer service, and scaling your store.

Here’s a quick overview of everything I will cover in this post. You can use the quick links below to jump to different sections:

5 Powerful Ways to Use AI in Your WooCommerce Store

Now, let’s explore the practical ways you can start using AI in your store today. These tools are designed to be easy to set up and can make a real difference in your daily operations.

1. Build a High-Converting eCommerce Store in 60 Seconds

Your store’s design has a huge impact on sales, but hiring a designer can be really expensive. This is where using AI to create your eCommerce website can save you a lot of time and money.

SeedProd’s AI website builder helps you quickly create the foundation of your WooCommerce website in under 60 seconds.

Instead of starting with a blank page, you simply describe your business, and SeedProd AI automatically creates a complete site layout with starter pages, design styles, and content.

Providing a small prompt to vibe code a small business website using SeedProd AI

This is especially helpful if you’re launching a new store or redesigning an existing one.

Then, you can use WooCommerce + SeedProd to fine-tune individual product pages, landing pages, and checkout flows as needed. SeedProd includes multiple WooCommerce blocks, so this process is quick and easy.
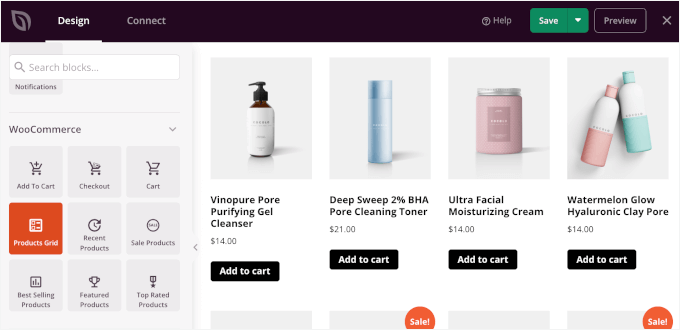
Adding WooCommerce's Product Grid block

It also includes built-in AI support for the content on your WooCommerce pages.

This lets you easily generate images and written copy without leaving the page builder.
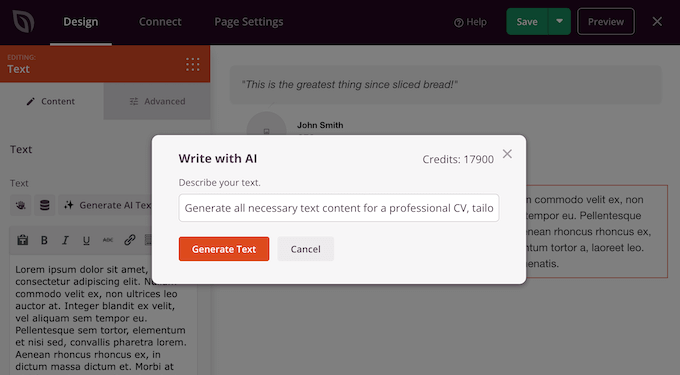
Creating an online resume using artificial intelligence (AI)

For details, see our guides on how to create a website with AI and how to customize your WooCommerce product pages.

How to Use SeedProd the Right Way:
  • AI Website Builder: Create a WooCommerce-ready site layout by describing your business in plain language. SeedProd generates the layout, pages, and starter content for you.
  • AI Product Page Copy: Quickly create persuasive product descriptions and headlines without starting from scratch, making pages easier to scan and convert.
  • Drag-and-Drop Storefront Builder: Customize product grids, checkout pages, and landing pages visually, without coding or touching theme files.
  • Pre-Built WooCommerce Templates: Launch sales pages, coming soon pages, lead funnels, and product launches faster using professionally designed templates.
  • Optimized for Conversions: Built-in blocks for countdown timers, testimonials, reviews, and CTAs to help you create high-converting product and landing pages.

My Experience: I have been using SeedProd for a while now. I love its built-in AI features that make it super easy to quickly build on-demand landing pages. I have also vibe-coded websites using AI from scratch, and SeedProd stood out as the easiest AI website builder.

Pricing: Starting from $39.50 / year.

2. Generate Product Descriptions That Actually Sell

Writing unique and persuasive product descriptions is one of the most time-consuming parts of managing a WooCommerce store.

One way to write product descriptions is to simply use ChatGPT or another AI tool. However, you’ll need to write a prompt and manually provide product details for each product.

This kills the purpose of using AI, which is to save time and automate things.

On the other hand, an AI tool like StoreAgent can instantly generate compelling copy that highlights your product’s best features and benefits.

StoreAgent website

For example, instead of a plain description like “Blue cotton t-shirt,” AI can create something like, “Experience all-day comfort with our ultra-soft blue cotton t-shirt, made from 100% breathable fabric perfect for any season.”

This not only saves you hours of work but also improves your product page SEO and helps convert more visitors into buyers.
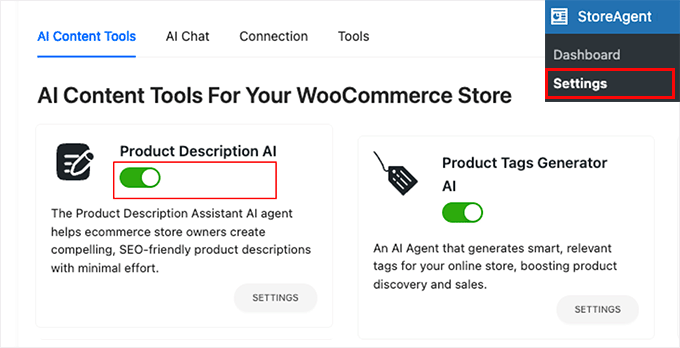
Activate Product Description AI agent in StoreAgent

To get started, just see our guide on how to autogenerate WooCommerce product descriptions using AI.

How to Use StoreAgent the Right Way:
  • AI Product Content Generator: Creates long and short product descriptions, tags, and review summaries in one click.
  • AI Support Chatbot: Answers customer questions using your product data, policies, and FAQs right inside your store.
  • Conversion Insights: Scans your product pages and suggests improvements to boost clarity and sales.
  • Native WooCommerce Integration: Works directly in your dashboard with no coding, prompts, or API keys required.

My Experience: I found StoreAgent to be a major time-saver for managing a WooCommerce store. I tried it on a dropshipping store with hundreds of products, and the bulk product description generator saved me a ton of time. The AI chatbot helped answer customer questions immediately, which led to more conversions.

Pricing: Starting from $19 / month. There is also a free plan available with limited features.

3. Automate Your Store’s Repetitive Tasks

In a typical online store, there are many tasks that seem small, but they become repetitive and time-consuming as your business grows.

For example, sending order follow-up emails, tagging customers after a purchase, creating coupons for repeat buyers, updating spreadsheets, or notifying your team when stock runs low.

These tasks seem small on their own, but they add up quickly as your store grows. Before long, you’re either working extra hours or paying someone else to handle them.

This is where Uncanny Automator can help. This is the ultimate WordPress automation plugin that allows your WooCommerce store to connect to over 150 different apps and plugins.
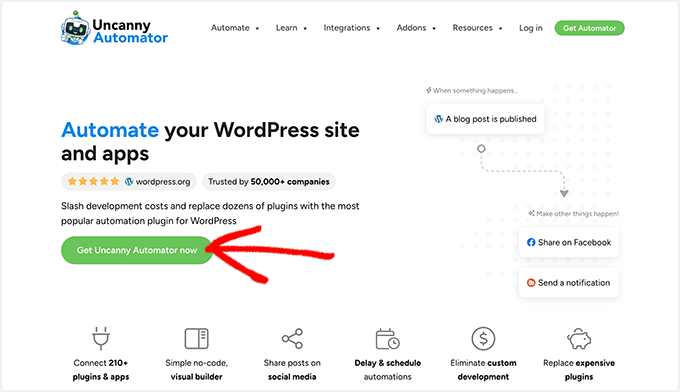
Uncanny Automator WordPress Automation and Integration Plugin

Let’s look at a simple example. Imagine you want WooCommerce to automatically send a personalized follow-up message after a customer completes a purchase, without writing emails manually or copying data between tools.

With Uncanny Automator, you can set this up once, and it runs automatically every time someone places an order.

Once you have installed and activated Uncanny Automator, you can simply go to Automator » Add New Recipe page to create a new automation.

You will be asked to choose the app that triggers the recipe. For instance, you can select WooCommerce here.

Uncanny Automator recipe trigger

After that, you will need to pick what will trigger the automation.

For instance, you can choose ‘When a guest completes a purchase’.
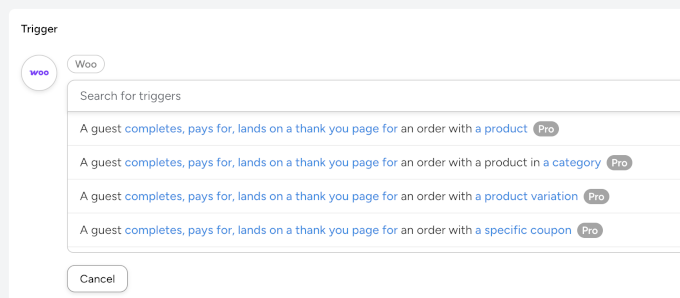
Uncanny Automator WooCommerce actions

After that, you can choose the action you want to perform when this trigger is run.

Here, you can choose the apps you have connected or the plugins installed on your WooCommerce store, or you can connect to an AI platform (e.g., Google Gemini, ChatGPT, Claude, etc.) to perform a desired action.

For instance, you can connect to an AI and generate an upsell message based on a user’s purchase.
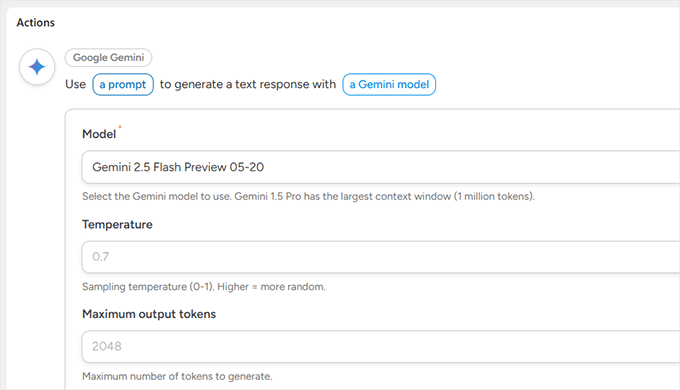
Using AI to automate WooCommerce store

Uncanny Automator supports OpenAI, Gemini, Anthorpic Claude, and several other popular AI platforms. This allows you to use AI tools in your automations and create smarter workflows.

For details on how to use it, see our guide on how to create automated workflows with Uncanny Automator.

How to Use Uncanny Automator the Right Way:
  • Automate Store Workflows: Trigger actions when customers make a purchase, leave a review, abandon a cart, or change membership status — no coding required.
  • Connect WooCommerce to Other Plugins, Apps, and AI Platforms: Integrates with tools like WPForms, LearnDash, Mailchimp, Google Sheets, Slack, and over 100+ services to keep your store in sync.
  • Personalized Customer Experiences: Automatically send targeted follow-up emails, grant rewards, or unlock special content based on what users buy or browse.
  • Reduce Manual Tasks: Replace repetitive admin work (like tagging users, updating CRM records, and creating coupons) with smart automation recipes.
  • Supports Multi-Step Automations: Build advanced workflows where one action leads to another — perfect for marketing, membership workflows, and post-purchase sequences.

My Experience: I have been using Uncanny Automator quite a lot. Its integration with popular AI platforms makes it easy and cheaper to create automations right inside WordPress. It integrates with WordPress plugins and dozens of third-party apps. I also find it a lot less complicated when compared with other AI automation tools.

Pricing: Starting from $149 / year

4. Provide Instant Customer Support 24/7

Ever wished you could answer customer questions instantly while they’re shopping, but don’t have the budget for expensive live chat software or a dedicated support agent?

When customers can’t get quick answers, they often leave your store and buy elsewhere. This is especially frustrating when the questions are simple, like shipping times, return policies, or product availability.

This is where WPChat comes in. It lets customers chat with you through messaging apps they already use, like WhatsApp, Messenger, Instagram, and Telegram.
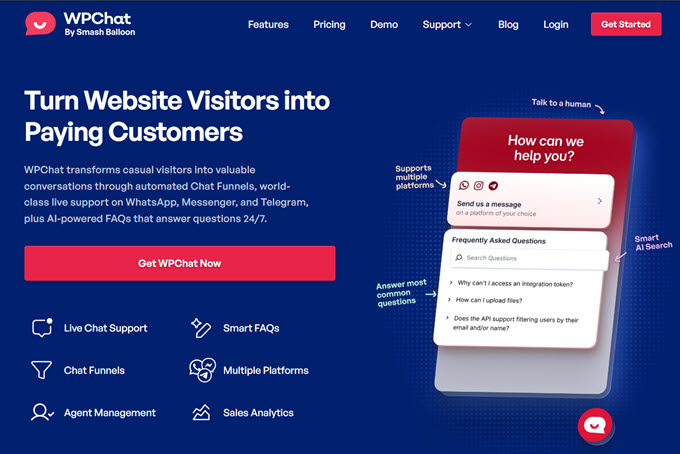
wpchat homepage

This makes it easy for you to talk to them in real time and keep the conversation going even after they leave your site.

This is different from traditional live chat boxes, which disappear when the customer closes your website. With WPChat, the chat continues on their phone — just like talking to a friend.
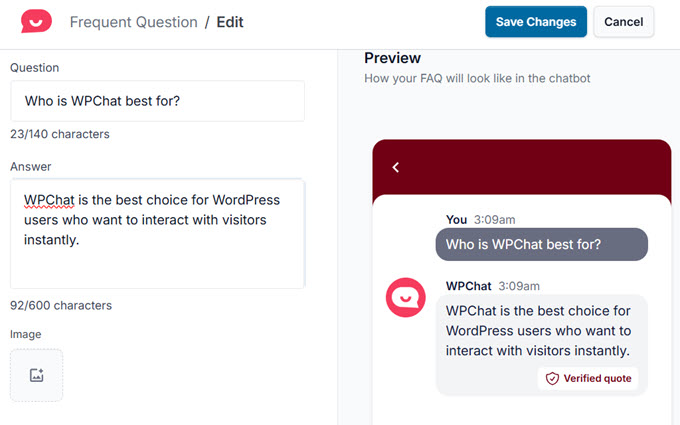
wpchat faqs

Plus, WPChat offers AI-powered Smart FAQs, so customers can get instant answers even when you’re offline. This helps reduce repetitive support questions and lets you focus on the conversations that matter.

WPChat isn’t just support — it also helps you increase conversions by guiding visitors through purchasing decisions with automated chat funnels.

For details on how to use it, see our guide on how to add live chat to your WooCommerce store.

How to Use WPChat the Right Way:
  • Chat on Popular Messaging Apps: Talk with customers on WhatsApp, Messenger, Instagram, and Telegram — not just on your website.
  • AI-Powered Smart FAQs: Automatically answer common questions instantly, even when you’re not available.
  • Chat Funnels for Sales: Create automated conversation flows that help customers choose products and complete purchases.
  • Customizable Chat Assistant: Match your brand with custom colors, messages, and visibility rules.
  • Built-In Team Tools: Add support agents, manage availability, and route conversations automatically.
  • Clear Analytics: Track conversations, agent performance, and popular questions right from your WordPress dashboard.

My Experience: I’ve seen WPChat make a big difference in stores where support was slowing down sales. When customers get answers instantly, they make decisions faster — and more of those visitors turn into paying customers.

Pricing: Starts from $49 / year. A free version is available on WordPress.org with limited automations.

5. Optimize Your Products for Search Engines With AI

Getting your products to show up in Google searches is one of the easiest ways to get more traffic and sales. The challenge is that SEO can feel complicated if you’re not familiar with keywords, metadata, or structured data.

All in One SEO (AIOSEO) works directly inside WooCommerce and WordPress to make product SEO approachable. It comes with built-in support for schema markup, which allows search engines like Google to easily show your store’s products in search results.
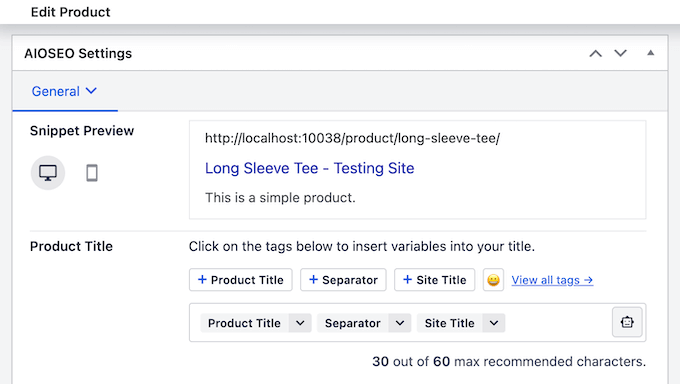
Optimizing your WooCommerce SEO using AIOSEO

All in One SEO also comes with a built-in AI Assistant that helps you write marketing content and generate AI images without leaving WordPress.

For store owners, this is a huge time-saver. You can use the AI to generate persuasive product descriptions that convert, write optimized SEO titles for thousands of items, or create featured images for product categories that lack high-quality photos.
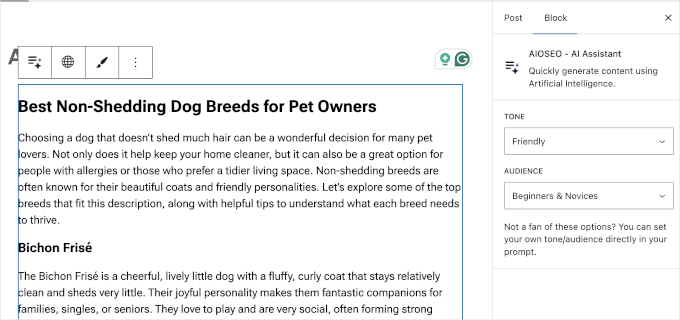
AIOSEO AI Assistant lets you set tone and audience

AIOSEO also includes a powerful Social Media post generator.

This helps you easily generate social media posts using AI to promote your store on platforms like Instagram, Facebook, and more.
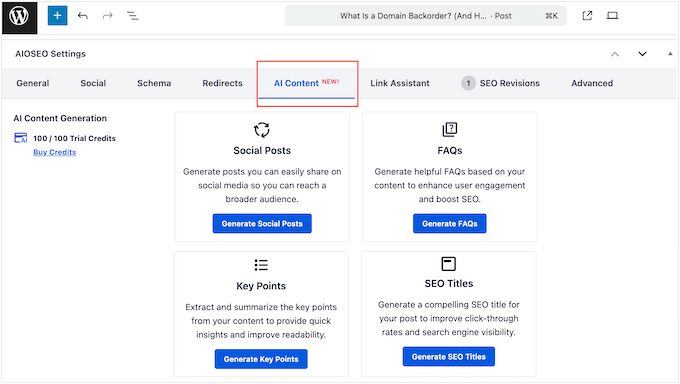
How to generate social media posts using powerful artificial intelligence

Plus, it comes with LLMs.txt file support, which makes your site more accessible to AI chatbots. This could potentially get your content cited by AI platforms more frequently.

For WooCommerce stores, this means you can control exactly how AI bots index your catalog, ensuring they recommend your products correctly to users searching for them.

How to Use AIOSEO the Right Way:
  • AI Assistant for Content Creation: Write product page copy, blog posts, FAQ sections, or meta descriptions by simply typing a prompt.
  • Image Generator: Create original, on-brand visuals for product pages in seconds — no designer needed.
  • Social Media Posts: Comes with a pre-configured tool to generate Social Media posts using AI.
  • LLMs.txt Generator: Control how AI search engines and large language models view your site by customizing llms.txt and llms-full.txt files.
  • WooCommerce On-Page SEO Tools: Optimize product titles, meta descriptions, schema markup, and more directly inside the WooCommerce editor.
  • Schema Markup Support: Automatically add product schema, review schema, and FAQ schema to help your listings stand out in search snippets.
  • SEO Analysis & Recommendations: Get clear scores and actionable suggestions to improve each product page’s search visibility.

My Experience: I have been using AIOSEO as my go-to SEO toolkit. I have found it to be the easiest way to optimize for both search engines and AI-powered discovery tools. Its comprehensive support for schema markup, AI features, and eCommerce readiness makes it a must-have for any WooCommerce store.

Pricing: Starts from $49.50 / year. A free version is available covering core SEO. The AI credits may vary depending on the plan.

Bonus: Understand Your Store’s Performance in Plain English

Google Analytics is essential for growth, but it can be overwhelming to navigate.

MonsterInsights solves this by bringing your most important WooCommerce analytics directly into your WordPress dashboard.
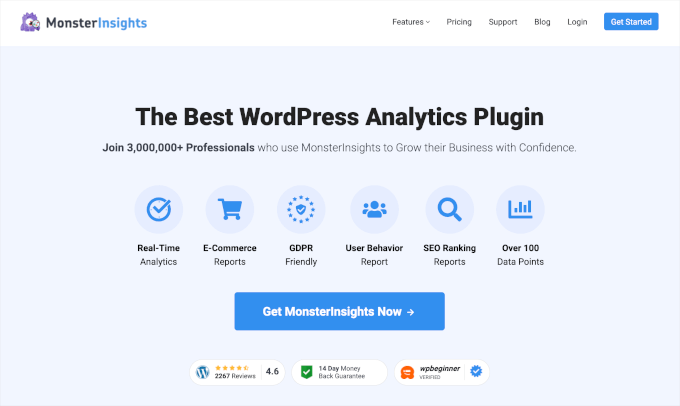
The MonsterInsights Google Analytics plugin for WordPress

It turns complex data into clear reports, allowing you to see your top-selling products, conversion rates, and revenue sources without leaving your site.

MonsterInsights also includes powerful AI tools to help you manage your shop. The AI Insights feature proactively monitors your store’s health, tracking sales trends and traffic shifts to give you an immediate overview at Insights » AI Insights.

It spots anomalies automatically, so you catch issues like sudden traffic drops instantly.
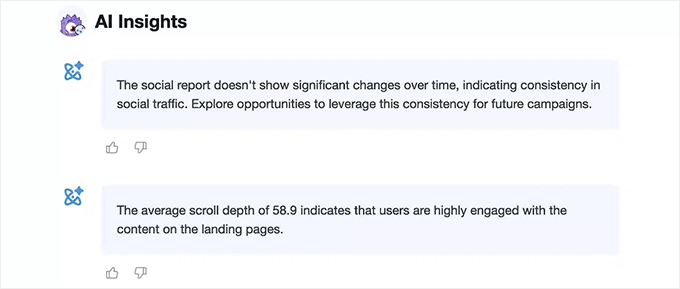
MonsterInsights AI insights

For specific queries, the Conversations AI feature acts as your personal data analyst. You can ask plain-English questions like “Which marketing channel drove the most sales this week?” or “What are my most popular products?” and get instant, data-driven answers.

How to Use MonsterInsights the Right Way:
  • Simple WooCommerce Reports: View sales data, revenue, conversion rates, and top-performing products directly inside WordPress.
  • Enhanced eCommerce Tracking: Automatically tracks add-to-cart events, product impressions, checkout behavior, and more.
  • Traffic & Marketing Insights: See exactly where your visitors are coming from and which channels drive the most sales.
  • Content Analytics: Find out which product pages and blog posts get the most engagement.
  • No Coding Needed: MonsterInsights sets up Google Analytics correctly with just a few clicks — no GA configuration headaches.

My Experience: We use MonsterInsights here on WPBeginner to understand what content performs best. It removes the guesswork and helps us decide what to improve — without digging through complicated analytics dashboards.

Pricing: Starts from $99.50 / year. A free version is also available with basic metrics.

How Much Money Can AI Actually Save and Make Your WooCommerce Store?

The return on investment from using AI comes from both time saved and revenue gained. Let’s look at some realistic numbers.

Real Numbers: Time Savings Breakdown

Here’s a conservative estimate of the time you could save each month by automating common tasks:

Task Manual Time (per month) AI-Assisted Time (per month) Hours Saved
Writing 20 Product Descriptions 10 hours 2 hours 8 hours
Answering 100 Support Queries 8 hours 3 hours 5 hours
Writing 4 Blog Posts 12 hours 4 hours 8 hours
Managing Social Media 10 hours 5 hours 5 hours
Total 40 hours 14 hours 26 hours
Revenue Impact: What to Expect

Beyond time savings, AI can directly boost your bottom line. Better product descriptions and SEO can increase conversion rates by 5-10%.

Meanwhile, abandoned cart emails can recover 10-15% of otherwise lost sales. These small, consistent gains add up to a significant increase in overall revenue over time.

Getting Started: Your First AI Implementation

Ready to start? The key is to begin with one high-impact area and expand from there.

Your 30-Day AI Implementation Plan

Here’s a simple plan to roll out AI tools over the next month without feeling overwhelmed:

  1. Week 1: Product Descriptions. Use an AI writer to generate or rewrite all your product descriptions. Focus on making them benefit-oriented and SEO-friendly.
  2. Week 2: Customer Support. Set up an AI chatbot to handle your most frequently asked questions. Create a knowledge base of answers for it to use.
  3. Week 3: Analytics. Install a tool like MonsterInsights to start gathering data. At the end of this week, review the insights to see what’s working.
  4. Week 4: Optimization. Review your results, refine AI outputs, and expand automation to one additional area, such as email marketing or SEO.

Frequently Asked Questions About Using AI in WooCommerce

Is AI going to replace the personal touch in my store?

No. AI is there to handle the repetitive tasks you shouldn’t have to do — like writing first drafts or answering the same basic questions over and over. This frees you up to focus on the things only you can do, like connecting with customers and improving your products.

What if AI makes mistakes?

Think of AI as an assistant, not a replacement. It can create content and responses very quickly, but you should still review and refine the output to match your tone and accuracy. A quick edit goes a long way.

Do I need technical skills to use these tools?

No. Every tool mentioned in this guide works just like a normal WordPress plugin. You can install and use them with a few clicks — no coding required.

How much do AI tools typically cost?

Most AI tools start around $20–$50 per month, and several offer free versions or trials. In most cases, the time saved and sales gained outweigh the subscription cost.

Which tool should I start with first?

Start with the task that currently takes you the most time. If writing product descriptions is slowing things down, start with an AI content tool. If support is overwhelming, start with a chatbot. One small improvement can create momentum.

Will AI tools work with my existing WooCommerce setup?

Yes. All the tools listed here integrate directly with WooCommerce and WordPress. They work with standard themes, plugins, and hosting environments.

Additional Resources for WooCommerce Stores

To help you on your journey, here are some helpful guides to get your store set up for success:

If you liked this article, then please subscribe to our YouTube Channel for WordPress video tutorials. You can also find us on Twitter and Facebook.

The post 5 Ways to Use AI in WooCommerce (Save Time & Make Money) first appeared on WPBeginner.


from WPBeginner https://ift.tt/wme9UWr
More links is https://mwktutor.com

Monday, 22 December 2025

Best Exit-Intent Popup Plugins for WordPress: I Tested 9, Recommend 5

Most visitors will leave your website quietly without signing up, purchasing, or even giving it a second thought.

Exit-intent popups change that by catching people right before they close the tab and offering a compelling reason to stay. When used well, they can help you recover lost leads, grow your email list, and boost sales.

But to get those results, you need a plugin that’s easy to use and effective at the right moment. With so many options in the WordPress ecosystem, figuring out which tools actually help can feel overwhelming.

I tested 9 popular plugins across blogs, eCommerce stores, and business websites to see how they perform in real-world scenarios. Based on this testing, I identified the 5 exit-intent popup plugins that stood out for performance, usability, and effectiveness.

These tools help you engage visitors at just the right moment, turning potential bounces into leads and sales.🚀

Best Exit-Intent Popup Plugins for WordPress: Tested 9, Recommended 5

My Verdict: The Best Exit-Intent Popup Plugins for WordPress

Product Starting Price Best For WPBeginner Rating
OptinMonster Starts at $29/month (Pro) Most accurate exit detection ⭐⭐⭐⭐⭐
Thrive Leads Starts at $99/year WordPress users who want full control ⭐⭐⭐⭐⭐
HubSpot Marketing Hub Starts at $9/mo/seat (Starter) Popups connected to CRM workflows ⭐⭐⭐⭐☆
Poptin Starts at $25/month (Basic) eCommerce sites ⭐⭐⭐⭐☆
Popup Maker Starts at $59.40/year Advanced users who need precise control ⭐⭐⭐⭐

Why Use Exit-Intent Popups in WordPress?

Exit-intent popups help you turn abandoning visitors into subscribers, customers, or engaged readers.

They detect when someone’s about to leave and give you one last chance to grab attention—whether that’s offering a discount, promoting a free guide, or growing your email list.

I like using them because they convert passive readers into active participants without disrupting the browsing experience.

And if you’re using WordPress, setting them up is easier than you might think. Exit-intent popup plugins give you everything you need to make these popups work effectively, including:

  • Full ownership – Control your data, design, and how often popups appear.
  • Flexible targeting – Show personalized popups based on page, device, or visitor behavior.
  • Simple setup – Most can be installed in minutes with no coding required.
  • Deep integrations – Instantly connect popups to your email service, customer relationship management software (CRM), or analytics.

Overall, they make it simple to capture leads just before visitors leave your site.

How I Tested Popup Plugins for This Review

I didn’t just install these plugins and look at their settings. I wanted to see how they perform when someone’s actually trying to leave a page.

That’s why I tested each plugin on real WordPress sites — a content blog, an online store, and a business landing page. My goal was to see which ones caught attention without being annoying, and which ones made setup simple enough for beginners.

Here’s what I focused on during testing:

  • Exit detection accuracy: I checked how well each plugin detected exit behavior.
  • Ease of setup: I timed how long it took to go from install to a live, working popup.
  • Customization options: I tested how much control I had over design, timing, and targeting rules.
  • Mobile performance: I triggered popups on phones and tablets to see if they worked smoothly.
  • Integrations: I connected each plugin to email marketing tools and tracked how seamlessly data synced.
  • Analytics and testing: I looked for built-in A/B testing and conversion tracking to optimize results.
  • Pricing transparency: I compared free plans, paid tiers, and which features were locked behind upgrades.

This process helped me find plugins that balance power with simplicity, so you can recover leads without frustrating visitors.

Why Trust WPBeginner?

At WPBeginner, we’ve spent over 15 years helping WordPress users build websites that convert visitors into subscribers and customers.

Our team tests every plugin on real WordPress sites that serve millions of readers. We install, configure, and measure performance based on real user behavior — not marketing claims.

When we recommend exit-intent popup tools, it’s because we’ve tested them on live sites and seen how they perform under real traffic.

We only recommend plugins that meet our standards for usability, reliability, and value. You can read more about our process in our editorial guidelines.

Now, let’s take a look at my top picks for the best WordPress exit-intent popup plugins.

1. OptinMonster — Best Overall Exit-Intent Popup Plugin

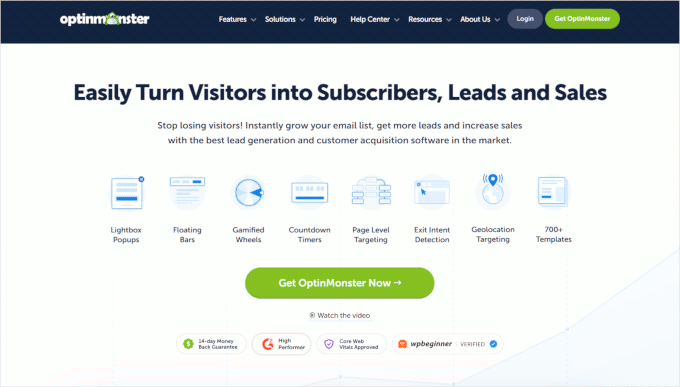
OptinMonster website
✅ OptinMonster Pros ✅ Highly accurate exit-intent technology
✅ Extensive popup customization options
✅ Advanced targeting and segmentation
✅ Built-in A/B testing
✅ Excellent customer support
❌ OptinMonster Cons ❌ Higher price point than some competitors
❌ Limited templates on lower plans
Pricing Starts at $29/month (Pro plan required for Exit-Intent®)
Best For Serious marketers who want the most advanced exit-intent features and don’t mind paying premium prices

OptinMonster isn’t just the best exit-intent popup plugin — it’s a complete lead generation powerhouse trusted by top brands.

With its signature Exit-Intent® Technology, it detects exactly when someone is about to leave your website and shows the perfect offer to turn them into subscribers or customers.

You can easily build eye-catching popups, floating bars, and slide-ins using its drag-and-drop campaign builder, no coding required.

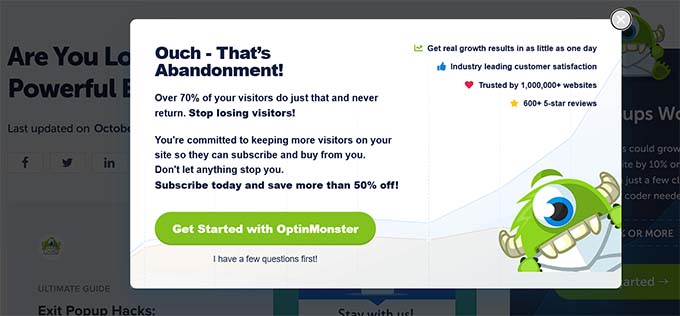
Example of exit-intent popup created with OptinMonster

What really sets it apart is the smart targeting and personalization. It lets you customize campaigns based on pages visited, referral sources, location, and user behavior to drive higher conversions.

My Experience

At WPBeginner, we’ve used OptinMonster’s Exit-Intent® technology for multiple popups aimed at converting visitors who were about to leave our website. You can learn more about our hands-on experience in our detailed OptinMonster review.

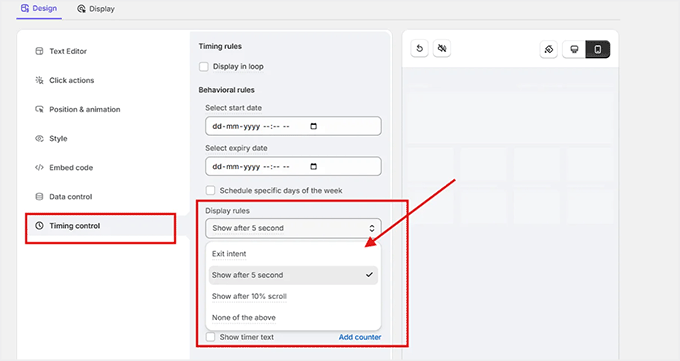
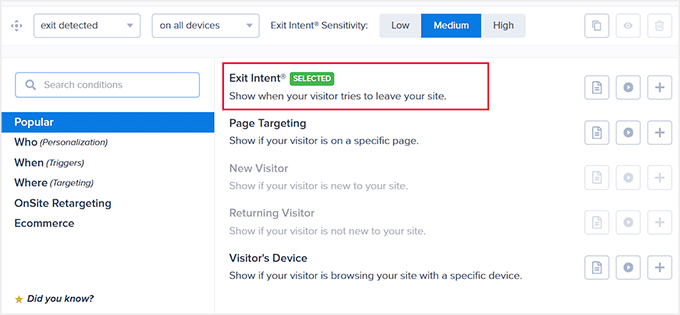
When I tried it out on my own website, the setup process was straightforward. I logged into the dashboard, selected a template, and customized the design using the drag-and-drop builder. After that, I simply activated Exit-Intent in the display rules settings.

Use exit intent technology for popups

This technology is where OptinMonster really shines. On desktop, it tracks mouse movement and triggers the popup the moment a visitor moves toward the browser’s back button or address bar.

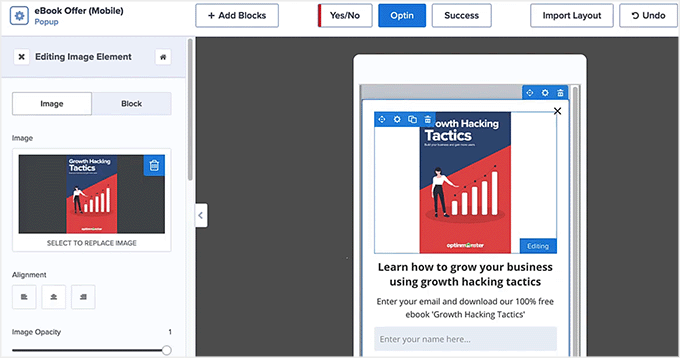
On mobile, it uses scroll-up detection to catch visitors before they leave. Both methods worked reliably during my tests.

Design exit-intent popup for mobile in OptinMonster

Smart targeting rules also let me show different messages to different visitors. I set up one popup for visitors from Google and another for people who came from Facebook. I also created a special offer for visitors viewing specific product pages.

The campaign builder includes dozens of campaign types beyond popups—slide-ins, floating bars, and coupon wheels all worked well.

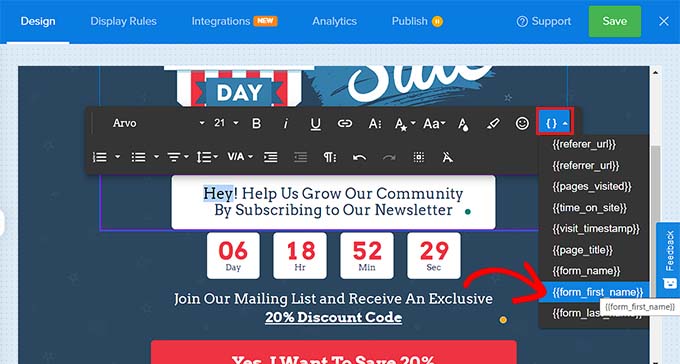
Select a smart tag

Plus, the built-in A/B testing made it easy to test different headlines and button colors. Conversion analytics showed me exactly which version performed better.

The plugin even integrates with all major email marketing platforms, including Mailchimp, HubSpot, and ConvertKit, so new leads could flow directly into my email list.

Why I recommend OptinMonster: It is ideal for marketers and eCommerce stores that want the most accurate exit detection and powerful targeting options. If you’re serious about converting abandoning visitors into leads or customers, OptinMonster delivers the best results.

2. Thrive Leads – Best for Advanced Lead Capture Control

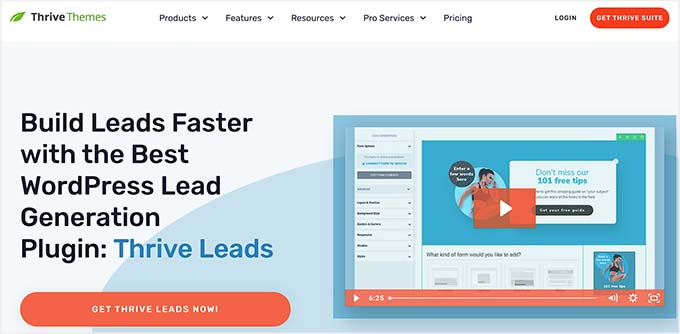
Thrive Leads
✅ Thrive Leads Pros ✅ SmartExit+ technology detects exit behavior accurately
✅ SmartLinks prevent annoying repeat popups
✅ Built-in A/B testing and analytics
✅ Works seamlessly within WordPress
✅ One-time purchase option available
❌ Thrive Leads Cons ❌ Steep learning curve for beginners
❌ Only works on WordPress sites
❌ Many settings can feel overwhelming at first
Pricing Starts at $99/year
Best For WordPress users who want precise control over form behavior and don’t want to rely on external SaaS platforms

Thrive Leads stands out if you want granular control over when and how your lead capture forms appear. It’s built specifically for WordPress, so everything stays on your site without needing a separate account somewhere else.

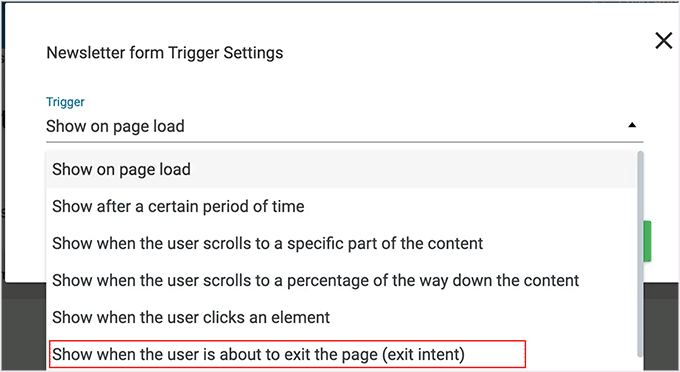
I particularly appreciate how SmartLinks and SmartExit+ work together to show exit-intent forms at the right moment without annoying visitors who have already seen them. The built-in testing makes it easy to compare different designs and find what actually converts.

Enable smart exit for popups in Thrive Leads

Thrive Leads is part of the Thrive Themes ecosystem. Our team has tested all their tools, and you can check out our Thrive Themes Suite review to discover how each one works in action.

My Experience

I experimented with Thrive Leads on a blog and tested SmartExit+ triggers to see how accurately they detected visitors leaving. The triggers worked smoothly on both desktop and mobile.

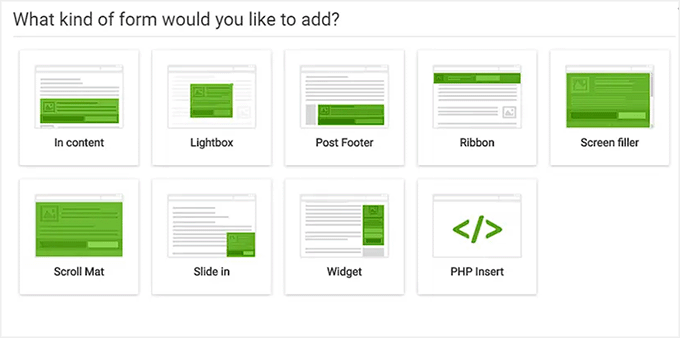
I also set up different form types—popups, slide-ins, and sticky ribbons—to test which placement worked best on each page.

Each form type gave me a different way to capture attention without feeling pushy.

Different form types in Thrive Leads

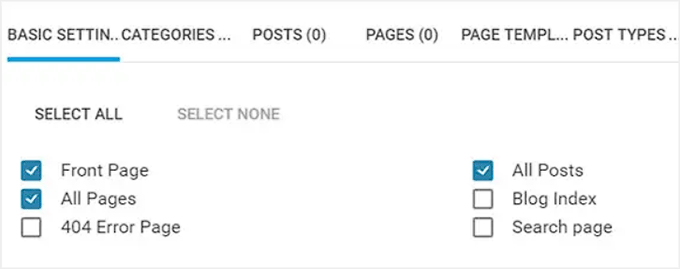
The advanced targeting rules let me show specific forms based on page categories, tags, and user behavior. I used this to display product-related offers only on product pages, which felt more relevant to visitors.

I even ran A/B tests on two different exit-intent popup designs to see which one got more signups. The built-in analytics made it simple to track performance without installing extra tools.

Configure where to show exit-intent popup in Thrive Leads

SmartLinks prevented the same form from showing up repeatedly to returning visitors. This helped me keep the experience cleaner and reduced the chance of annoying people who’ hadalready subscribed.

The mobile-responsive designs also looked good on phones and tablets without extra adjustments. Device-specific triggers let me customize when forms appeared based on whether someone was on mobile or desktop.

Configure SmartLinks in Thrive Leads

The only downside I noticed was the learning curve. With so many settings and options, it took time to figure out which features I actually needed versus which ones I could ignore.

Why I Recommend Thrive Leads: It gives you full control over your lead-capture strategy. With SmartLinks and SmartExit+, you can display forms at exactly the right moment—engaging visitors without annoying them and boosting conversions.

3. HubSpot Marketing Hub – Best for All-in-One CRM Integration

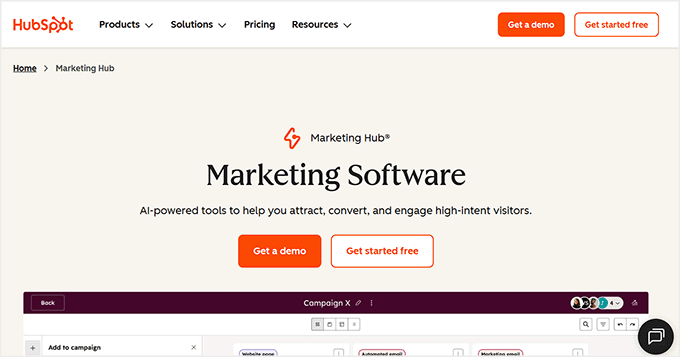
HubSpot Marketing Hub website
✅ HubSpot Marketing Hub Pros ✅ Exit intent popups connect directly to CRM workflows
✅ Behavior-based triggers to maximize engagement
✅ Built-in analytics track every visitor interaction
✅ All-in-one platform handles leads from capture to close
✅ Automated nurturing starts immediately after capture
❌ HubSpot Marketing Hub Cons ❌ The full suite can be expensive for small businesses
❌ Some customization options are complex for beginners
❌ Requires familiarity with HubSpot’s ecosystem
Pricing Starts at $9/mo/seat (Starter)
Best For Businesses that want to capture leads and immediately nurture them through automated workflows, all within one CRM-driven platform

HubSpot Marketing Hub stands out if you want exit-intent popups that connect directly to the HubSpot CRM marketing system.

Instead of just capturing emails, it tracks behavior, triggers workflows, and automatically moves leads through your sales funnel.

I tested it on blog pages and product pages to see how well the CRM integration worked in practice. The difference became clear once I started seeing how visitor data flowed into the Smart CRM without extra setup.

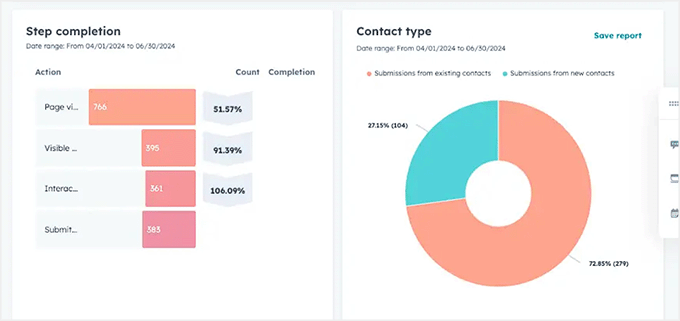
Exit-intent popup data shown in HubSpot
My Experience

I started by setting up exit-intent popups on a few blog posts. The trigger options let me choose time on page, scroll depth, or exit intent.

Once I selected exit intent, the popup appeared just as visitors moved their cursor toward the browser tab. The timing felt natural and caught people right before they left.

Create an exit-intent popup in HubSpot

I also tested time-based triggers on product pages. Setting a 30-second delay gave visitors enough time to browse before seeing the offer.

The popup editor made it easy to write custom messages and adjust form fields. I added a simple email signup and changed the button text to match the page content.

Name exit-intent popup in HubSpot

After a visitor submitted their email, HubSpot’s Smart CRM automatically saved their contact info and tagged them based on the page they visited. I didn’t have to export lists or manually update spreadsheets.

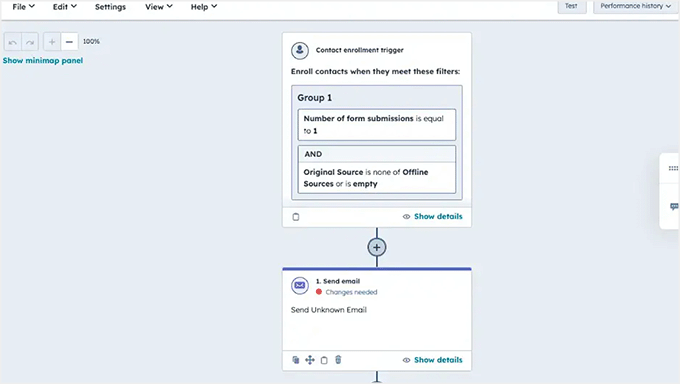
From there, I built a simple workflow that sent a welcome email within five minutes of signup. The automation started immediately after the popup form was submitted.

Create email workflow in HubSpot

Plus, the built-in analytics gave me insights into visitor behavior, form submissions, and conversion rates. I could see exactly how many people saw the popup and how many took action.

The only thing that annoyed me a bit was that advanced targeting and automation features require paid plans, which adds cost if you’re only looking for basic exit-intent popups.

Why I Recommend HubSpot Marketing Hub: It takes exit-intent popups beyond simple lead capture by integrating them into a complete marketing system. Leads are not only captured—they’re automatically nurtured with personalized email sequences and segmentation.

4. Poptin – Best for eCommerce Stores

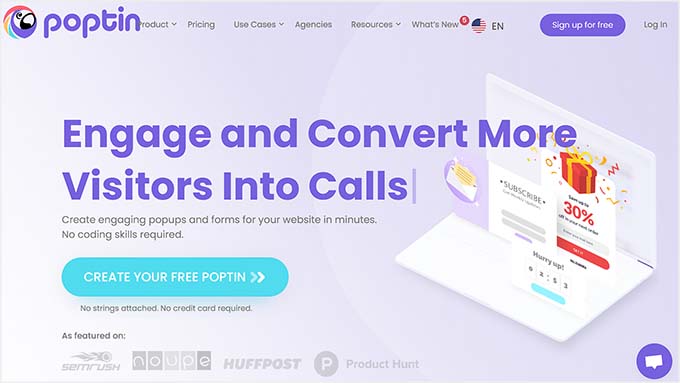
Poptin
✅ Poptin Pros ✅ Easy-to-use drag-and-drop editor with flexible popup types
✅ Powerful automation with welcome emails and coupon delivery
✅ Wide range of integrations with CRMs, email marketing tools, and analytics platforms
✅ Advanced targeting based on visitor behavior
✅ Smart popups including lightbox, floating bars, slide-ins, and social widgets
❌ Poptin Cons ❌ Free plan limits the number of monthly popups and campaigns
❌ Full analytics and integrations are restricted to higher-tier plans
❌ Some features require upgrading from the free version
Pricing Free (Lite), Paid plans start at $25/month
Best For eCommerce sites and digital agencies that want to capture abandoning visitors and immediately engage them with personalized popups and automated follow-up emails

Poptin combines exit-intent technology with smart automation to help you capture visitors who are about to leave and immediately engage them.

It’s particularly effective for eCommerce sites that want to reduce cart abandonment and boost conversions.

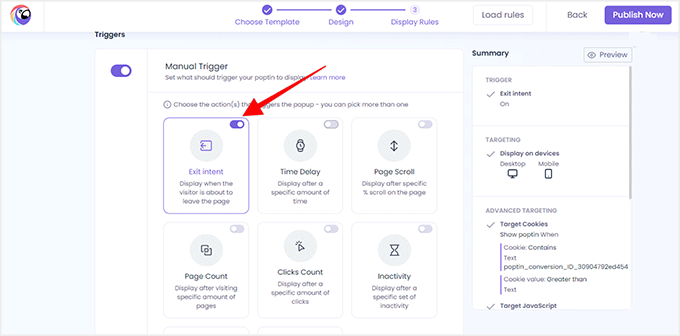
I specifically used exit-intent triggers on product and checkout pages, as well as blog landing pages, to capture leaving visitors. The setup was quick, and the results showed up fast.

Enable exit-intent in Poptin
My Experience

When I first installed Poptin, the exit-intent trigger setup was straightforward. I targeted product pages and checkout flows to catch visitors before they left.

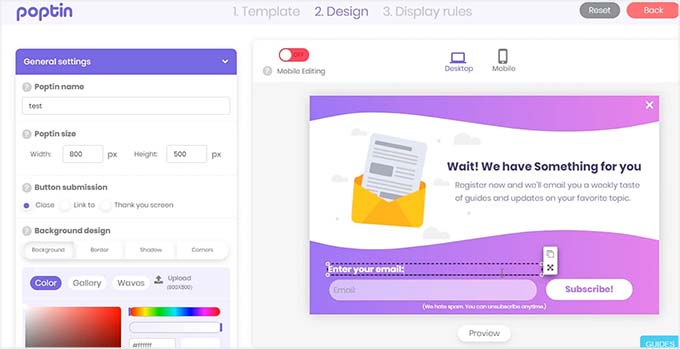
The drag-and-drop editor made it easy to customize popups without touching any code. I built lightbox popups, floating bars, and slide-ins in minutes.

Drag and drop editor in Poptin

Smart targeting rules let me show different popups based on visitor behavior. I created separate campaigns for first-time visitors versus returning customers.

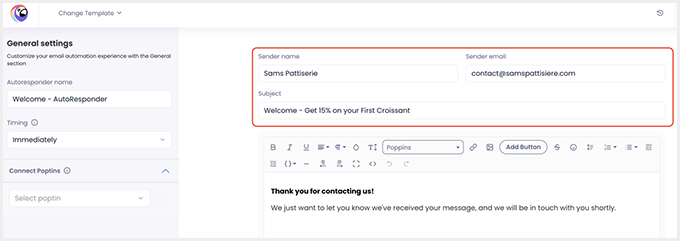
The autoresponder feature stood out immediately. After someone entered their email, Poptin automatically sent a welcome message or discount code.

I tested exit-intent popups on blog landing pages, too. When readers scrolled up to leave, the popup appeared and offered a content upgrade.

Autoresponder feature in Poptin

Behavior-based display rules also gave me control over when popups appeared. I set triggers based on scroll depth, time on page, and exit intent together.

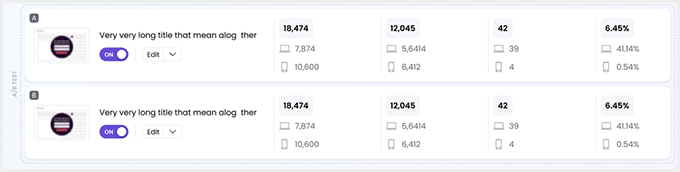
Next, A/B testing helped me optimize popup design and messaging. I ran tests on different headlines and saw which versions converted better.

A/B testing in Poptin

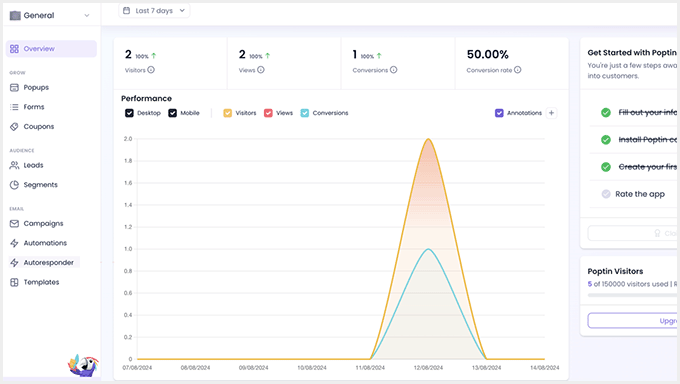
Plus, I loved the analytics dashboard that showed me which popups performed best. I tracked views, conversions, and drop-off points for each campaign.

What I didn’t like was that the free plan limits monthly popups and campaigns. Full analytics and some integrations require upgrading to a paid plan.

Analytics dashboard in Poptin

Why I Recommend Poptin: For eCommerce stores, Poptin is a powerful tool to capture abandoning shoppers with exit-intent popups and automatically send follow-up emails to bring them back. It’s highly effective for reducing cart abandonment and recovering lost sales.

5. Popup Maker – Best for WordPress Developers & Advanced Users

Popup Maker
✅ Popup Maker Pros ✅ Multiple exit-intent detection methods for desktop and mobile
✅ Highly customizable targeting and display rules
✅ Deep integration with WordPress forms and eCommerce plugins
✅ Cookie management prevents annoying repeat popups
✅ Built-in analytics and conversion tracking
❌ Popup Maker Cons ❌ Full exit-intent functionality requires a premium extension
❌ Steeper learning curve due to a wide range of options
❌ Interface is less visual than drag-and-drop builders
Pricing Starts at $59.40/year (single site)
Best For WordPress site owners and developers who want precise control over popup triggers and deep integration with existing WordPress tools.

Popup Maker stands out because it gives you complete control over when and how your exit-intent popups appear. It’s built specifically for WordPress, so it works seamlessly with the plugins you already use.

During testing, I found it especially useful for creating targeted popups that fit different scenarios. The variety of trigger options meant I could match each popup to how visitors actually behave.

My Experience

I started by installing the free core plugin to test basic popups. Setup was quick, and I could create simple popups right away.

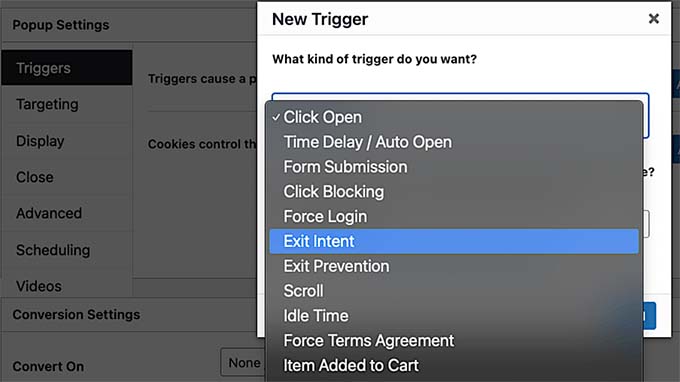
Once I added the premium Exit Intent Trigger extension, things got interesting. I had access to multiple detection methods that worked across different devices.

Choose exit-intent as trigger in Popup Maker

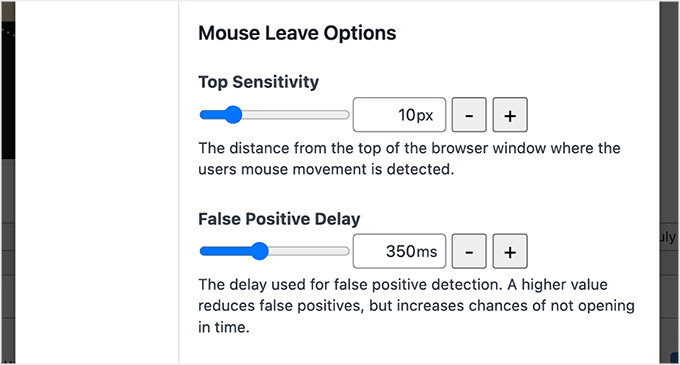
For desktop visitors, I used the Mouse Leave trigger. It detected when someone moved their cursor toward the browser’s close button or address bar.

I also tested the Lost Browser Focus trigger. This worked on both desktop and mobile when visitors switched tabs or apps.

Mouse Leave option in Popup Maker

The Back Button trigger caught visitors trying to leave by clicking the browser’s back button. This worked well on product pages where people were comparing options.

For mobile users, I experimented with the Mobile Scroll-Up trigger. It displayed popups when someone scrolled up quickly, which often signals they’re about to leave.

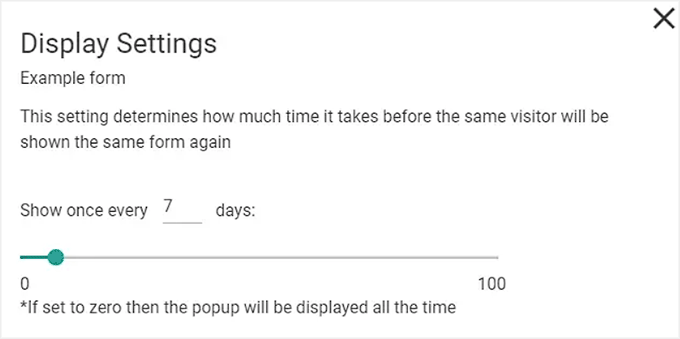
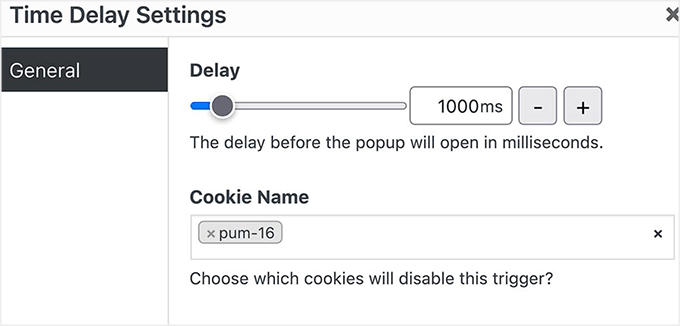
Additionally, the cookie management tools helped me avoid annoying repeat visitors. I set cookies to prevent showing the same popup multiple times within a set period.

Configure cookie management settings

I also used the advanced targeting rules to show different popups based on pages, categories, and products.

Other than that, the integration with WordPress form builders like WPForms and Gravity Forms was seamless. I built popups with embedded forms without needing extra setup.

What I didn’t like about the plugin was its interface, which wasn’t as visual as drag-and-drop builders. You’ll spend more time in settings panels than dragging elements around.

Why I Recommend Popup Maker: It gives you precise control over popup behavior. Plus, Popup Maker integrates deeply with WordPress tools you already use.

Other WordPress Exit-Intent Plugins I Tested

If you’re looking for a few more options, there are additional popup plugins that didn’t make the top 5 but can still be useful for certain websites.

I’ve tested these myself, and while they’re not as feature-packed as the top picks, they can still be a good fit depending on your site’s needs:

6. OptiMonk – Best for Multi-Format, Behavior-Driven Popups

OptiMonk
  • The good: Advanced personalization, multiple popup types (slide-ins, interstitials, lucky wheel), and behavioral triggers.
  • The bad: Limited integrations with niche marketing tools; advanced targeting rules have a learning curve.
  • Best for: Highly targeted, multi-format exit-intent popups that reduce cart abandonment and recover leaving visitors.

7. Popupsmart – Best for Multi-Step, Gamified Popups

Popupsmart
  • The good: Multi-step popups to collect extra visitor information, inactivity sensors, advanced targeting, and detailed analytics to optimize campaigns.
  • The bad: Limited animation options; some templates might require a few tweaks to look good on mobile.
  • Best for: eCommerce stores or websites that want engaging, multi-step popups.

8. Elementor Pro – Best For Dynamic, Personalized Popups

Elementor
  • The good: Popups can pull dynamic content directly from your site, advanced targeting rules, trigger-based animations, and a wide variety of templates.
  • The bad: No built-in analytics—requires third-party tools; advanced features can take time to master.
  • Best for: Store owners, bloggers, or membership sites that want exit-intent popups showing personalized product recommendations, posts, or membership info.

Alternative: Bloom – Best for Elegant Email Optins (No Exit Intent)

Elegant Themes
  • The good: Highly responsive popups and optin forms, seamless email marketing integrations, and content-locked opt-ins to capture leads.
  • The bad: No exit intent technology.
  • Best for: Bloggers and eCommerce stores who want visually appealing exit-intent popups.

What Is the Best Exit-Intent Popup Plugin for WordPress?

After extensive testing, I have concluded that OptinMonster is the best exit-intent popup plugin for most users. It offers the most accurate exit detection, powerful targeting options, and detailed analytics that help you convert abandoning visitors into leads and customers.

If you want advanced control within WordPress, Thrive Leads is ideal. For businesses needing a complete CRM-driven marketing platform, HubSpot Marketing Hub is excellent.

To get started quickly, try OptinMonster and create your first exit-intent popup today.

Frequently Asked Questions About Exit-Intent Popup Plugins

What is an exit-intent popup?

An exit-intent popup detects when someone is about to leave your site and displays a targeted message to capture their attention before they go.

Do exit-intent popups work on mobile devices?

Yes. Modern plugins like OptinMonster and Popup Maker use scroll-up detection and other mobile-specific triggers to catch visitors on phones and tablets.

Which exit-intent popup plugin is easiest for beginners?

OptinMonster offers the easiest setup with a drag-and-drop builder and hundreds of templates, making it simple for beginners to create effective popups.

Can exit-intent popups reduce cart abandonment?

Yes, they are specifically designed to reduce cart abandonment by showing targeted offers or discounts when visitors are about to leave checkout pages.

Do I need a paid plan to use exit-intent features?

Most plugins require a paid plan for full exit-intent functionality. OptinMonster requires the Pro plan, Popup Maker requires a premium extension, and Poptin’s free plan has limited popups.

Which exit-intent plugin works best with WooCommerce?

Popup Maker integrates deeply with WooCommerce and lets you target specific product categories. Poptin and OptinMonster also work well with eCommerce stores.

More Resources for Creating Popups in WordPress

If you found this guide helpful, you might also enjoy these related WPBeginner articles:

If you liked this article, then please subscribe to our YouTube Channel for WordPress video tutorials. You can also find us on Twitter and Facebook.

The post Best Exit-Intent Popup Plugins for WordPress: I Tested 9, Recommend 5 first appeared on WPBeginner.


from WPBeginner https://ift.tt/WJaXPp6
More links is https://mwktutor.com
Friday, 19 December 2025

How I Get More Customer Reviews (12 Easy Tips You Can Try Too)

Getting customers to leave reviews isn’t always easy, even when they’re happy with your product or service.

Without enough positive reviews, your business can look less trustworthy and may even struggle to rank in local search results.

The good news is that you don’t need to be pushy or tech-savvy to get great feedback from real customers.
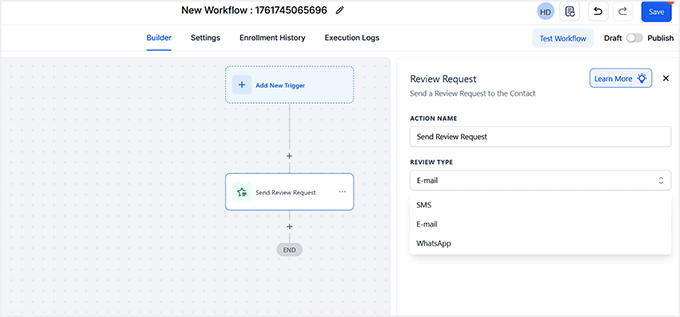
In this guide, I’ll show you how I consistently get more customer reviews using simple, beginner-friendly tips that anyone can follow.

You’ll learn how to ask for reviews naturally, automate follow-ups, and display them beautifully on your website to attract even more buyers.
Get More Customer Reviews (Easy Tips You Can Try Too)

💡Quick Answer: How to Get More Customer Reviews

In a hurry? Here are quick tips you can apply immediately to start collecting more reviews:

  • Ask right after purchase or project completion. Customers are happiest and most likely to leave a review.
  • Send a friendly email reminder 7–10 days later using an automation tool like FunnelKit Automations (physical products) or Uncanny Automator (digital products).
  • Showcase existing reviews on your site with Smash Balloon to inspire new feedback.
  • Encourage ongoing engagement with loyalty programs, points, or small policy-compliant incentives.

Why Do Customer Reviews Matter?

Customer reviews are a big deal because they can shape how people see your business — and whether they decide to buy from you.

Here’s why they’re so important:

  • Build Trust and Credibility: When someone visits your website for the first time, they want to know if they can trust you. Honest reviews from real customers give instant reassurance.
  • Boost Your Local SEO: Reviews don’t just improve your reputation — they help Google notice you and recommend you to people in your local area. The more positive feedback you have, the higher your business can show up in local search results.
  • Increase Conversions With Social Proof: Reviews act like little nudges. When visitors see that others have had great experiences, they’re more likely to make a purchase, sign up, or reach out. It’s proof that your product or service really works.

For example, all of our partner brands showcase real user testimonials on their websites. This simple addition has helped them build trust, keep their audience engaged, and show that their products really deliver.

How to Create a Customer Review Form in WordPress

Before you start collecting reviews, you’ll need an easy way for customers to share their feedback. That’s where WPForms comes in.

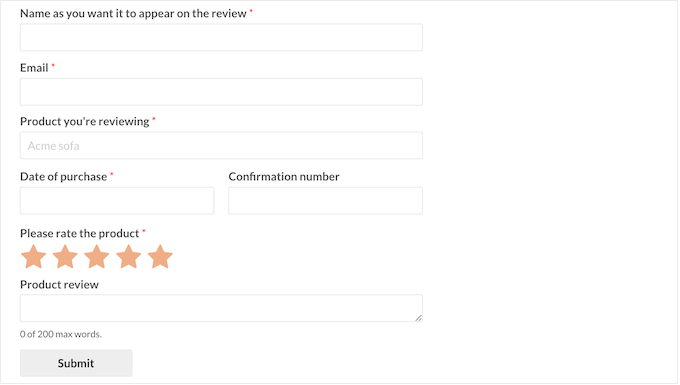
It’s hands down the best drag-and-drop form builder for WordPress. You can use it to create a customer review form in just a few minutes, complete with star ratings, comment boxes, and custom fields — all without writing a single line of code.

WPForms

👉 To get started, check out our step-by-step tutorial on how to create a client feedback form in WordPress.

Once your form is ready, you’ll have a dedicated place for customers to leave their reviews — making the next steps of collecting feedback even easier.

WP Forms testimonial template

With that in mind, let’s jump into my beginner-friendly tips for collecting more reviews. You can also use the links below to skip ahead to a specific tip:

12 Proven Tips to Get More Customer Reviews

Collecting reviews doesn’t have to be a guessing game. With a few simple strategies, you can make it super easy for customers to share their feedback.

I’ve put together 12 proven tips that have worked well for our partner brands and can work for you, too.

Let’s dive in and start turning happy customers into glowing reviews.

1. Ask Right After Completing a Purchase or Project

The best time to ask for a review is right after a customer buys something or you finish a project. That’s when they’re happiest and most willing to share feedback.

I’ve found that adding a review request to the thank-you page works surprisingly well. This is the page customers see immediately after placing an order, submitting a form, or booking a service.

It works great for WooCommerce stores, membership sites, online courses, agencies, photographers, and pretty much any business with a checkout or confirmation step.

With SeedProd, you can create a custom thank-you page in just a few minutes. It is the best WordPress page builder that has ready-made templates and even includes a WPForms block for integrating your survey form.

SeedProd website

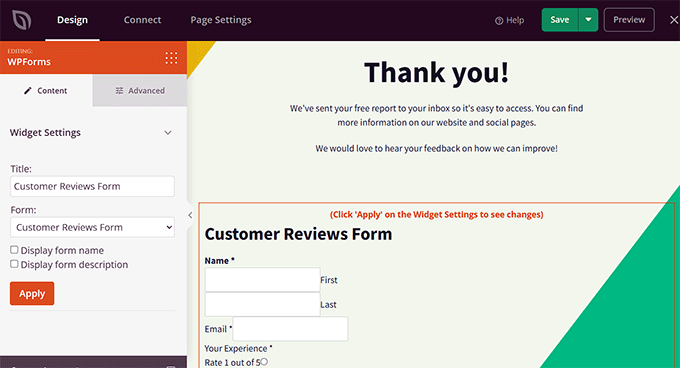
This makes it super easy to embed your customer review form directly on the thank-you page, so customers can leave feedback without clicking a separate link.

If you are interested, take a look at our tutorial on how to create thank-you pages in WordPress.

Thank you page with customer reviews form in SeedProd

Of course, not everyone will leave a review instantly — and that’s where automated emails help.

You can send a friendly thank-you message along with the customer’s receipt and include a quick review request. For WooCommerce stores, FunnelKit Automations is one of the best tools to do this.

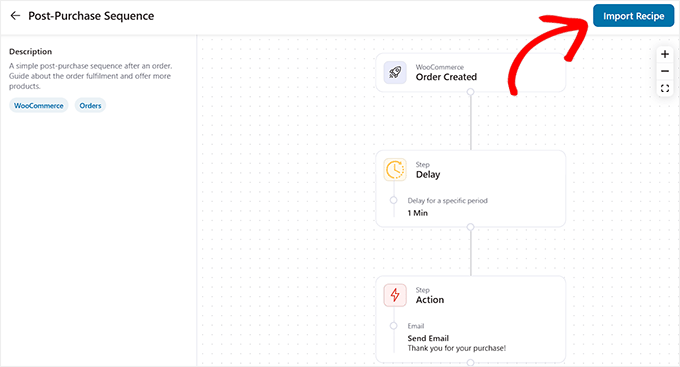
It includes a pre-built post-purchase email sequence that lets you easily add a link to your review form. This keeps everything fully automated and reminds customers when they’re most likely to respond.

Click the Import Recipe button in Funnelkit

I recommend checking out our tutorial on how to create post-purchase surveys in WordPress to set this up step-by-step.

2. Request Reviews After Positive Customer Support Interactions

Some of the best reviews come from customers who have had a great support experience. Across our brands, we like to reach out right after resolving a ticket or when a customer praises our team because they’re happy, engaged, and much more likely to leave a review.

Several popular helpdesk plugins let you easily send review requests after positive customer interactions. For instance, with HelpScout, you can set up a simple workflow to follow up automatically after a ticket is resolved.

Tools like FollowUpThen let you schedule a friendly reminder to send a review request, so nothing slips through the cracks.

Send a review request with HelpScout

Other helpdesk platforms, like Zendesk, Freshdesk, and HubSpot Service Hub, offer similar features to automate this process.

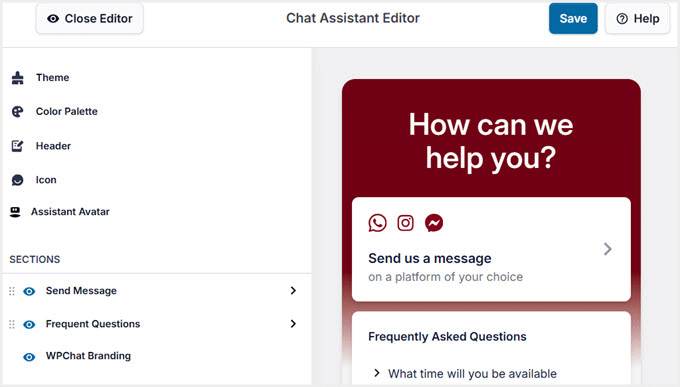
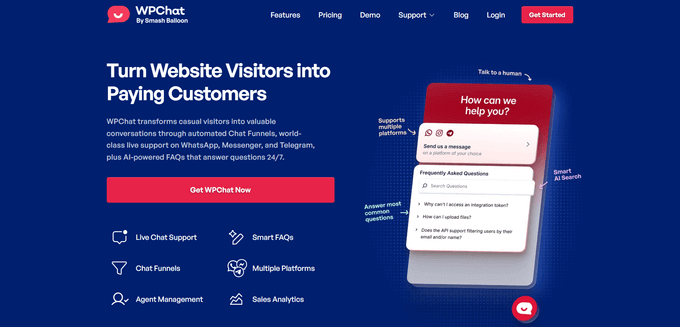
If your support includes live chat, then you can use WPChat — a powerful WordPress live chat plugin that lets your agents talk to visitors in real time using platforms like WhatsApp, Messenger, and Telegram.

WPChat

Your support agents can ask for reviews right after helping a customer and share a link to your review form instantly. Reaching out while the experience is still fresh makes customers much more likely to leave a thoughtful, positive review.

To get started with WPChat, see our guide on how to add free live chat in WordPress.

Customize chat widget in WPChat
3. Follow Up a Few Days Later

Sometimes customers don’t leave a review immediately because they’re busy, distracted, or need a little time to experience your product. That’s why sending a gentle reminder 7–10 days after delivery can make a big difference.

By then, physical products have usually arrived, and digital products have had time to be used, so your customers can give more thoughtful, accurate feedback.

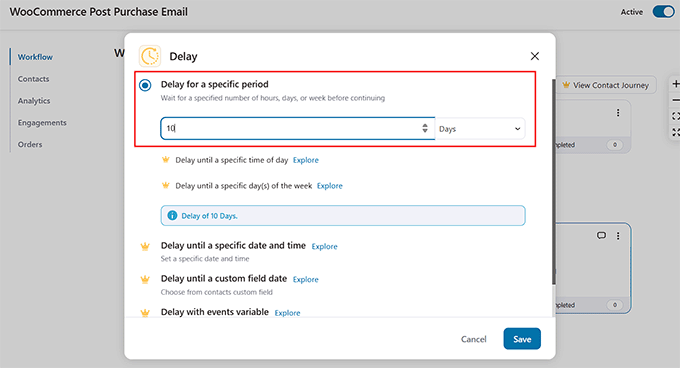
You can automate this process to save time. For WooCommerce physical products, I recommend FunnelKit Automations, which lets you create post-purchase email sequences with built-in review requests.

It’s a great choice because it can use your store’s shipping and delivery data to time the follow-up email perfectly.

Set a delay period for post purchase review request email in Funnelkit Automations

For digital products, Uncanny Automator works great.

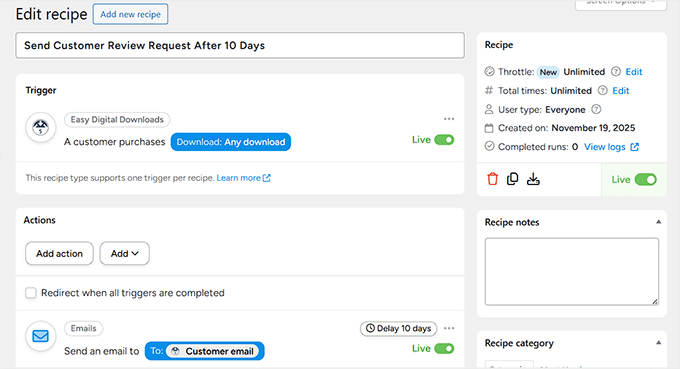
It connects with popular plugins and can trigger a review request after a user completes a course, downloads a file, or makes a purchase through Easy Digital Downloads.

Create post purchase review request recipe in Uncanny Automator

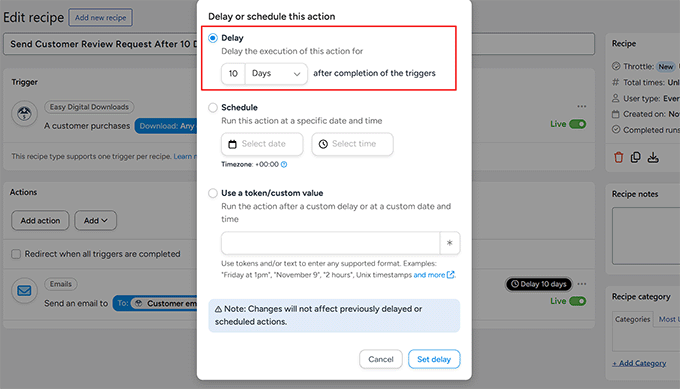
You can also easily add a delay between the trigger and the action by clicking the ‘Delay’ link in the recipe editor.

It opens a simple prompt where you can set how long to wait before the email is sent—for example, 3 days, 1 week, or a custom timeframe.

This ensures your follow-up hits at the perfect moment: after customers have had time to use your product, but while the experience is still fresh.

Set a delay period for post purchase review requests in Uncanny Automator

💡Pro tip: Keep your reminder friendly and short. A simple “We hope you’re loving your purchase! If you have a moment, we’d really appreciate your feedback” works wonders.

To find out how to do this, take a look at our tutorial on creating automated workflows in WordPress.

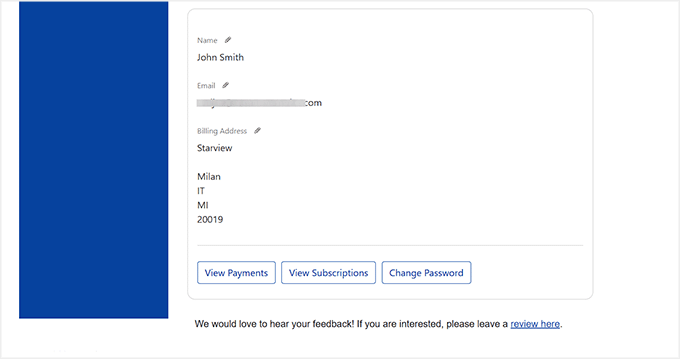
4. Add a Review Section in Customer Accounts

Another easy way to get more reviews is to let customers leave feedback directly from their account dashboard on your website.

I’ve noticed this works especially well on membership sites and online learning platforms, where users log in frequently and engage with your content over time.

Giving them a convenient spot to leave a review right inside their account increases the chances they’ll actually do it.

Add a review link on accounts page

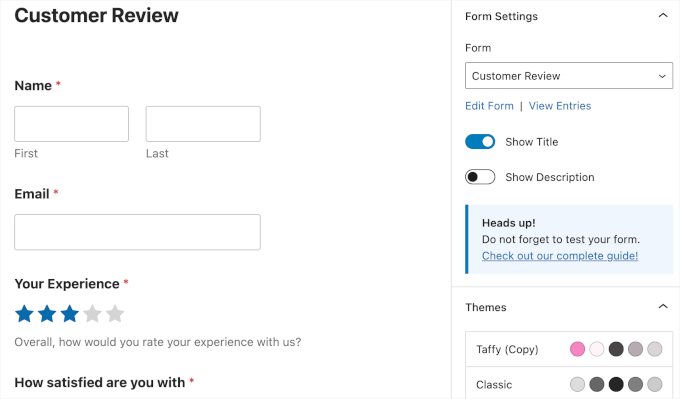
You can easily set this up in WordPress by opening the customer account page in the block editor. From there, just add a WPForms block with your review form.

For the best results, place it somewhere visible but not intrusive — for example, near the top of the dashboard, on a “My Account” or “Dashboard” tab, or under recent purchases or course progress.

If you don’t know how to do that, check out our guide on embedding WordPress forms.

WPForms form settings in block editor

If you prefer, you can also link to the review form rather than embed it directly. This works well if you want to keep the dashboard clean or direct users to external review sites like Google, Yelp, or Facebook.

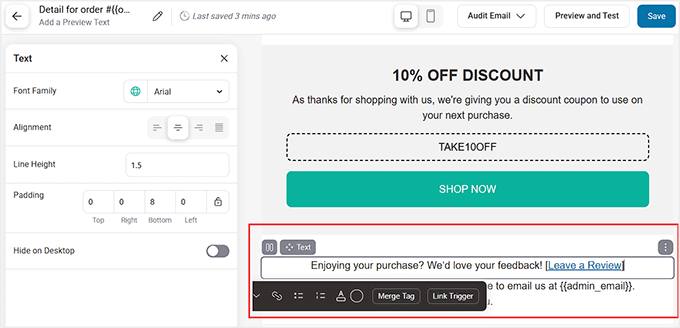
5. Add Review Links to Email Signatures and Order Receipts

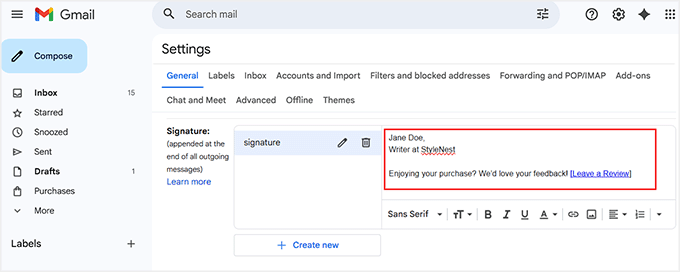
One of the easiest ways to get more reviews is to include a ‘Leave a Review’ link in your team’s email signatures.

Every email your team sends, whether it’s a support reply, invoice, or general correspondence, becomes an opportunity to remind customers to share feedback.

This works because it’s subtle, consistent, and reaches customers naturally without feeling pushy.

You can set this up quickly in Gmail (or most email clients) by going to the Settings page and scrolling down to the ‘Signature’ section. Then, create a short, friendly line like:

“Enjoying your purchase? We’d love your feedback! [Leave a Review]”

Add customer reviews link to email signature

💡Pro Tip: I recommend using the WPBeginner Email Signature Generator to create a polished signature for your team.

While the free tool doesn’t have a built-in field for review links, you can add other information like your name, title, and social profiles, then copy and paste the generated signature into Gmail.

Once in Gmail, simply edit it to include your review link. This way, you get a professional-looking signature that also encourages reviews.

Another great spot for review requests is order receipts. Customers usually check their receipt right after a purchase, so it’s the perfect time to remind them you value their experience.

A quick, friendly prompt can encourage them to leave feedback while the experience is still fresh.

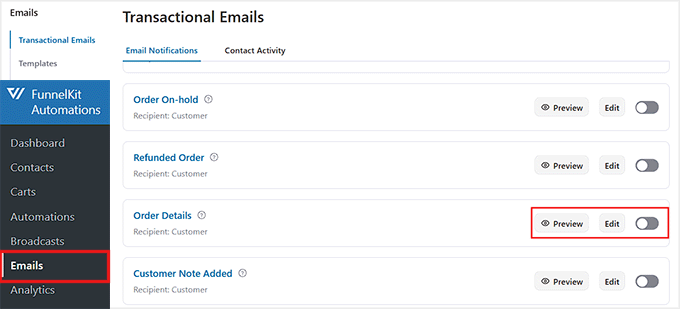
If you’re using FunnelKit Automations, it automatically creates an order details email notification for WooCommerce. You can easily customize this email to include your review request.

Simply go to the FunnelKit Automations » Settings » Emails page from the WordPress dashboard and click the ‘Edit’ link next to the ‘Order Details’ option.

Click the Edit link for the Order Details email in FunnelKit Automations

This will open the email editor, where you can drag a ‘Text’ block right after the order details, and add your review sentence with a link to your feedback form.

Once you’re happy with it, click ‘Save’ to store your changes.

Add review link to order receipt in FunnelKit Automations

Then, go back to the Emails page and toggle the switch next to ‘Order Details’.

FunnelKit will automatically send your order receipt emails with the review link now included. This makes it effortless to turn every purchase into an opportunity for feedback.

Activate order details email in FunnelKit Automations
6. Use QR Codes to Make Leaving Reviews Effortless

If you have customers who interact with your business offline — like in-store shoppers, event attendees, or people receiving physical products — then a QR code can make leaving a review super easy.

You could print the QR code on receipts, packaging, brochures, or even flyers. When customers scan it with their phone, they’re taken directly to your review form or landing page, making the process quick and effortless.

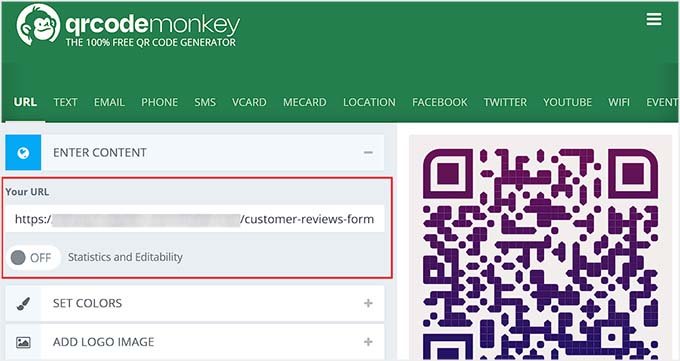
A tool I like for this is QRCode Monkey. It’s completely free and lets you create a QR code that links to any URL.

To use it for reviews, you need to first create a dedicated customer review page. Once your page is ready, just copy its URL and paste it into the QR code generator.

Add reviews page URL to generate a QR code

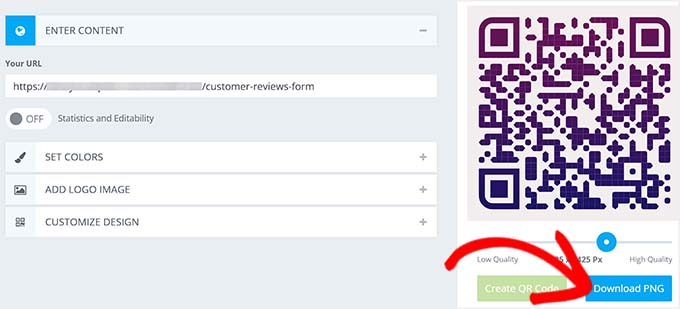
It will create a scannable QR code that takes customers straight to your review form. You can download the QR code by clicking the ‘Download PNG’ button.

Then add the QR code somewhere noticeable, such as at the bottom of receipts, on product inserts, or in a brochure.

Download QR code for reviews page

I also recommend adding a short prompt nearby, like ”Scan here to leave a quick review — it only takes a minute!‘, to draw attention and encourage customers to actually take action.

This simple step turns even offline interactions into valuable opportunities for feedback.

7. Showcase Reviews Prominently on Your Website

You should make sure your customer reviews stand out and catch visitors’ attention as soon as they land on your website.

For the best results, I recommend placing these reviews on your homepage, product pages, and even the checkout page to build trust at key decision points.

When visitors see authentic, positive testimonials, they’re reminded that other people are sharing their experiences, which often motivates them to add their own review.

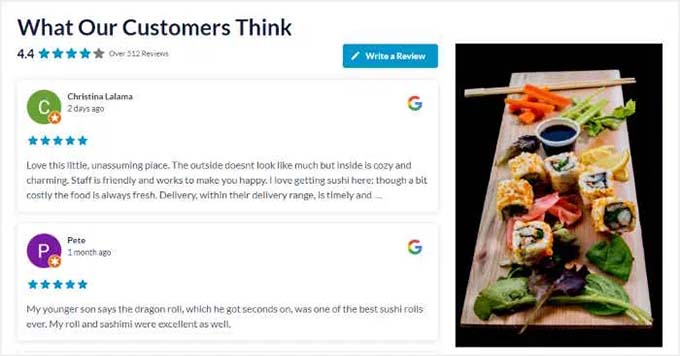
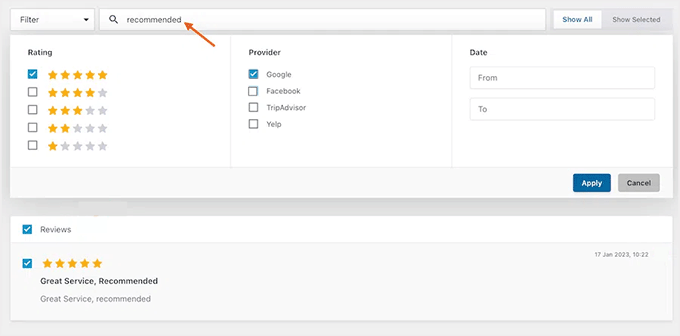
Preview of filtered Google Reviews shown with Smash Balloon

For WordPress users, Smash Balloon Reviews Feed Pro is the best reviews plugin for managing and displaying customer reviews.

It gives you full control over which reviews appear, lets you filter by star rating, and offers flexible display options, such as carousels or grids.

This makes it easy to showcase reviews in a professional, engaging way without touching a single line of code.

Filter reviews using Smash Balloon moderation feature

For step-by-step instructions, see our guide on displaying Google, Facebook, and Yelp reviews in WordPress.

💡Alternative: If you want to collect and display reviews from your own customers rather than just social platforms, then Thrive Ovation is a solid option. It integrates smoothly with WordPress and provides similar customization features for managing testimonials.

For details, see our complete Thrive Ovation review.

8. Collect Reviews with On-Site Popups

Another easy way to increase the number of reviews you get is by asking visitors at the right moment. On-site popups let you target engaged users, so you can collect quick feedback without interrupting their experience.

You can trigger these popups based on time spent on a page, scroll depth, or when a visitor views specific product pages. This ensures you’re only asking users who are already interested, which leads to more reviews and higher-quality responses.

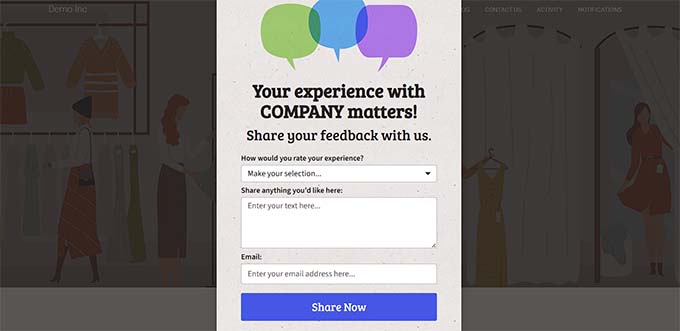
Preview of popup asking for review

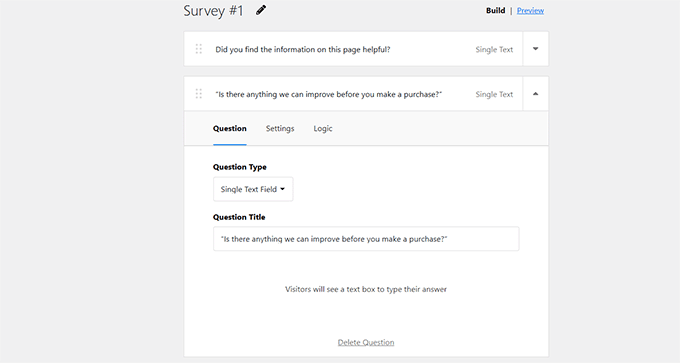
UserFeedback is one of the best survey plugins for this purpose, and it’s the tool I recommend if you want a quick, non-intrusive popup that blends naturally into your site.

You can create simple star ratings, short questions, or lightweight surveys, and place them on the pages that matter most.

If you want to see how it works, you can follow our step-by-step tutorial on how to create a survey form in WordPress.

Create customer reviews popup in UserFeedback

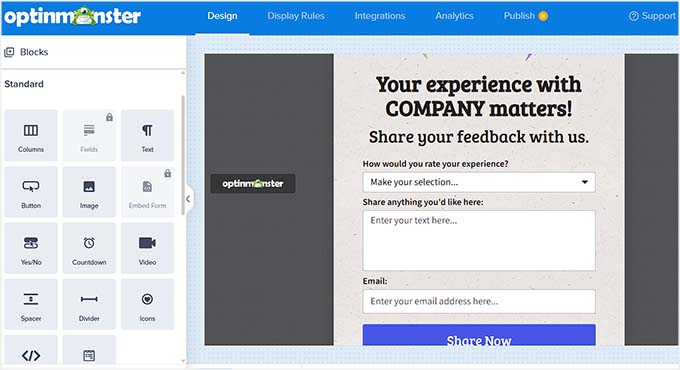
For more control over who sees your popups—and exactly when—OptinMonster is the better fit. It includes advanced targeting rules such as scroll-depth triggers, page-level display, device targeting, and exit-intent detection.

This makes it ideal for stores that want to personalize review requests based on user behavior or show popups only during key moments in the buyer journey.

Create customer reviews popup in OptinMonster

To dive deeper into what’s possible, you can check out our full guide on how to create popups in WordPress.

💡 Pro Tip: When creating on-site review popups, keep the questions short, clear, and easy to answer. For example:

  • “How satisfied are you with your purchase?”
  • “Would you recommend us to a friend?”
  • “What’s one thing we could improve?
9. Offer Incentives to Encourage Reviews

Giving customers a little nudge can go a long way when it comes to collecting reviews, but you don’t have to offer money to make it effective.

I’ve found that non-monetary incentives work really well and feel natural for both your business and your customers. Think along the lines of early access to new products, exclusive content, or special recognition in your community.

📌Important: When offering incentives, make sure to do so only for reviews collected on your own website.

Third-party platforms like Google, Yelp, and Trustpilot have strict rules against incentivized reviews, so offering rewards there can put your business at risk.

Instead, focus on creating small perks or recognition for customers who leave feedback directly on your site, keeping everything transparent and compliant.

If you want to go the coupon or discount route, you can set up rewards for leaving a review without violating platform rules.

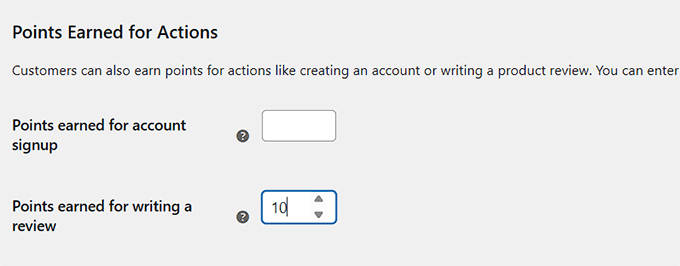
Tools like WooCommerce Points and Rewards let you give points for actions such as writing a review, which customers can later redeem for discounts.

Earn points for writing a review in WooCommerce Points And Rewards

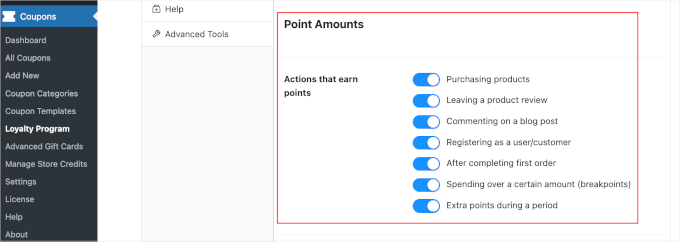
For stores that want a purpose-built solution, Loyalty Program by Advanced Coupons is my top recommendation. It’s specifically designed to reward customers for leaving reviews, as well as for other actions such as purchases or social shares.

You can easily create custom reward rules, track points, and automate notifications to let customers know when they’ve earned something for their feedback.

Point amounts toggle

To get started, see our tutorial on how to create a loyalty program in WooCommerce.

10. Encourage Reviews on Social Media

Social media is a great way to get more reviews while also engaging your audience. I’ve found that when you ask followers to share their experiences in a friendly way, it not only encourages participation but also strengthens your community.

You can run simple campaigns asking people to leave a review or share a story about how they use your product.

Alternatively, you can run interactive campaigns with RafflePress. This powerful giveaway plugin allows you to create contests or giveaways that encourage followers to leave reviews, share posts, or engage with your content.

You can set up simple rules, track entries, and even integrate it with email marketing tools.

For example, you could run a “Share Your Experience” campaign where participants submit a review or testimonial to earn a chance to win a small prize. This creates a fun, non-intrusive way to boost reviews and engagement.

Create a review giveaway with RafflePress

For step-by-step instructions, take a look at our tutorial on how to run a social media contest to grow your site.

11. Collect Video Testimonials

Video testimonials are one of the most powerful ways to build trust with potential customers. When people see real customers talking about their experience, it creates an instant connection and makes your product or service feel more authentic.

You can reach out to your top customers and ask them to submit short video reviews. These videos can then be displayed on your homepage, sales pages, or dedicated testimonial pages to boost credibility and encourage more purchases.

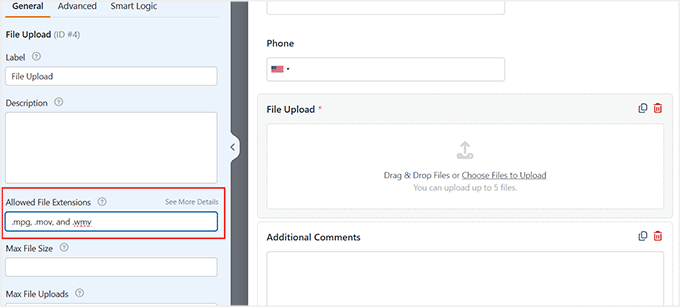
To make collecting videos easy, WPForms is a great choice. You can create a simple upload form where customers can submit their videos directly from your website.

Create a file upload form for video testimonials

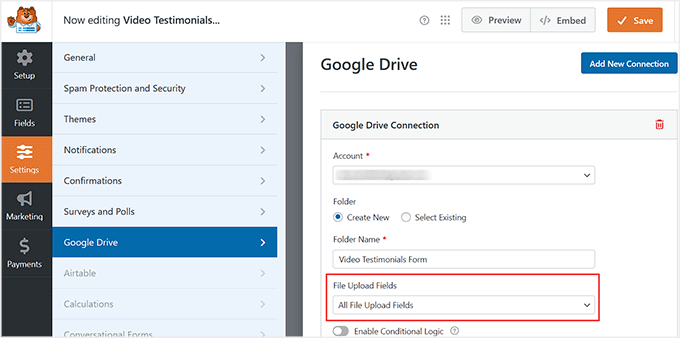
However, uploading videos directly to WordPress can put a heavy load on your server, especially on shared hosting. That’s why I highly recommend using the Google Drive or Dropbox addons offered by WPForms.

Once activated, these addons connect your website to your preferred cloud storage, and all videos submitted by your users are safely saved there.

Connect Google Drive to a video testimonial form in WPForms

This setup keeps your website running smoothly while making it easy to manage user-submitted videos. You can then select the best ones from your storage to display on your reviews page so that visitors can watch them.

💡Pro tip: Short, authentic videos usually perform better than long, overly polished ones. Encourage customers to speak naturally about their experience and highlight one or two things they loved most about your product or service.

12. Track and Improve Your Review Strategy

Collecting reviews is great, but understanding what’s working—and what’s not—is where the real magic happens. I always make it a point to monitor how many reviews I’m getting, where they’re coming from, and which products or pages are generating the most feedback.

This helps me fine-tune my timing, messaging, and tools to achieve even better results over time.

MonsterInsights is my go-to tool for tracking review submissions in WordPress. By integrating it with your WordPress forms or popups, you can see which pages drive the most reviews, identify trends, and uncover which campaigns are truly effective.

It’s also the easiest way to set up Google Analytics without touching a single line of code, giving you reliable insights without the headache.

The MonsterInsights Google Analytics plugin for WordPress

If you want a full walkthrough, check out our guide on how to set up WordPress form tracking in Google Analytics.

Beyond numbers, it’s equally important to listen to the feedback in the reviews themselves. Customers often share valuable insights, suggestions, or pain points you might not hear anywhere else.

Acting on this feedback not only improves your products or services but also shows your customers that you genuinely care, which can encourage even more positive reviews in the future.

By combining analytics with active listening, you can continuously refine your review strategy, make smarter decisions, and turn customer feedback into a powerful growth tool.

❌ Common Mistakes to Avoid When Asking For a Review

Getting more customer reviews works best when the process feels natural.

I’ve noticed a few mistakes that can make it harder to get feedback, so here’s what to watch out for:

  • Asking Too Soon or Too Often – If you ask a customer for a review before they’ve had enough time to experience your product or service, they may not have much to say. Waiting a few days or a week can lead to more thoughtful, helpful feedback.
  • Offering Direct Monetary Rewards – Giving money or gift cards for reviews can violate the rules on third-party platforms like Google or Yelp. However, offering small incentives, such as loyalty points or discount coupons, for reviews collected directly on your website is a common and acceptable practice.
  • Using Automated Messages Without Personalization – I’ve found that reviews get much better responses when you add a personal touch, like mentioning the customer’s name or the product they bought. A simple, friendly note goes a long way.
  • Making it Hard For Customers to Leave Feedback – Long or confusing forms, missing links, or unclear instructions can stop customers from leaving a review, even if they want to. Keep your process simple and easy to follow.
  • Failing to Follow-Up – Sometimes, a gentle reminder a few days after a purchase or service can make a big difference. Following up shows you value their feedback and gives customers another chance to leave a review.

Focusing on these points will help you collect more honest, helpful reviews without making customers feel pressured.

🤝 How to Handle Negative Reviews Gracefully

Even if you follow all the best practices, sometimes reviews won’t be positive. Negative feedback happens to every business, and it’s completely normal.

The key is how you respond. Handling criticism gracefully can actually turn a tricky situation into a win for your brand and even encourage more customers to share their experiences.

Here are some tips:

  • Stay Calm And Professional: It’s easy to feel defensive, but responding politely and thoughtfully shows that you value feedback. A friendly, composed response speaks volumes to both the reviewer and anyone else reading your reviews.
  • Offer to Resolve The Issue Privately: Suggest moving the conversation to email or direct messages to fix the problem. This keeps the discussion constructive and helps avoid public back-and-forth that could escalate.
  • Once Resolved, Ask if They’d Consider Updating Their Review: After the customer’s concern is addressed, politely invite them to revise their review to reflect the updated experience. Many are happy to do so when they see the effort you put into resolving the issue.

I’ve found that responding to negative reviews with empathy and a clear solution not only helps repair the relationship but also shows other customers that you genuinely care.

Using a customer support plugin can make this process much easier. These tools let you track tickets, respond quickly, and even set up workflows to follow up after issues are resolved.

If you want, check out our guide on the best customer support plugins for WordPress to see the top options for managing support efficiently.

Frequently Asked Questions About Collecting Customer Reviews

Even with all these tips, you probably still have a few questions.

I’ve answered the most common ones I get from business owners, keeping it simple and actionable:

Is it legal to offer rewards for reviews?

Yes, but only if you are collecting reviews on your own website and clearly disclose it.

Offering rewards for reviews on third-party platforms like Google, Yelp, or Trustpilot is against their rules and can result in penalties. Stick to site-hosted reviews for incentivized programs.

How many reviews should I get per month?

Focus on consistency rather than quantity. Even adding 5–10 new reviews each month can help improve your search rankings and gradually build trust with potential customers.

How do I ask for reviews naturally?

The key is to be friendly and personal. For example, sending a message like, “Your opinion helps others — would you mind sharing your thoughts?” feels more genuine than a generic automated request.

Where should I focus on getting reviews first?

Start with platforms that directly affect your visibility, such as Google Business Profile and Facebook. Once you have a solid foundation there, you can expand to industry-specific sites like Tripadvisor, Trustpilot, or other niche review sites relevant to your business.

Remember, any incentives should only apply to reviews on your own website, not third-party platforms.

What’s the best way to handle negative reviews?

Always respond politely, acknowledge the customer’s concern, and offer to resolve the issue offline. Using tools like WPForms or UserFeedback can help you collect private feedback before it becomes a public complaint, which often turns unhappy customers into satisfied ones.

I hope this article helped you learn how to collect more customer reviews for your business. You may also want to see our guide on how I turned my WordPress.org reviews into social proof and our top picks for the best customer service tools.

If you liked this article, then please subscribe to our YouTube Channel for WordPress video tutorials. You can also find us on Twitter and Facebook.

The post How I Get More Customer Reviews (12 Easy Tips You Can Try Too) first appeared on WPBeginner.


from WPBeginner https://ift.tt/yqULPi4
More links is https://mwktutor.com