Monday, 9 June 2025

How to Improve User Experience in WordPress (13 Practical Tips)

A few months ago, my friend asked me to look at her WordPress website. Her online store looked great, but she was frustrated because visitors weren’t buying anything. After spending just 30 minutes on her site, I could see exactly why—the user experience was all over the place.

I’ve seen this same problem a lot of times. Small business owners focus so much on making their sites look pretty that they forget about making them easy to use.

The result? High bounce rates, low conversions, and missed opportunities.

That’s why I put together this guide with 13 practical tips to improve your WordPress user experience. These simple changes can dramatically boost your conversions and keep visitors coming back for more.
How to Improve User Experience in WordPress

Why User Experience Matters for Your WordPress Site

User experience (UX) is about how easy and enjoyable it is for visitors to use your WordPress website. This applies whether they’re reading your blog, exploring your services, or making a purchase.

Think about what happens when customers walk into a well-organized store. 🛒

If everything’s easy to find and the checkout is quick, people are more likely to stay longer, browse, and buy.

The same applies to other websites: a clear navigation menu, fast load times, and a clean design keep visitors engaged.

But if your site is confusing, slow to load, or crowded with too many elements, many users will get frustrated and leave. And most won’t come back. In fact, even a one-second delay in page speed can cause conversions to drop by 7%.

That’s why good UX isn’t optional — it’s essential. The right design choices make your site easier to use and help guide visitors toward taking action, whether that’s subscribing to your email newsletter, signing up, or making a purchase.

And the best part? Many of these improvements are easy to set up, even if you’re not a developer. I’ll walk you through the most effective tips in the sections below.

Here’s a quick overview of all the tips I’ll cover in this guide:

Ready? Let’s get started.

Tip #1: Understand Your Users

Before you can improve your WordPress site’s user experience, you need to know who you’re designing for. A great way to start is by creating simple user personas, which are fictional profiles that represent your typical visitors.

For example, if you’re running a WordPress blog targeting busy parents, one of your personas could be “Sarah.” She’s a working mom looking for time-saving tips, easy-to-follow guides, and parenting hacks to manage her busy life.

Having user personas in mind helps you tailor your website’s features and content to better serve your audience. To create one, I recommend trying the free HubSpot Make My Persona tool.
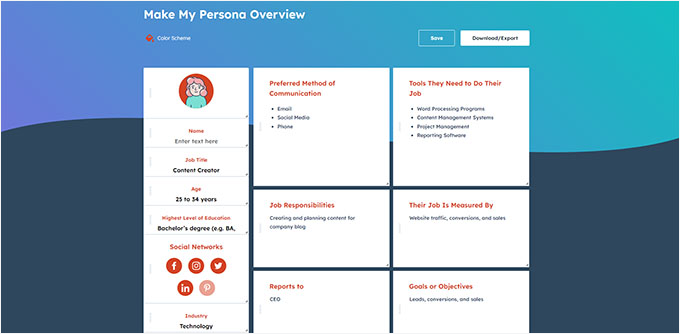
Creating user personas for UX audit

Once you understand who your users are, it becomes easier to make design and content choices that actually help them.

It’s even more important to get direct feedback from your visitors if your site is already up and running. In my experience, even a simple feedback survey can uncover valuable insights about your site’s navigation, design, or content.

You can gather real feedback using tools like UserFeedback. For example, you might create a feedback form that displays across your website so that users can share what’s working (or what isn’t).
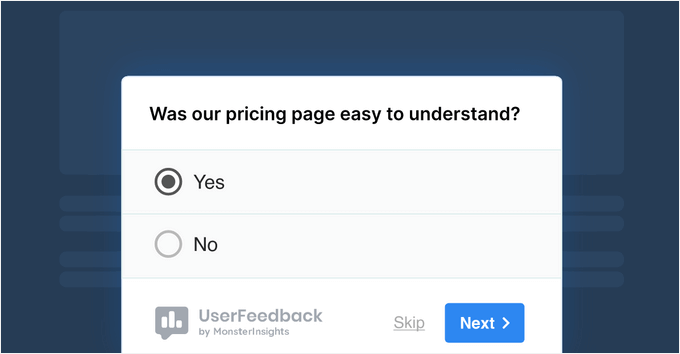
UserFeedback popup poll example

You might ask user experience feedback questions like, “Was this page helpful?” or “What information were you hoping to find?” This way, you collect direct, actionable feedback.

You can also easily create surveys and polls to gather visitor feedback with a tool like WPForms. For instance, you could run a quick poll asking which new features your users would like to see next or set up a short survey with a rating system to learn more about their overall experience.

The more you learn about your audience, the better your UX decisions will be — and the more likely your visitors will be to stick around, explore, and take action.

For more details, we have a full guide on how to choose a target audience.

📝 Insider Tips: At WPBeginner, we use WPForms to create and manage our annual reader survey. Its extensive library of 2,000+ templates, AI tools, and drag-and-drop builder make it incredibly easy to use. You can learn more about its features in our complete WPForms review.

Meanwhile, UserFeedback has helped us set up interactive surveys and understand the needs of our web design customers. It has 20+ questionnaire templates and different question types. See our extensive UserFeedback review for insights into what it can do.

Tip #2: Do a UX Audit

A UX audit is basically a deep dive into your website from a visitor’s point of view. It helps you spot anything that might be confusing, so you can fix it as soon as possible.

One of the first things you’ll want to do is test your site for usability issues. This means checking how easily someone can navigate your site, find what they need, or complete an action.

Even minor issues, like a misplaced or hidden button, can negatively impact the user experience.

I always recommend walking through important steps on your site, like submitting a contact form or making a purchase, just like a first-time visitor would.
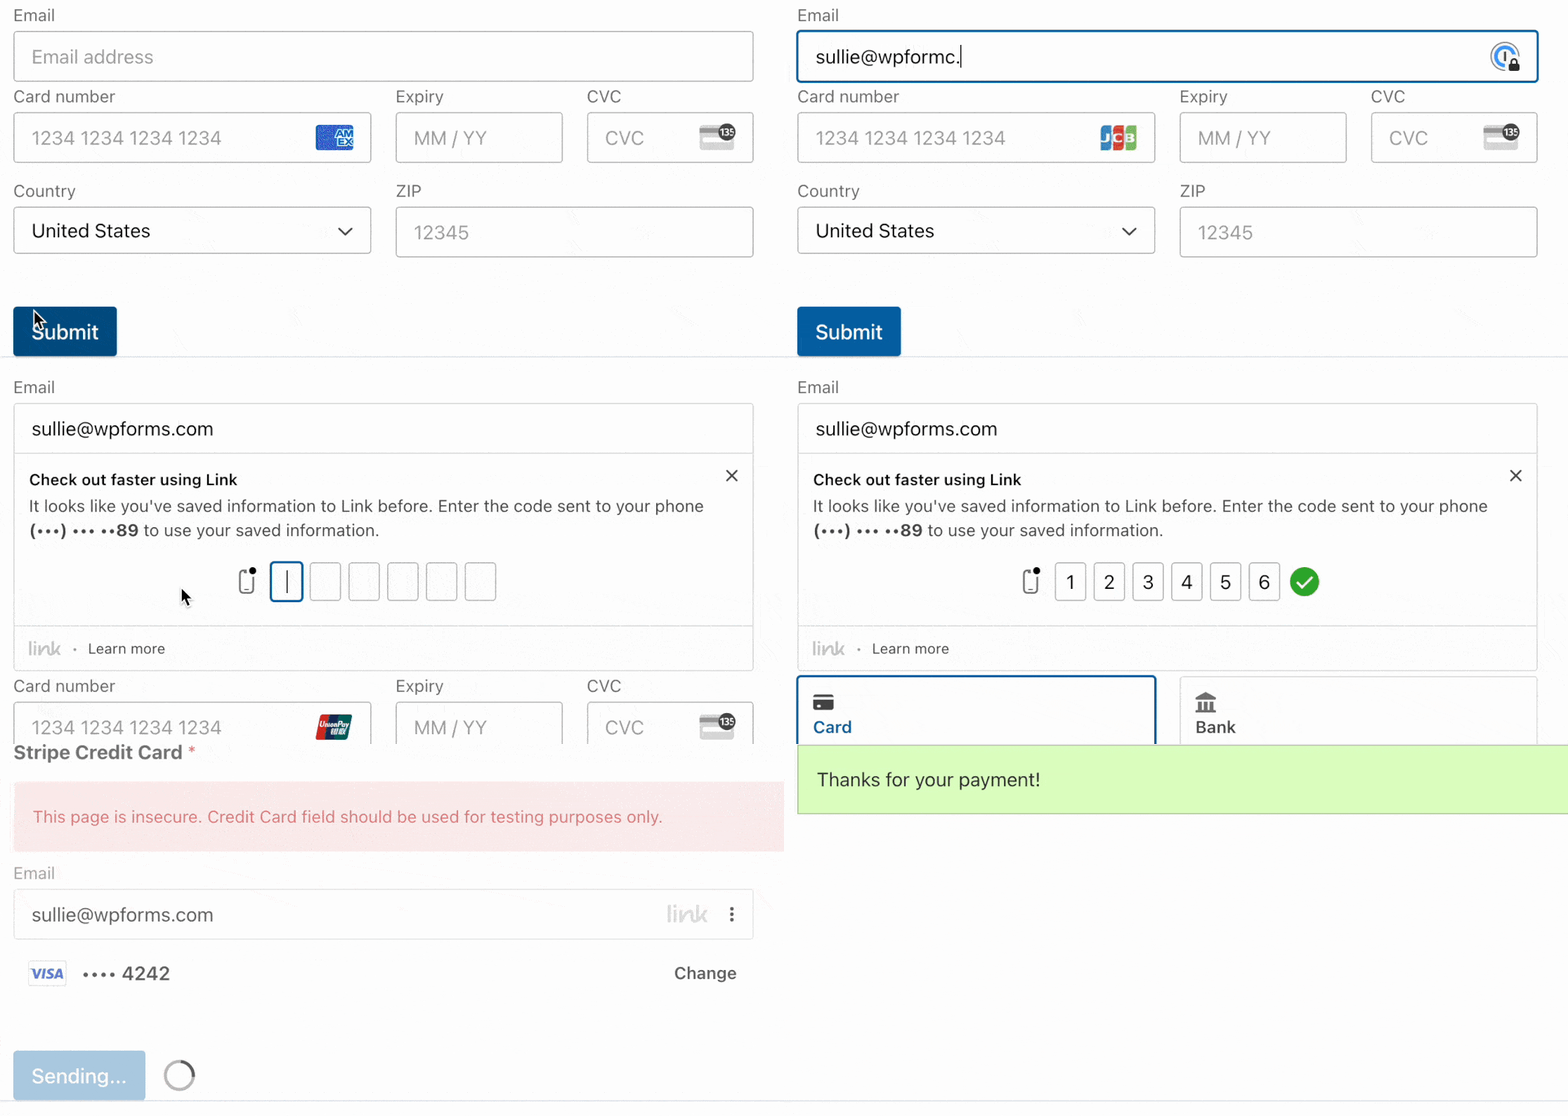
stripe-link-checkout-wpforms

Take note of any steps that feel confusing, slow, or frustrating — these are your pain points and bottlenecks to address.

It’s also a good idea to track the time it takes to go from finding a feature to completing the desired action. This way, you know exactly how much time a user typically takes to convert or complete a specific action.

For a full walkthrough, be sure to check out our expert tips for how to do a UX audit in WordPress.

Tip #3: Use Analytics to Guide UX Improvements

User experience isn’t just about design — it’s also about data. Tracking how users actually interact with your WordPress site helps you make smart decisions that improve usability and drive results.

While Google Analytics (GA) is the gold standard for tracking data, it can be tricky for beginners to set up and navigate. That’s why I always recommend using MonsterInsights.

It’s a user-friendly Google Analytics plugin for WordPress that gives you the insights you need without having to navigate complex reports.

With MonsterInsights, you can track user behavior, set up conversion goals, and improve your site’s performance, all inside your WordPress dashboard. At WPBeginner, our team uses MonsterInsights every day to see this data.

For more insights into its features, see our full MonsterInsights review.
MonsterInsights' homepage

MonsterInsights also lets you keep an eye on key metrics like:

  • Bounce rate: If visitors leave your site right away, it could signal poor content, confusing navigation, or an unprofessional design. Addressing these issues can help keep visitors engaged longer.
  • Time on page: If visitors aren’t sticking around, your content may not be engaging or visually appealing enough. Use this metric to identify pages that need improvement in writing, visuals, or layout.
  • Behavior flow: This shows where visitors go next and where they drop off. If users leave key pages early, it may indicate issues with your site’s structure, navigation, or content. Analyzing this helps improve user journeys by addressing bottlenecks.

These insights are accessible on the MonsterInsights Reports page. They can help you spot what’s working and what needs improvement.

The MonsterInsights Google Analytics plugin for WordPress

For more information, see our guide on WordPress conversion tracking.

Using heatmaps is another powerful way to visualize behavior. Heatmaps and session recording tools like Microsoft Clarity and UserFeedback show you exactly where people click, scroll, or get stuck.

Clicking unclickable element

This is especially helpful for refining navigation paths or identifying parts of your layout that are being ignored.

For more information on this topic, read our guide on how to set up heatmaps in WordPress.

Tip #4: Make Your Site Mobile-Friendly

More than half of all website traffic comes from mobile devices. That means if your WordPress blog or site doesn’t look or work right on a phone, you’re likely losing visitors before they even get to your content.

To prevent this from happening, I always recommend using a responsive WordPress theme. These themes will adjust automatically to different screen sizes — whether someone’s on a tablet, phone, or desktop.

Most modern themes include this feature, but it’s always good to double-check.

In my opinion, Sydney is one of the best responsive themes on the market. It’s also flexible and lightweight, and comes with 17+ starter templates.

It makes building a mobile-friendly site easy, thanks to the 8 mobile-ready header styles, drag-and-drop sections, and full design control.

Sydney Pro Education Theme

Plus, there’s a free version of Sydney that you can use to get started!

Next, just because your website looks fine on a laptop doesn’t mean it’s easy to tap through on a phone. That’s why I suggest avoiding small text, hard-to-click buttons, and menus that are difficult to open.

The good news is that you can preview the mobile layout of your site from your WordPress content editor.

Some page and theme builders, like SeedProd, even let you customize the mobile version of your site from the editor.
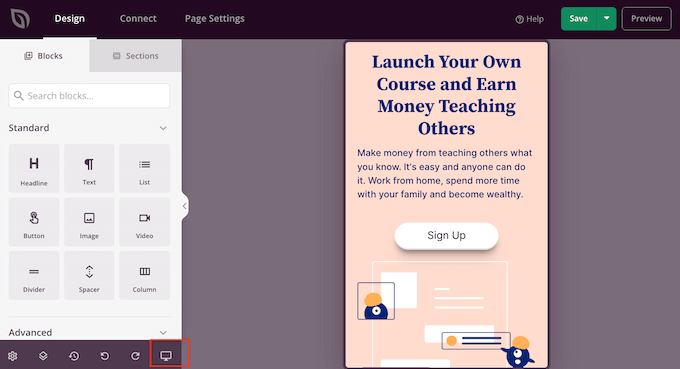
Previewing a custom page on mobile

For more information about this, you can explore our expert tips for creating a mobile-friendly WordPress site.

Tip #5: Improve Accessibility for All Users

Did you know that websites are considered “places of public accommodation”? That’s why the Americans with Disabilities Act (ADA) allows people to file complaints if a website doesn’t meet accessibility standards.

This is a good reason to make sure your site is inclusive for all users, including people with visual, hearing, or motor impairments.

But making your website accessible doesn’t just help people with disabilities. It also improves the user experience for everyone.

One easy accessibility adjustment you can make is adding alt text and titles to your images:

  • Alt text is a short description of an image that screen readers read aloud. This can help visually impaired users while giving search engines more context for better SEO.
  • Image titles appear when users hover over an image, providing additional context.
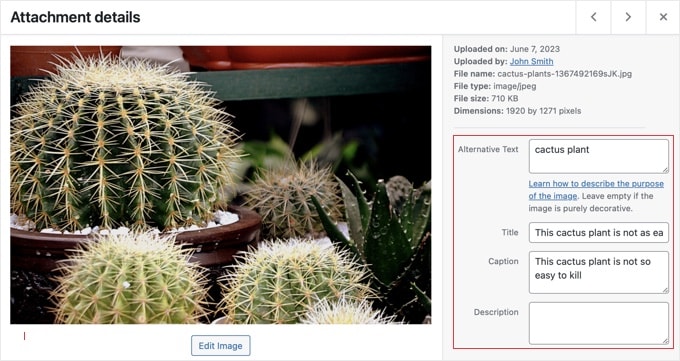
Add alt tag and title via media library

When it comes to fonts, ideally, you’ll want to pick options that are easy to read.

At WPBeginner, we use Proxima Nova for its clean look and readability. It’s sleek, contemporary, and subtly elegant, which is ideal for blogs, portfolios, and media companies.

Another good one is Lato, which you can see on the WPForms website. It’s welcoming and approachable with a balanced design, perfect for mobile apps, retail stores, and eCommerce websites.
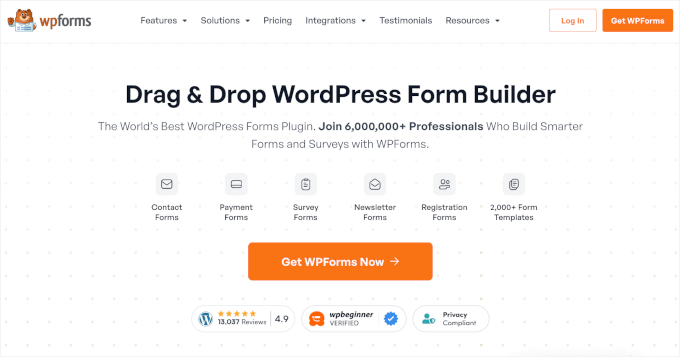
WPForms' homepage

But simply choosing a good font isn’t enough. You also need to make sure there’s enough contrast between the text and the background color.

And even with the right font and contrast, some users may still struggle with reading the text if it’s too small. One simple way to make your site more accessible is by letting visitors resize the text.

All that said, true ADA compliance goes beyond just these basic steps. It involves adhering to the Web Content Accessibility Guidelines (WCAG), which provide a comprehensive framework for making web content accessible to people with disabilities.

For more in-depth insights, check out our guide on how to improve accessibility on your WordPress site.

Tip #6: Simplify Your Website Navigation and Search

Confusing navigation is one of the fastest ways to lose visitors. But the good news is that you can avoid this with an intuitive navigation menu. You’ll want it to be clear, simple, and easy to follow.

You can start by creating a logical menu structure. Stick to familiar terms like “Home,” “About,” “Blog,” “Shop,” and “Contact” so users immediately know where to go.

For example, if you’re running a business website where you sell software, your navigation should make it easy for visitors to learn about your products. In this case, key links might include “Features,” “Solutions,” “Pricing,” and “Resources.”

Plus, you may want to group similar content under dropdowns to avoid cluttering the top menu with too many items.

A mega menu can be particularly helpful for larger sites. This basically consists of multiple dropdown menus to help organize large amounts of content, products, or information.

For example, WPForms uses this menu type in their navigation to neatly group features, tutorials, and resources. This makes it easy for visitors to find what they need quickly.
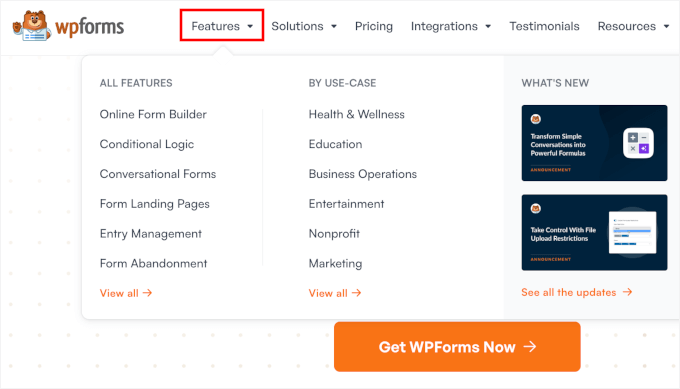
Dropdown menu in WPForms' navigation

For more information, see our guide on how to add a navigation menu in WordPress.

It’s also a good idea to add breadcrumbs, which are small links that show users where they are on your site (like Home > Blog > Article Name).

Breadcrumbs make it easy for visitors to backtrack and are especially helpful for blogs and online stores with lots of content.
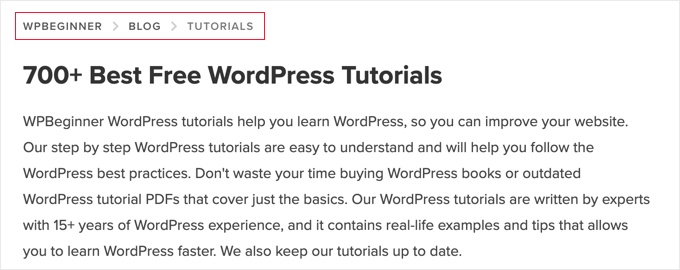
Example of Breadcrumbs on a Category Page

Finally, if you want to provide your visitors with the best possible navigation experience, I suggest optimizing your WordPress search.

The default search function isn’t always the most accurate or helpful. Upgrading it can make a big difference, especially if you have a content-heavy site where users need to quickly find posts, products, or resources.

To do this, I recommend starting by reviewing your site’s search stats. This can show you what visitors are looking for, what they can’t easily find, and whether your current search function is meeting their needs.
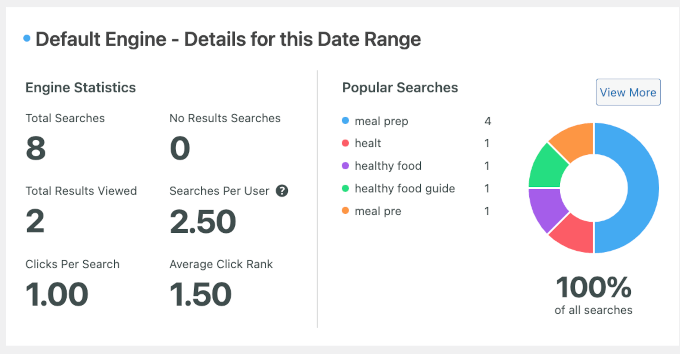
Search analytics from SearchWP Metrics

From there, you can upgrade your WordPress search to deliver faster, more accurate results. Learn more about it in our guide on how to improve WordPress search.

Tip #7: Use Clean, Minimalist Design

A cluttered website can overwhelm your visitors and make it hard for them to focus. It can be tempting to overdo your design with fancy features, loud colors, and animations, but it’s not always the best option.

On the other hand, clean design helps guide people’s attention to what really matters — whether that’s your content, products, or call-to-action.

That’s why I strongly recommend using clean, minimalist design principles.

For starters, it’s usually best to stick to a consistent color scheme and limit your font choices to two or three. This keeps things looking polished and makes your content easier to read.

For example, on WPBeginner, we use our famous orange as the primary color on our website, and Proxima Nova as our font.
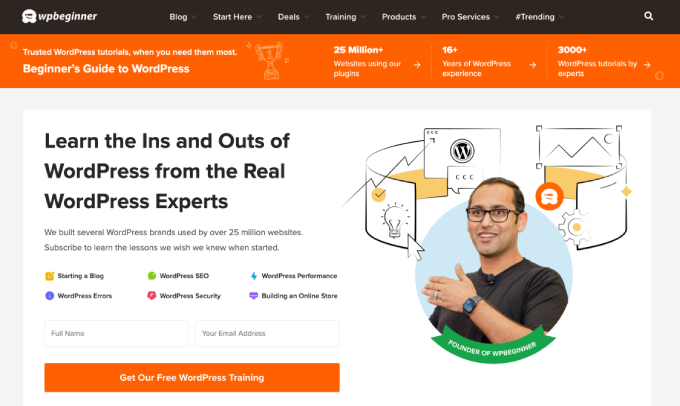
WPBeginner homepage

Using plenty of white space also prevents your layout from feeling crowded or cluttered. It not only looks modern but also makes your site feel more organized and professional.

I recommend keeping each page focused by limiting the number of elements, like popups, banners, and widgets, unless they serve a clear purpose.

Too many distractions can make it hard for visitors to choose what to do next, which often leads to confusion or even higher bounce rates.

In contrast, a clean and minimalist design improves the user experience. This can also increase conversions, generate more leads, and boost engagement!

One of the easiest ways to ensure a good balance of color, fonts, and white space is by using a well-designed theme, like Sydney, Neve, or OceanWP.

For tips on picking the right theme, check out our guide on selecting the perfect theme for WordPress.

Sydney Pro WordPress theme

If you already know you want something minimalist and easy to set up, you can take a look at our list of the best simple WordPress themes for a professional, clutter-free design.

Alternatively, you can use a page builder like SeedProd to create custom layouts that give you more control over design elements.

SeedProd lets you drag and drop elements to build landing pages, sales pages, coming soon pages, and even entire WordPress themes — no coding needed.

It’s perfect for beginners and non-technical users who need a completely custom look.

Did you know? Duplicator’s website was custom-built using SeedProd. To learn more about what the page builder can do, see our extensive SeedProd review.
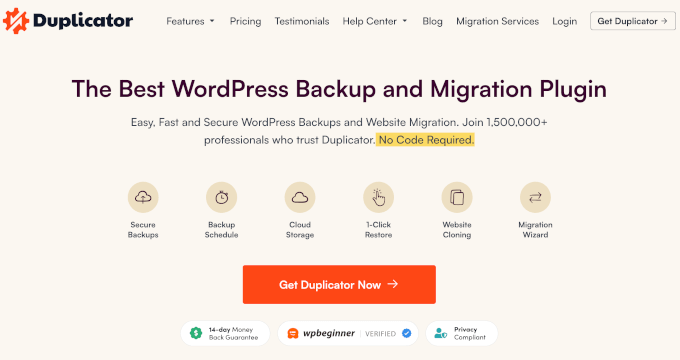
Duplicator's homepage

To get started building your custom pages, see our expert checklist of key design elements for an effective WordPress website.

ℹ️ Insider Tip: Want a professionally designed WordPress site without all the heavy lifting? Our WordPress Website Design Service starts at just $599 — perfect for bringing your vision to life, hassle-free.

Tip #8: Present Content in a User-Friendly Way

When you showcase your content in an organized and user-friendly way, you’ll be more likely to get your message across.

To organize your content better, I recommend starting by using clear headings. They are like signposts that guide visitors along your page.
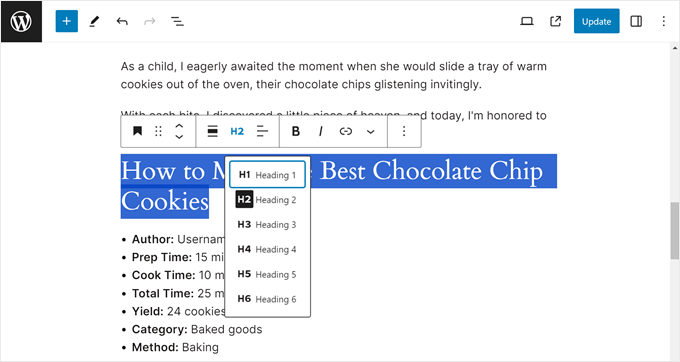
Adding heading tags to a recipe title

You can also use these headings to create a table of contents, like we do on the WPBeginner blog. That way, readers can quickly jump to the parts of a post or page that interest them most.

Many of our posts also start with a brief overview and then break into actionable steps using bullet points. Here’s why that helps with content organization:

  • Big blocks of text can overwhelm readers who skim.
  • Bullet points highlight key details quickly, while short paragraphs keep content light and digestible.
  • Together, they make your posts and pages more engaging, encouraging visitors to stay and interact longer.

Visuals can make a big difference, too. Adding images, videos, or infographics can help illustrate your points and simplify complex ideas.

In our A/B test tutorial, for example, we included a screenshot of our test results. This visual comparison helped readers quickly see which version won and why it was more effective, making the concept of A/B testing more concrete and actionable. (You’ll learn more about A/B testing in Tip #10!)
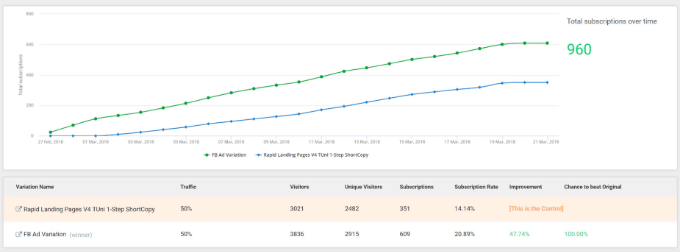
View split test results

Additionally, a quick explainer GIF can help keep visitors engaged and make your content more memorable.

Want to boost interaction? I also recommend including interactive polls, sliders, or fun quizzes using WordPress plugins. These small touches can make your content feel more dynamic and invite visitors to actively participate.

Looking for more details on how you can improve the way you present content? Check out our guide on how to write a great blog post and structure it.

Tip #9: Speed Up Your Website

How quickly your website loads plays a big role in user experience. A delay of just one second can cause people to lose interest and leave your site.

That’s why improving your WordPress website’s performance should be a top priority.

To start, you’ll want to use a caching plugin. Caching stores a ready-to-go copy of your site, so it loads much faster for repeat visitors.

Plugins like WP Rocket or WP Super Cache make this super easy.
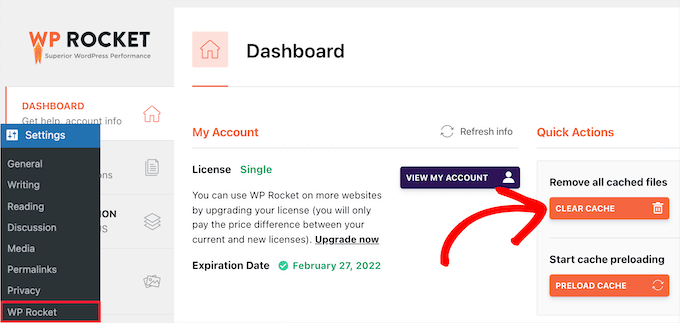
How to clear the WP Rocket cache manually

I tested WP Rocket to see how it works, and it turned out to be really easy!

During testing, I enabled mobile caching to ensure a smooth experience on all devices. I also activated user caching to support logged-in users on WooCommerce and membership sites.

Then, I adjusted the cache lifespan based on how often the site content was updated, and enabled file minification and lazy loading.
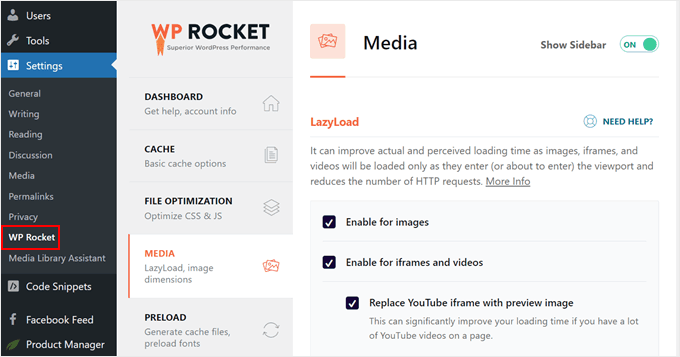
Enabling lazy loading in WP Rocket

These tweaks alone helped reduce my test site’s page load times by over 40%, and bounce rates also dropped.

For details, please see our guide on how to properly install and set up WP Rocket in WordPress.

Another way to boost your speed is by adding a CDN (Content Delivery Network).

A CDN stores copies of your site’s files on servers around the world, which means users load your site from the server closest to them. This can dramatically cut down load times, especially if you have visitors from different parts of the globe.
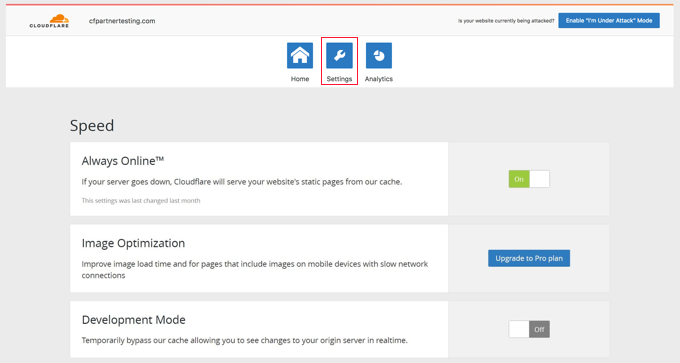
Cloudflare for WordPress Settings

If you’re not sure where to start, we have a handy guide on how to set up Cloudflare’s free CDN in WordPress.

It’s also important to compress your images. Large image files are one of the biggest reasons sites slow down.

You can shrink your images without losing quality by using tools like TinyPNG or plugins like EWWW Image Optimizer that automate the process for you.

While you’re at it, consider switching to modern image formats like WebP. These formats offer better compression compared to traditional JPEG or PNG files, so your pages load even faster without sacrificing image quality.
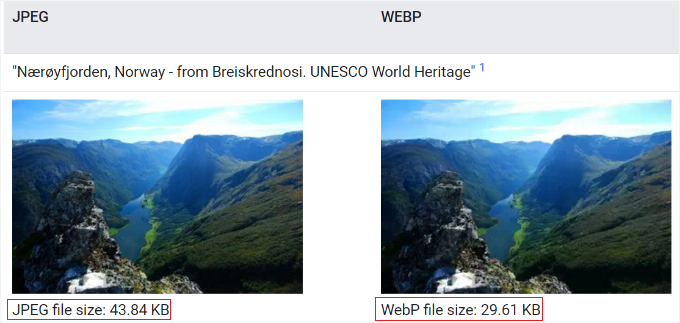
JPEG vs WebP

Finally, don’t forget to test your site’s performance regularly. Free tools like GTmetrix or Google PageSpeed Insights can analyze your site and give you specific suggestions to make it even faster.

For more information and tips on improving site speed, refer to our ultimate guide to boosting WordPress performance.

ℹ️ Insider Tip: Want expert help speeding up your WordPress site? Our Site Speed Optimization Service can take care of it for you — starting at just $699!

Tip #10: Test Website Changes with A/B Testing

When it comes to improving your site’s user experience, small tweaks can lead to big results — but how do you know what actually works?

That’s where A/B testing comes in.

A/B testing is a method for comparing two versions of a webpage or element (like a button or headline) to see which one works better.

Here’s how it works: You create two variations (A and B), show them to different groups of visitors, and then see which version gets more clicks, conversions, or engagement.

With tools like Thrive Optimize, setting up an A/B test is easy. It will then help you track which version gets more clicks, signups, or sales.

You can test things like:

  • Headline variations
  • Button color or text
  • Page layout or section order
  • Different images or testimonials

For example, in Thrive Optimize, I ran a test where I changed the color of the call-to-action (CTA) button on a landing page. After editing the variation, I split traffic between versions and started the A/B test.
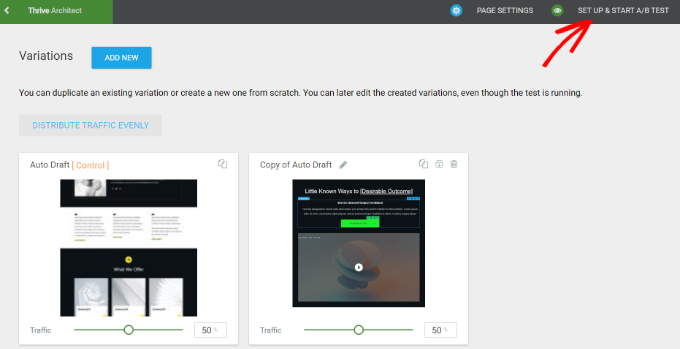
Set up and start A/B test

This process is intuitive, and instead of relying on gut feeling, you’ll have real data to back up your design and content choices!

For example, you might find that a shorter headline keeps users engaged longer, or that moving your CTA higher on the page increases conversions.

Most A/B testing tools will automatically show the winning version once enough data has been collected, helping you continuously improve your site without guessing.

For details on how to do it, refer to our guide on how to do A/B split testing in WordPress.

🧑‍💻 Pro Tip: I recommend starting with high-impact pages, such as your homepage, sales page, or lead capture forms, where even a small improvement can make a significant difference.

Tip #11: Be Selective With Your Content

If your posts or pages include too much unnecessary content, it can make it harder for your audience to understand your message.

That’s why it’s always best to keep your content focused and intentional. Every page should have a clear goal, and every section of content should support that goal.

If you’re building a landing page, for example, the layout and copy should guide visitors toward a single action, like signing up for your newsletter or downloading a free resource.
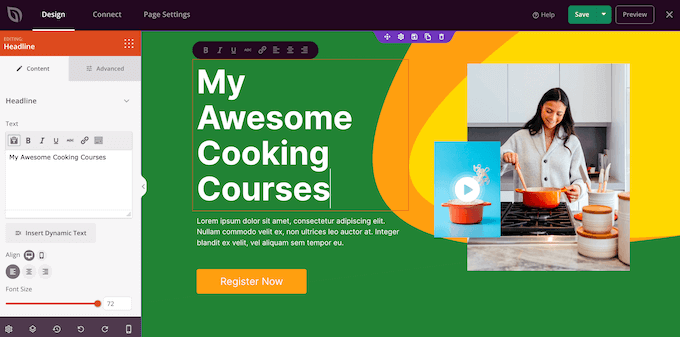
Adding headings to a custom WordPress landing page

For tips on building landing pages, please see our complete guide on increasing your landing page conversions.

When it comes to writing blog posts, the same rule applies. Publishing every idea that comes to mind might fill your site with content, but it won’t always serve your readers.

It is better to focus on topics that align with your niche and help your audience solve real problems.

To take it a step further, you can group related posts around a main pillar page using a content cluster strategy. This helps improve navigation and build authority in your niche.
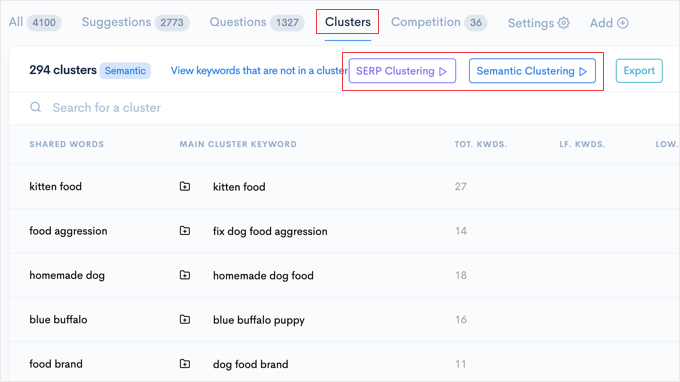
Clusters in LowFruits

We have a full tutorial on how to build content clusters in WordPress, including how to plan them around your areas of expertise.

It also helps to do regular content audits. This is because, over time, some posts stop performing — either because they’re outdated or because search intent has changed.

This is called content decay. For example, a blog post called ‘Top SEO Tips for 2020’ might no longer rank well in search results because SEO practices have evolved.

So, during your regular content audits, you’ll want to review older pages and decide: should I keep, update, or delete the content?

A little cleanup goes a long way in keeping visitors engaged and helping them find exactly what they need.

Tip #12: Encourage User Interaction 

When people can actively interact with your pages, they will naturally stay on your site longer.

Creating opportunities for user interaction can make all the difference.

A great place to start is your comments section. If it feels outdated, clunky, or inactive, people might not bother leaving a reply.

To give it an update, you can add like/dislike buttons. This way, your visitors can engage with the conversation even if they don’t want to post.

Alternatively, you might want to feature a simple user ranking system. For instance, you can pin top comments to the top of the section or award badges to users who consistently leave helpful remarks.
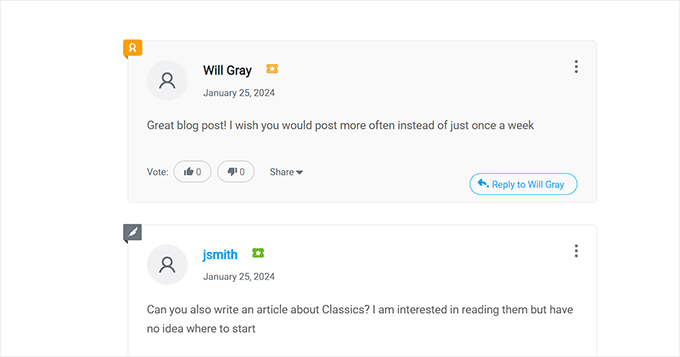
Comment ranking system preview

These small touches motivate readers to participate and foster a stronger community around your content.

To do all this, you can upgrade your comment system using a plugin like Thrive Comments. It helps create a better experience that encourages more interaction and discussion.

For insights about the plugin, see our in-depth Thrive Themes Suite review. Need more tool recommendations? Feel free to check out our expert picks of the best plugins to improve WordPress comments.

Tip #13: Build Community with Live Chat or Chat Rooms

Want to take user interaction to the next level?

Creating space for real-time conversations can turn your website into a more inclusive and supportive place. Providing a platform for real-time interaction helps create community and encourages return visits.

If you’re running an eLearning, support-based, or membership site, adding a live chat feature can make a significant impact. It allows users to ask questions about course material or get help with platform features.
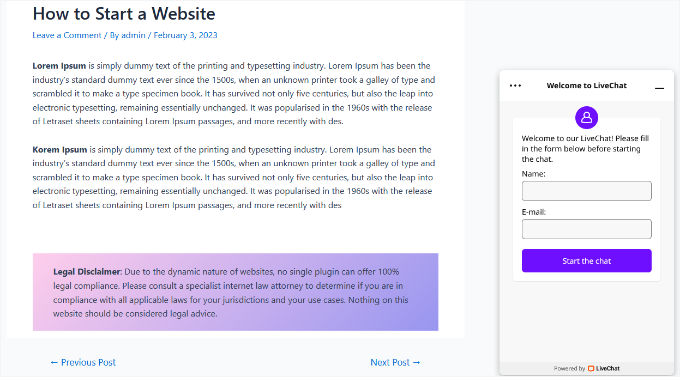
View LiveChat preview

For other types of websites, such as online stores or service-based sites, live chat offers immediate support. Users can easily get help with a product feature, clarifying a service detail, or resolving a technical issue.

Learn more about it in our guide on how to add live chat in WordPress.

Want something more community-focused? You can create private chat rooms or discussion boards using tools like BuddyBoss.

This is especially helpful for membership programs or online courses, where people want to connect with others on the same journey.
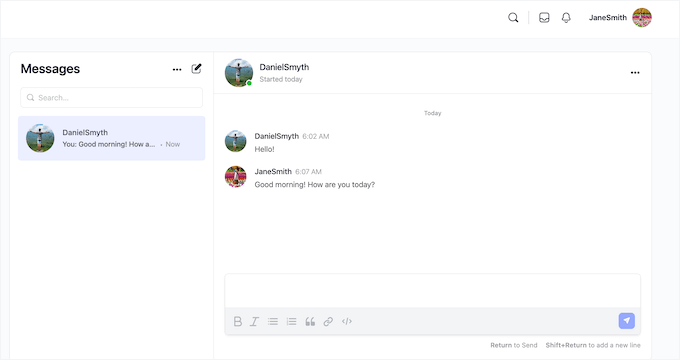
An example of a live chat room, created using BuddyBoss

Hop over to our guide on how to create chat rooms in WordPress to learn more.

Bonus Tip: Detect Design Issues with Visual Regression Testing 🕵️

Sometimes, even a small theme or plugin update can break your layout without you noticing. That’s where visual regression testing comes in.

Visual regression testing (VRT) helps you make sure that updates to your website don’t accidentally mess up its look or design.

The process is simple – your VRT software takes ‘screenshots’ of a page before and after you make changes to it. It analyzes the code or pixel differences of these pages to catch any visual issues early, before they hurt the user experience.
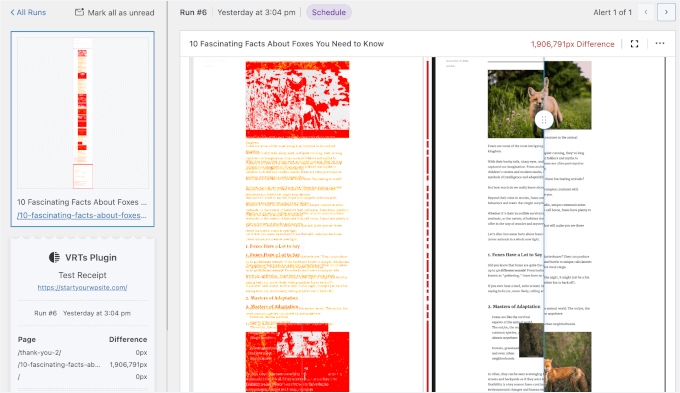
Side by side comparison

The VRTs plugin is one of the best tools for automating this process. For step-by-step instructions, you can read our guide on how to do visual regression testing in WordPress.

I hope my tips and tricks help you improve user experience in WordPress. Next, you might want to check out our guide on how to add a forum to your site and our expert picks of key design elements for an effective WordPress website.

If you liked this article, then please subscribe to our YouTube Channel for WordPress video tutorials. You can also find us on Twitter and Facebook.

The post How to Improve User Experience in WordPress (13 Practical Tips) first appeared on WPBeginner.


from WPBeginner https://ift.tt/baY0ry3
More links is https://mwktutor.com

Friday, 6 June 2025

11 Best WordPress Payment Plugins (Tested & Verified)

When I first tried to accept payments on my WordPress website, the process was frustrating. Hours of setup, confusing settings, and test transactions that failed more often than they succeeded.

I quickly realized that choosing the wrong payment solution could mean the difference between a thriving business and lost customers.

The right payment plugin can help you securely process transactions, reduce cart abandonment, and boost your conversion rates. But what works for a small nonprofit accepting donations won’t necessarily work for a consultant selling services or an online store processing hundreds of orders.

That’s why I’ve personally tested over 20 WordPress payment plugins across different business scenarios. Each plugin on this list has been thoroughly vetted for reliability, ease of use, and real-world performance.

Whether you’re just starting out or scaling up, you’ll find a solution that fits your needs and gets you paid without the headaches.

Best WordPress Payment Plugins (Tested & Verified)

Quick Overview: Best WordPress Payment Plugins

If you’re in a hurry, here’s a quick overview of the best WordPress payment plugins:

# Plugin Best For Free Version Pricing
🥇 WP Simple Pay Stripe payment forms for subscriptions and services ✅ $49.50/year
🥈 WPForms Payment forms for Stripe, PayPal, Square, and Authorize.net ✅ $49.50/year
🥉 WooCommerce Selling physical products ✅ Free
4 Easy Digital Downloads Selling digital downloads ✅ $99.50/year
5 WP Charitable Donation forms ✅ $69/year
6 MyPayKit Square payment forms ✅ $49.50/year
7 MemberPress Membership sites ❌ $179.50/year
8 Formidable Forms Advanced payment forms ✅ $39.50/year
9 Wishlist Member Protecting premium content ❌ $149.50/year
10 Thrive Apprentice Selling online courses ❌ $149/year
11 MemberMouse Enterprise-level membership websites ❌ $149.50/year

How I Test And Review WordPress Payment Plugins

You might be wondering how I actually tested all these payment plugins before recommending them. Well, I didn’t just skim the features on different blogs and move on.

I’ve worked directly with plugins like WP Simple Pay, MemberPress, and WPForms to accept payments on my own websites.

Plus, I personally tested every other plugin on this list to make sure it worked well and could process payments without issues.

Here’s what my testing process looked like:

  • 🛠️ I installed each plugin on a test site: I set up a clean WordPress site and installed each payment plugin just like you would. This helped me see how easy (or complicated) it is to get started, connect payment gateways like Stripe or PayPal, and configure the basic settings.
  • 💳 I simulated real payments: Next, I ran test transactions using test mode. I checked if payments went through smoothly, how the plugin handled errors, and whether things like taxes, coupons, or recurring payments worked as expected.
  • 🔍 I checked for compatibility issues: I tested the plugin alongside popular WordPress tools and themes to make sure everything plays nicely together.
  • 🔒 I reviewed security and updates: Payment data is sensitive, so I also looked at how the plugin handles security, whether it’s regularly updated, and if the developers follow WordPress best practices.
  • 👍 I rated user-friendliness: Finally, I looked at how beginner-friendly the plugin is. Are the settings clear? Is the setup wizard helpful? Would a first-time user get overwhelmed or feel confident?

By the time a plugin makes it onto my recommendation list, it’s been through all of this and more. Having said that, let’s take a look at the best WordPress payment plugins.

🙌 Why Trust WPBeginner?

At WPBeginner, we don’t just write about WordPress—we actively run websites that accept online payments every day.

From selling our own digital products and services, we know firsthand how important it is to use a secure, reliable payment plugin.

A single payment error can mean lost sales or frustrated customers, which is why we take plugin testing seriously. We’ve tested dozens of WordPress payment plugins over the years to find the ones that work the best.

The recommendations you’ll find here aren’t based on guesswork—they’re based on real-world experience across different types of websites. If we wouldn’t trust a plugin for our own businesses, we won’t recommend it to you.

To learn more, see our editorial process.

1. WP Simple Pay – Best for Stripe Payment Forms

WP Simple Pay website

WP Simple Pay is the best WordPress payment plugin if you’re using Stripe, especially if you want to sell services or subscriptions without building a full-blown online store.

When I first tested this plugin, I was impressed by how quickly I could create a working Stripe payment form without any of the complexity that comes with complete eCommerce platforms.

This plugin solves the biggest headache most service providers and subscription businesses face: getting paid without the technical nightmare of setting up complex store solutions.

We covered all the details and our hands-on experience in our WP Simple Pay review, so you can get the full picture there.

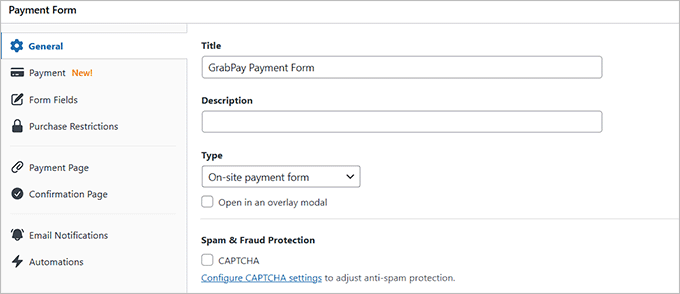
Add a form name and description

When I started creating my own payment forms, I found the drag-and-drop builder incredibly user-friendly.

Creating attractive, custom payment forms took minutes instead of hours. No coding skills are required, which is a significant advantage for many business owners.

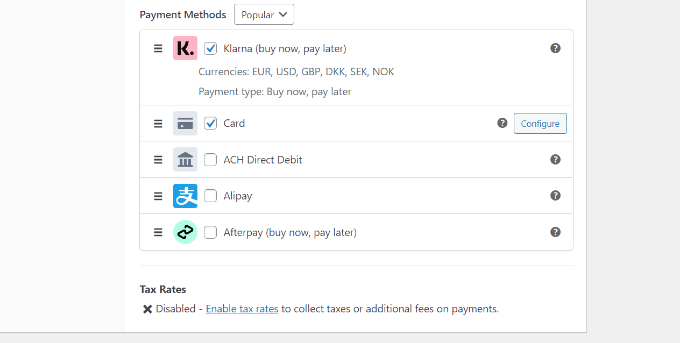
I was also impressed by the payment options. It supports Stripe Checkout, Apple Pay, Google Pay, ACH bank transfers, and even Buy Now, Pay Later options like Afterpay and Klarna.

Select Klarna payment method

Plus, you can set custom pricing fields, coupon codes, and multi-step payment forms.

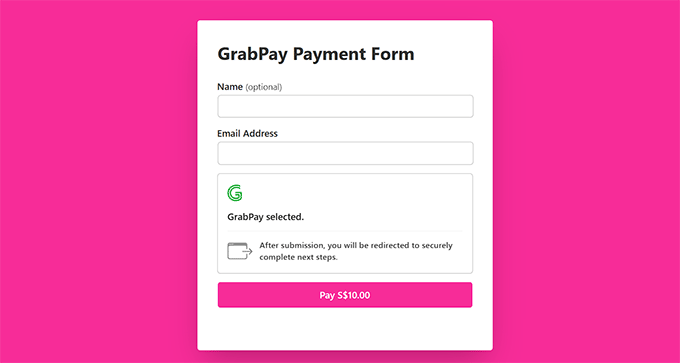
However, what really stood out to me was the customization control. You can brand the entire payment form page to match your business.

Clean URLs, custom background colors, and layout adjustments can all work together to create a professional checkout experience that feels like part of your site.

GrabPay payment form preview

All in all, I recommend WP Simple Pay for anyone looking to sell services and subscriptions without setting up an online store.

It handles the payment complexity while keeping your WordPress site fast and reliable. No bloated code or performance issues that slow things down.

To get started, see our tutorial on how to accept Stripe payments in WordPress.

Pros of WP Simple Pay

  • Pre-made templates speed up form creation
  • Set up partial payments (for deposits) and installment plans for high-value services
  • Stripe handles all sensitive data for maximum security
  • One-click payments with Apple Pay and Google Pay
  • Flexible billing intervals for subscriptions
  • Built-in coupon codes and promotional discounts
  • Option to pass processing fees to customers
  • Easy purchase restrictions and limits

Cons of WP Simple Pay

  • Advanced features locked in free version
  • Only works with Stripe (no other payment processors)

Pricing: WP Simple Pay’s paid plans can range from $49.50/year to $209.65/year.

Why I recommend WP Simple Pay: What makes WP Simple Pay stand out is how easy it is to accept Stripe payments on WordPress with no need to build a full online store.

It’s a great fit if you’re offering services, running a membership site, or collecting subscriptions, one-time payments, or even deposits. The payment forms are simple, flexible, and work right out of the box.

2. WPForms – Best for Stripe, PayPal, Authorize.Net, and Square Payment Forms

WPForms homepage

WPForms is the best WordPress payment plugin for collecting customer information alongside payments, such as registration forms, order forms with custom fields, or surveys that include payment options.

The plugin also supports multiple payment gateways, including Stripe, PayPal, Authorize.net, and Square. This flexibility allows you to offer your customers a variety of payment options without needing to juggle different plugins.

We use WPForms here at WPBeginner for our contact forms and annual surveys, so I’ve seen firsthand how reliable and flexible this plugin can be. If you’re curious about all the things it can do, we go over them in more detail in our WPForms review.

A key advantage of WPForms is how it combines powerful form building with payment processing. You’re not limited to simple “pay now” buttons.

Instead, you can create comprehensive forms that gather the information your business needs while processing payments securely.

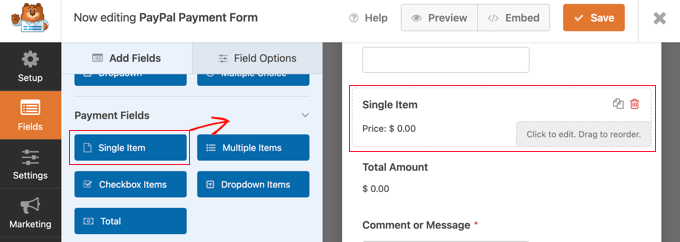
WPForms also comes with a variety of payment fields.

Add a Single Item Field to Your Form

You can add single-item payments, multiple items, dropdowns for selecting products or quantities, and even donation fields with preset or custom amounts.

This makes building complex payment forms super easy, even if you’re new to it.

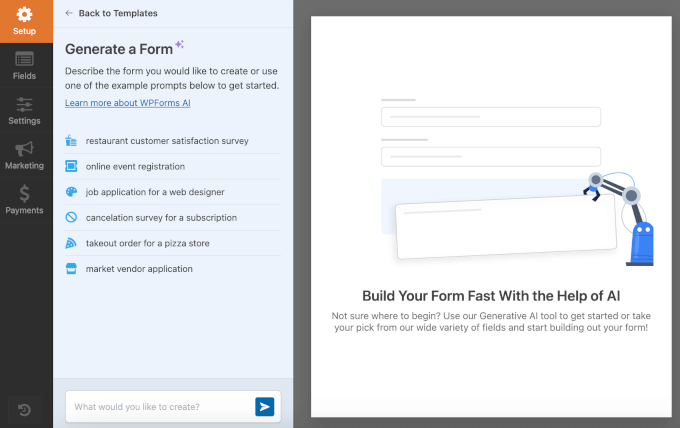
One feature I found particularly helpful is the plugin’s AI-powered form builder.

It helps speed up the design process by generating form templates that you can customize with simple prompts. This can save you hours when creating new forms with payment integrations.

Additionally, the conditional logic feature is very powerful. Forms can show or hide fields based on user selections, creating a smooth experience that only displays relevant options.

WPForms AI Builder

Your customers see exactly what they need without confusion.

Overall, WPForms strikes a great balance between being powerful and user-friendly.

It’s perfect if you want to build payment forms combined with surveys, registrations, or quotes, all while securely processing payments through your preferred gateway.

For more information, see our tutorial on how to add a PayPal payment form in WordPress.

Pros of WPForms

  • Over 2,000 pre-made form templates
  • Drag-and-drop builder that’s genuinely beginner-friendly
  • Supports one-time payments and recurring subscriptions
  • Coupon code fields for checkout discounts
  • Automatic email notifications and confirmations
  • Complete spam protection
  • Secure data storage accessible from the WordPress dashboard

Cons of WPForms

Pricing: WPForms pricing starts at $49.50. However, to unlock the extensions for PayPal, Stripe, and Square, you will need the pro plan for $199.40/yr.

Why I recommend WPForms: It’s a great solution that gives you the flexibility to build forms that go beyond simple contact fields. Whether you’re setting up a survey, registration form, or quote request, WPForms makes it easy to include payment options right inside the form.

3. WooCommerce – Best for Selling Physical Products

Is WooCommerce the right eCommerce plugin for your WordPress website?

If you’re planning to build a full-fledged online store, I always recommend starting with WooCommerce. It’s the best WordPress payment plugin for selling physical products and managing inventory, shipping, taxes, and payments, all from one dashboard.

The plugin stands out as a complete eCommerce solution when you need more than simple payment collection.

You’re not just processing payments. Instead, you’re running a real business with product catalogs, inventory tracking, shipping calculations, and tax management.

I’ve been working with WooCommerce since its early days and have used it to build online stores for clients across different industries.

You can check out our full WooCommerce review to see why it’s such a solid choice.

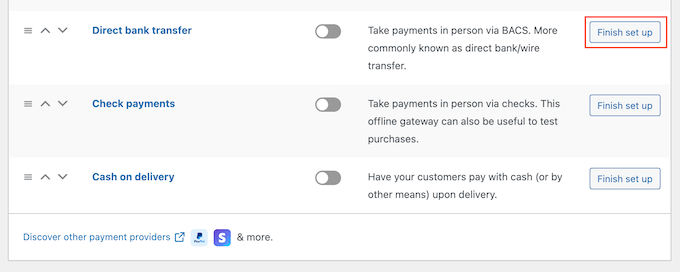
One thing that has improved significantly over the years is the built-in payment integrations. PayPal and Stripe used to need separate plugins, but now they work smoothly right out of the box.

How to sell car parts online in WordPress

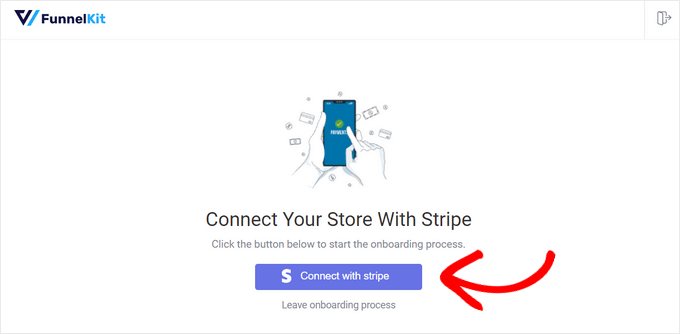
During my recent WooCommerce testing, I was particularly impressed with how plugins like FunnelKit’s Stripe integration can make the checkout process even better.

You get fully customizable, high-converting checkout pages that feel modern and fast.

The ability to design checkout pages, offer upsells, and accept express payments like Apple Pay and Google Pay can make a significant difference in conversion rates.

How to set up the FunnelKit Stripe payment gateway

In my opinion, WooCommerce is ideal if you want complete control over your store’s design and functionality. Whether you’re selling five products or five thousand, it scales well and gives you all the tools you need to grow.

If your goal is to turn your WordPress site into a full eCommerce platform, then WooCommerce is the payment plugin I’d trust every time.

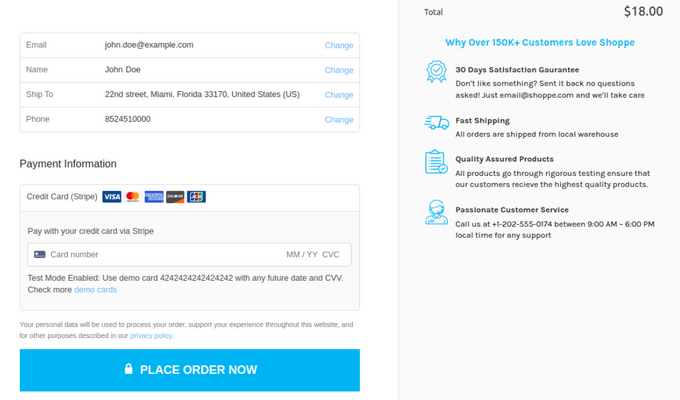
Stripe checkout example in WooCommerce

To get started, see our beginner’s guide on WooCommerce made simple.

Pros of WooCommerce

  • Accepts diverse payment methods, including cash on delivery and bank transfers
  • Credit/debit cards, Apple Pay, Google Pay, and local methods via Stripe
  • Supports one-time and recurring payments with subscription addons
  • Accept Square and Authorize.net payments with addons
  • Custom tax rules with flexible pricing options
  • Hundreds of payment-related extensions in the marketplace
  • Built-in refund management and order status controls

Cons of WooCommerce

  • Can feel like overkill for simple service payments or single digital downloads
  • Extensions required for certain payment gateways (costs vary)

Pricing: WooCommerce is free to use, but you’ll need to purchase extensions to add certain payment options like Square or Authorize.net. The pricing for these extensions can vary.

Why I recommend WooCommerce: In my opinion, WooCommerce is well-suited if you want extensive control over your store’s design and functionality. Whether you’re selling five products or five thousand, it scales well and offers a comprehensive set of tools to help you grow.

4. Easy Digital Downloads – Best for Selling Digital Products

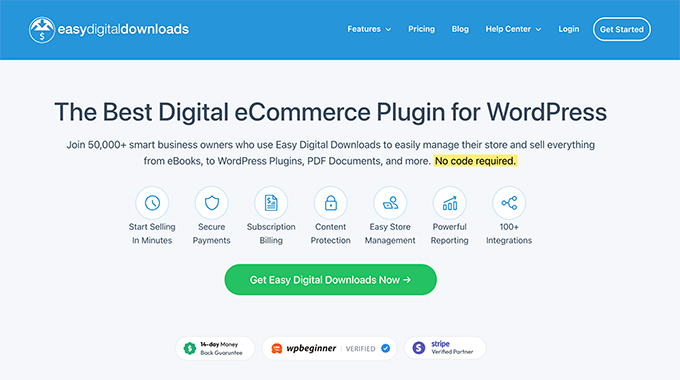
Easy Digital Downloads Website

If you’re selling digital products, like eBooks, software, PDFs, or music, then Easy Digital Downloads (EDD) is the ideal WordPress payment plugin for the job.

Unlike general payment plugins, EDD offers effective solutions specifically built for the unique challenges of selling digital goods.

It is particularly effective for digital product sales, where you need instant delivery, license management, and customer download tracking.

Our partner brands have been using EDD to sell their premium plugins for years, and it’s consistently delivered excellent results. We’ve also spent a lot of time testing it on demo sites to see how it performs in different scenarios.

We explain it all in our detailed review of EDD if you want a closer look.

What makes EDD perfect for digital sales is how it handles the entire customer journey. When someone buys your digital product, they instantly receive download links, account access, and professional receipts. No manual work required on your end.

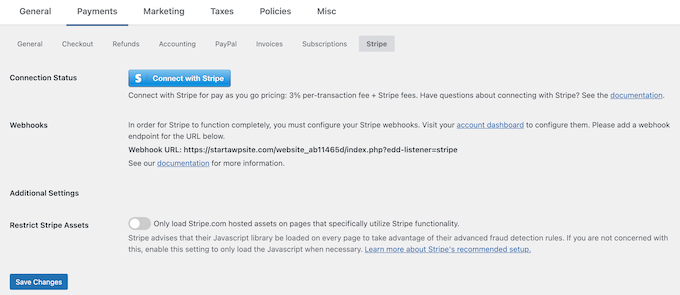
The plugin accepts Stripe, PayPal, Apple Pay, and Google Pay right out of the box.

Connecting to Stripe in Easy Digital Downloads

I found the payment setup process much faster than configuring similar functionality with other plugins. The setup is straightforward and functions well without complicated integrations.

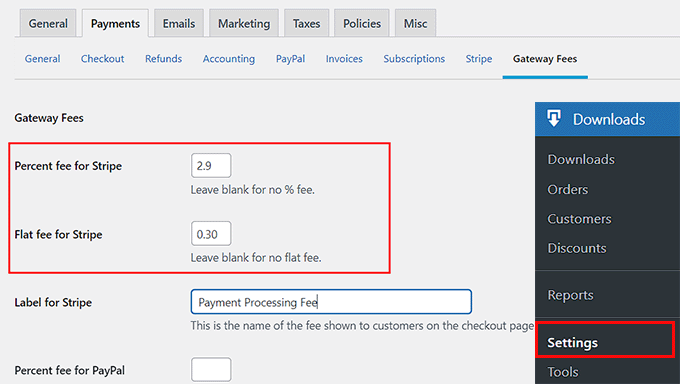
The one feature that impressed me most was the ability to pass payment processing fees to customers. This might seem minor, but over time, it saves significant money in transaction costs, especially when selling lower-priced digital items.

You can also set up one-time or recurring payments, offer discount codes, and even create custom checkout fields without needing a developer.

Configure the gateway fees

Another key strength of EDD is its scalability. With premium extensions, you can add license key generation, affiliate tracking, and customer email automation while keeping your payment flows smooth and secure.

If your site revolves around digital content, then this is a plugin I can confidently recommend for handling your transactions.

For step-by-step instructions on using Easy Digital Downloads, see our tutorial on how to sell digital downloads in WordPress.

Pros of Easy Digital Downloads

  • Cart and checkout system optimized for digital products
  • Customizable purchase receipts and confirmation emails for better branding
  • Test mode for simulating transactions before going live
  • Built-in sales and earnings reports for revenue analysis
  • Tax settings with VAT support for EU compliance
  • Customer account area for re-downloading purchases
  • Instant digital delivery after payment

Cons of Easy Digital Downloads

  • Advanced features are locked in the free plan.
  • Not suitable for physical product sales

Pricing: EDD’s pricing starts at $99.50/year for one site. You can also opt for the All Access Pass for $499.50/yr to unlock all the features.

Why I recommend Easy Digital Downloads: We use EDD to sell our premium plugins and software, and it’s always worked great. If you’re selling eBooks, PDFs, plugins, courses, or music, then EDD offers a payment processing and delivery system specifically designed for your business model.

5. WP Charitable – Best for WordPress Donation Forms

WP Charitable

WP Charitable is the best payment plugin for accepting donations in WordPress, especially if you’re running a nonprofit or a cause-based website.

It stands out as the specialized solution when you need more than basic payment collection for charitable causes. The tool makes it super easy to manage donor relationships, track campaign progress, and build long-term fundraising success.

Our team has tested this plugin extensively, both through demo campaigns and real-world use for our founder’s education nonprofit, the Balkhi Foundation.

WP Charitable makes the donation process seamless for supporters and removes a lot of the friction that usually gets in the way. You can get the complete details in our review of WP Charitable.

Instead of complicated checkout flows, you get simple, clean donation forms that integrate well with Stripe, PayPal, and other popular gateways.

recurring donations charitable preview

The user experience feels designed specifically for donors who want to give quickly and easily.

One of the things that stood out during my testing was how customizable Charitable’s donation forms are. You can set suggested amounts, let donors enter custom amounts, create recurring donation options, and even add goal meters to encourage participation.

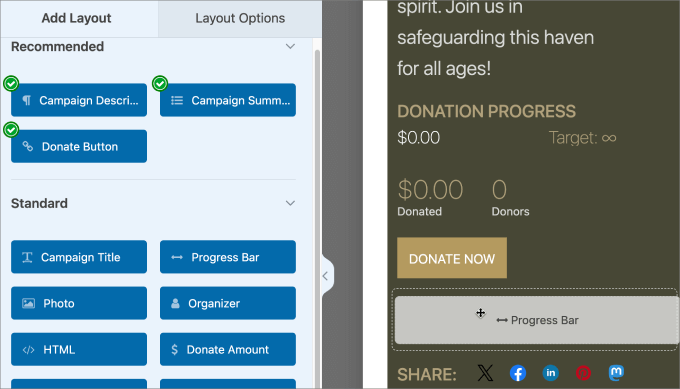
Plus, it supports campaign management, so you can run multiple fundraisers at once and track their progress easily. Each campaign gets its own dedicated page, donation tracking, and goal visualization, which helps create urgency and transparency for donors.

Charitable drag and drop editor

I think most will also appreciate Charitable’s email integrations.

They help make it easy to automate thank-you emails and provide donors with donation receipts right away, something I know is important for nonprofit transparency and tax purposes.

Plus, built-in reports can help you make data-driven decisions, so you can maximize your fundraising efforts.

The bottom line? With a strong focus on donor experience and campaign management, Charitable is the best WordPress payment plugin for nonprofits.

You can start building your website easily by following our article on how to create a non profit website in WordPress.

Pros of WP Charitable

  • Dozens of pre-made templates for quick form creation
  • Unlimited donation campaigns with individual goals and forms
  • Custom checkout fields for collecting donor details and dedications
  • Multi-currency support for international fundraising
  • Offline payment tracking for checks and cash donations
  • Built-in reporting tools with donation history and data export capabilities
  • Goal meters and progress tracking to encourage donations
  • Automated donor communication and receipt generation

Cons of WP Charitable

  • Only PayPal is included in the free plan; Stripe and other gateways require paid plans
  • Limited to donation forms (not general-purpose like WPForms)

Pricing: Charitable’s pricing starts from $69 to $299 per year.

Why I recommend WP Charitable: The plugin is great for nonprofit fundraising, with features designed for charitable organizations. If you’re running fundraising campaigns and need more than basic payment buttons, I recommend Charitable.

6. MyPayKit – Best WordPress Square Payment Plugin

MyPayKit Square Payment Plugin for WordPress

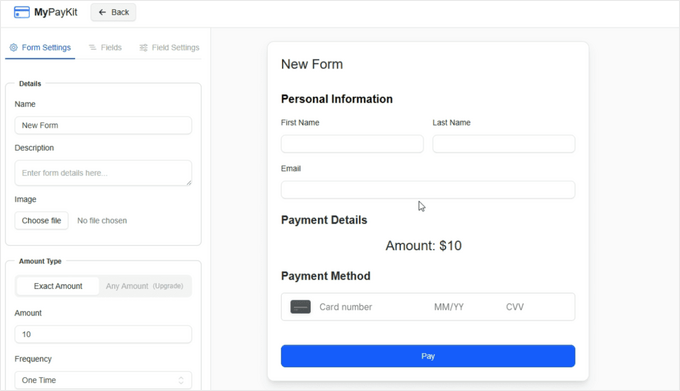
MyPayKit is a great WordPress payment plugin for when you want to accept payments through Square without the complexity of a full eCommerce platform.

You get clean, professional payment forms that connect directly to Square’s payment processing system.

Since it’s a new plugin, I wanted to see how well it worked—and it delivered on its promise: offering a simple way to accept Square payments online.

This makes it excellent for collecting deposits, one-time payments, or even donations without forcing customers through a complicated checkout process.

MyPayKit form builder

Another thing I really appreciate is how lightweight MyPayKit is compared to other payment solutions.

Unlike WooCommerce or other store-focused plugins, it doesn’t overload your site with extra features you might not need. It focuses specifically on payment collection and does it well.

Plus, it’s not just limited to Square. You can also accept Stripe, PayPal, and Apple Pay if you want to expand your options.

But if Square is your go-to processor, MyPayKit makes accepting payments very easy and straightforward.

Pros of MyPayKit

  • Seamless Square integration
  • Clean, professional payment form design
  • Supports multiple payment processors (Square, Stripe, PayPal, Apple Pay)
  • Handles both one-time and recurring payments
  • Simple 2-minute setup process for non-technical users
  • Perfect for service businesses and local retailers

Cons of MyPayKit

  • Limited advanced features compared to full eCommerce solutions
  • Primarily focused on Square (other processors feel secondary)
  • May not suit complex payment scenarios

Pricing: MyPayKit has a free plan with unlimited forms and transactions. However, there’s a 3% application fee. Paid plans start at $49.50 per year to remove the application fee and access premium features.

Why I recommend MyPayKit: It’s a great choice for accepting Square payments on your WordPress website. When I tested it, I found that it worked smoothly and allowed me to collect payments in just a few clicks.

7. MemberPress – Best for WordPress Membership Websites

MemberPress' homepage

If you are planning to sell subscriptions, memberships, or online courses on your WordPress website, then MemberPress is my top pick.

It’s a powerful payment plugin that offers payment processing combined with content protection and access control for your membership business.

We’ve used MemberPress to set up free online courses at WPBeginner, and we love its advanced (yet straightforward) access control and content protection features.

The plugin manages the entire member lifecycle from signup to content delivery without requiring manual work. If you want a full look at how it works, check out our MemberPress review.

MemberPress comes with built-in support for Stripe, PayPal, and Authorize.net, so you can start accepting payments securely from day one.

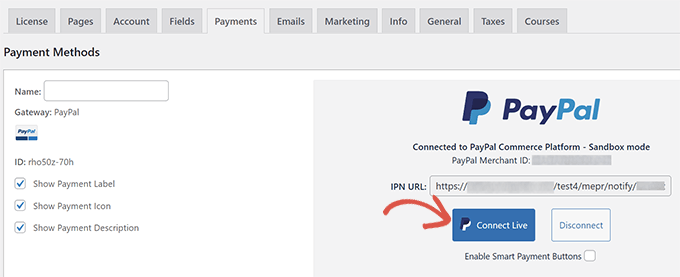
Connect MemberPress to PayPal Commerce

The payment gateway setup is straightforward and reliable across all supported processors. You can offer one-time payments, free trials, recurring subscriptions, and even charge based on access tiers.

This flexibility lets you create sophisticated pricing strategies that grow with your business.

What makes the plugin particularly well-suited for membership sites is how well everything integrates. When someone signs up, their access is instantly managed, and there’s no need to manually approve or update anything.

The tool is also great for building online courses. With the built-in MemberPress Courses addon, you can create lessons, lock premium content, and drip content based on membership levels.

If you’re a creator or educator looking for a simple way to monetize your content, MemberPress makes it easy to get started. To learn more, see our ultimate guide on how to create a membership site.

Pros of MemberPress

  • Multiple membership levels with different pricing tiers for upselling
  • Built-in coupon system for promotions and discounts
  • Immediate content access after payment processing
  • Automated payment reminders and failed transaction handling
  • Built-in tax support for compliance
  • Paywall feature for teasing premium content

Cons of MemberPress

  • Advanced features are locked behind paid plans
  • Higher starting price than simple payment plugins

Pricing: The pricing for the MemberPress basic plan is $179.50/year. However, to unlock its full LMS potential, including quizzes, assignments, and gradebooks, you will have to buy the pro plan for $399.50/year.

Why I recommend MemberPress: It’s an excellent WordPress plugin for building a membership site or selling courses. While WP Simple Pay works well for basic subscriptions, MemberPress takes it a step further by handling payments, locking down your content, and controlling which members have access to specific pages, lessons, or downloads.

8. Formidable Forms – Best for Advanced Payment Forms

Formidable Forms

If you’re looking to build advanced forms that calculate pricing and process payments based on user selections, then Formidable Forms is a great option.

It offers powerful form-building tools for creating interactive calculators, quote generators, and custom workflows.

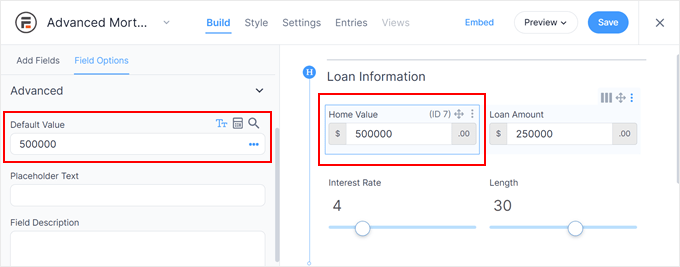
During testing, I was able to easily build loan applications, pricing estimates, and shipping calculators that automatically updated totals based on user input.

And these aren’t static forms—they’re dynamic tools that adapt using conditional logic, changing fields, prices, or redirects based on answers.

This makes Formidable Forms well-suited for legal consultations, service quotes, and custom product estimates.

To learn more about what the plugin can do, check out our Formidable Forms review.

Editing the default value of a form field in Formidable Forms

I also really like how easily you can connect Stripe, PayPal, or Authorize.net to charge users after form completion.

Plus, the multi-page form support and integrated data tracking make it easy to manage both submissions and payments from one dashboard.

Overall, if your business needs intelligent forms that do more than collect payments, like guiding users through personalized pricing or registration steps, then Formidable Forms is a solid choice.

Pros of Formidable Forms

  • Advanced conditional logic for dynamic form behavior
  • Multi-page forms with integrated payment processing
  • Supports Stripe, PayPal, and Authorize.net
  • Comprehensive data management and submission tracking
  • Custom field types for specialized information collection
  • AI form builder to speed up initial setup

Cons of Formidable Forms

  • More complex than needed for simple payment collection
  • Steeper learning curve compared to basic form builders

Pricing: Formidable Forms starts at $39.50/year. However, to unlock calculations, you will need the business plan for $199.50/year.

Why I recommend Formidable Forms: It is a great option if you need more than just a simple payment form. You can build smart forms that automatically calculate the total based on user selections, and then let them pay right away using Stripe, PayPal, or Authorize.net—there’s no coding required.

9. WishList Member – Best for Paywalls and Memberships

Wishlist Member

WishList Member is a reliable WordPress payment plugin if you’re building a membership site or want to protect premium content behind a paywall.

When I tested WishList Member, I found the integration with Stripe, PayPal, and other gateways to be quite easy. I didn’t need any third-party addons to start charging users for access.

For more details about how the plugin works, see our WishList Member review.

Setting up multiple payment gateways

I also appreciate the tool’s ability to create different pricing tiers and offer upsells inside your membership flow.

You can even pair it with your favorite page builder or LMS plugin if you’re offering courses.

If you want to build a paid membership community or sell gated digital content, WishList Member is worth checking out.

Pros of WishList Member

  • Automatic management of member upgrades, downgrades, and cancellations
  • Drip content feature for gradual content release
  • “Pay Per Post” option for selling individual content pieces
  • Strong integrations with email marketing tools (Kit, ActiveCampaign, Mailchimp)
  • Fully customizable login and registration forms
  • Granular content protection controls
  • Multiple membership levels with flexible pricing

Cons of WishList Member

  • No free plan available
  • User interface can feel overwhelming for beginners

Pricing: WishList Member’s basic plan at $149.50/year works well if you are just starting out. It offers unlimited memberships, upgrade paths, and restriction rules.

Why I recommend WishList Member: It is a great option if you’re building a membership site and want to protect your content. It’s designed to help you set up multiple access levels, build a community, and accept payments through Stripe or PayPal, without needing extra tools.

10. Thrive Apprentice – Best for Selling Online Courses

Is Thrive Apprentice the right membership and online course plugin for you?

Thrive Apprentice is a great choice if you’re building an online course business and want to control how students access your courses after they’ve paid.

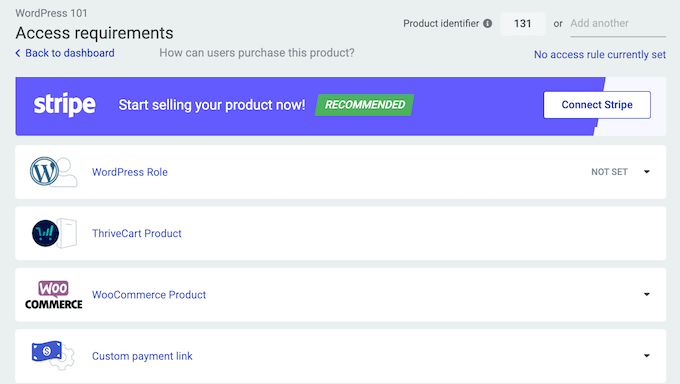
It integrates seamlessly with Stripe and ThriveCart, which makes it easy to sell one-time courses, bundles, or memberships. The payment integration is very intuitive and doesn’t require complicated setup processes.

Want to learn more about what the plugin can do? We did a deep dive for our Thrive Apprentice review.

The best part? It also connects with Thrive Suite tools like Thrive Leads and Thrive Architect, so you can design your entire sales funnel—from opt-in forms to checkout to course delivery—without writing any code.

Restricting access to your online training using Thrive Apprentice

It makes it very easy to create a polished course experience. You can set access rules, offer free previews, lock lessons until payment is made, and even integrate it with WooCommerce for added flexibility.

If you’re looking for a powerful course builder that doubles as a payment solution, Thrive Apprentice is one of the best options available, especially if you’re already using other Thrive tools.

Pros of Thrive Apprentice

  • Access restriction tools for locking courses or individual lessons
  • Course bundle creation tied to specific pricing tiers
  • Free preview feature for showcasing content quality
  • Seamless WooCommerce integration for complex pricing
  • Custom login pages and thank you pages for smooth post-purchase experiences
  • Built-in student progress tracking and auto-enrollment

Cons of Thrive Apprentice

  • Limited to Stripe as the only payment gateway
  • No free plan available

Pricing: Thrive Apprentice costs $149/year for the standalone plugin. However, to unlock all the Thrive Themes plugins, you can opt for the Thrive Suite plan at $299 per year.

Why I recommend Thrive Apprentice: It’s a solid choice for anyone building an online course business. Thrive Apprentice provides a seamless course creation experience with built-in Stripe integration, allowing you to start selling immediately without the need for additional plugins or a complex technical setup process.

11. MemberMouse – Best for Enterprise-Level Membership Sites

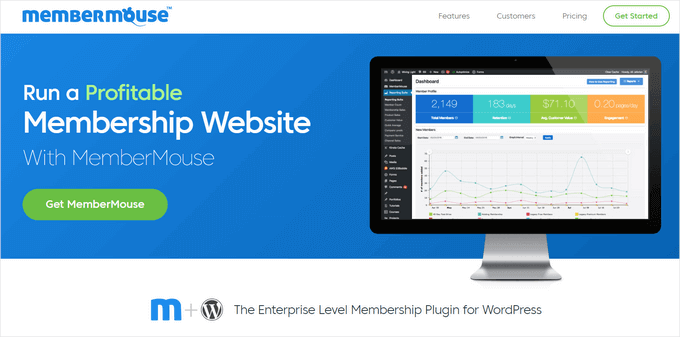
MemberMouse Courses

MemberMouse is a comprehensive membership plugin designed for larger businesses and enterprises running premium membership sites.

Even when you are managing hundreds or thousands of paying members, it handles complex payment processing without any issues.

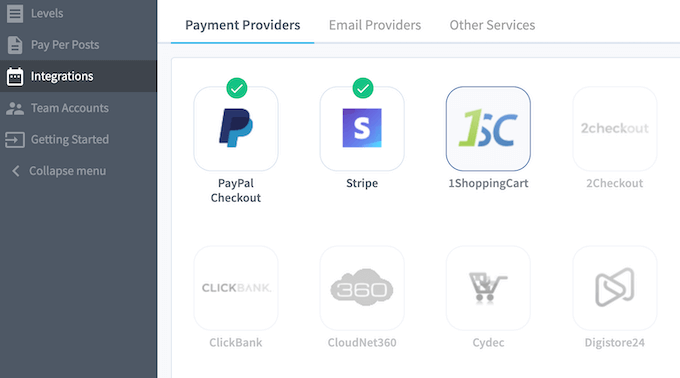
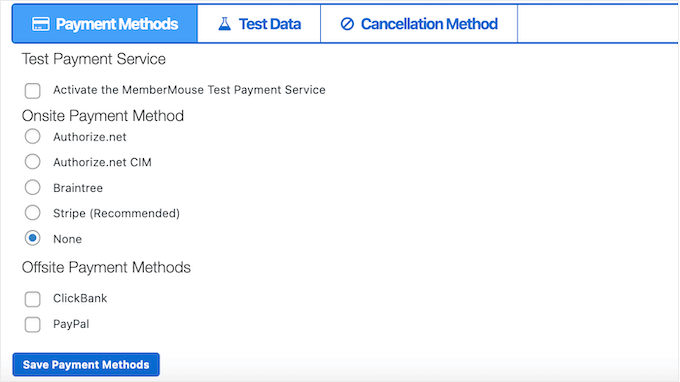
MemberMouse offers built-in support for major payment gateways like Stripe, PayPal, Authorize.net, and Braintree. This means you don’t need any extra plugins to start collecting payments—it’s all ready to go right after installation.

If you’re curious about the tool’s other features, check out our full MemberMouse review.

Adding multiple payment gateways to your website blog, or online marketplace

The plugin handles one-time payments, subscriptions, and even free trials seamlessly.

Where MemberMouse really shines is in its advanced automation and customer management tools. You can set up smart rules to drip content, offer upsells after checkout, and downgrade or cancel access automatically based on payment status.

If you’re looking for an enterprise-level solution to manage paid memberships, MemberMouse is definitely worth considering.

Pros of MemberMouse

  • Create custom checkout pages and upsell offers
  • Automated access management based on payment status
  • Drip content scheduling
  • Has a ‘dunning’ system which automatically follows up on failed payments and helps reduce churn
  • Comes with an analytics dashboard
  • Supports gift memberships and free vs. paid trials for flexible offers

Cons of MemberMouse

  • No free plan
  • Limited design customization options

Pricing: Its basic plan starts at $149.50/year.

Why I recommend MemberMouse: If you’re building a membership site with tiered pricing, time-released content, and advanced automation, MemberMouse is built for that level of complexity. From what I’ve seen, it goes beyond basic membership plugins by offering enterprise-level tools, such as smart member segmentation, upsells, and detailed analytics.

My Verdict: What Is the Best WordPress Payment Plugin?

In my opinion, WP Simple Pay is the best WordPress payment plugin for accepting Stripe payments.

It’s perfect for anyone who wants to accept subscription or service payments through clean, customizable forms, without the need to build a full online store. You can offer deposit options, installment plans, and coupon codes, all while keeping the setup super simple.

If you need to build more advanced forms and want to accept Stripe, PayPal, Square, or Authorize.net payments, then WPForms is my top recommendation.

When it comes to selling physical products, you can’t go wrong with WooCommerce. It’s the most powerful option for creating a full-fledged online store, with built-in support for major gateways and powerful extensions like FunnelKit for optimizing your checkout flow.

For digital products specifically, I recommend Easy Digital Downloads. It’s more lightweight and built for selling software, downloads, and licenses.

Meanwhile, if your goal is to raise donations, WP Charitable is the best fit. I’ve tested it for several nonprofit sites, and its donation-focused features, like recurring giving, goal tracking, and customizable campaigns, make it stand out from generic form plugins.

Frequently Asked Questions: WordPress Payment Plugins

Here are some frequently asked questions about WordPress payment plugins.

Can I test WordPress payments before going live?

Most quality plugins, including WP Simple Pay, WPForms, WooCommerce, and Easy Digital Downloads, offer a sandbox or test mode that allows you to test payments with just a few clicks.

I recommend enabling this before launching to avoid errors and ensure everything works smoothly. To get started, see our tutorial on how to test Stripe payments in WordPress.

Can I charge a processing fee to customers in WordPress?

Yes, plugins like Easy Digital Downloads, WooCommerce, and WP Simple Pay let you pass the Stripe or PayPal processing fee directly to the customer. This is especially useful if you’re selling digital products with thin margins.

For step-by-step instructions, see our tutorial on how to pass the payment processing fee to customers in WordPress.

What’s the best plugin for accepting recurring payments or subscriptions?

MemberPress is ideal for subscriptions and membership sites. It supports recurring billing, access control, and integrates with major payment gateways out of the box.

Can I accept payments on WordPress without WooCommerce?

Yes, absolutely. Plugins like WP Simple Pay, WPForms, and MemberPress let you accept payments without setting up a full online store. They’re great for selling services, subscriptions, or digital downloads through custom forms.

For more information, see our guide on how to sell on WordPress without WooCommerce.

💡Related Guides: Managing Payments in WordPress

Looking for more information on how to manage payments in WordPress? Check out these additional guides:

Whether you need step-by-step tutorials, tips for boosting conversions, or guidance on securing your transactions, these resources will help you optimize your payment setup.

If you liked this article, then please subscribe to our YouTube Channel for WordPress video tutorials. You can also find us on Twitter and Facebook.

The post 11 Best WordPress Payment Plugins (Tested & Verified) first appeared on WPBeginner.


from WPBeginner https://ift.tt/ZImQ7xS
More links is https://mwktutor.com