When I first looked into hosting WordPress on Google Cloud, I thought, “This could be the upgrade I’ve been waiting for.”
The idea of running my site on the same infrastructure powering Google Search and YouTube? That was exciting. But it also raised a lot of questions.
There’s no question that Google Cloud offers serious speed and reliability. But I quickly realized that it’s not built with beginners in mind. Between managing virtual machines, setting up your server, and configuring DNS, it’s easy to get stuck.
The good news is that you don’t have to do it the hard way. Whether you want a simple managed solution or you’d rather roll up your sleeves and do it all yourself, I’ll show you both options.
By the end of this guide, you’ll know exactly how to host WordPress on Google Cloud and which path I recommend based on real-world experience.
Why Host WordPress on Google Cloud?
Google Cloud is known for speed, stability, and high-powered infrastructure. It powers everything from YouTube to Gmail, and it’s built to handle huge amounts of traffic without any issues.
That’s why a lot of website owners, including myself at one point, start thinking: “If I host my WordPress site on Google Cloud, won’t I get the same performance?”
And in theory, yes — you can. But there’s a big difference between having access to Google Cloud and actually knowing how to use it well for WordPress. It’s like buying a race car without knowing how to drive it.
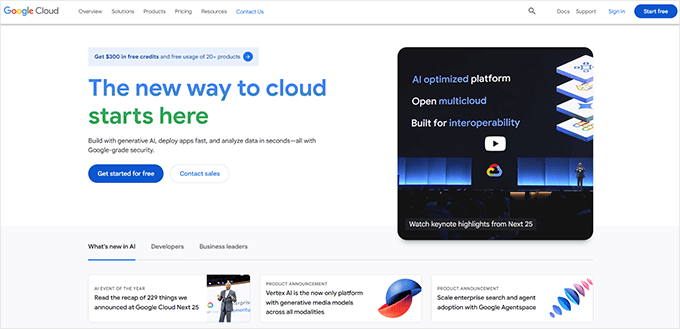
That’s where most people get stuck. The platform itself is amazing, but it’s built for engineers and DevOps teams, not regular WordPress users trying to publish content or grow an audience.
So if you’ve been wondering whether Google Cloud is the right choice for your WordPress site, you’re not alone.
In the next section, I’ll show you the easiest way to tap into its power, without having to configure anything manually.
After that, I’ll walk you through two hands-on methods if you prefer the DIY route.
You can use the jump links below if you want to skip ahead:
- Method 1: Use SiteGround to Host WordPress on Google Cloud
- Method 2: Use Google Cloud Marketplace to Install WordPress (Click to Deploy)
- Method 3. Manually Host WordPress on Google Cloud VM
- Google Cloud Hosting Costs Explained
- Final Verdict: Why I Recommend SiteGround for Hosting WordPress on Google Cloud
- Frequently Asked Questions About Hosting WordPress on Google Cloud
- Bonus WordPress Hosting Resources 🎁
Method 1: Use SiteGround to Host WordPress on Google Cloud
If you want the speed and reliability of Google Cloud without the technical setup, then SiteGround is the option I recommend — and personally use.
We also host WPBeginner on SiteGround. Describing the move, Syed Balkhi, founder of WPBeginner, wrote:
After testing SiteGround across multiple projects and seeing how well their platform handled real-world demands, I knew it was the right move for WPBeginner.
Syed Balkhi
For more details, see the reasons why WPBeginner switched to SiteGround or take a look at my in-depth SiteGround review.
SiteGround runs its entire platform on Google Cloud infrastructure, so you get the same performance without having to manage it all yourself.
You don’t need to worry about setting up servers, installing software, or handling updates. Everything from performance tuning to WordPress security is already taken care of. You just log in, install WordPress, and start building your website.
SiteGround makes it easy for anyone to get started. Their dashboard is clean and beginner-friendly, and you get powerful features out of the box, including automatic caching, free CDN, daily backups, built-in security, and one-click staging environments.
Pros of Using SiteGround
- Built on Google Cloud’s fast and reliable infrastructure
- No technical setup required — perfect for beginners
- Excellent customer support with real WordPress experts
- Includes caching, backups, security, and CDN out of the box
- Flat monthly pricing, with no surprise bills
Cons of Using SiteGround
- Not ideal if you want full server-level control or custom OS-level tweaks
- More advanced developers might prefer a DIY cloud setup for niche use cases
Pricing: Unlike Google Cloud Platform’s pay-as-you-go pricing, SiteGround offers fixed pricing starting from $2.99 per month.
If you just want to build your site and have it run fast, stay secure, and never think about server maintenance, this is the easiest and most reliable way to do it.
How to Host WordPress on Google Cloud Using SiteGround
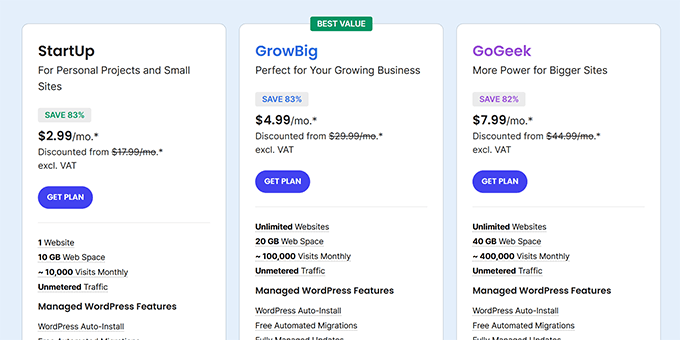
First, you need to visit SiteGround’s website and choose a WordPress hosting plan.
I recommend choosing the Startup plan if you are just getting started, or the GrowBig plan if you are upgrading from a regular shared hosting service.
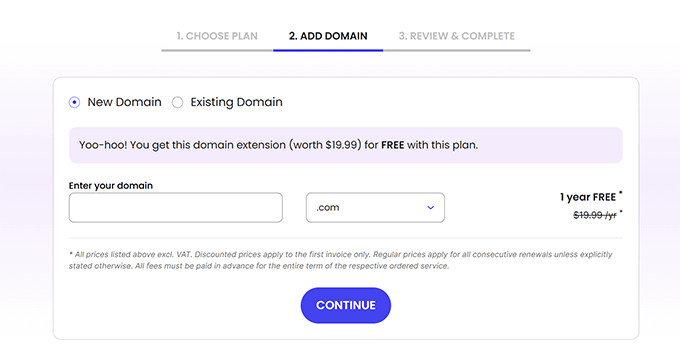
Next, you will be asked to choose a domain name. SiteGround offers a free domain name with each hosting plan for the first year.
If you already have a domain name, you can use that as well.
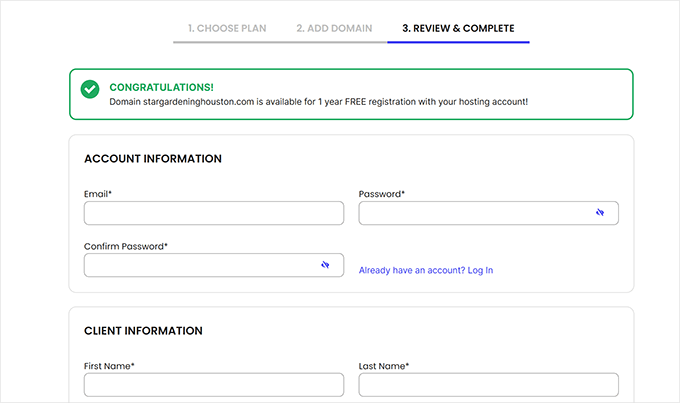
After that, you will be asked to provide personal information to create your account.
Just fill in the information and go to the payment section to complete your signup.
Once you have completed the purchase, you need to log in to your SiteGround account.
From here, simply click WordPress » Install & Manage.
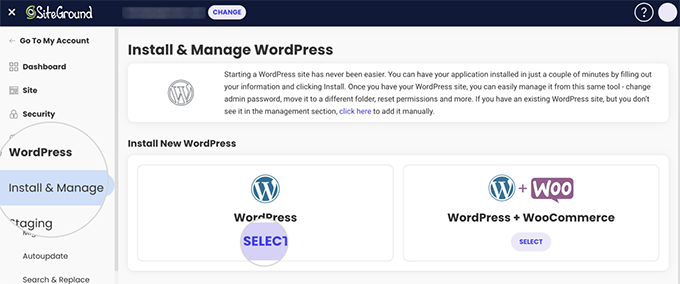
Select WordPress, or if you want to build an online store, then select WordPress + WooCommerce.
Simply follow the on-screen instructions to complete the setup wizard.
Congratulations 🎉 Your WordPress website is running on Google Cloud. It is already fully optimized and ready to go.
How to Manually Host WordPress on Google Cloud
There are multiple ways to manually host WordPress on Google Cloud. You can use a ready-to-deploy instance or deploy it manually yourself.
Here is a comparison table to understand the difference between the two approaches:
| Feature | Manual VM Setup | Click to Deploy |
|---|---|---|
| Ease of Use | Requires Linux experience and command line | Easier with a guided setup wizard |
| Installation Speed | Slower – install and configure everything yourself | Faster – WordPress and stack are auto-installed |
| Customization | Full control over software and server settings | Limited with a pre-configured environment |
| Learning Value | Learn about the system setup in depth | Good for getting started without diving deep into system setup |
| Maintenance | You’re fully responsible | You’re still responsible, but there are pre-installed tools |
| Use Case | Developers, technical users, or testing environments | DIY users who want to try GCP hosting |
Method 2: Use Google Cloud Marketplace to Install WordPress (Click to Deploy)
If you’re not comfortable running server commands or want a quicker way to get started, then Google Cloud offers a ‘Click to Deploy’ version of WordPress in their Marketplace.
It sets up a fully functional WordPress site with a few clicks, including your virtual machine, database, and web server stack.
Here are the pros and cons of using the Click to Deploy method.
Pros:
- Faster and easier than manual setup
- No need to SSH or install software manually
- Great for users new to Google Cloud
Cons:
- Less flexibility because you’re using a pre-configured environment
- Still responsible for backups, updates, and security
- Some users report difficulty scaling or customizing Click to Deploy sites later
Overall, if you’re experimenting or building a personal project, this method is a great way to get started.
Step 1. Create a New Google Cloud Project
To begin, log in to your Google Cloud account and create a new project from the dashboard.
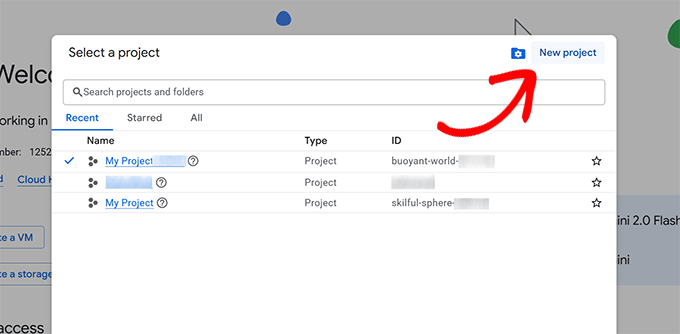
Step 2. Turn on billing
After creating your project, you need to enable billing.
From the left-hand menu, click on Billing and follow the on-screen instructions.
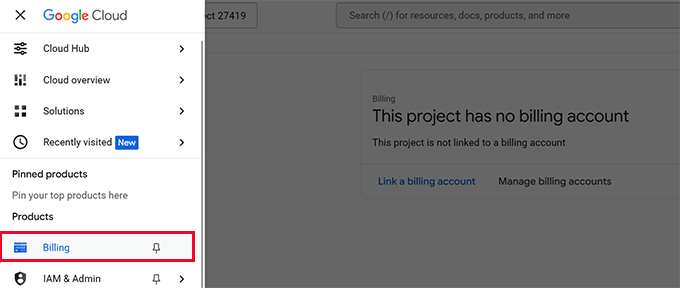
Step 3. Select Click to Deploy WordPress Package
Once billing is active, click the search bar at the top of the dashboard and type in “WordPress.”
From the results, you need to choose the option labeled ‘WordPress – Click to Deploy’ by Google Cloud.
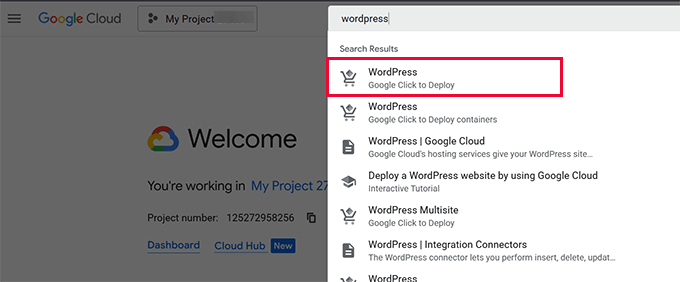
On the next screen, go ahead and click the ‘Get Started’ button.
After that, you may be asked to agree to the terms of service and enable APIs. Simply follow the instructions to move to the next step.
Step 4. Configure Your WordPress Deployment Settings
On the next screen, you’ll see a form with several options for setting up your WordPress instance.
Let’s walk through each one so you know exactly what to choose.
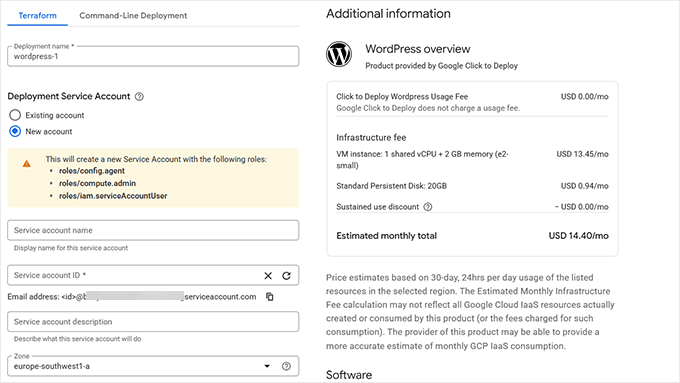
Start by giving your deployment a name. This is just a label inside your Google Cloud dashboard, and you can use something like wordpress-1 or mywebsite.
For the Deployment Service Account, leave it set to ‘New Account’. Google Cloud will automatically create the right permissions to manage your instance.
Next, choose a zone where you want your website to be hosted.
Pick a region closest to your target visitors. For example, asia-southeast1-c for Asia or us-central1-a for the United States.

Under Machine type, you should stick with General Purpose. Then choose ‘e2-small (2 vCPU, 2 GB memory)’, which is a good balance between cost and performance.
In the Administrator email address field, you need to enter your real email address. This is where Google will send notifications and status updates related to your server.
Below that, you’ll see optional features. I recommend keeping both Install phpMyAdmin and HTTPS Enabled checked. This adds a database manager and an SSL certificate to your install.
For Boot Disk, leave it as Standard Persistent Disk with 20 GB selected. That’s enough for most small to medium WordPress sites.
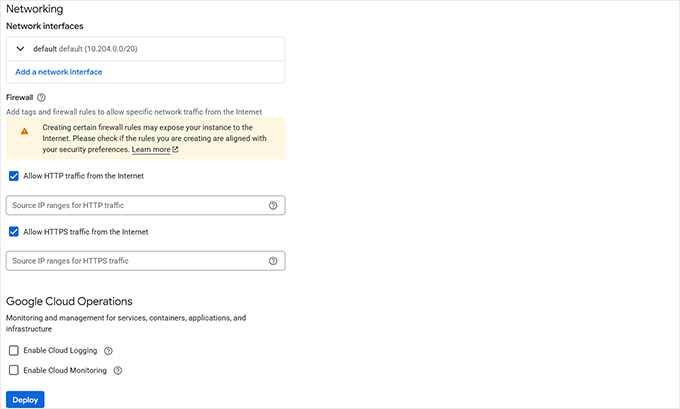
In the Networking section, make sure both checkboxes are selected to allow HTTP and HTTPS traffic. This ensures visitors can reach your site in their browsers.
You can leave Google Cloud Operations unchecked unless you plan to use advanced monitoring tools. They’re not required for running a typical WordPress site.
Once you’ve reviewed everything, simply click the blue ‘Deploy’ button at the bottom. Google Cloud will now set everything up for you behind the scenes.
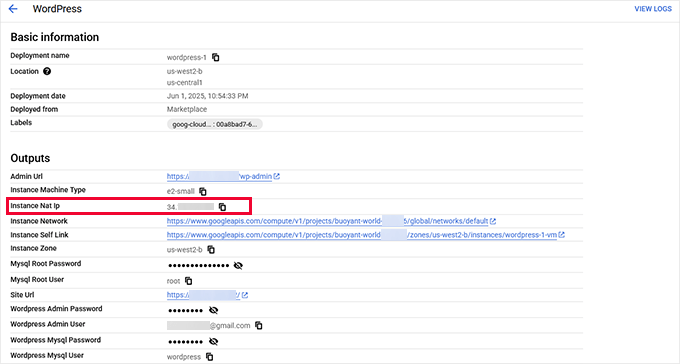
Once finished, you will see the status of your deployment. From here, you need to copy the ‘Instance Nat IP’. This is your site’s external IP, and you will need it in the next step.
Step 5. Connect Your Custom Domain to Google Cloud
To use your own domain name with your deployed WordPress instance on Google Cloud VM, you’ll need to update your domain’s DNS settings to point to the external IP address of your VM (virtual machine) instance.
Tip: If you don’t already have a domain name, I recommend Domain.com. It’s my go-to domain name registrar due to transparent pricing and ease of use.
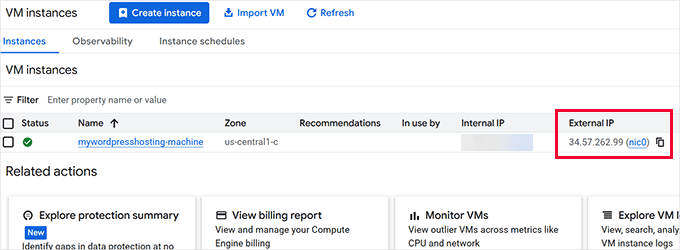
First, go to the Google Cloud Console, open the ‘VM instances’ page, and copy the external IP address of your virtual machine.
This is the address your domain needs to point to.
Next, log in to your domain registrar’s dashboard — this is where you bought your domain, like Domain.com, GoDaddy, Bluehost, or other registrars.
I will show you instructions for Domain.com, but it is pretty much the same for all domain registrars.
Find the DNS settings or ‘Manage DNS’ section for your domain.
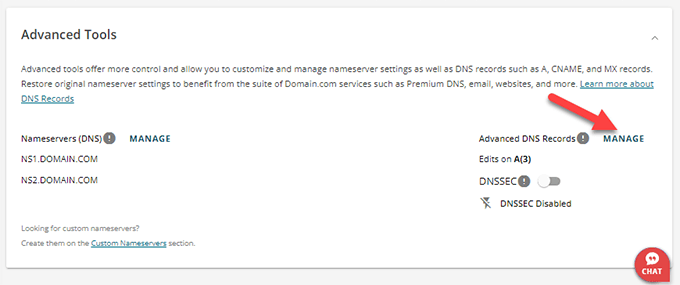
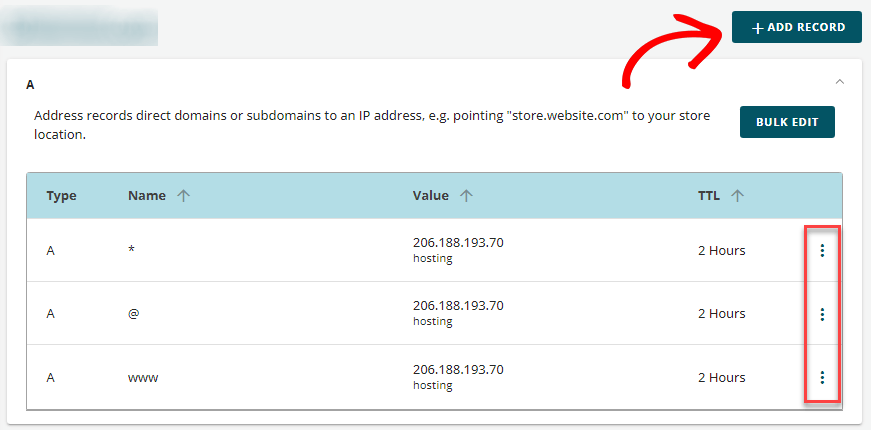
Here, you need to delete any A records that are currently pointing to a different IP address.
After that, click on the ‘Add Record’ button at the top.
In the form that appears, make sure the record type is set to A. In the ‘Refers to’ dropdown, choose Other Host. Change the Name or Host field to @ if you’re pointing the root domain (e.g., example.com).
In the IP address field, you need to enter the external IP address of your Google Cloud VM. For example, if your VM’s IP is 35.247.XX.XX, then you have to type that in.
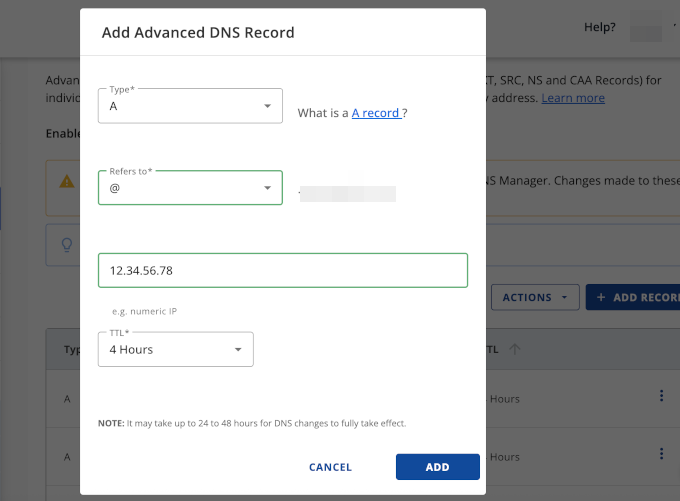
Set the TTL (Time to Live) to the default value and then click the ‘Edit’ button to save the changes.
If you also want to support www.yourdomain.com, repeat the process and add another A record with the host set to www, pointing to the same IP.
It may take a few minutes for the DNS changes to propagate. Once that’s complete, visiting your domain in a browser should take you to your Google Cloud-hosted website.
After saving your DNS changes, it may take a few minutes (up to 24 hours, but usually much faster) for them to propagate globally.
Once that’s done, visiting your domain should load your website. You may still need to update your WordPress website address so that it uses your domain name instead of the IP address.
Method 3. Manually Host WordPress on Google Cloud VM
This method is for advanced users, developers, and learners. For this method, you’ll manually configure your VM and use the SSH command line to install software.
Step 1. Create a Project
To begin, you’ll need to sign in to your Google Cloud account and create a new project from the Cloud Console.
Once your project is created, the next step is to enable billing.
Step 2. Enable Billing
Simply click on the Billing label from the left column and follow the on-screen instructions.
Step 3. Enable Computer Engine
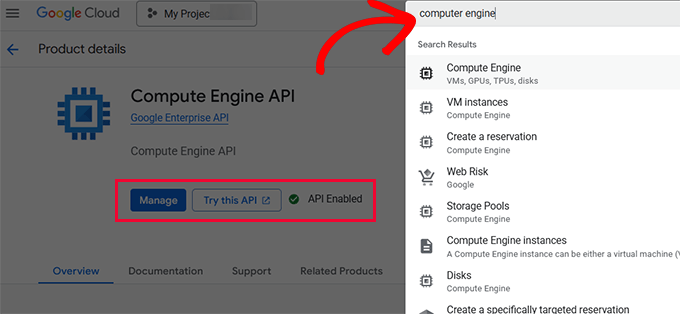
Once billing is set up, you need to click on the ‘Compute Engine’ option from the left column (or use the search bar at the top to find it) and click ‘Enable’ to start using the API.
This unlocks the tools that you’ll use to create and manage your server.
Step 4. Create a Virtual Machine
Once you have enabled the Compute Engine, you can now create a Virtual Machine instance (VM instance for short).
A VM instance is your own virtual private machine that you can turn into a VPS server to host your website on the Google Cloud platform.
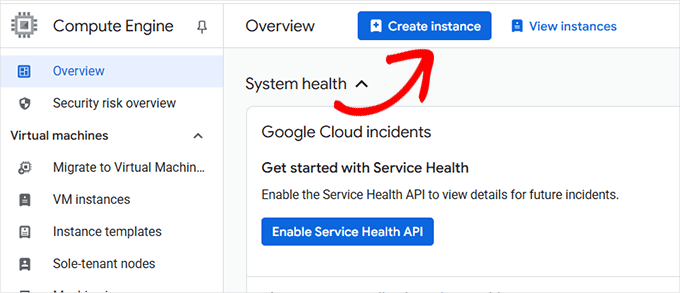
On the next screen, you will be asked to configure your VM instance.
First, you need to provide a name for your VM, which could be anything that helps you easily identify it. And choose a region and zone where you want to host it.
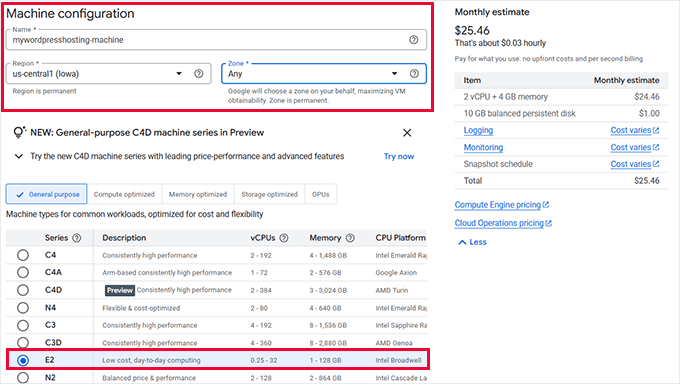
Below that, you’ll see pre-configured setups for different use cases. I recommend using E2, which is low-cost and perfect for hosting a WordPress website.
Below that, you’ll be able to configure your instance further by adding more memory or CPU cores to it.
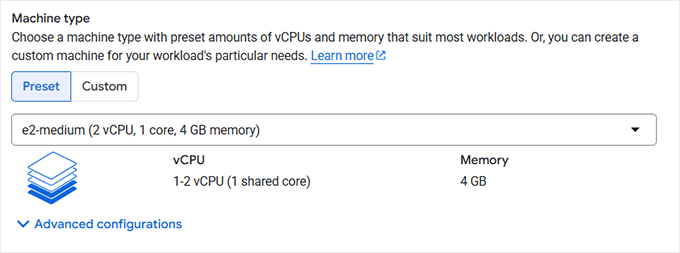
Next, you need to click ‘Create’ to continue to the next step.
Google Cloud console will now create your Virtual Machine instance and redirect you to the VM management dashboard.
Step 5. Set up Firewall Rules
While your VM is ready, its firewall rules currently don’t allow incoming traffic requests.
Let’s change that.
Simply click on the ‘Set up firewall rules’ option.
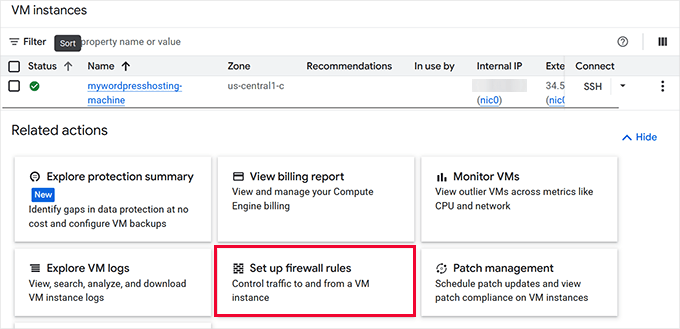
This will bring you to the Network Security area and display your VM’s firewall rules.
Simply click on the ‘Create firewall rule’ option to continue.
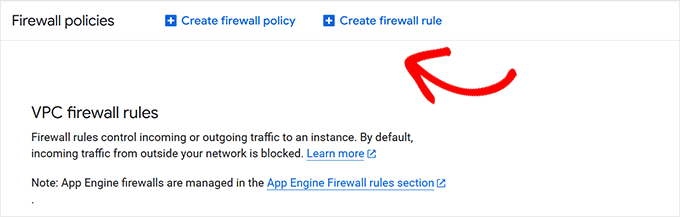
On the next screen, you need to enter the following information into the fields:
- Name: allow-http
- Targets: All instances in the network
- Source filter: IPv4 ranges
- Source IP ranges: 0.0.0.0/0
- Second source filter: None
- Destination filter: None
- Protocols and ports: Check ‘TCP’ and enter
80
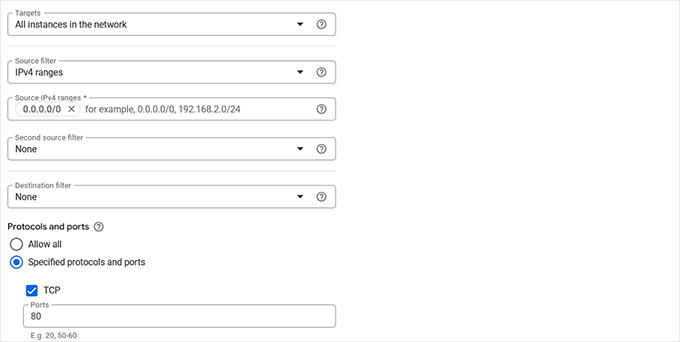
Don’t forget to click ‘Create’ to save your firewall rule.
Your Virtual Machine is now ready for website traffic.
Step 6. Installing Web Server Software
Next, you need to use the SSH button in the Cloud Console to connect to your server. This command-line interface allows you to install software and give your virtual machine commands in text format.
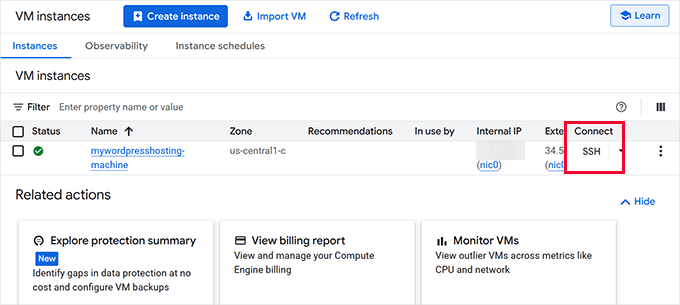
You’ll need to use it to install the necessary software stack. This includes Apache or Nginx for your web server, PHP for WordPress, and MySQL or MariaDB for your database.
You can run it in your web browser. Once connected, you will see a black terminal screen.
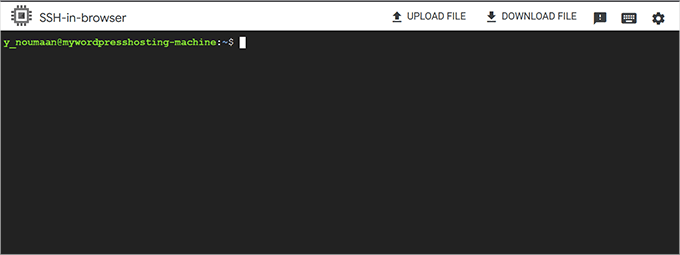
Now, you will need to run several commands, one after another. I know it does sound a bit complicated, but trust me, it is not as difficult as it sounds. Simply copy and paste the commands below.
You’ll first start by updating your VM instance. This is kind of like updating your computer to ensure you have all the security updates installed:
sudo apt update && sudo apt upgrade -y
It may take a few minutes to complete. During this time, you may see options pop up. Simply hit Enter to continue with the default choices.
Once finished, copy and paste the following command to install the Apache web server:
sudo apt install apache2 -y
For those of you who want to install Nginx, you can enter the following command:
sudo apt install nginx -y
Wondering which one is better? See our article comparing Apache vs. Nginx vs. LiteSpeed.
I prefer Nginx because it gives better performance and speed. However, Apache is more widely used due to its flexibility and ease of use.
Once you have installed the web server software, the next step is to install MySQL. Simply run this command:
sudo apt install mysql-server -y
Depending on your VM’s operating system, in some cases, mysql-server may not be available for installation. In that case, you can use MariaDB as a drop-in replacement for MySQL. It works perfectly with WordPress, and the commands are nearly identical.
Simply add the following command to install MariaDB instead:
sudo apt install mariadb-server -y
After that, you need to run the MySQL/MariaDB installation.
Enter the following command next:
sudo mysql_secure_installation
During installation, you can accept the defaults or tighten things based on your comfort level (say yes to remove anonymous users, disable root login remotely, and so on).
Now that you have MySQL installed, you can create a database to use for your WordPress website.
First, enter this command:
sudo mysql -u root -p
You’ll be asked for a password. If you created one during the installation, you can use that. Or simply hit the Enter key on your keyboard.
You will now enter the MySQL server. This is where you will manage your WordPress database.
Let’s first create one by modifying and entering the following command:
CREATE DATABASE wordpress DEFAULT CHARACTER SET utf8 COLLATE utf8_unicode_ci;
GRANT ALL ON wordpress.* TO 'wpuser'@'localhost' IDENTIFIED BY 'strongpassword';
FLUSH PRIVILEGES;
EXIT;
You can change the database name from wordpress to anything else.
Similarly, you can change wpuser (the MySQL username), and finally replace strongpassword with your own strong password.
📝Important: Write down your MySQL username, password, and database name somewhere safe, you will need them later for installing WordPress.
Next, you will need to install PHP and the required modules. Simply enter the following command:
sudo apt install php php-mysql php-curl php-gd php-xml php-mbstring php-zip libapache2-mod-php -y
Once the installation is finished, you need to restart your web server. This allows your web server to load the PHP and other installed modules on reboot.
For Apache, use the following command:
sudo systemctl restart apache2
For Nginx, you need to use the following command instead:
sudo systemctl restart nginx
Step 7. Connect Your Custom Domain to Google Cloud
To use your own domain name (like yourdomain.com) with your Google Cloud VM, you’ll need to update your domain’s DNS settings to point to the external IP address of your VM instance.
First, go to the Google Cloud Console, open the ‘VM instances’ page, and copy the external IP address of your virtual machine. This is the address your domain needs to point to.
Next, you have to log in to your domain registrar’s dashboard. This is where you bought your domain, like Domain.com, GoDaddy, Bluehost, or other platforms.
I will show you instructions for Domain.com, but it is pretty much the same for all domain registrars.
Find the DNS settings or ‘Manage DNS’ section for your domain.
Here, you need to delete any A records that are currently pointing to a different IP address.
Then, click on the ‘Add Record’ button at the top.
In the form that appears, make sure the record type is set to A. In the “Refers to” dropdown, choose ‘Other Host’. Change the Name or Host field to @ if you’re pointing the root domain (e.g., example.com).
In the IP address field, enter the external IP address of your Google Cloud VM. For example, if your VM’s IP is 35.247.XX.XX, type that in.
Set the TTL (Time to Live) to the default value and then click the ‘Edit’ button to save the changes.
If you also want to support www.yourdomain.com, repeat the process and add another A record with the host set to www, pointing to the same IP.
It may take a few minutes for the DNS changes to propagate. Once complete, visiting your domain in a browser should take you to your Google Cloud-hosted website.
After saving your DNS changes, it may take a few minutes (up to 24 hours, but usually much faster) for them to propagate globally. Once that’s done, visiting your domain should load your server instead of just the raw IP.
Step 8. Install SSL and Enable HTTPS
Before visiting your domain, it’s a good idea to set up an SSL certificate. This allows you to serve your WordPress site over HTTPS, which is more secure and preferred by search engines.
I recommend using Let’s Encrypt, which is a free and trusted certificate authority.
To make things easier, I’ll use a tool called Certbot to automatically issue and configure the SSL certificate for Apache or Nginx.
First, update your package list and install Certbot:
sudo apt update
sudo apt install certbot python3-certbot-apache -y
If you’re using Nginx, you can install Certbot with the Nginx plugin instead:
sudo apt install certbot python3-certbot-nginx -y
Once installed, run this command to request an SSL certificate for your domain.
Remember to replace yourdomain.com with your actual domain:
sudo certbot --apache -d yourdomain.com -d www.yourdomain.com
For Nginx users, the command is:
sudo certbot --nginx -d yourdomain.com -d www.yourdomain.com
Certbot will ask a few questions, including your email for urgent notices. You can choose to redirect all traffic to HTTPS when prompted, and I recommend saying yes.
That’s it! You’ve now installed a free SSL certificate, and your site is available over HTTPS.
Note: Let’s Encrypt certificates are valid for 90 days, but Certbot automatically renews them. You can test auto-renewal with this command:
sudo certbot renew --dry-run
Step 9. Install WordPress on Your Server
Now it’s time to install WordPress. Switch back to your VM instance, SSH into your server, and run:
wget https://wordpress.org/latest.tar.gz
Once the download finishes, you need to extract it using the following command:
tar -xvzf latest.tar.gz
This creates a wordpress folder.
Move its contents to your web root, which is usually called /var/www/html/ , like this:
sudo mv wordpress/* /var/www/html/
You need to give proper file permissions so your web server can access everything:
sudo chown -R www-data:www-data /var/www/html/
Now, create the WordPress config file.
First, copy the sample:
sudo cp /var/www/html/wp-config-sample.php /var/www/html/wp-config.php
Edit it using nano or another editor to enter your database name, user, and password.
This is the information you saved earlier when creating your WordPress database:
sudo nano /var/www/html/wp-config.php
Save and close the file by pressing CTRL+X.
Finally, go to your domain in a browser, and you should see the WordPress installation screen.
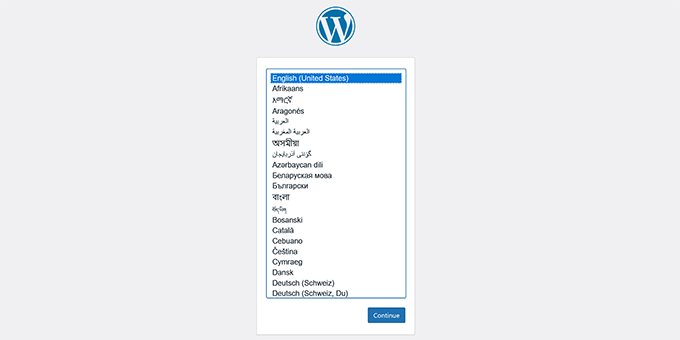
You can now follow the steps to create your admin user and finish the setup. Need help? See our complete WordPress installation tutorial.
Troubleshooting Tip 💡: If you see a default server page instead of the WordPress installation screen. This means that a default index.html page is present in the root directory of your site. To delete it, connect to SSH again and enter the following command:
sudo rm /var/www/html/index.html
🎉 That’s it! You now have a working WordPress website running on Google Cloud with your custom domain.
Keep in mind that you’re also responsible for securing your WordPress site, managing backups, applying updates, and monitoring its performance. If you’re not confident doing those things, Method 1 (SiteGround) may be a better fit.
Google Cloud Hosting Costs Explained
One thing that can catch beginners off guard is how Google Cloud charges for hosting. Unlike traditional web hosts with flat monthly plans, Google Cloud uses a pay-as-you-go model that depends on how much you use their services.
When you launch a WordPress site on Google Cloud, whether manually or using Click to Deploy, you’re billed separately for your virtual machine, disk storage, network usage, and optional services, such as snapshots or load balancing.
For example, if you go with the default setup from Click to Deploy using an e2-small instance (2 vCPU, 2 GB RAM) and a 20 GB disk, the estimated monthly cost looks like this:
- VM instance: $15.09/month
- Persistent disk: $0.88/month
- Total estimated monthly cost: ~$15.97/month
This doesn’t include bandwidth usage or backup storage. If your site gets a lot of traffic, or if you store large files or create snapshots, then the cost can increase without warning.
You’ll also need to monitor usage, set up budget alerts, and manually handle software updates, backups, and security patches. That can be a lot of work if you just want to focus on building your site.
That’s why, even though Google Cloud is incredibly powerful, I don’t usually recommend it for beginners — unless you’re prepared to manage everything yourself and optimize for cost.
Google Cloud vs. SiteGround – Cost Comparison
| Feature | Google Cloud | SiteGround (Managed Hosting) |
|---|---|---|
| Monthly Cost (Starter Site) | ~$15.97/month (e2-small + 20GB disk) | $2.99/month (Startup plan) |
| Traffic Costs | Usage-based billing (can increase with traffic) | Generous resources with each plan to handle traffic |
| Backup & Restore | Manual setup required | Automated backups included |
| Security | User-managed updates and firewall | AI-powered security and server monitoring |
| Support | No support for server setup (DIY) | 24/7 expert WordPress support |
| Ease of Use | Requires technical skills and CLI access | Beginner-friendly dashboard and tools |
SiteGround, on the other hand, provides the same Google Cloud infrastructure underneath, but with predictable pricing, automated security, expert support, and no unexpected bills.
If you’re building a serious website or running a business, the peace of mind and support alone are worth it.
Final Verdict: Why I Recommend SiteGround for Hosting WordPress on Google Cloud
Over the years, I have used all three methods: manual VM setup, Click to Deploy, and SiteGround. And my honest recommendation is simple.
If you love digging into server setups and want to learn cloud infrastructure hands-on, then the DIY method is a great project.
But if you’re focused on growing your business rather than managing infrastructure, then SiteGround is the smarter way to go.
You still get the power and reliability of Google Cloud behind the scenes. But everything else — performance optimization, backups, caching, staging, support — is handled for you by people who know WordPress inside and out.
We host WPBeginner on SiteGround, and many of our partner companies are also hosted on SiteGround.
If you’re building a serious website and don’t want to worry about server configuration, billing spikes, or keeping up with security patches, then SiteGround is where you should start.
Frequently Asked Questions About Hosting WordPress on Google Cloud
1. Can I host WordPress on Google Cloud for free?
Google Cloud offers a free tier, but it’s pretty limited. You might be able to run a low-traffic WordPress site for free using a small VM instance, but you’ll still need to monitor usage to avoid surprise charges. In my experience, it’s better to assume some cost if you’re serious about your site.
2. Do I need to be a developer to host WordPress on Google Cloud?
Not necessarily, but some technical comfort helps. The Click to Deploy method is beginner-friendly, while the manual VM setup does require familiarity with Linux, SSH, and server configuration.
If you’re not comfortable with that, then I recommend going with SiteGround — it’s built on Google Cloud and handles all the hard parts for you.
3. Which is better: Click to Deploy or manual VM setup?
Click to Deploy is faster and easier, making it great for testing or smaller projects. Manual setup gives you full control, better performance tuning, and tighter security if you know what you’re doing. I’ve used both, and it really comes down to how hands-on you want to be.
4. What’s the easiest way to host WordPress on Google Cloud?
Without a doubt, the easiest and most reliable option is using SiteGround. You get all the benefits of Google Cloud’s speed and infrastructure without having to deal with technical setup, scaling issues, or security patches. That’s why we use it for WPBeginner.
5. Will my WordPress site be faster on Google Cloud?
Yes — Google Cloud’s network is world-class. Whether you go with SiteGround or configure it yourself, you’ll get faster load times, low latency, and excellent uptime. But keep in mind that speed also depends on how well your site is optimized.
6. Is Google Cloud cheaper than shared hosting?
Not really. Once you factor in bandwidth, storage, and external IP costs, running your own VM can cost more than standard shared hosting. If you’re price-conscious, then SiteGround’s flat-rate plans are often more predictable and affordable in the long run.
Bonus WordPress Hosting Resources 🎁
The following are a few additional resources on hosting WordPress that you may find helpful.
- How to Install WordPress on Amazon Web Services
- Shared Hosting vs. Cloud Hosting vs. Managed WordPress – What’s the Difference?
- Best Cloud Hosting Providers for WordPress (Expert Pick)
- How to Move WordPress to a New Host or Server With No Downtime
- Best WordPress Migration Services (Compared)
Whether you choose SiteGround for simplicity or go the manual route for full control, hosting WordPress on Google Cloud is absolutely doable. I hope this guide has helped you pick the right path and feel more confident about launching your site.
If you liked this article, then please subscribe to our YouTube Channel for WordPress video tutorials. You can also find us on Twitter and Facebook.
The post How to Host WordPress on Google Cloud Platform (3 Ways) first appeared on WPBeginner.
from WPBeginner https://ift.tt/gFzGCjX
More links is https://mwktutor.com