Monday, 23 March 2026

Forget Boring Forms: How to Build Interactive WordPress Surveys with AI

Building a survey in WordPress is easy, but designing one that gives you actionable data is a different story. Most surveys give useless results because they aren’t engaging enough to get honest, detailed answers from visitors.

I’ve found that the best way to fix this is by creating interactive surveys that adapt to your users in real-time. And by using AI to build your forms, you can skip the frustrating manual setup and focus on asking the right questions

In my experience, using interactive elements like conditional logic and conversational layouts can boost your completion rates. This makes sure you collect the hard data you need to grow your business instead of just polite feedback.

In this article, I will show you how to use WPForms and its AI features to create interactive surveys in WordPress. I’ll show you exactly how to set this up so you can start getting better insights from your audience today.

How to Use AI to Generate Interactive Surveys in WordPress

Quick Summary: Create smarter surveys using WPForms AI to generate questions and conditional logic to personalize the user experience. This guide shows you how to set up conversational layouts and visual reporting to boost engagement and collect actionable insights.

Here are the topics I will cover in this article:

Why Create Interactive Surveys in WordPress?

Creating interactive surveys in WordPress is one of the best ways to get honest feedback from your visitors.

Static forms can often feel long and boring, which causes many people to leave before they finish.

Interactive surveys solve this problem by adapting to your users in real-time.

This personal touch significantly improves your completion rates:

  • Better Engagement: Users are more likely to finish a form that feels personalized and conversational.
  • Higher Quality Data: You can use specialized fields like Likert Scales to get more accurate ratings than a simple ‘Yes’ or ‘No’.
  • Shorter Forms: By using conditional logic, you only show questions that are relevant to each specific user.
  • Professional Insights: Features like NPS allow you to track customer loyalty using the same standards as big brands.

Plus, interactive surveys help you make better decisions for your website. Instead of guessing what your audience wants, you have hard data to guide your next steps.

Best of all, using AI to generate these forms reduces your setup time from hours to roughly 15 minutes. It allows you to focus on the goal of your data rather than the mechanics of the builder.

What You Need to Get Started (Free vs. Pro)

WPForms is the best drag-and-drop form builder for WordPress. It helps you create interactive surveys using AI, conditional logic, and conversational layouts to increase completion rates and gather actionable data.

You can start building your first WordPress survey using the free version of WPForms. However, if you want to create truly interactive surveys with visual data reports, you will need WPForms Pro.

While the free plugin allows you to use the AI form builder, the specialized survey fields, reporting tools, and the ‘Conversational Forms‘ addon are all premium features that require WPForms Pro. This addon makes your surveys feel more like a one-on-one chat.

To get started, you will first need to install and activate the WPForms plugin. If you need help, you can see our guide on how to install a WordPress plugin.

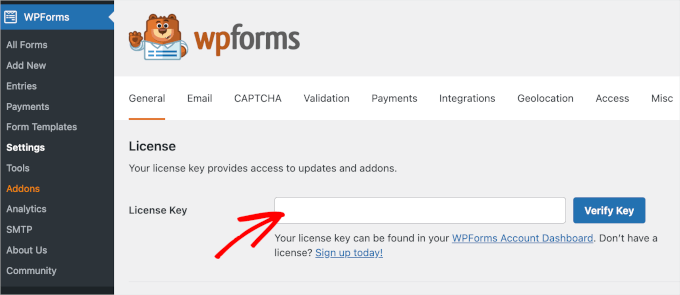
Once the plugin is active, you must verify your license. You can do this by going to WPForms » Settings and entering your license key to unlock the Pro features.

WPForms license key field

Next, you’ll need to install the survey tools.

You can do this manually by navigating to WPForms » Addons to find and install the ‘Surveys and Polls’ addon.

Install surveys and polls addon

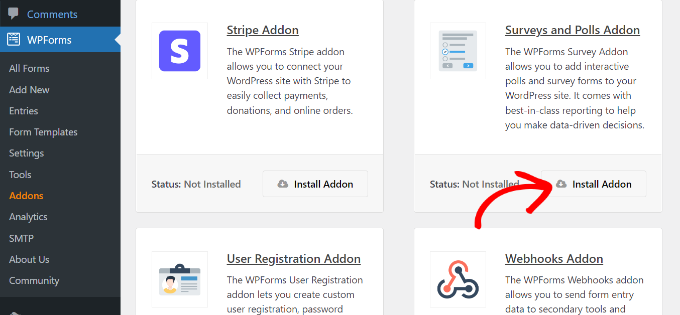
While you are there, I also highly recommend finding the ‘Conversational Forms‘ addon and clicking ‘Install Addon’.

This is the specific tool that will allow you to turn your standard survey into a full-screen, interactive layout.

Install Conversational Forms Addon by WPForms

Once these steps are complete, your website is ready to handle smart, interactive surveys. You can now start building your first form using AI.

Expert Tip: When you start collecting survey data from users, you should update your Privacy Policy page. It is important to let your visitors know exactly how you use their information to stay compliant with privacy laws like GDPR.

Using AI to Build an Interactive Survey Prompt

Now that you have the right tools installed, you are ready to start building your first survey. To begin, navigate to WPForms » Add New Form in your WordPress dashboard.

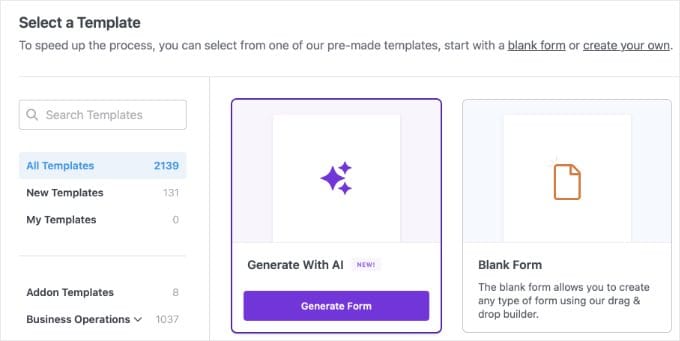
You will see the form builder screen with several template options. Instead of choosing a pre-made template, click the ‘Generate With AI’ button to open the AI assistant.

Generating a Form With AI Using WPForms

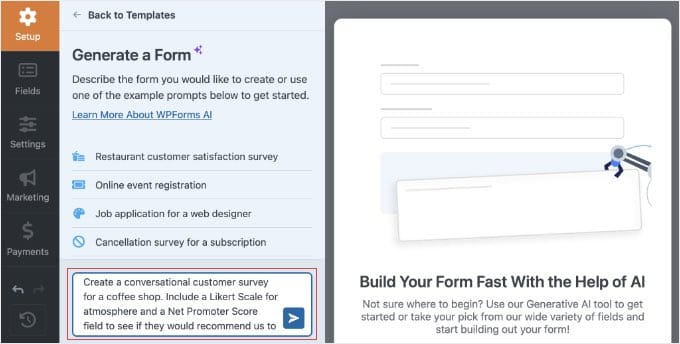
This is where you can use a creative prompt to describe exactly what you want. I’ve found that asking the AI to include specific interactive fields, like a Likert Scale or an NPS field, gives you a much more professional result.

For this example, you can enter a prompt like:

Create a conversational customer survey for a coffee shop. Include a Likert Scale for atmosphere, a Net Promoter Score field, and a Paragraph Text field asking 'Please explain your low rating'.
Generating a Form With AI in WPForms

The AI will then process your request and build a draft of the form for you.

It will automatically select the best field types and even set up the standard 0-10 rating for your loyalty questions.

A Form Generated by AI in WPForms

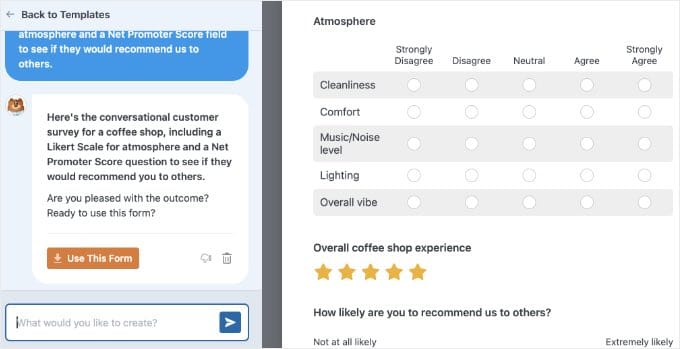
After the AI finishes, you will see a preview of your new survey. If you want to make changes, you can use the chat prompt to ask the AI to adjust it.

For example, you can ask it to ‘add a newsletter optin checkbox’ or even ‘translate this entire form into Spanish.’

Note: AI refinements only work during this active preview session. Once you leave this screen, the chat session closes.

Once you are happy with the preview, simply click the ‘Use This Form’ button. This will open the regular WPForms drag-and-drop builder.

From here, we always recommend double-checking the fields to make sure the questions fit your brand voice and the rating scales are configured exactly how you want them.

Adding Smart Logic for a Personalized Experience

Once your fields are in place, you can make your survey interactive by using conditional logic. This is a powerful feature that allows you to show or hide certain questions based on a visitor’s previous answers.

This is the best way to keep your forms short and relevant. Instead of asking every customer the same questions, you can choose to only show a feedback box to someone who gave a low star rating.

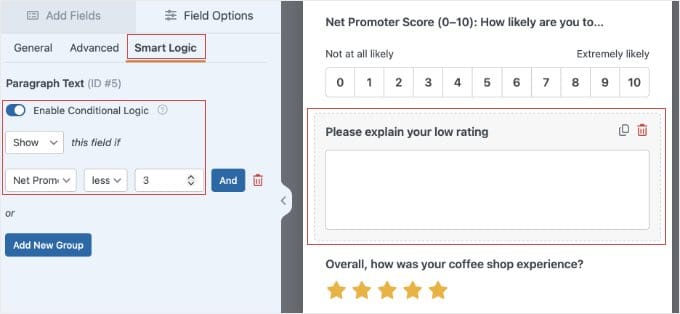
To set this up, you’ll first need to select a field in the form builder. For our example, I will click on the ‘Please explain your low rating’ text field.

Note: If the AI didn’t create this exact field for you, simply drag a ‘Paragraph Text’ field from the left menu onto your form, click on it, and change the label.

Next, look at the left-hand panel under ‘Field Options’ and click on the ‘Smart Logic’ tab. You will see a toggle to ‘Enable Conditional Logic’ that you can click to turn on.

Now you can create a simple rule to control when this field appears. For instance, you can tell the plugin to show this box only if a specific rating is less than 3 stars. This could be a rating like ‘Coffee Quality’ from the earlier AI prompt.

Enabling Conditional Logic for a WPForms Survey Field

This small change makes sure your survey feels personalized and interactive for every visitor. It prevents people from feeling overwhelmed by questions that don’t apply to their experience.

Pro Tip: You can actually ask the AI to set up your conditional logic for you during the creation step. For example, try adding ‘only show the feedback box if the rating is 2 stars or less’ to your initial prompt.

While this is a great time-saver, I still highly recommend checking the ‘Smart Logic’ tab manually using the steps below to make sure the rules are exactly how you want them.

You can repeat this process for any other fields you want to hide. It helps you build a smarter survey that only collects the most important data from your audience.

Before moving on, it is a good idea to click the ‘Preview’ button at the top of the builder to test your logic and make sure the hidden fields appear correctly.

Finally, to give your survey that true one-on-one chat feel, go to Settings » Conversational Forms in the form builder and check the box to ‘Enable Conversational Form Mode’.

Enabling Conversational Forms Mode in WPForms

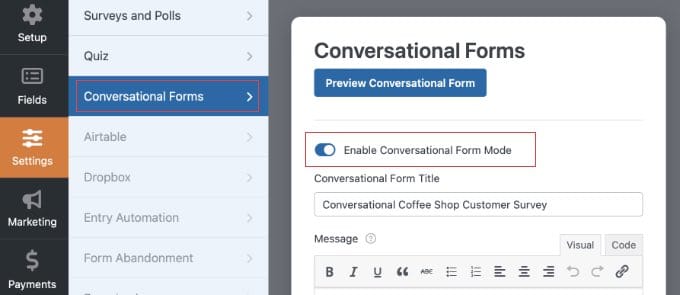
This will convert your survey into a distraction-free, interactive page. From here, you can customize your page colors, add a custom logo, and even add a percentage-based progress bar.

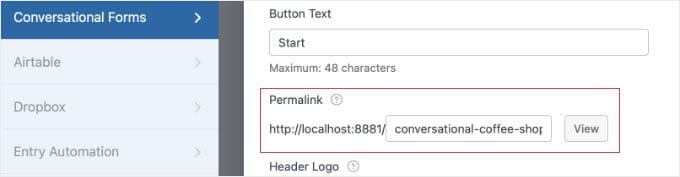
Most importantly, you will see a ‘Permalink’ field. This is where you can create a clean, custom URL for your survey (like yoursite.com/feedback). Be sure to copy this link to your clipboard so you can share it with your visitors later.

Setting a Permalink for a Conversation Form

Expert Tip: I recommend performing a ‘Thumb Test’ on your conversational survey. These layouts use full-screen interaction. So, you should open the live preview on your phone to make sure the buttons and text are easy to tap and read on a small screen.

For a complete walkthrough of these design settings, check out our dedicated guide on how to create conversational forms in WordPress.

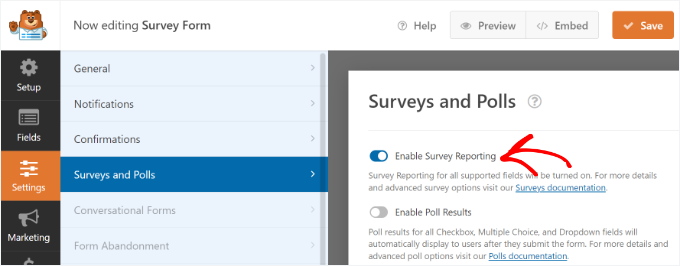
Before you publish your form and start collecting data, you need to make sure that survey reporting is enabled. While the AI builder often turns this on for you automatically, it is always a good idea to double-check.

In the form builder, simply go to Settings » Surveys and Polls. From here, make sure the box next to the ‘Enable Survey Reporting’ option is checked, and then click ‘Save’.

Enable survey reporting option

Publishing Your Interactive Survey

Once you are happy with your questions and smart logic, it is time to make your survey live.

Don’t forget to click the ‘Save’ button at the top of the form builder before exiting.

Saving a WPForms Survey

If you followed my recommendation to enable Conversational Forms mode, your survey is automatically published to the dedicated, full-screen permalink you created earlier.

Because this is a standalone landing page, it will not automatically appear in your website menu. To get people to take your survey, you will need to manually share that link.

You can paste it into your email newsletter, share it on your social media accounts, or link to it from a ‘Take Our Survey’ button on your homepage.

Option 2: Embed the Survey on an Existing Page

Alternatively, you might want to place your survey directly inside an existing blog post or contact page. If you choose this method, the survey will use a standard inline layout instead of the full-screen conversational mode.

To do this, simply open the post or page where you want the survey to appear.

Then click the ‘+’ add block button and search for ‘WPForms’. Add the block to your page, and select your new AI survey from the dropdown menu.

Adding the WPForms Block to a Post or Page

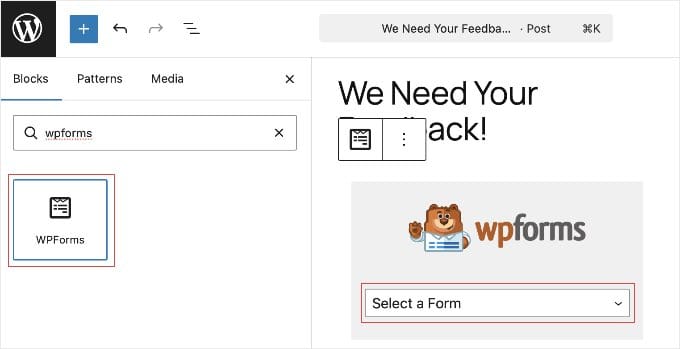
Once you hit ‘Publish’ or ‘Update’ on your page, your inline interactive survey will be live.

Related: You can learn how to change the colors, styling, or manually adding different field types to your form in our comprehensive guide on how to create a survey in WordPress.

Analyzing Your Data with Interactive Reports

After your survey has been live for a while, you will want to see the results.

To do this, go to WPForms » All Forms in your WordPress dashboard and hover your mouse over your survey.

WPForms Survey Results Link

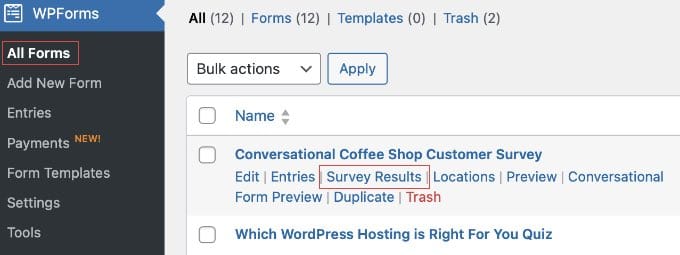
You will see a link for ‘Survey Results’ that you can click to open a new screen.

This is where the plugin turns your raw data into interactive charts and graphs.

WPForms Survey Results

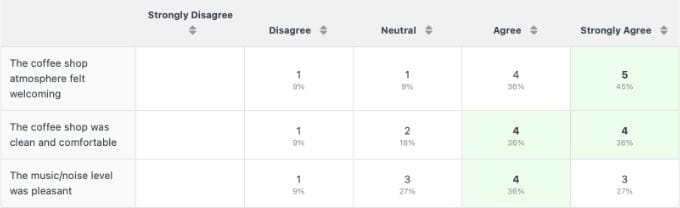
Instead of looking at a long list of text, you can see your feedback in colorful pie charts or bar graphs. This makes it much easier to spot trends in your customer behavior at a glance.

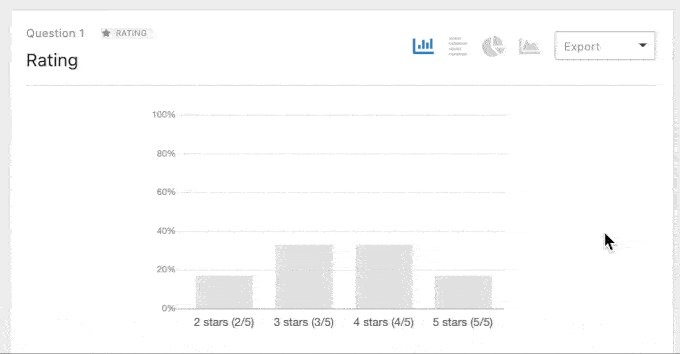
If you want to change how a specific chart looks, you can simply click the chart icons at the top of each individual graph.

You can quickly switch between different styles, like pie charts or bar graphs. This helps you find the one that is easiest for you to read.

WPForms Survey Results Charts

One of the best things about this feature is that it works on your past data. This means if you had a form running before you installed the survey tools, the plugin can still generate interactive reports for those older entries.

You can also share these results with your team or clients. There is an ‘Export’ button that allows you to save individual charts as PDF files or images for your reports.

Bonus: How to Reduce Form Abandonment

If you want to get even better results from your interactive surveys, I recommend tracking where your visitors stop filling out your forms. This helps you identify which questions might be too difficult or confusing for your audience.

If you are interested in improving your completion rates, you can see our guide on how to track and reduce form abandonment in WordPress. This will show you exactly how to capture partial entries so you never lose valuable feedback again.

Frequently Asked Questions About WordPress Surveys

I have helped many readers set up their first WordPress surveys. I often hear similar questions about the best way to handle data and interactive features. Here are some of the most common questions about using AI and WPForms to collect feedback on your website.

Can I create an interactive survey for free?

You can create a basic survey with the free version of WPForms, but you will need a Pro license to access the interactive reporting and advanced smart logic features.

While the free AI builder can help you structure your questions, the specialized visual charts and ‘Conversational Forms‘ are part of the premium addon.

Are my visitors’ survey answers shared with the AI?

No, your visitors’ answers are never seen or collected by the AI. The WPForms AI tool is only active in the backend to help you design the form’s layout and questions.

Once your survey is live, all user responses are collected normally and safely stored directly in your own WordPress database.

Can I add images to my survey choices?

Yes, you can add images to your survey choices to make them more interactive and visual for your visitors. When you are editing a multiple-choice field, you can simply toggle on the ‘Use Image Choices’ option to upload your own photos for each answer.

How do I show real-time results to my users?

You can show real-time results to your users by turning your survey into a poll. By enabling the ‘Poll Results’ feature in your form settings, visitors will see an interactive chart showing how other people have voted as soon as they submit their answer.

Is there a limit to how many responses I can get?

No, there is no limit to the number of survey responses you can collect when using WPForms on your website. Unlike many other third-party survey platforms, you own your data and can collect as many entries as your web hosting server can handle.

Additional Resources for Improving Your Surveys

I hope this article helped you learn how to use AI to create interactive surveys.

Once you have your interactive survey running, you may want to explore more ways to use that data to grow your website:

If you liked this article, then please subscribe to our YouTube Channel for WordPress video tutorials. You can also find us on Twitter and Facebook.

The post Forget Boring Forms: How to Build Interactive WordPress Surveys with AI first appeared on WPBeginner.


from WPBeginner https://ift.tt/bz0sRkY
More links is https://mwktutor.com

Friday, 20 March 2026

5 Best AI Blog Post Generators I Actually Use (& Recommend)

Writing blog posts can take a lot of time. Between brainstorming ideas, creating outlines, and turning everything into a polished article, it’s easy to get stuck staring at a blank page.

That’s where AI can make a big difference. Today’s AI blog tools have changed blogging by helping you generate ideas, write full blog post drafts, and optimize content for search engines.

I’ve tried many AI blog generators while experimenting with different writing workflows, but only five really stood out for their quality, reliability, and ease of use.

These are the tools I keep coming back to and use myself. In this guide, I’ll share the 5 best AI blog post generators worth trying, so you can blog faster and create better content.

AI Blog Post Generators I Actually Use (and Recommend)

Quick Summary: I recommend All in One SEO (AIOSEO) if you want to write and optimize content directly inside WordPress. For a flexible AI partner that helps with brainstorming and conversational drafts, ChatGPT is my top choice.

💡My Verdict: The Best AI Blog Generators

In a hurry? Take a look at my top picks to make a quick decision:

# Tool Name Best For Pricing
🥇 All in One SEO AI writing + SEO optimization inside WordPress Starts at $49.50/yr + Free
🥈 ChatGPT Flexible AI content generation, brainstorming, and conversational writing Starts at $20/month + Free
🥉 Semrush AI Article Generator Data-driven SEO content creation with keyword insights Starts at $60/mo
4 Rytr Budget-friendly AI writing for quick drafts and beginners Starts at $7.50/month + Free
5 Jasper Enterprise-grade AI content creation for teams and agencies Starts at $59/month per seat

Why AI Blog Post Generators Are Important for Bloggers

AI blog post generators aren’t just a trend. They’re tools that actually make blogging faster, smarter, and more efficient.

They handle time-consuming tasks so you can focus on creating better content and growing your blog. Here’s why these tools are essential:

  • Save Time on Content Creation: Generate full drafts, outlines, or topic ideas in minutes, instead of spending hours writing from scratch.
  • Improve Content Quality: Built-in grammar checks, SEO suggestions, and readability enhancements make your posts polished and professional.
  • Scale Your Blogging Efforts: Publish consistently without needing a large writing team, which keeps your blog active and engaging.
  • Experiment and Brainstorm Ideas: Quickly generate new angles, headlines, and meta descriptions to keep your content fresh.
  • Integrate Easily: Many AI tools work directly with WordPress, Google Docs, or your favorite editors for a smooth workflow.

Overall, using the right AI generator can improve how you approach blogging. With these tools, you’ll save time, boost quality, and consistently produce content your audience loves.

How I Tested and Reviewed These AI Blog Generators

I wrote a blog post with each tool to see how they perform in real-world scenarios. I wanted to know which AI blog generators truly deliver, so I put each tool through thorough testing.

This helped me separate the ones that work well from those that fall short.

Here’s how I tested them:

  • Installed or Connected Tools – Set up each AI generator, including plugins, web apps, and integrations where applicable. This helped me see which tools were easy to use for beginners.
  • Tested Writing Speed & Content QualityCreated full blog posts to evaluate readability, accuracy, and engagement. This allowed me to find the specific generators that deliver accurate, engaging text with minimal editing required.
  • Compared Free vs Paid Plans – Assessed feature differences, limitations, and overall value between tiers to see which blog post generators are worth the money for bloggers.
  • Evaluated Integration & Workflow – Tested how easily each tool works with WordPress, Google Docs, and other platforms to speed up workflows for writers.
  • Checked SEO Friendliness – Reviewed built-in keyword suggestions, meta description support, and optimization features. This allowed me to see which platforms actively improve content visibility and can bring traffic to your website.
  • Reviewed Support, Updates & Learning Curve – Examined documentation, tutorials, and customer support to see easy of use for beginners.
Why Trust WPBeginner for AI Blog Generator Recommendations?

At WPBeginner, we don’t just list tools—we test them in real-world blogging environments. This means you get recommendations based on actual usage, not marketing hype.

Our guidance is always honest and beginner-friendly. We focus on tools that are easy to use, reliable, and deliver real value for bloggers of all levels.

We’ve tested these AI blog generators on multi-author blogs and demo personal sites. This ensures our picks work no matter the size or scope of your blog.

With WPBeginner, you can be confident these AI tools will help you create content faster, improve quality, and streamline your blogging workflow. To learn more, take a look at our editorial process.

💡Expert Tip: Always treat AI as your co-pilot, not an autopilot! To rank well on Google, you must review your AI-generated drafts, add your personal experience, and optimize the final text using a WordPress SEO plugin.

Ready to get started? Let’s dive into my top picks for the best AI blog post generators:

1. All in One SEO for WordPress – AI-Powered Blog Optimization & Content Assistant

AIOSEO website
✅ Pros of All in One SEO AI-powered title and meta description generation
Creates SEO-optimized blog post drafts
Generates tables, key takeaways, and FAQ sections with AI
Built-in content readability scoring for polished posts
AI Image Generator for unique visuals
An intuitive AI Assistant block
Works completely inside WordPress
❌ Cons of All in One SEO Free version is limited
AI features are supplementary, not full content replacement
Pricing Starts at $49.50/yr + Free
Best For WordPress bloggers who want AI-assisted content creation and built-in SEO optimization in one tool

After thorough testing, I’ve found All in One SEO to be the overall best AI blog post generator for WordPress.

AIOSEO’s AI Assistant acts like a creative partner, helping you structure and generate full articles in seconds, right inside the WordPress editor.

It’s not just an SEO plugin—it’s a complete AI writing assistant. It combines optimization, content guidance, and AI-powered suggestions for titles and meta descriptions.

For more details about using it, see our complete AIOSEO review.

My Experience

Writing with AIOSEO is incredibly simple. I open a new post, add the AIOSEO AI Assistant block, type a clear prompt, and within seconds, I get a well-structured first draft.

This alone saves me hours compared to starting from a blank page.

Use AI Assistant block in AIOSEO

The AI doesn’t just generate text—it helps me organize my ideas. I can quickly create headings, bullet points, and even comparison tables without worrying about formatting.

For instance, when I wrote a demo post about the top cities to visit, the AI automatically generated a comparison table. I could drop it straight into the post.

Generate a table with AI in AIOSEO

On-page SEO is also baked right in. The AI suggests optimized titles, meta descriptions, and readability improvements as I write.

I no longer have to switch between multiple plugins or tabs. The entire workflow stays inside WordPress, which keeps my focus on content rather than technical details.

AIOSEO OpenAi SEO post title suggestions

The AI Image Generator is another time-saver. I can produce unique visuals, illustrations, and banners directly in WordPress.

All generated images are automatically added to my Media Library, ready to use anywhere on my site. This has replaced the hours I used to spend hunting for stock photos.

Insert AI generated image

Even when the AI output isn’t perfect, refining it is straightforward. Adjusting the prompt or generating additional blocks allowed me to expand sections, go deeper on key points, and add examples. This makes the content feel personal and high-quality.

The AI is fast, but the human touch is still essential, and AIOSEO makes combining both effortless.

Overall, using AIOSEO has transformed how I can create content. It lets me write faster, stay organized, and produce polished posts—all without ever leaving WordPress.

Why I recommend All in One SEO: AIOSEO is my go-to AI blog generator for WordPress. It lets you generate content quickly, optimize for search engines, and create visually engaging posts—all from one plugin. It’s perfect for bloggers of all levels who want to save time, maintain quality, and make sure every post is SEO-ready.

💡Expert Tip: If you don’t yet have a WordPress site, check out our guide on how to create a WordPress website to get started and take full advantage of AIOSEO’s AI Assistant.

2. ChatGPT – Flexible AI Content Generation

ChatGPT website
Pros of ChatGPT ✅ Generates natural, human-like text across diverse topics
✅ Highly flexible with tone, style, and audience adaptation
✅ Excellent for brainstorming headlines, outlines, and meta descriptions
✅ Multi-language support for global content
Cons of ChatGPT ❌ Outputs sometimes include generic or factually incorrect content
❌ Not natively integrated into WordPress or Google Docs
Requires human editing to ensure accuracy and SEO optimization
Pricing Starts at $20/month + Free
Best For Bloggers who want a creative AI assistant capable of conversational writing, flexible brainstorming, and content refinement

I recommend ChatGPT if you need a flexible assistant that can help with everything from brainstorming to refining your conversational tone.

While it does not have the WordPress integration that AIOSEO offers, its ability to generate natural text is excellent. It also adapts to your specific writing style.

I rely on it for creating outlines, writing full sections, and polishing drafts before final edits. This is why it earns a solid second place on my list of AI blog generators.

My Experience

Using ChatGPT feels like having a co-writer at your side. I can give it a clear prompt and get a full draft in seconds. This is a huge time-saver when working on multiple posts per week.

The AI adapts to the tone I need, whether it’s friendly and approachable for beginners or more professional for technical topics.

ChatGPT conversation view

I especially appreciate its brainstorming capabilities. For every post, I use ChatGPT to generate headline options, outline sections, and even suggest FAQs.

This alone reduces hours of planning and keeps my content structured and relevant.

Create an article outline with ChatGPT

Although I strictly recommend fact-checking your content, I usually treat ChatGPT’s output as a strong first draft rather than a finished article.

Before publishing, I quickly verify statistics, dates, and technical details. Then I refine the wording to better match the voice and standards we use on WPBeginner.

Why I recommend ChatGPT: It earns its second-place spot because of its versatility and creativity. ChatGPT is not just for drafting text—it helps you experiment with tone, structure, and ideas. When combined with careful editing and SEO optimization, it can produce human-like content that connects with readers and saves a huge amount of writing time.

💡Alternative: Claude is another excellent AI writing assistant that’s especially strong at generating clear, well-structured long-form content.

In my testing, it followed instructions closely and produced thoughtful drafts. This makes it a great option for bloggers who want an alternative to ChatGPT for brainstorming, writing, and refining posts.

3. Semrush AI Article Generator – Create Search-Friendly Content in Minutes

Semrush AI Article Generator
✅ Pros of Semrush AI Article Generator Generates blog posts in just a few clicks
Uses real SEO data from Semrush
Helps optimize for Google and AI search visibility
Can turn blog posts into social media posts and emails
Supports direct publishing integrations (WordPress, Mailchimp, and more)
Includes AI image generation and AI chat for brainstorming and editing
❌ Cons of Semrush AI Article Generator Requires a Semrush subscription
Works best if you already understand basic SEO concepts
Some drafts may still need editing for tone and clarity
Pricing Starts at $60/mo
Best For Bloggers, marketers, and teams who want to create SEO-optimized articles backed by real search data

Semrush AI Article Generator is built for bloggers who want to turn real-time data into search-ready drafts. Unlike many AI tools that simply generate text from prompts, Semrush combines AI writing with real SEO data.

This helps you create content that’s designed to rank on Google and appear in AI-powered search results.

My Experience

Using the Semrush AI Article Generator felt very different from testing typical AI writing tools.

Semrush AI Article Generator dashboard

Instead of starting with a blank prompt, the platform guides you through keyword selection, search intent, and competitor analysis before generating the draft.

This approach helped me create articles that were already structured around ranking opportunities rather than just sounding good.

Competitor analysis in Semrush AI Article Generator

I also liked how the AI automatically integrated relevant keywords and optimized the article structure. Instead of manually adding keywords later, the content was already aligned with SEO best practices from the start.

The brand voice feature was another highlight.

By providing a writing sample, I was able to train the AI to match a more natural tone. This helps reduce the “generic AI writing” feel that many tools produce.

Create brand voice with Semrush AI Article Generator

However, it’s worth noting that Semrush’s AI Article Generator isn’t as conversational or flexible as tools like ChatGPT or AIOSEO.

Because it focuses heavily on SEO data and structure, some drafts can feel a bit robotic or repetitive, requiring editing to sound more natural.

It also works best if you’re already using the Semrush ecosystem. This means the cost and learning curve may be higher for beginners who just want a simple AI writing tool.

Why I recommend Semrush AI Article Generator: If your main goal is to create content that ranks in search engines, Semrush’s AI Article Generator is a powerful choice. By combining AI writing with real keyword data and SEO optimization, it turns ideas into search-ready blog posts.

💡Alternative: If you don’t need a full AI blog generator, SEOBoost is a great option for AI-powered content research, outlines, and optimization.

It analyzes top-ranking pages, builds SEO content briefs, and provides real-time optimization suggestions. This helps you structure articles that have a better chance of ranking.

4. Rytr – Budget-Friendly AI Assistant

Rytr website
✅ Pros of Rytr Very affordable compared to most AI writing tools
Supports 30+ writing use cases, including blog posts and outlines
Allows tone and language customization
Includes a Chrome extension for writing across different platforms
❌ Cons of Rytr Content quality can be inconsistent or repetitive
Long-form blog posts often need significant editing and expansion
Limited SEO guidance and optimization tools
Pricing Starts at $7.50/month + Free
Best For Beginners, bloggers on a budget, and anyone who wants a simple AI assistant for generating quick drafts and ideas

If you are on a budget, Rytr is an easy-to-use assistant for generating quick blog ideas and product descriptions. It’s designed to help you quickly generate blog drafts, outlines, and short-form content without the complexity or high cost of more advanced AI tools.

While it doesn’t offer the deep SEO integrations you’ll find in tools like AIOSEO or Semrush, it does a great job of helping you get ideas on the page fast.

My Experience

Using Rytr felt straightforward from the start. The setup process only took a few minutes, and the interface made it easy to choose a content type, tone, and language before generating text.

Rytr dashboard

I tested Rytr by creating a few short blog sections and outlines.

The tool generated results quickly, which made it helpful for kickstarting content ideas or drafting simple sections.

Rytr also includes 30+ content templates, allowing you to create product descriptions and even social media captions.

In my experience, it’s particularly helpful for overcoming writer’s block and creating rough drafts that you can later refine and expand into a full article.

Write content with Rytr

However, for longer blog posts, I noticed that the content sometimes needed extra editing to improve flow and depth.

That said, Rytr still performs well for what it’s designed to do: quick content generation at an affordable price. For beginners who want to experiment with AI writing without committing to a more expensive platform, it’s a solid starting point.

Why I recommend Rytr: Rytr earns its place on this list because it offers accessible AI writing tools at a very affordable price. While it may not replace more advanced AI platforms, it’s a great option for bloggers who want to generate outlines and quick drafts without a high cost.

5. Jasper – Enterprise-Grade AI Content Creator

Jasper website
Pros of Jasper ✅ Generates polished and structured long-form content
✅ Large library of pre-built content templates
✅ Built-in team collaboration and project organization tools
✅ Consistent outputs suitable for high-volume publishing
Cons of Jasper ❌ Expensive compared to many other AI writing tools
❌ Can have a steeper learning curve for beginners
❌ Works best when combined with other SEO tools
Pricing Starts at $59/month per seat
Best For Agencies, professional bloggers, and teams that need to scale content production without sacrificing quality

Jasper is a powerful platform for teams that need to produce a high volume of content while maintaining a consistent brand voice.

It’s built with scalability in mind, offering advanced AI writing features, structured templates, and collaboration tools that make it easier to manage high-volume content workflows.

My Experience

Using Jasper felt more like working with a full content platform rather than just a writing assistant.

The templates helped speed up the process of building structured articles, especially when creating introductions, outlines, and section drafts.

Jasper interface

I also liked how Jasper handles long-form content generation. Compared to some simpler AI tools, the outputs looked more organized and polished. This greatly reduced the amount of editing needed afterward.

Another feature I really like is Jasper’s Brand Voice system. You can upload examples of your existing content, files, or even URLs from your website, and Jasper will analyze them to understand your writing style.

From there, it generates a brand voice profile that helps keep all your content consistent. This is particularly useful for teams because everyone can generate content that matches the same tone.

Add brand voice with Jasper

However, Jasper’s advanced features also mean there’s more to learn at the beginning, and the pricing can be a bit high for solo bloggers just getting started.

For teams or businesses producing content at scale, though, it can be a very powerful solution.

Why I recommend Jasper: This tool is designed for serious content production. If you run a blog, agency, or marketing team that publishes content frequently, Jasper’s templates, long-form generation, and collaboration tools can significantly speed up your workflow.


Other AI Blog Generators Worth Trying

While the tools above are some of the best AI blog generators I tested, they’re not the only options available.

Here are a few additional AI blog generators worth trying if you want more features, different pricing options, or alternative writing styles.

1. Copy.ai – Fast AI Writing for Marketing & Short Blogs

Copy.ai icon

The Good: Beginner-friendly interface with lots of templates for blog ideas, social media posts, and marketing copy.

The Bad: The free plan has usage limits, and longer blog posts may require additional editing.

Best For: Quickly generating marketing copy and social media posts.


2. Writesonic – AI Blog Post Generator with Templates

Writesonic icon

The Good: Creates blog ideas, outlines, and full posts using templates. Supports multiple writing tones and languages, and offers a beginner-friendly interface with a free trial.

The Bad: Long-form content often needs editing, and the free plan comes with usage limits.

Best For: Template-based AI writing.


3. QuillBot AI Blog Post Generator – Paraphrase & Draft Creator

Quillbot icon

The Good: Excellent paraphrasing tools that help improve readability and rewrite existing content. It also offers a free tier.

The Bad: Not as advanced for generating long-form SEO-focused blog posts compared to other AI tools.

Best For: Improving readability and writing blog drafts.


Which AI Blog Generator Should You Use?

For bloggers who want the simplest setup and the easiest experience, I recommend starting with All in One SEO. Its AI Assistant works directly inside WordPress. It lets you generate drafts, structure your articles, and even create SEO-ready titles and meta descriptions without switching between multiple tools.

It’s perfect if you want an all-in-one solution that speeds up writing while keeping your content optimized for search engines.

If you want to expand your creative options, tools like ChatGPT or Claude are excellent for conversational, human-like content, and brainstorming new ideas.

On the other hand, Rytr is ideal for budget-conscious users who need quick drafts and simple short-form content.

For larger-scale blogging, Jasper offers structured templates, brand voice support, and multi-language capabilities. This helps you generate polished, professional content faster.

💡Expert Tip: No matter which AI generator you choose, the best results come when you combine AI output with your own editing.

Fact-checking, refining the tone, and adding personal insights help make sure your content resonates with readers while remaining optimized for search engines.

Using AI as your creative partner rather than a replacement makes blogging faster, easier, and more effective.


Frequently Asked Questions About AI Blog Post Generators

AI blog generators are powerful tools, but they also raise a lot of questions—especially for beginners. In this section, I’ve answered the most common questions about using AI to write, optimize, and publish blog content.

Can I rely solely on AI to write my blog?

AI can generate content quickly, but it shouldn’t replace human editing. Always review, fact-check, and add your own insights to ensure quality and accuracy.

Which AI blog post generator is best for beginners?

For beginners, AIOSEO’s AI Assistant is ideal—it’s built directly into WordPress and combines AI drafting with SEO guidance. Rytr is also great for simple, fast drafts on a budget.

How do I optimize AI content for SEO?

Use tools like AIOSEO to generate optimized titles, meta descriptions, headings, and readability suggestions. Combine these with proper keywords and human editing for best results.

Are AI-generated posts original?

AI generates unique text based on patterns it has learned, so the output is typically original. However, always check for plagiarism and refine content to avoid accidental repetition.

Will Google penalize my site for using AI content?

Actually, Google focuses on content quality rather than how it was created. As long as your posts are helpful, original, and provide value to your readers, your site won’t be penalized for using AI.


Additional Resources to Help You Write Blog Posts

Writing great blog posts takes more than just generating text—it’s about planning, optimizing, and refining your content.

These additional resources will help you level up your blogging workflow, improve SEO, and make your posts more engaging for readers:

If you liked this article, then please subscribe to our YouTube Channel for WordPress video tutorials. You can also find us on Twitter and Facebook.

The post 5 Best AI Blog Post Generators I Actually Use (& Recommend) first appeared on WPBeginner.


from WPBeginner https://ift.tt/PZ4vubx
More links is https://mwktutor.com

Wednesday, 18 March 2026

How to Turn Your Membership Site into an App (The Easy Way)

It’s a common misconception that you need to hire a developer or spend $10,000+ to build an app. You can actually turn your membership website into a branded app in under three hours and on a much smaller budget.

Forcing your members to repeatedly log in through a phone browser is a major cause of churn. An app removes this friction by keeping users logged in right on their home screens.

In this guide, I’ll show you exactly how to get your membership site onto your members’ phones using MemberPress AppKit, all without writing a single line of code.

Turn Your Membership Site into an App (The Easy Way)

💡Quick Answer: How to Turn Your Membership Site into an App

You can turn your WordPress membership site into a mobile app using MemberPress AppKit, without hiring developers or writing code.

It automatically converts your existing site into iOS and Android apps, so your members can access content through an app instead of a browser.

Why Turn Your Membership Site into an App?

A membership app makes it easier for members to come back, stay logged in, and engage with your content more often.

When your site lives as an app on a member’s phone, a lot of small frustrations disappear. There’s no browser to open, no tabs to find, and no repeated logins. Everything feels faster, simpler, and more natural to use.

That’s where the real benefits show up:

  • Your site lives on your members’ home screens, so it’s always visible and easy to open.
  • Members stay logged in, which removes one of the biggest barriers to repeat visits.
  • Content opens faster than a mobile browser, especially for lessons and videos.
  • Push notifications help you bring members back at the right time.
  • Courses, videos, and community areas feel more focused inside an app.

Because of this smoother experience, apps generally see higher engagement than mobile websites.

If your members already use their phones to watch lessons, read posts, or check updates, an app simply removes friction. This makes it easier for them to stay involved.

How Much Does Creating a Membership App Actually Cost?

Creating a membership app is more affordable and accessible than many site owners expect. You don’t always need to hire developers or build everything from scratch.

When most site owners think about mobile apps, they imagine high costs, long timelines, and technical headaches.

But there are several options available, which make launching your own branded app much simpler. Here’s a quick breakdown of the main approaches and what they typically cost:

Option Process Typical Cost
Hiring developers High complexity, ongoing maintenance $10,000–$50,000+ upfront
App agencies Long timelines, rigid processes $5,000–$20,000+
Generic app builders Manual content setup, constant syncing $50–$300/month
MemberPress AppKit Turns your existing site into iOS & Android apps, real-time content sync, push notifications, in-app payments, no-code setup $1,746.50/year (including hosting, membership site, and app)

Compared to other options, MemberPress AppKit is much faster, easier, and more affordable—all without losing functionality or control of your site.

Why I Recommend MemberPress AppKit
MemberPress AppKit Homepage

As you can see in the table above, MemberPress AppKit stands out from the rest.

It turns your existing MemberPress membership site into a fully branded mobile app without rebuilding anything, hiring developers, or dealing with complex setup.

Plus, it supports both iOS and Android. Your content, members, and payments stay exactly the same, you just get a mobile-friendly app experience.

Here are just some of the reasons why I recommend MemberPress AppKit:

  • Fully branded Mobile App: Launch your own iOS and Android app that reflects your brand.
  • Real-time Content Syncing: Courses, lessons, and membership rules stay perfectly up to date.
  • Built-In Push Notifications: Remind members about new lessons, events, or updates.
  • In-App Payments: One-tap enrollment boosts conversions by 3–5x.
  • No-Code Setup: Everything you need to publish in the App Store and Google Play.

For most membership site owners, this is the easiest and most cost-effective way to launch a real mobile app. And it delivers a smooth experience.

Is Creating a Membership App the Right Path for You?

A membership app can be highly beneficial, but it’s not required for every site.

To make this easier to see at a glance, I’ve created this table. It shows when an app makes sense and when you might want to wait:

An App Makes Sense If You May Want to Wait If
Members regularly access your content on mobile. Your membership site is brand new.
You offer courses, lessons, or video content. You have very few active members.
You want to boost retention and engagement. Your content is mostly text-based and works fine on mobile web.
Members have specifically asked for an app experience. Your budget is extremely tight right now.

The good news is you don’t have to decide forever. You can always start with a mobile-friendly website and add a membership app later as your site grows and your members’ needs evolve.

MemberPress AppKit Setup: What You Need & How Much It Costs

Before I show you how to turn your MemberPress membership site into a mobile app, let’s make sure you’ve got everything ready.

I’ve put together a quick checklist so you know exactly what you need:

  • Reliable WordPress Hosting – Your site needs fast, stable hosting. I recommend Rapyd Cloud, which is optimized for membership sites. It starts at around $29/month.
  • MemberPress Plugin – Required to run your membership site and manage subscriptions. Pricing starts at $199.50/year.
  • MemberPress AppKit Subscription – Turns your existing site into a fully branded mobile app, starting at around $1,199/year.
  • Apple Developer Account – Needed to publish your iOS app, costs about $99/year.
  • Google Play Developer Account – Needed to publish your Android app, starting at $25 one-time.

If you haven’t built your membership site yet, I suggest taking a look at our ultimate guide. It covers creating a membership site in WordPress.

If your site is already live with MemberPress, your main new costs will just be the AppKit subscription and developer accounts.

Compared to hiring a developer to build a custom app, this is a much faster and more affordable way to get a professional app.

Step-by-Step: How to Turn Your Membership Site into an App

Now that you clearly understand the costs and requirements for building a membership app, it’s time to dive into the actual setup.

Expert Tip: While the setup is no-code, you still need to generate API keys from your developer accounts. It is a one-time process, but I recommend setting aside an hour to get everything configured correctly.

With MemberPress AppKit, the process itself usually takes around 2–3 hours. This includes connecting your site, customizing your app, and preparing it for launch.

It’s worth noting early on that submitting your app to the Apple App Store and Google Play can take extra time.

Apple’s review process can take a few days, while Google’s is typically faster.

💡 Pro Tip: Since first-time app submissions sometimes require minor tweaks before approval, I highly recommend waiting until your app is officially approved by both stores before announcing a hard launch date to your members.

In the steps below, I’ll guide you through turning your MemberPress membership site into a polished, fully branded mobile app. Your members can access it anytime, anywhere.

Step 1: Install and Activate the MemberPress AppKit Plugin

To get started, you’ll first need to purchase MemberPress AppKit from the MemberPress website. Once you’ve completed your purchase, you’ll be able to download the AppKit plugin.

After that, the next step is to install and activate it on your WordPress site.

This plugin is what connects your membership site to your mobile app. It handles everything behind the scenes, including syncing your content, members, and settings automatically.

If you’re not familiar with the process, you can follow our guide on how to install a WordPress plugin, which walks through every step.

Upon activation, you’ll need to connect it to your website using a license key. You can find your license key by logging into your MemberPress account and opening the AppKit subscription details.

Copy the MemberPress AppKit license key

Next, go to MP AppKit » Connect in your WordPress dashboard. Paste your license key into the field and click the ‘Connect’ button.

After a few seconds, you should see a confirmation message letting you know the connection was successful.

Add MemberPress AppKit license key in WordPress

From here, you’re ready to start configuring your app and preparing it for the build and publishing process.

Step 2: Configure Your iOS Settings (Apple Developer Account)

Now that your MemberPress AppKit is connected to your site, it’s time to get your iOS settings ready. This helps your app appear on the Apple App Store.

The first thing you’ll need is an Apple Developer account. Setting this up is simpler than it sounds.

You just sign up at Apple’s developer site, fill in some basic personal and contact information, and pay the annual fee. Apple usually takes a day or two to approve your account, so it’s a good idea to get this started early.

Create Apple Developer account

Once your Apple Developer account is ready, go to your WordPress dashboard and head over to MP AppKit » Configure » iOS Settings. This is where you’ll connect your Apple account to MemberPress AppKit.

Start by pasting in your Key ID and Issuer ID, then upload the API key you generated in App Store Connect.

📍Security Warning: Treat this API key like a highly sensitive password. Keep it strictly confidential and never share it with unverified third parties to protect your app’s security.

This connection lets MemberPress AppKit handle all the complicated stuff behind the scenes. This includes creating certificates, syncing your app content, and managing in-app subscriptions.

Connect the Apple Developer account with MemberPress AppKit

There are a few key pieces of information you’ll need to add here, and each one has a very important role:

  • Bundle IDs – These give your app a unique identity on iOS. Think of it as your app’s passport.
  • Signing Certificates – These act as your digital signature, proving the app was created by you.
  • Provisioning Profiles – These tell Apple which devices can install your app for testing.
  • App ID and App-Specific Shared Secret – These make in-app purchases and membership subscriptions work smoothly.
Add bundle IDs in MemberPress AppKit

I know this might feel like a lot at first, but I promise it’s mostly copy-paste work once you have your Apple account ready.

We’ve gone through the full process in detail in our tutorial on turning a WordPress site into an app. The steps for MemberPress AppKit are very similar, so you can follow that guide and feel confident you’re doing everything correctly.

Step 3: Configure Android Settings (Google Developer Account)

Once your Apple setup is done, it’s time to connect your Android settings so your app can be published on the Google Play Store. I know this sounds technical, but if you follow along carefully, it’s easier than it looks.

Start by creating a Google Developer Account, which lets you publish apps and manage updates. Then, the next step is to create your app in Google Play Console.

Here, you’ll give your app a name, select a default language, and choose whether it’s free or paid.

For most memberships, I recommend setting it to free, since monetization is usually handled through MemberPress itself.

Configure app details and create an app

Next, head over to MP AppKit » Configure » Android Settings. Here, you’ll need to upload the Service Account key you generated in Google Cloud.

📍Security Warning: Just like your Apple API key, this file gives access to your app’s infrastructure. Keep it completely secure and do not share it.

This connects your Google Developer account to MemberPress AppKit so your app can sync content, users, and in-app purchases automatically.

Connect Google Developer account with MemberPress AppKit

There are a few key items you’ll need to set up at this stage:

  • Application ID – Think of this as your app’s unique ID in the Google Play Store. It needs to follow a reverse-domain format. This usually means taking your website domain extension and name, and adding a suffix (for example, if your website is mywebsite.com, your ID could be com.mywebsite.app).
  • KeyStore certificate – This is like a digital signature for your app, which ensures Google recognizes you as the owner for future updates. You can generate this directly in MP AppKit.
Add Keystore information in MemberPress AppKit

You can see our guide on turning your site into an app for more setup tips.

Once your Service Account key, Application ID, and KeyStore are all configured, your Android account is fully connected.

Step 4: Configure Firebase to Send Push Notifications With Your App

One of the best ways to keep your members coming back is through push notifications. These little nudges let your community know about new posts, messages, or events.

To make this work on both iOS and Android, you’ll need to integrate your MemberPress AppKit with Google Firebase. This is a free Google tool that handles real-time notifications.

To get started, create a Firebase project, which is basically the foundation for all your push notifications. Head over to the Firebase Console and click the ‘Get started by setting up a Firebase project’ button.

Create a project in Firebase console

Give it a name that matches your app so you can easily recognize it later.

You’ll also have the option to enable Google Analytics, which can be handy if you want to track app activity, but it’s optional.

Add a name for your Firebase project

Next, you need a Firebase Service Account Key. This key acts like a digital passport, allowing WordPress to securely send push notifications through Firebase.

To get it, go to your project in Firebase, then navigate to Project Settings » Service accounts. Scroll down to the ‘Firebase Admin SDK’ section, click ‘Generate new private key’.

Then, download the JSON file. I know downloading a “JSON file” sounds highly technical, but don’t worry! There is absolutely no coding required.

You are simply downloading this file from Google to upload it into WordPress in the next step. Make sure to store it in a safe place — this file can only be downloaded once.

Generate an admin key for MemberPress AppKit in Firebase

After that, head back to your WordPress dashboard under MP AppKit » Configure » Google Firebase and upload the file under ‘Firebase Admin Key.’

This step connects Firebase to your MemberPress AppKit.

Add Firebase admin key in MemberPress AppKit

Next, you’ll register your mobile apps in Firebase. You’ll need to create four apps in total: a main app and a test version for both iOS and Android.

Make sure the Bundle IDs for iOS and Application IDs for Android match exactly what you used in your developer accounts. They also need to match your MemberPress AppKit settings.

For iOS, you’ll also need to upload your APN (Apple Push Notification) authentication key from Apple so push notifications can reach Apple devices.

Add iOS and Android apps in Firebase Console

After registering all apps, download the configuration files. This includes the .plist file for iOS and the .json file for Android, along with their test versions.

Then, go back to WordPress and upload all four files under the Google Firebase settings. Click Save Changes,’ and you’re done.

Add android and iOS apps Firebase file in MemberPress AppKit

Your app is now connected to Firebase, and push notifications can start reaching your members on both iOS and Android.

💡 Pro Tip: Double-check that your Bundle IDs and Application IDs match exactly. Any mismatch can cause errors and prevent push notifications from working.

We cover this process in more detail in our guide on how I turned a WordPress site into a mobile app. You can follow it for extra guidance.

Step 5: Set Up Key Features in MemberPress AppKit

Now that your app is connected and Firebase is ready, it’s time to configure the features that make your app really engaging for your members.

From push notifications to sharing and feedback, these settings help keep your community active and returning to your app.

1. Enable Push Notifications

Push notifications are one of the easiest ways to keep members engaged. They pop up in real-time on members’ devices when there’s a new post, message, or membership update.

Turning notifications on helps members remember to return to your app. When members open your app for the first time, their phone will ask for permission to send these alerts.

To enable, go to the MP AppKit » Components page and click the ‘Activate’ link for push notifications.

Enable push notifications component in MemberPress AppKit

Next, I suggest configuring the ‘Automated Notification Types.’ These are triggered by specific actions—like a new post or membership update—so you don’t have to send notifications manually.

Head over to MP AppKit » Settings » Push Notifications, select the automatic notifications you want active, and click the ‘Save Changes’ button.

Select automatic notifications in MemberPress AppKit

Only enabled notifications will appear in members’ app settings, and they can choose which ones to receive.

2. Enable User Registration

I highly recommend letting new members register directly from your app. It makes onboarding super easy and reduces admin work.

Go to MP AppKit » Settings » General and scroll down to the ‘Registration’ section. Then, check the ‘Allow registering a new account from within the app’ option.

Enable user registration in MemberPress AppKit

Once you’re done, click the ‘Save Changes’ button to store your settings.

3. Configure Delete Account Settings

It’s important to give members control over their accounts. The Delete Account feature allows them to request account deletion while keeping you compliant with privacy rules.

To add this feature, go to the MP AppKit » Settings » Feedback page and scroll to the ‘Delete Account’ section.

Here, enter the email address where deletion requests should be sent. I suggest also customizing the email subject line so these requests are easy to spot.

Allow account deletion with your app with MemberPress AppKit

If you leave the email blank, the system will use your WordPress Administration Email. Upon making the changes, just click the ‘Save Changes’ button.

4. Enable Report a Bug and Send Us Feedback Features

Getting user feedback is super important. The Report a Bug feature lets members submit issues with screenshots or videos, while Send Us Feedback collects general suggestions.

I recommend enabling both by going to MP AppKit » Settings » Feedback and checking the boxes for ‘Report a Bug’ and ‘Send Us Feedback’ options.

Enable Send Us Feedback option in MemberPress AppKit

Then, enter the email addresses for submissions, and optionally add default subject lines.

Members can submit directly through the app. Each submission will include device info, app version, and platform details to help you troubleshoot efficiently.

Add the Report a Bug feature in MemberPress AppKit
5. Enable Share and Related Posts

Sharing content helps your members become promoters, and showing related posts keeps them reading longer. I usually recommend turning on both.

For this, head over to MP AppKit » Settings » Blog Posts. Under the ‘Bookmarking’ section, check the ‘Enable Sharing’ and ‘Enable Related Posts’ options. Then, click ‘Save Changes.’

Enable social sharing in app with MemberPress AppKit

Now, in the app, members can tap the share icon to copy the post link. They can also share via apps like WhatsApp, Facebook, or Messages. Related posts will show at the bottom of articles, keeping members engaged.

6. Configure Smart Banner

The Smart Banner is another handy feature. It prompts visitors who land on your website via a mobile browser (like Safari or Chrome on their smartphones). They will be prompted to either download your app or open it if they already have it installed.

Note that this banner won’t appear for users visiting your site on a desktop computer.

This works well for boosting app installs because it targets users who are already engaged with your site. This makes them more likely to try the app.

To enable it, go to the MP AppKit » Settings » Smart Banner page and check the boxes for iOS and/or Android.

Enable smart banners in MemberPress AppKit

After that, simply click the ‘Save Changes’ button to store your settings.

7. Configure Default Restricted Message

Finally, I suggest customizing your Default Restricted Message. This appears when members try to access content they don’t have permission for. A clear message with a call-to-action improves member experience.

Go to MP AppKit » Settings » Access Controls, scroll to ‘Default Restricted Message’ section, and enter a title and explanatory text.

You can also select a button action (like opening a membership page or a custom app page). Plus, you can enable content teasers to give members a preview of restricted content.

Add default restricted message in MemberPress AppKit

Click ‘Save Changes’ when done.

Step 6: Configuring App Branding in MemberPress AppKit

Custom visuals make your app feel professional and on-brand. I recommend taking time to configure logos, splash screens, icons, and colors carefully. These help reinforce your identity and make the app feel polished.

Start by adding your app’s logos and images. Head to the MP AppKit » Branding » Images page from the WordPress dashboard.

This is where you can upload logos for your home screen, login screen, registration screen, and launch screen. I suggest using the same logos and colors as your website so your members instantly recognize your brand.

Add image icons for your app in MemberPress AppKit

Next, customize your app colors by switching to the ‘Colors’ tab from the top.

This controls backgrounds, buttons, navigation bars, text, and interactive elements. I recommend picking a color palette that complements your logos and helps with readability.

Set general colors for your backgrounds, accents, borders, and image placeholders. Once you are done, make sure to click ‘Save Changes’ to store your settings.

Configure app colors in MemberPress AppKit

Typography is important for readability and brand identity. Switch to the ‘Typography’ tab to import Google Fonts or upload your own custom fonts.

Choose fonts that are clear on mobile screens and match your brand style.

Configure your app's typography in MemberPress AppKit

Other than that, you can personalize your navigation icons in the Tab Bar and More Screen menus by going to MP AppKit » Menu » Tab Bar. I suggest using simple, branded icons that are easy to recognize.

Upload your icons, crop them so they fit neatly, and repeat the process for the More Screen menu. Then, click the ‘Save Changes’ button.

Add image icons for your tab bar in MemberPress AppKit

Finally, decide where your navigation appears by configuring the ‘Tab Bar visibility’ from the left column.

You can choose to show the navigation on all screens, which keeps it always accessible. Or, show it only on main menu screens for a cleaner, distraction-free experience.

You should test both options to see what works best for your app content.

Configure tab bar visibility in MemberPress AppKit
Step 7: Configure the App Homepage

After your app branding is set up, the next thing you should focus on is the app homepage. This is the first screen members see right after logging in. It plays a big role in how easy your app feels to use.

A well-designed homepage helps members find what they need faster, reinforces your branding, and highlights the actions you want them to take.

To get started, go to MP AppKit » App Pages in your WordPress dashboard. This is where you create custom screens for your app. Click the ‘Add New App Page’ button.

Create an app page in MemberPress AppKit

Then give your page a simple title like “Home.”

I recommend keeping the name short and clear because you’ll use it later when adding the page to your app’s navigation.

Once the page is created, you can start designing it using familiar Gutenberg blocks. Just click the ‘+’ icon to add blocks.

Use blocks to customize app pages in MemberPress AppKit

One of the most useful options here is the ‘Quick Link’ block. It lets you point members to key areas like courses, activity, or important resources.

I suggest adding the links members are most likely to tap right after logging in, so they don’t have to dig through menus.

Add Quick Links block to MemberPress AppKit

If your app includes courses, you can add the ‘Courses’ app block to the homepage. This block displays courses in a carousel that feels very natural on mobile.

Members can tap a course to view details or choose “See All” to browse the full list.

You can rename the block title and adjust colors. You can also decide whether to show courses automatically using filters or manually select specific ones.

Add the Courses block in MemberPress AppKit

After your homepage layout is ready, click the ‘Publish’ button to make the page live. You can now repeat the process to create other pages for your app.

Step 8: Build and Test Your Mobile App

Now that everything is set up, this is the point where you actually turn your membership site into a working mobile app.

To get started, head over to the MP AppKit » Build in your WordPress dashboard and click the ‘Request Build’ button.

Click the Request Build button in MemberPress AppKit

Next, select your platforms — iOS, Android, or both — and choose ‘Test App’ and ‘Release App’ as your build types.

This will generate four versions: a test and a release build for both iOS and Android.

The Test App version is what you can install on your devices to check functionality. For Android, you can usually install this immediately using a QR code. For iOS devices, you will need to use Apple’s TestFlight app to install your test build.

It’s perfect for checking how your app looks, testing features, and making sure everything works before submission.

The Release App is the one you’ll use to upload to the Apple App Store and Google Play Store. After selecting your platforms and build types, click ‘Next Step’ and review the build summary.

Select platforms and Build Type in MemberPress AppKit

Make sure your site configuration, menus, branding, and customizations are correct.

Once everything looks good, click ‘Send Build Request.’

Click Send Build Request button in MemberPress AppKit

Your build request will now go to MemberPress’ cloud build system. When the build is complete, the status will change to Completed.

At that point, click the ‘Install Test App’ button to generate a QR code. Scan it with your device to download and install the test version.

Install the test version of the app in MemberPress AppKit
🔍 Things to Check in Your Test App (Before Submitting to App Stores)

Upon installing the test version of the app on your phone, here are a few important things I recommend checking.

This will make sure everything is working properly:

  • Can you log in and register a new account?
  • Do menus, content, and core features load correctly?
  • Are push notifications working?
  • Does the branding match your settings — logo, colors, and app icon?
  • Is navigation smooth with no broken links or missing icons?

Testing now helps you catch issues early, so your app store submission goes smoothly.

Step 9: Submit Your App to the App Stores

Once you’re happy with the test version, the next step is submitting your app to the app stores.

From the Build page, switch to the ‘Release Apps’ tab. Here, you will see the Release App versions of both your iOS and Android apps listed together.

For Android, expand the ‘Submit for Publishing’ dropdown and select the ‘Upload to Google Play Console’ option.

For iOS, expand the ‘Submit for Publishing’ dropdown and choose ‘Upload to App Store Connect.’ This will start the upload process for each platform, sending your app builds directly to the stores.

Submit apps for publication in MemberPress AppKit

Before uploading, make sure you’ve prepared everything the app stores require, including your app description, screenshots, and keywords.

These items will appear on your public app listing and play a major role in helping users discover your app through search.

In the Google Play Console, you can enter this information by going to your dashboard, selecting your app, and opening the ‘Store Listing’ section.

Add app details in Google Play Console

For App Store Connect, simply go to ‘My Apps’ and select your app.

Here, you can upload your screenshots, add your app description, and include relevant keywords to improve visibility in the App Store search results.

Upload screenshots in App Store Connect

After submission, your app will go through a review process. This usually takes a few days, but it can vary. If your app isn’t approved on the first try, don’t worry — Apple and Google provide feedback so you can fix issues and resubmit.

Once approved, your app will be live for users to download.

💡 Bonus Tip: Keep Your App Updated

Publishing your app isn’t a one-time process. Minor updates, like adding new posts, courses, or content, will automatically sync to your MemberPress AppKit app.

However, bigger changes — such as enabling new MemberPress features, updating APIs, or changing your app branding — require generating a new build. You must then resubmit it to the app stores.

I recommend doing this regularly to keep your app stable. This also makes sure everything works smoothly and your users always have the best experience.

Frequently Asked Questions About Creating an App for a Membership Site

Have questions about turning your MemberPress site into a mobile app? You’re not alone.

Below, I’ve answered the most common questions to help you get your iOS and Android apps up and running quickly and smoothly.

Do I need to know how to code to create an app for a membership site?

No, you don’t need any coding skills. MemberPress AppKit handles the app creation for iOS and Android automatically using your WordPress site settings.

Will members need new accounts for their membership app?

No, your existing members can use the same accounts they already have on your WordPress membership site.

Can I use Stripe or PayPal in my app?

While MemberPress easily uses Stripe and PayPal on your website, mobile apps have different rules.

If you are selling digital goods (like memberships or online courses) inside the app, Apple and Google strictly require you to use their native In-App Purchase (IAP) systems. This is to comply with their guidelines.

Keep in mind that both platforms take a percentage cut (usually 15% to 30%) of these in-app sales.

What if the app for my membership site gets rejected?

App store rejections are common and usually easy to fix. Most issues happen because of metadata, screenshots, or minor policy requirements. You can fix these quickly and resubmit for approval.

Will content update automatically in my app?

Yes, updates like new posts, courses, or membership content will sync automatically with your app without needing a new build.

Can I send push notifications for free?

Yes, by using Google Firebase, you can send unlimited push notifications to your app users at no extra cost. This is one of the best ways to improve engagement without increasing your monthly budget.

By following these steps, you’ve turned your membership site into a professional mobile app that lives right on your members’ home screens. This not only makes your content more accessible but also helps build a more engaged community.

To grow your site even further, you should check out our tutorial on how much it costs to start a membership site. Also see our top picks for the best WordPress membership plugins.

If you liked this article, then please subscribe to our YouTube Channel for WordPress video tutorials. You can also find us on Twitter and Facebook.

The post How to Turn Your Membership Site into an App (The Easy Way) first appeared on WPBeginner.


from WPBeginner https://ift.tt/0jUxgZh
More links is https://mwktutor.com