Wednesday, 31 December 2025

Best of Best WordPress Tutorials of 2025 on WPBeginner

As the year comes to an end, we’re taking a moment to look back at some of the best tutorials we’ve published on WPBeginner in 2025.

While 2025 brought us plenty of exciting WordPress updates and new features, one topic naturally stood out this year: Artificial Intelligence.

Our goal wasn’t for you to simply watch the AI revolution unfold, but to use it in practical ways to grow your website and business.

That is why we shared practical guides on using AI inside WordPress, along with step-by-step tutorials, and smart automation techniques to help you work faster and more effectively.

At the same time, our core mission remains unchanged: to make WordPress easier for everyone, whether you are just starting out or managing a growing business.

In 2025, we published hundreds of guides designed to help you build better websites, master new tools, and improve your skills.

In this roundup, we’ve carefully selected the most popular and helpful tutorials of the year. Whether you missed these articles or want a quick way to revisit them, this guide will help you catch up on all the must-read WordPress and AI content from 2025.

WPBeginner year-end roundup

WPBeginner Recap 2025

2025 has been a remarkable year for the WPBeginner team.

From expanding our WordPress tutorials to experimenting with new tools and workflows, our focus stayed the same: helping users succeed without unnecessary complexity.

None of this would be possible without the dedication of our team and the continued support of the WPBeginner community.

Similarly, our family of products made significant progress, focusing on artificial intelligence, automation, and user experience.

Here’s how our top tools evolved to help you grow your business.

WPForms

WPForms is the most beginner-friendly WordPress form builder on the market. Over 6 million websites use it to create contact forms, payment forms, surveys, and more with a simple drag-and-drop interface that’s now even easier with AI.

This year, we shipped a ton of new features, with a heavy focus on automation and AI.

We launched AI-powered form generation, so you can describe the form you need, and WPForms will build it for you in seconds.

WPForms AI forms in action

We also added AI Calculations, which lets you turn plain English into complex calculation formulas without using math or weird syntax. This is great for eCommerce, event planners, real estate, consultants, or anyone who needs dynamic pricing or custom calculations.

One of the most requested releases was our new PDF Addon, which automatically turns form submissions into professional documents. It’s a huge time-saver if you need to create invoices, contracts, receipts, or certificates after someone fills out a form.

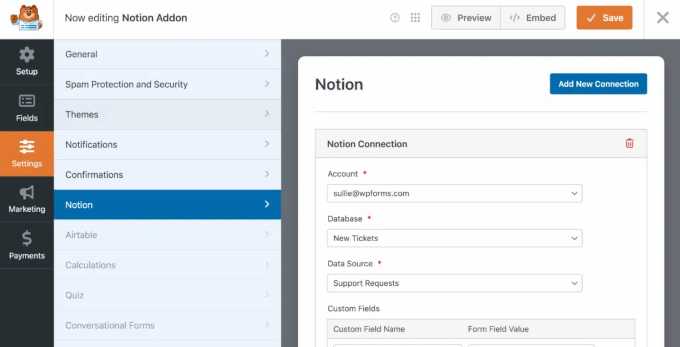
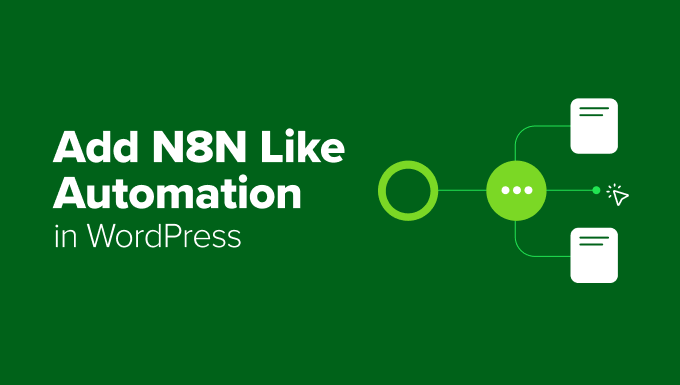
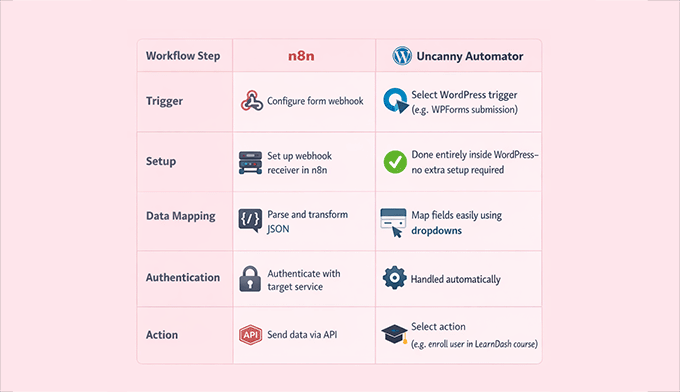
On the integration front, we added seamless connections with Airtable, Google Drive, Notion, Make.com, and n8n. These integrations make it easier than ever to automate workflows and keep data synced across tools.

Plus, we introduced the Entry Automation Addon, which automatically exports and cleans up form entries. For example, automatically export last week’s leads to a spreadsheet every Monday morning, or delete entries older than 90 days to stay compliant with privacy laws.

We also launched a Camera Field for capturing photos directly in forms. We built this because we wanted to collect video testimonials without paying for a third-party SaaS. Now, our users can do the same.

Design also got a boost with Form Themes for All, making professional styling accessible to everyone with no CSS required. Plus, free users gained the ability to accept payments via Square, which is a big win for small business owners who want to get paid faster.

We truly believe that WPForms is a must-have plugin for WordPress users, and we also have a free version that you can download straight from the WordPress plugin directory.
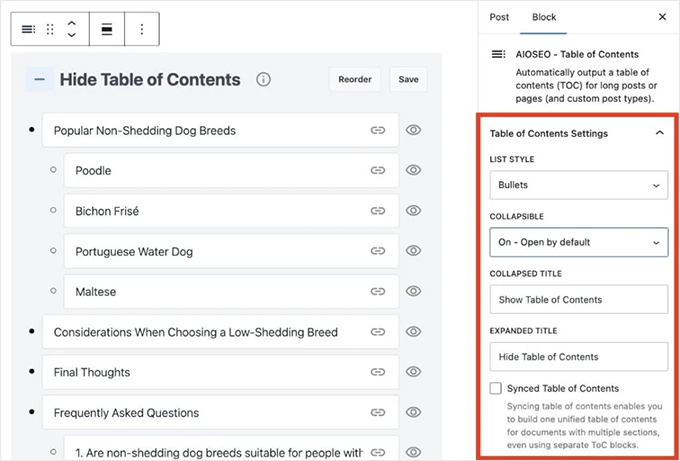
AIOSEO

All in One SEO (AIOSEO) is the best WordPress SEO plugin, and over 3 million website owners use it to improve their rankings, add schema markup, and manage their SEO right inside WordPress.

This year, we shipped a ton of updates, with a big focus on AI search visibility, faster content creation, and clearer reporting to prepare for the future of search.

One of our biggest releases was the AI Assistant, which works right inside the WordPress editor. It can generate entire articles from a simple prompt, so you can spend less time drafting and more time optimizing.

We also introduced the AI Content Generator, which can generate FAQ blocks, key points, social posts, and even SEO titles and meta descriptions directly in WordPress.

Another game-changing update was our AI Image Generator, which instantly creates unique, on-brand visuals and saves them to your media library. No need to design your own graphics or buy stock photos.

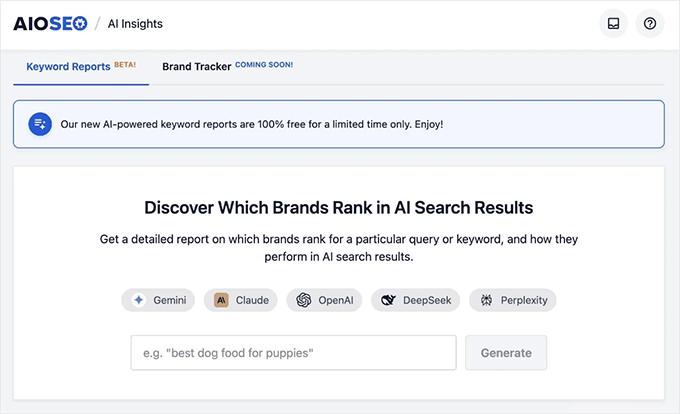
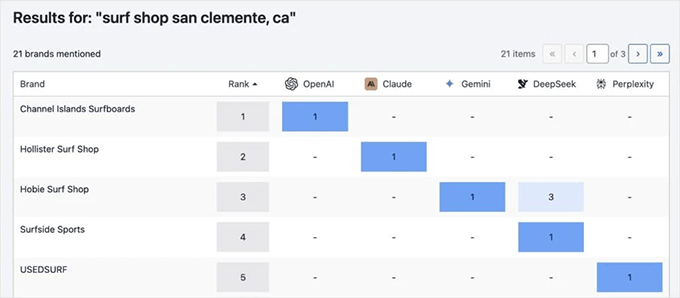
We also rolled out our new AI-powered Keyword Report tool, which lets you see which brands are ranking for search queries in AI search results. This is the best tool to prepare you for Generative Engine Optimization (AI Search).

Technical SEO saw major upgrades with the new Index Status Report and AI Insights, which help you see exactly how Google sees your content and uncover hidden opportunities without leaving the dashboard.

To give you more control over how AI systems see your content, we also introduced the LLMs.txt Generator. It lets you manage how large language models read your site, which is becoming increasingly important as AI engines index the web.

Other key updates included a visual Site Audit tool for finding issues faster, advanced Crawl Controls to manage bot traffic, and a highly requested feature for duplicating posts and pages.

We strongly recommend checking out AIOSEO if you want to grow your website rankings. We also have a free version that you can download from the WordPress plugin directory.

SeedProd AI Website Builder

SeedProd is the best drag-and-drop WordPress website builder used by 1+ million website owners. It makes it easy for anyone to create custom landing pages and full websites without hiring a developer or touching code.

This year, our team redefined website building for WordPress users with the launch of the AI Website Builder.

This game-changing tool allows you to generate a complete, fully designed WordPress website, including copy and images, in less than 60 seconds simply by describing your business in plain text.

It’s the fastest way to go from “I need a website” to “my site is live and ready to edit.”

Beyond AI, we rolled out a completely redesigned dashboard to streamline user workflows. This makes it easier to manage your pages, jump between projects, and keep everything organized as your site grows.

SeedProd also expanded the design library with over 15 new industry-specific themes and upgraded the Image Carousel block. It’s now even easier to build a website that looks polished right from the start.

You can download the free version of SeedProd from the WordPress plugin directory.

Other Notable Product Highlights

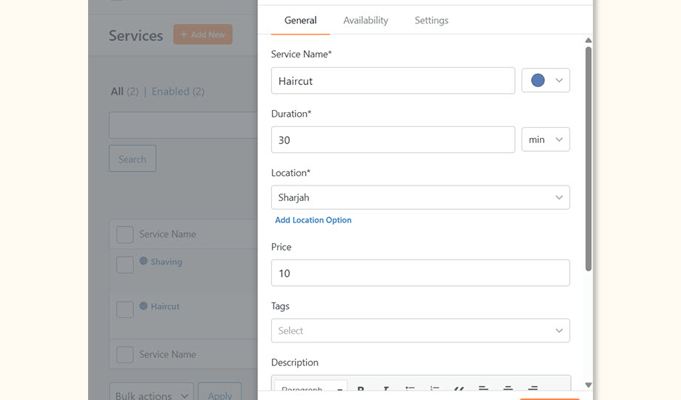
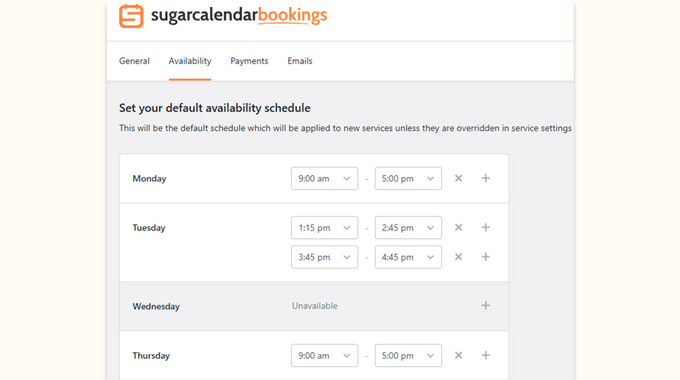
  • Sugar Calendar Bookings is a brand-new appointment booking solution that lets customers schedule and pay for appointments directly on your WordPress site. It’s ideal for consultants, coaches, and service-based businesses that want full control over scheduling and payments. Learn more.
  • WPChat is a new live chat tool that helps you turn website conversations into sales. It offers chat funnels, AI-powered FAQs, and live chat support across WhatsApp, Messenger, Instagram, and Telegram. Read our announcement.
  • WPConsent is the best WordPress privacy compliance plugin, used by 100,000+ websites. It makes privacy compliance easy by automatically blocking tracking scripts until users give consent. It also includes geo-targeted banners, self-hosted consent logs, and auto-generated cookie policies. Learn more about WPConsent.
  • RewardsWP is a lightweight refer-a-friend plugin built for WooCommerce and Easy Digital Downloads. It helps you launch word-of-mouth marketing campaigns for your online store without relying on complex third-party platforms. See how it works.
  • PDF Embedder is a powerful WordPress PDF plugin used by 300,000+ websites that lets you securely embed and manage PDF documents on your site. It replaces clunky browser viewers with a clean, mobile-friendly experience while protecting your files from unauthorized downloads and tracking how visitors interact with your PDFs. See how it works.
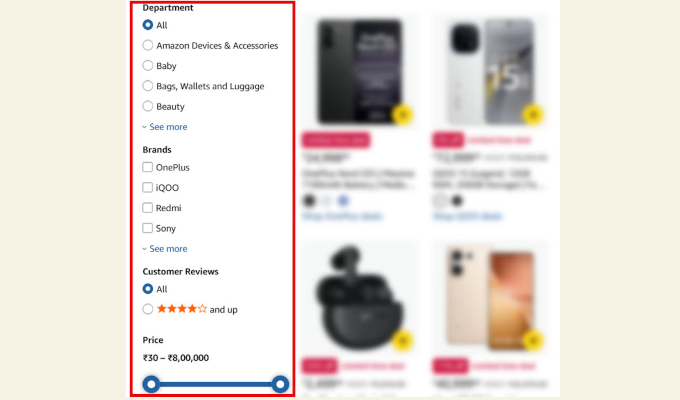
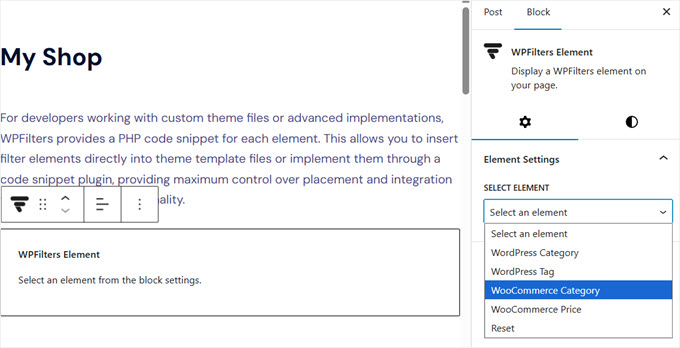
  • WPFilters is a new filtering tool by SearchWP that makes it easy to add advanced, Amazon-style search filters to WordPress. Visitors can quickly narrow results by price, category, rating, or custom fields, helping them find exactly what they’re looking for. For more details, see our WPFilters announcement.

There have been many more exciting updates across all our products, and it’s hard to cover everything in one place. I recommend that you check out our WordPress plugins page to see what we’re building. Your continued support truly means a lot to us.

Acquisitions and Investments

Through the WPBeginner Growth Fund, we continue to invest in and support companies that solve important problems for WordPress users.

This year, we were thrilled to welcome aThemes to our family of products.

aThemes is the team behind some of the most popular and lightweight WordPress themes on the market, including Sydney and Botiga.

This acquisition allows us to provide our readers with professionally designed, speed-optimized templates to launch their websites quickly and efficiently.

aThemes also offers the powerful Merchant plugin, which enables WooCommerce store owners to increase their sales, retain customers, and boost average order value.

Want us to acquire or invest in your business? Learn more about the WPBeginner Growth Fund, where we invest in WordPress and SaaS companies.


Now, let’s look at the best content we published throughout the year on WPBeginner. πŸ“…

January February March April
May June July August
September October November December

January

How to Backup WordPress to Amazon S3 (Free + Paid Methods) – Keeping your website data safe is our top priority, and cloud backups are the best way to do it. We walk you through how to automatically send your backups to the cloud using Duplicator so you never have to worry about losing your hard work.

How to Reduce Stripe Transaction Fees in WordPress (3 Expert Tips) – Nobody likes losing a chunk of their hard-earned revenue to payment processing costs. We share our favorite strategies, including using WP Simple Pay, to help you lower those fees and keep more money in your pocket.

Why Is WordPress Slow? Learn How to Fix It with Our 10 Expert Tips – A slow website can hurt your user experience and search rankings, which is frustrating for everyone. We break down the most common causes of sluggish performance and give you actionable steps to speed up your site immediately.

How to Accept Deposit Payments in WordPress (2 Easy Methods) – Collecting partial payments upfront is a great way to secure your revenue for services or custom orders. We show you two simple methods to set this up on your site so you can manage your cash flow with confidence.

February

MonsterInsights vs Site Kit: The Best Analytics Solution for WordPress – Choosing the right analytics tool is crucial for growing your website. We compared Google’s Site Kit against MonsterInsights to help you decide which plugin offers the insights and user-friendly features you need to improve your strategy.

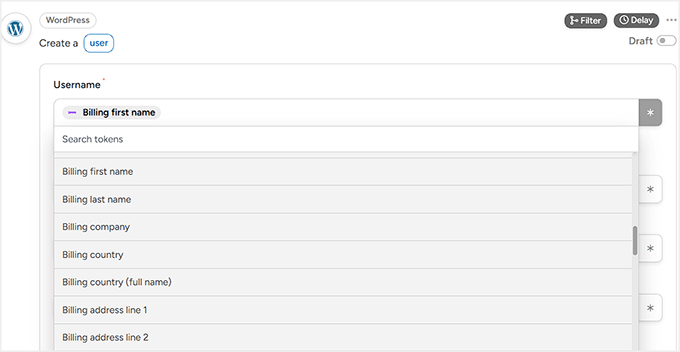
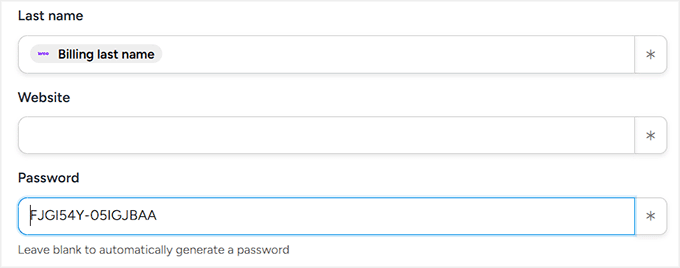
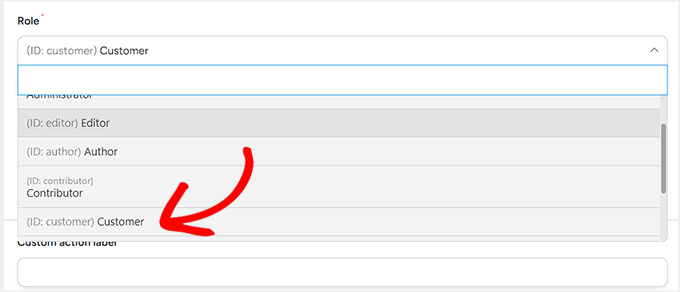
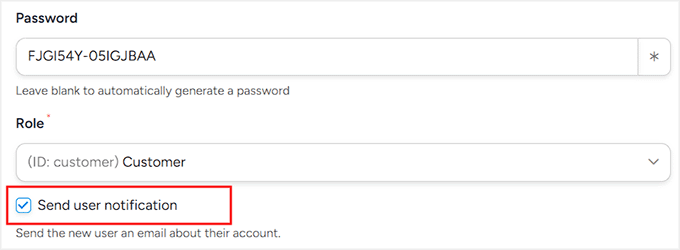
How to Turn Your WooCommerce Customers into Affiliates – Want to boost your sales without spending a fortune on ads? We showed how to easily turn your happy customers into brand ambassadors, leveraging word-of-mouth marketing to grow your revenue.

How to See Search Analytics in WordPress (2 Easy Ways) – Understanding what visitors are typing into your search bar reveals exactly what they are looking for. We highlighted two simple methods for tracking on-site search activity, helping you uncover content gaps and improve the user experience.

How to Create a Lead Magnet Optin Form in WordPress (2 Ways) – Growing an email list is much easier when you offer the right incentive. We explained how to set up high-converting lead magnet forms that deliver freebies instantly to turn casual visitors into loyal subscribers.

March

Introducing WPConsent – WordPress Privacy Compliance and Cookie Management Made Easy – We know that navigating privacy laws like GDPR and CCPA can be a major headache for website owners. We introduced WPConsent, a powerful new tool that makes cookie compliance and privacy management completely stress-free for your site.

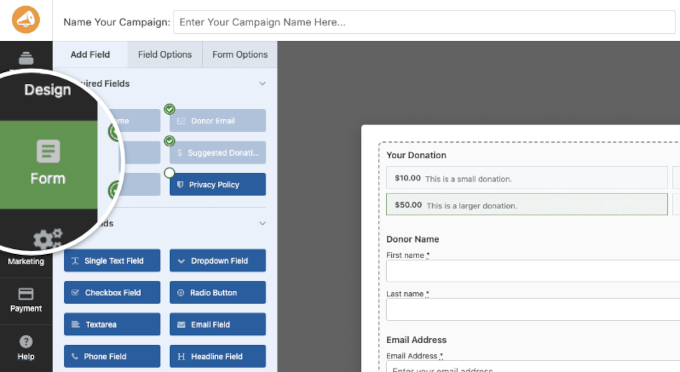
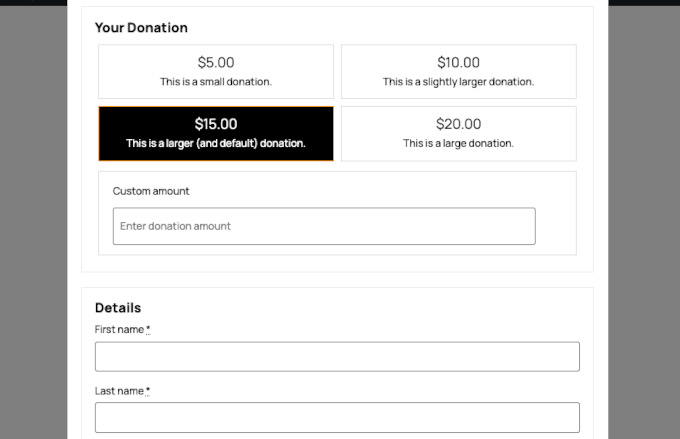
How to Create a Nonprofit Website in WordPress (Step by Step) – Are you looking to build an online presence for a charitable cause? We created a comprehensive guide on building a nonprofit website that not only looks professional but also includes the best tools to help you accept donations and raise funds effectively.

How to Generate Leads Through Affiliate Marketing in WordPress – Affiliate marketing is a great revenue stream, but are you maximizing its potential? We share proven strategies to generate high-quality leads through your affiliate campaigns, helping you boost conversions and grow your income significantly.

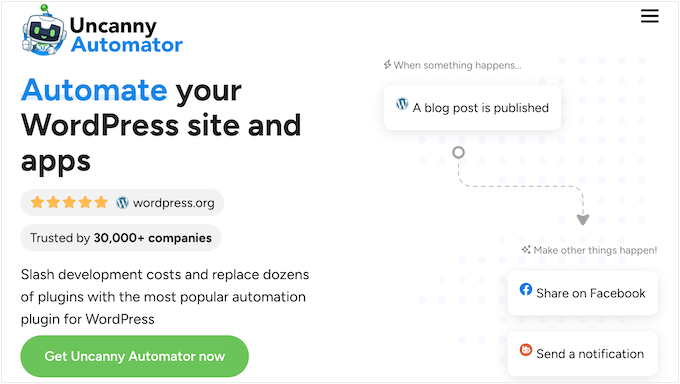
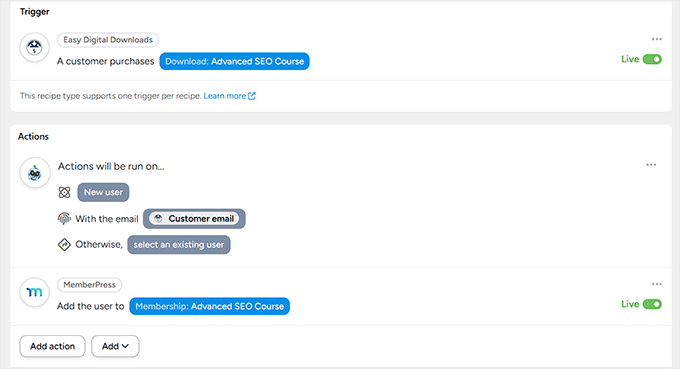
How to Use AI for Customer Service (Tips for Small Businesses) – Customer service can be overwhelming for small teams facing a mountain of repetitive questions. We shared practical ways to use AI to automate replies and provide 24/7 support, freeing up your team for issues that truly need a human touch.

#MyWordPressStory

This year, we also launched #MyWordPressStory, an interview series featuring insights from leaders who use WordPress to make positive changes in the world.

We shared inspiring journeys from founders like Justin Ferriman (LearnDash), developers like Tobias BΓ€thge (TablePress), and innovators like Nicolas Lecocq (OceanWP).

You can read these incredible success stories in our #MyWordPressStory archive.

April

Welcome aThemes to the WPBeginner Family of Products – We were thrilled to welcome aThemes to the WPBeginner family of products. Known for creating fast, reliable, and beautiful WordPress themes, this acquisition allows us to provide you with even better design solutions for your website.

What’s New in WordPress 6.8? (Features and Screenshots) – We explored the beta version of WordPress 6.8 to show you the upcoming features, screenshots, and improvements. From a smarter admin interface to new design blocks, here are the new features that came with this major release.

How to Automatically Generate Image Alt Text in WordPress Using AI – Writing alternative text for every image is crucial for SEO and accessibility, but it can be incredibly time-consuming. We found a better way to handle this chore using artificial intelligence. This tutorial shows you how to automatically generate accurate image descriptions, saving you hours of work while improving your search rankings.

How to Keep Personally Identifiable Info Out of Google Analytics – Did you know that accidentally collecting user data like email addresses in Google Analytics can violate their terms of service? We created a step-by-step guide to help you prevent personally identifiable information (PII) from entering your analytics reports. This ensures that your site stays compliant and your account remains safe.

May

8 Best WooCommerce Affiliate Plugins Compared (Tried and Tested) – Want to increase your online store’s sales without spending a fortune on ads? We tested the top affiliate tools to help you create a referral program that empowers your customers and partners to do the marketing for you.

How to Setup WordPress Heatmaps (2 Easy Ways) – Are you guessing where your visitors are clicking? We show you exactly how to visualize user behavior on your site so you can see what is working, fix what isn’t, and optimize your layout for better conversions.

How to Add WordPress Analytics Without Cookies (2 Easy Methods) – Concerned about privacy regulations affecting your data? We explain how to track your website traffic accurately without using cookies, helping you stay compliant with GDPR and CCPA while still getting the insights you need to grow.

A Small Business Owners’ Guide to Artificial Intelligence – Many business owners are leaving money on the table by not using AI to its full potential. We cut through the fluff to show you practical ways to use AI today to save time, reduce stress, and automate your marketing and support.

June

11 Best WordPress Payment Plugins (Tested & Verified) – We know that choosing the right payment plugin is critical for your online business success. That’s why we tested and verified the top solutions to help you accept payments in WordPress securely and reliably.

The Ultimate Guide to WordPress and CCPA Compliance – Navigating privacy laws like CCPA can feel overwhelming, but ignoring them isn’t an option. We put together this ultimate guide to help you make your WordPress site compliant and avoid hefty fines without the legal headaches.

How to Create Faster Checkout in WooCommerce (9 Expert Tips) – A slow checkout process is the number one reason shoppers abandon their carts. We share expert tips to help you streamline your WooCommerce checkout, improve the user experience, and boost your sales.

How to Use AI to Translate Your Website (2 Easy Methods) – Want to reach a global audience without hiring expensive translators? We show you how to leverage AI to automatically translate your website content, helping you expand your reach into new markets with just a few clicks.

WPBeginner Spotlight

We also published WPBeginner Spotlight, a monthly news column that shares the most important updates from the WordPress world.

From major acquisitions to community milestones, Spotlight helps you stay informed about the industry without the noise. You can read all past issues in our Spotlight archive.

July

WPBeginner Turns 16 Years Old – Here’s What’s New + a $20,000 WordPress Giveaway – We were thrilled to celebrate another major milestone in our journey! To say thank you for your support over the last 16 years, we shared exciting updates about the site’s future and hosted a massive giveaway to help small business owners compete with the big guys.

How AI is Reshaping SEO: 30+ Trends to Watch in 2025 – Artificial intelligence is rapidly changing how search engines rank content, and we want to ensure you don’t get left behind. We analyzed the landscape to bring you the most critical trends, helping you adapt your strategy to maintain and grow your organic traffic.

Beginner’s Guide to Generative Engine Optimization for WordPress – With the rise of AI search tools like ChatGPT and Gemini, traditional SEO is evolving into something new. We put together this guide to show you exactly how to optimize your content for these generative engines so your site remains visible in the age of AI.

How to Migrate From Substack to WordPress in 10 Easy Steps – If you are feeling limited by Substack’s features and fees, it might be time to take full ownership of your newsletter. We created a step-by-step walkthrough to help you move your subscribers and content to WordPress, giving you total freedom to monetize and grow your audience your way.

August

How I Blocked 18,000 Spam Lead Attacks in My WordPress Form – Spam submissions can clutter your database and ruin your marketing analytics. We show you the exact method we used to stop thousands of automated attacks, keeping your forms secure and your leads high-quality.

How to Create a Live Autocomplete Search in WordPress – Helping visitors find content quickly keeps them on your site longer. We walk you through setting up live search suggestions so your users can see real-time results instantly as they type.

The Ultimate Guide to WordPress Privacy Compliance – Navigating regulations like GDPR and CCPA can feel overwhelming. We researched dozens of laws to create this ultimate guide. It shows you exactly how to make your WordPress site compliant with simple changes that protect both your business and your visitors.

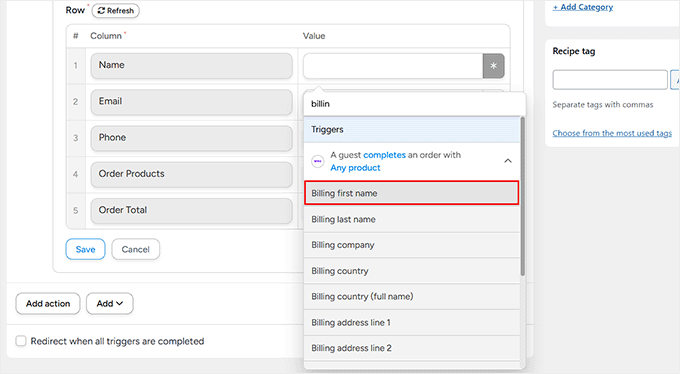
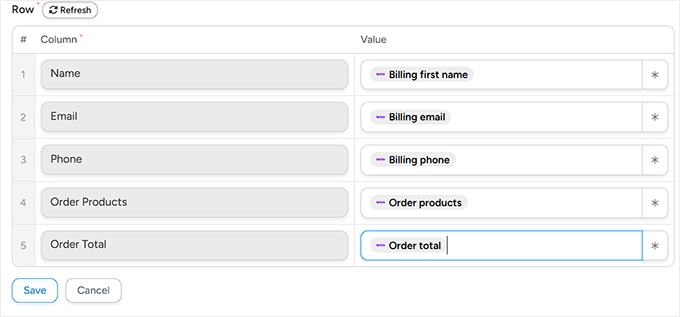
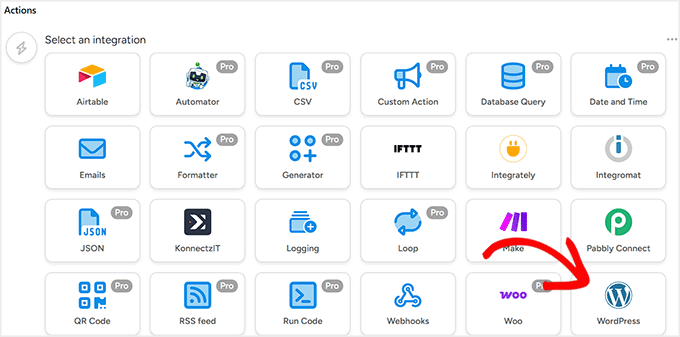
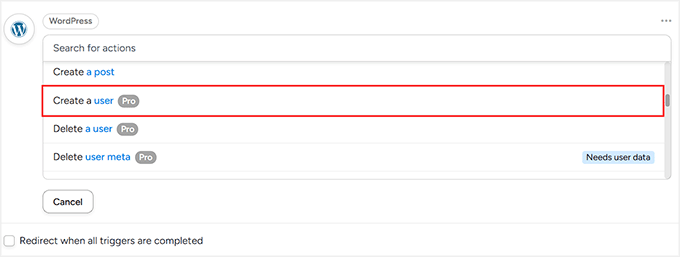
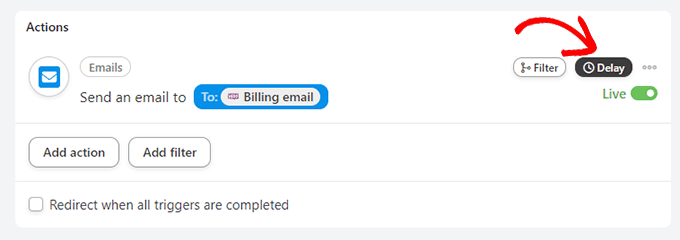
How to Auto Export WordPress Form Entries (The Easy Way) – Manually downloading data for team reports is a waste of time. We show you a simple way to automatically export your form entries, streamlining your workflow and making data management effortless.

September

My Ultimate Guide to Conversion Rate Optimization in WordPress – You don’t always need more traffic to grow your business; often, you just need to do a better job with the visitors you already have. We put together this comprehensive guide to help you optimize your site’s conversion rates and unlock more revenue from your existing content.

BuddyBoss vs. Circle vs. Mighty Networks: My Top Pick – Building an online community is a powerful way to engage your audience, but choosing the right platform can be overwhelming. We compared the top contenders side by side to help you decide which tool offers the best flexibility and features for your community’s goals.

How I Block WordPress Form Entries From Certain Countries – Dealing with spam submissions or leads from regions you don’t serve can be a major headache. We show you a simple way to restrict form submissions by location, keeping your inbox clean and ensuring you focus only on relevant users.

I Created a Donor Portal in WordPress in Just 15 Minutes (No Coding) – Providing a seamless experience for your supporters is key to maintaining long-term contributions. We demonstrate how you can easily set up a professional donor portal without writing a single line of code, giving your donors full control over their giving history.

WPBeginner Live Workshops

In 2025, we took our community education to the next level by hosting monthly free workshops designed to help you level up your WordPress, SEO, and marketing skills.

From mastering Google Analytics 4 and WordPress Security to leveraging AI automation and building email lists, these live sessions provided deep dives into the topics that matter most to site owners.

Each workshop also features a live Q&A session, providing you with direct access to our experts who can answer your specific questions.

If you haven’t attended one yet, you can watch past recordings and sign up for the next session on our Free Workshops page.

October

I Ran a WooCommerce Flash Sale — Here Are My 10 Expert Tips – We share our proven strategies and favorite tools for creating urgency and boosting revenue during a sales event.

Forget Semrush — I Tried 9 Best Semrush Alternatives for Bloggers – We tested the top SEO tools to find powerful, budget-friendly solutions that help you uncover hidden keywords and outrank your competition without breaking the bank.

The Easy Way to Embed TripAdvisor Reviews in WordPress (No API Required) – We guide you through adding authentic social proof to your website by automatically displaying your latest customer reviews.

I Built a Fundraising Thermometer in WordPress (in Just 10 Minutes) – We show you a simple, effective way to visualize your campaign goals on your site. This can help you engage visitors and motivate supporters to contribute more to your cause.

November

Introducing WPChat: Your Live Chat Assistant for WordPress That Converts – We know that engaging with visitors in real-time is the fastest way to boost sales, but traditional chat tools are often expensive or clunky. That’s why we were thrilled to introduce WPChat, an AI-powered live chat solution designed to help you automate support and increase conversions.

How You Can Help Prevent Link Rot and Make the Open Web Better – Web content changes over time, leaving behind broken links that hurt your SEO. We showed you how to use a free plugin that automatically scans for dead links and replaces them with archived versions from the Internet Archive.

Want More Sales or Signups? I Tried 11 Best Conversion Optimization Tools – It is frustrating when you have traffic, but visitors leave without taking action. We tested the top conversion optimization software to show you exactly which tools can help you turn abandoning users into loyal subscribers and customers.

14 Ways I Get More Donations for My Nonprofit (I’ll Show You How) – Fundraising is often the biggest challenge for any cause-driven organization. We share our proven strategies and favorite tools to help you streamline your donation forms, engage your supporters, and reach your fundraising goals faster.

December

Introducing Sugar Calendar Bookings – The Easiest Way to Accept Appointments in WordPress – We were thrilled to announce a major update for Sugar Calendar that transforms your site into a powerful scheduling engine. We built this feature to help you accept appointments and manage your availability directly in WordPress, without expensive third-party booking platforms.

I Tried 7 Best GoFundMe Alternatives (Raise More, Pay Less) – High platform fees can significantly cut into your fundraising efforts. We tested the best alternatives to help you create a donation site with total control, so you can bypass strict restrictions and keep more of the money you raise for your cause.

Can You Delete a Google Review? Here’s What You Can Do Instead – A single bad review can feel disastrous for a business, but you aren’t helpless. We explain why you can’t simply hit “delete” and walk you through actionable strategies to flag fake feedback and leverage social proof tools to showcase your best reviews.

What’s New in WordPress 6.9? (Features & Screenshots) – We want you to be prepared for the future of your website. We explored the upcoming WordPress 6.9 release to give you an exclusive look at the new features and block editor improvements so you can take full advantage of the update.


These were our top WordPress tutorials of 2025. We hope they helped you take your website to the next level.

Thank you to everyone who visited, commented, and supported WPBeginner this year. We couldn’t do this without you.

Get ready for even more helpful guides coming in 2026. Happy New Year!

If you liked this article, then please subscribe to our YouTube Channel for WordPress video tutorials. You can also find us on Twitter and Facebook.

The post Best of Best WordPress Tutorials of 2025 on WPBeginner first appeared on WPBeginner.


from WPBeginner https://ift.tt/HTX1lpr
More links is https://mwktutor.com

Monday, 29 December 2025

WPBeginner Spotlight 19: Smarter Plugins, AI Innovation & the Future of WordPress

December has been an incredible month for the WordPress community as we wrap up a landmark year. From the excitement of AI developments to the launch of WordPress 6.9, this issue covers the major innovations shaping the future of the web.

We are diving into powerful new AI tools, automated workflow integrations, and game-changing search features that make site management easier than ever.

It is the perfect time to reflect on our community’s growth and get ready for an even bigger year ahead.

Let’s take a look at what’s new in the world of WordPress.

December 2025 issue of WPBeginner Spotlight covering latest WordPress news

β„Ή️ WPBeginner Spotlight brings you a monthly roundup of the most important WordPress news, updates, and community happenings.

Got something to share? Whether it’s a new product launch, a significant update, or an exciting event, reach out to us through our contact form, and your news could be featured in the next edition! πŸ’¬

Sugar Calendar Bookings: A Simpler Way to Accept Appointments in WordPress πŸ“…

The creators of Sugar Calendar have officially launched Sugar Calendar Bookings, which is a powerful new tool designed for service-based businesses to accept bookings in WordPress.

It turns your event calendar into a complete appointment scheduling system directly inside your WordPress dashboard.

Visitors can book time slots 24/7, so you don’t have to rely on expensive third-party booking platforms or send people to an external booking page.

Adding a new service in Sugar Calendar Bookings

You keep control of your branding and customer data, since the booking flow stays on your site. This also provides a more seamless experience for your visitors.

The plugin includes flexible scheduling rules that allow you to set business hours, buffer times, and specific blackout dates for holidays. This automation ensures you never get double-booked and your schedule remains perfectly organized.

Sugar bookings schedules

Plus, automated email notifications keep both you and your customers informed about new bookings, cancellations, or changes. This removes the manual stress of managing reminders and ensures everyone stays on the same page.

Additionally, payments are handled seamlessly via Stripe integration, which allows you to collect fees at the time of booking. It helps you get paid faster and more reliably, with no coding required.

For more details, see our Sugar Calendar Bookings announcement post.

AIOSEO Adds AI Keyword Report to Track Brand Rankings in AI Search + Smarter Blocks for Recipes, Products, & Navigation

All in One SEO recently released a new AI Keyword Report that shows which brands are appearing in AI-driven search results for specific keywords.

AI Insights in All in One SEO

Users can view the answers from different AI platforms directly in their WordPress dashboard.

This data helps website owners identify content gaps and discover new competitors that may not appear in traditional search results.

AI mentions for keywords on different AI platforms

An upcoming Brand Tracker feature was also announced for the AI Insights section. This will eventually allow site owners to monitor their own brand’s mentions, sentiment, and positioning across major AI platforms over time.

Related: Beginner’s Guide to Generative Engine Optimization for WordPress

AIOSEO also expanded technical SEO tools like redirects to more pricing tiers. Users on the Basic plan can now create redirects and receive automatic notifications to fix broken links when a post URL changes.

AIOSEO also introduced specialized blocks for food bloggers and online sellers. The new Recipe block automatically includes structured data schema markup to help recipes stand out in search results.

Plus, a new Product block allows websites to showcase items without needing a full eCommerce store. It is compatible with popular payment plugins, making it super easy to add a product to your site and start selling.

Product block in AIOSEO

This block also adds rich product schema, which can help display your customer ratings and reviews in search results.

Finally, the Table of Contents block received a significant upgrade, which is now available to all users. You can now add multiple tables per page, use collapsible sections, and reorder headings with drag-and-drop.

New and improved Table of Contents block in AIOSEO

WordPress 6.9 Released with AI Abilities API, Block Notes, and Speed Boosts πŸŽ‰

WordPress 6.9 was launched live during the State of the Word keynote, with a mix of AI innovation, editor improvements, and performance updates.

A major highlight is the new Abilities API, which creates a machine-readable list of everything your site can do.

This API acts as a shared language that allows AI agents to understand and interact with your plugins and themes securely. You may not notice this change right away, but it lays the groundwork for future AI automation features that can reduce busywork in WordPress.

Content creators will also appreciate the new Block Notes feature, which allows teams to leave comments and feedback directly on individual blocks.

This brings a Google Docs-style collaboration experience to the WordPress block editor.

View all notes attached to a post

WordPress 6.9 also includes significant speed boosts, such as moving the Emoji detection script to the footer to improve page rendering. It also improves server performance by running scheduled tasks at shutdown rather than during page loads.

Plus, a new Command Palette is now available across the entire WordPress dashboard, not just the Site Editor. This speeds up navigation by letting you jump to specific admin screens or trigger actions with a few keystrokes.

Command palette in WordPress dashboard

Designers also gain new tools, such as the Accordion block and the ability to hide specific blocks on the front end. This gives you more flexibility to build interactive templates and test design variations without showing everything publicly.

WPForms Launches Native Notion Addon to Automate Workflows πŸͺ„

WPForms has introduced a native Notion addon that allows users to send form entries directly to their Notion databases. This integration eliminates the need for manual data entry or complicated third-party connectors.

You can easily map your form fields to specific Notion properties, including text, dates, and multi-select tags. For example, you can send new leads to a CRM board, support requests to a tracker, or job applications to a hiring database.

WPForms - Notion field mapping

The addon also supports conditional logic, which lets you send data to Notion only when specific criteria are met. This helps keep your database clean, with only the entries you actually need.

State of the Word 2025 Celebrates Innovation and the Future of WordPress 🌐

The annual State of the Word keynote highlighted WordPress’s massive growth, with the platform now powering 43% of all websites globally.

WordPress has achieved a significant 60% market share of the CMS industry, showing its continued popularity for creating websites.

One of the most exciting shifts is the growth outside of the English-speaking community. For the first time, over 56% of WordPress sites are in languages other than English, with Japanese becoming the second-most-used language.

Matt Mullenweg, co-founder of WordPress, emphasized that AI is now foundational to WordPress, with a dedicated AI team formed earlier this year. They have already shipped four major “building blocks” to make WordPress understandable to AI systems and agents.

The Abilities API and WP AI Client are central to this strategy because they allow developers to build AI features without being locked into one provider. This will allow for collaborative editing and advanced workflows in future releases.

Community impact was also a major theme, with over 5,200 volunteers organizing 81 WordCamps across 39 countries this year. These events help bring new people into WordPress and support local communities around the world.

Search & Replace Everything Introduces Smart Search History for Faster Reuse πŸ”

Search & Replace Everything by WPCode now includes a new Smart Search History tool. This feature allows users to quickly access and reuse previous search and replace operations with a single click.

It is incredibly useful for site migrations and frequent content updates where you need to perform the same changes again and again.

Search & Replace Everything - Previous searches

Apart from running previous searches, you can also delete past searches by clicking ‘Delete’.

The plugin remains a top choice for developers due to its full support for serialized data. It also helps prevent replacements from breaking plugin settings or widget data.

Reuse a past search and replace operation

WPFilters Launches with “Amazon-Style” Search for WordPress πŸ›’

The SearchWP team has launched WPFilters, which is a new plugin designed to bring “Amazon-style” faceted search to any WordPress website. It lets visitors narrow down results using categories, tags, and custom data to quickly find exactly what they need.

The plugin is an alternative to complicated filtering tools that often require a developer or are strictly limited to WooCommerce.

WPFilters demo

This can improve navigation on blogs, stores, and directories, especially when visitors would otherwise leave because they can’t find the right content.

WPFilters supports a wide range of input types, including checkboxes, radio buttons, and dropdowns. It also features visual range sliders for numeric data such as price or weight, and a one-click reset button to start fresh.

Select filtering element

Site owners can filter content by standard categories, authors, tags, or any custom taxonomy. Additionally, the plugin automatically detects data from Advanced Custom Fields and allows you to use those fields as filters.

While it works with the default WordPress search, it is designed as a companion for the SearchWP engine to provide even more control over search.

For more details, see our WPFilters announcement post.

Charitable Launches Visual Donation Form Builder for Drag-and-Drop Fundraising πŸ’–

Charitable has introduced a brand-new Visual Donation Form Builder that makes it easier for nonprofits to create fundraising campaigns. This drag-and-drop tool lets you design donation forms visually inside WordPress.

You can now arrange fields, adjust layouts, and see a real-time preview of exactly what your donors will see. This removes the guesswork and technical hassle of configuring forms through traditional settings pages.

Visual donation form builder in Charitable

The builder includes a wide variety of fields, from basic contact information to advanced options like custom messages and file uploads.

You also have full creative control over styling, alignment, and even custom CSS for a professional look.

Donation form built with Charitable

Plus, nonprofits can get their campaigns up and running in minutes by choosing from pre-built templates or starting from scratch.

In Other News πŸ—ž️

  • BuddyBoss has introduced Competitions. This new gamification feature in the Plus plan adds time-bound challenges and visible progress tracking to your online community to create urgency.
  • Easy Digital Downloads introduced a new Cart Preview feature—a sleek, slide-out drawer that shows the cart instantly after adding a product. EDD Pro users also get access to AI-powered Cart Recommendations, which can increase sales with personalized suggestions at checkout.

OptinMonster – Convert Visitors into Subscribers & Customers

OptinMonster

OptinMonster helps you grow your email list and boost conversions with high-converting pop-ups and campaigns. Use smart targeting and a drag-and-drop builder to show the right message to the right person at the right time — no coding required.

  • RewardsWP now includes Points, a redesigned rewards widget, and a new dashboard to help you build customer loyalty through purchases, referrals, and redemptions. These features let you easily customize point systems, track results, and manage members with new import tools and reporting features.
  • Envira Gallery added two new layouts: Grid Fixed Title and Vertical Line Grid. They offer more creative ways to display galleries with side-by-side descriptions and editorial columns.

SeedProd – Build Professional Websites Using AI

SeedProd

SeedProd lets you instantly build professional websites with a single prompt. Simply describe your business details, and it will generate a ready-to-launch website with content in less than 60 seconds.

  • WooCommerce and Stripe have announced a new Agentic Commerce Suite. It uses AI to automate tasks like personalized customer offers and smarter checkout workflows.
  • Advanced Custom Fields (ACF) has introduced an inline editing feature that lets users edit custom field data directly in the block editor.

New Plugins & Tools

  • Sugar Calendar Bookings – A powerful appointment scheduling tool that lets you manage time slots and payments directly from your website.
  • WPFilters – Adds professional “Amazon-style” search filters to your site using categories, tags, and custom fields.
  • WPChat – A lightweight and fast chat solution for WordPress sites to help improve customer support and engagement.
  • RewardsWP – A loyalty and rewards plugin that helps you grow your brand through points, referrals, and customer engagement.

That is a wrap for this month’s WPBeginner Spotlight! We hope you enjoyed catching up on the latest news and updates from across the WordPress ecosystem.

Got a product launch, feature update, or cool project you think we should cover? Send us a message, and we might feature it in our next edition.

We’ll see you again next month with another round of WordPress news. Thanks for reading and being part of the WPBeginner family!

If you liked this article, then please subscribe to our YouTube Channel for WordPress video tutorials. You can also find us on Twitter and Facebook.

The post WPBeginner Spotlight 19: Smarter Plugins, AI Innovation & the Future of WordPress first appeared on WPBeginner.


from WPBeginner https://ift.tt/o7sEtqX
More links is https://mwktutor.com

Friday, 26 December 2025

How to Add n8n Like Automation in WordPress (Easier & Cheaper)

Automating processes on your WordPress website doesn’t have to be complicated. Tools like n8n are powerful, but they often require extra hosting, webhooks, and a lot of technical setup.

That’s why many beginners feel stuck before they even get started. The good news is that you can actually use a plugin to automate many common WordPress tasks.

In this guide, I’ll show you how to add n8n-like automation in WordPress using Uncanny Automator.

You can automatically connect your plugins, trigger actions based on user activity, and even build AI-powered workflows, all without touching a single line of code.

By the end, you’ll be able to automate everyday WordPress processes in a way that’s easier, cheaper, and beginner-friendly.

Add N8N Like Automation in WordPress

πŸ’‘Quick Answer: How to Add n8n Like Automation in WordPress

You don’t need n8n to get powerful automation on your WordPress site. With Uncanny Automator, you can connect plugins, run AI-powered tasks, and automate repetitive workflows without coding or webhooks.

Here’s how it works:

  1. Install and activate Uncanny Automator (Pro version needed for some integrations).
  2. Connect your external apps like Google Sheets or OpenAI inside Automator.
  3. Create a recipe by selecting a trigger, such as a WooCommerce purchase or WPForms submission.
  4. Add actions for what should happen next—like adding a row to Google Sheets, creating a new user, or sending AI-generated emails.
  5. Map dynamic fields using the dropdowns—no JSON or API setup required.
  6. Save and activate your recipe, and your workflow runs automatically whenever the trigger occurs.

Here’s a quick overview of all the topics I’ll cover in this guide:

What Is n8n?

n8n is an open-source workflow automation tool that lets you connect different apps and services to automate tasks.

Instead of writing code, you build workflows using a visual, node-based editor. Each node represents a step, such as receiving data, processing it, or sending it to another app. This makes it possible to create powerful, multi-step automations.

n8n website

I’ve tested n8n several times, and it’s a solid tool. Once you understand how everything fits together, it works smoothly and gives you a lot of flexibility.

n8n is commonly used for:

  • Syncing data between different tools and platforms
  • Handling webhook-based events
  • Creating multi-step automation workflows across multiple apps

This level of flexibility is great for advanced setups. But for many WordPress users, it can feel like more than they actually need—especially for everyday automation tasks.

Where Does n8n Fall Short for WordPress Users?

n8n is powerful, but it wasn’t built specifically for WordPress. Even simple automation tasks can feel complicated and confusing if you’re not a developer.

Here are the main reasons it can be tricky for WordPress users:

  • No Native Plugin Integration: If you’re a beginner, it can be really difficult and time-consuming to find and connect the right API for every tool you want to automate.
  • Data Mapping Complexity: WordPress often sends data in formats that n8n doesn’t understand right away, so you need to spend extra time translating and mapping fields correctly.
  • Limited WordPress-Specific Triggers: It’s not easy to track events like user role changes, post status updates, or plugin actions such as WooCommerce orders, which are common tasks for WordPress sites.
  • Extra Setup and Maintenance: Managing servers, keeping everything updated, and securing webhooks takes a lot of time and technical knowledge, which can be frustrating if you just want automation to work.

These challenges can make automation harder than it needs to be. To get a better sense of the hidden costs and extra effort involved, check out the dropdown below.

🀯The Three Hidden Costs of Using n8n for WordPress

Automating WordPress with n8n can seem simple at first, but I’ve discovered there are some hidden costs and time commitments that beginners often don’t expect.

Here’s a quick breakdown of the main challenges:

Hidden Cost What It Means Typical Cost / Time
Infrastructure Costs You need a Private Server (VPS) or self-managed hosting to run n8n, along with a domain and SSL certificate. VPS hosting: $12–24/month n8n.cloud: starts at $20/month for 2,500 workflow executions
Time Investment Setting up workflows, testing them, and maintaining them every month takes time and effort. Initial setup: 4–8 hours Monthly maintenance: 2–4 hours
Learning Curve n8n requires understanding webhooks, JSON mapping, and error handling. Estimated 10–20 hours to get everything working correctly

The bottom line is that creating even a simple n8n workflow for WordPress can be more complicated and time-consuming than most users expect.

Why Use Uncanny Automator Instead of n8n?

If you want powerful automation for WordPress without the technical headaches, Uncanny Automator is the best option.

I’ve tested both n8n and Uncanny Automator multiple times, and I can say from experience that while n8n is very powerful, it comes with a steep learning curve.

The Uncanny Automator no-code automation plugin

You need to set up webhooks, handle APIs, parse JSON, and manage authentication—steps that can take hours for even a simple workflow.

Uncanny Automator, on the other hand, makes all of this so much simpler. You don’t need external servers, webhooks, or complex technical setups.

Everything happens directly inside WordPress, and you can connect plugins and trigger actions without touching a single line of code.

Here’s a quick comparison of a typical workflow in n8n versus Uncanny Automator:

n8n vs Uncanny Automator workflow

Even with all this simplicity, Uncanny Automator is still incredibly powerful. You can automate complex workflows, connect dozens of plugins like WooCommerce, LearnDash, WPForms, MemberPress, BuddyPress, and more.

Plus, you get to handle multiple triggers and actions in a single workflow. It lets you focus on what you want to happen, not the technical mechanics behind it.

This combination of ease-of-use and power is what makes Uncanny Automator a game-changer for WordPress users compared to n8n.

Pricing Comparison: n8n vs Uncanny Automator

When it comes to automation, cost isn’t just about money—it’s also about your time and effort.

Here’s how n8n stacks up against Uncanny Automator:

Cost Factor n8n Uncanny Automator
Setup Costs & Time 4–8 hours to configure webhooks, servers, APIs, and authentication A few minutes to select triggers and actions inside WordPress
Ongoing Maintenance 2–4 hours per month for server updates, workflow monitoring, and troubleshooting (~$100–200/month in value) Minimal—runs on your existing WordPress hosting with no extra maintenance
Hosting / Infrastructure VPS hosting $12–24/month or n8n.cloud subscription starting at $20/month Uses your existing WordPress hosting (+ starting at $199 per year for the plugin’s annual license)
Per-Task / Execution Limits n8n.cloud has usage limits based on workflow executions Unlimited automations on your site (external APIs like OpenAI may still charge usage fees)
Learning Curve 10–20 hours to understand webhooks, JSON mapping, and error handling Almost zero—plain-English triggers, dropdown mapping, visual recipe builder

πŸ’‘Key Takeaway: For active WordPress sites, Uncanny Automator offers predictable, flat pricing and eliminates the hidden costs of hosting, maintenance, and technical setup, while still giving you all the power you need for complex automation.

When is n8n a Better Choice?

I want to be transparent here—no single tool fits every scenario.

While Uncanny Automator covers nearly all WordPress workflows without touching code, some situations demand advanced flexibility, complex data handling, or integration across multiple platforms.

Understanding these limitations helps you choose the right tool for the right job.

In my opinion, n8n could be better for:

  • Automating between multiple non-WordPress systems, like syncing CRMs, SaaS platforms, or databases.
  • Complex data transformations, such as regex, JSON parsing, or custom logic that WordPress plugins don’t handle natively.
  • Using a single automation platform for your entire tech stack, especially if your workflows span multiple apps.
  • Workflows that require extensive custom code execution, where visual dropdowns won’t cover all the requirements.

I also recommend a hybrid approach for many WordPress site owners. You can use Automator for WordPress-internal workflows and connect to n8n for external system integrations via Automator webhooks.

This lets you enjoy simple, no-code automation inside WordPress while still using n8n’s power for complex tasks.

How to Use Uncanny Automator for WordPress Workflows

Uncanny Automator isn’t just for simple tasks—you can use it to automate a wide range of workflows right inside WordPress.

For example, you can:

  • Automatically log WooCommerce purchases to Google Sheets.
  • Generate content automatically from form submissions using OpenAI.
  • Create new user accounts after a purchase or form submission.
  • Analyze WooCommerce reviews or blog comments with AI to detect negative sentiment and alert your team.
  • Connect your WordPress site to tools like Google Sheets, Slack, Zoom, Mailchimp, or even use Zapier for special edge cases—all without complex API setups.

To learn more about the plugin itself, you can check out our detailed Uncanny Automator review.

If this is your first time using an automation plugin, don’t worry. I’ll walk you through setting up a workflow in WordPress.

I’ll show you one example: logging WooCommerce purchases to Google Sheets and creating a user account on your site.

The process is very similar for almost any other automation you want to create, whether it’s AI content generation, user notifications, or syncing data between plugins.

Step 1: Install and Activate Uncanny Automator

The first thing you need to do is sign up for an account on the Uncanny Automator website. Just click on the ‘Get Uncanny Automator now’ button and follow the steps to sign up for an account.

πŸ“Œ Note: Uncanny Automator also has a free version. But since this workflow uses Google Sheets and WooCommerce, you’ll need a premium plan to unlock those platforms.

The Uncanny Automator no-code automation plugin

Next, go to your WordPress dashboard. Here, you will need to install the free core plugin and the premium plugin (which you can find in a zip file in your Uncanny Automator account) for the integrations to work.

If you don’t know how to do that, check out our step-by-step guide on installing WordPress plugins.

Once everything is installed, go to Automator » Settings in your WordPress dashboard and enter your license key. You can find this information in your account on the Uncanny Automator website.

Uncanny Automator license activation

After entering the key, click the ‘Activate License’ button, and you’re ready to start creating automations.

Step 2: Connect Uncanny Automator to Google Sheets

For this workflow, you need to connect Google Sheets so that every WooCommerce purchase can be automatically logged in a spreadsheet.

This connection only needs to be set up once, and after that, Uncanny Automator will automatically update your chosen spreadsheets whenever a new order comes in.

To get started, go to Automator » App Integrations and select ‘Google Sheets’ from the left column.

Click the ‘Sign in with Google’ button, then choose the account you want to link. If your account isn’t listed, you can add it using the ‘Use Another Account’ option.

Visit the Google Sheets page

Next, Google will ask for permissions so Uncanny Automator can access your spreadsheets.

This is completely normal, and the plugin only uses these permissions to add new rows to the spreadsheets you select.

Choose actions that you are giving Uncanny permissions for

Once you approve, you’ll be redirected back to your WordPress dashboard with a confirmation that your account is connected.

Finally, click ‘Select new sheet(s)’ and choose the spreadsheet you want to use for your WooCommerce store.

Google Sheets connected successfully

You can add multiple spreadsheets if needed, and all connected sheets will appear in the recipe editor when building automations.

For a more detailed, step-by-step guide on connecting Google Sheets, you can also see our tutorial on how to connect WooCommerce to Google Sheets.

Choose the spreadsheet you created for your store
Step 3: Create a Recipe and Set the WooCommerce Trigger

After connecting to Google Sheets, it’s time to create the automation itself. In Uncanny Automator, this automation is called a recipe.

Each recipe has two simple parts. The trigger is what starts the automation, and the action is what happens next.

Right now, I’ll be focusing on the trigger—the WooCommerce event that will start everything.

To get started, go to Automator » Add new recipe from your WordPress dashboard.

Here, you’ll be asked to choose between a ‘Logged-in’ recipe and an ‘Everyone’ recipe. Logged-in recipes only run when a user is signed in, but WooCommerce orders are often placed by guest customers.

Because of that, I recommend selecting ‘Everyone’ and clicking ‘Confirm.’

Select Everyone as the recipe type

Next, give your recipe a name. This is only for your own reference, so you can name it something simple like ‘Send WooCommerce orders to Google Sheets and Create User Accounts.’

Once that’s done, Uncanny Automator will show you a list of all the plugins and services installed on your site. From this list, select ‘WooCommerce.’

Choose WooCommerce for Uncanny Automator workflow

Now you’ll choose the event that should trigger the recipe.

For this workflow, select ‘A product has its associated order completed, paid for, thank you page visited.’ This ensures the automation only runs after a successful purchase.

Choose a WooCommerce trigger in Uncanny Automator

After choosing the trigger, you’ll need to decide when it should fire. I recommend selecting ‘thank you page visited’.

This means the recipe will run as soon as the visitor lands on the thank you page after checkout. If you wait for ‘Completed’, the automation won’t run until you manually mark the order as finished.

Click the ‘Save’ button to continue.

Select thank you page visited as trigger condition

Finally, choose whether the recipe should run for a specific product or for all products. To track every sale in your store, select ‘Any product’ and click ‘Save.’

That’s it. Your WooCommerce trigger is now ready, and the recipe knows exactly when it should run.

Choose the products that will trigger the recipe
Step 4: Add Google Sheets Action in the Recipe Editor

Now that the WooCommerce trigger is ready, you need to tell Uncanny Automator what should happen next. In this workflow, the next step is simple: send the order details to Google Sheets.

To do that, click the ‘Add action’ button inside your recipe.

Click the Add Action button in Uncanny Automator

You’ll now see a list of all the integrations available on your site.

From here, select ‘Google Sheets.’

Select Google Sheets as the action integration

Once you do that, Uncanny Automator will show you the actions it can perform. For this setup, choose ‘Create a row in a Google Sheet.’

This action tells Automator to add a new row to your spreadsheet whenever a WooCommerce order triggers the recipe.

Select the action condition

Upon doing that, you’ll see a dropdown where you can choose the Google Spreadsheet you connected earlier. Pick the spreadsheet where you want to store your order data.

Next, choose the worksheet inside that spreadsheet. If your file only has one sheet, you don’t need to worry much here.

But if you’re using multiple tabs, I suggest double-checking that you select the correct one, so your data doesn’t end up in the wrong place.

Choose a spreadsheet from the dropdown menu

Once that’s done, scroll down to the ‘Rows’ section. This is where you connect your WooCommerce order data to the columns in your Google Sheet.

If mapping sounds complicated, don’t worry—it’s actually very simple. You’re just matching each column in your spreadsheet with the right piece of order information. I like to think of it as assigning values to columns, one by one.

To start, click the asterisk (*) icon next to a field. This opens a list of available data that Automator can pull from the WooCommerce trigger.

Map each column

Under the ‘Triggers’ section, you’ll see order details like billing name, email, phone number, products, and order totals.

For example, you can map the Name column to the customer’s billing first name, the Email column to the billing email, the Phone column to the billing phone, the Products column to order products, and the Total column to the order total.

I recommend taking your time here and mapping each column carefully. Once this part is set up correctly, your spreadsheet will stay clean and easy to read, even as more orders come in.

Preview of mapped fields

After you’ve mapped all the columns, click the ‘Save’ button to store your settings.

Step 5: Create a WordPress User After a WooCommerce Purchase

Now it’s time to add the second action to your workflow. This action automatically creates a WordPress user when someone purchases an item in your WooCommerce store.

You might be wondering why this is useful. Creating a user account after a purchase is helpful if you plan to give customers access to gated content, courses, digital downloads, or member-only areas later.

It also saves you from manually creating accounts, making the buying experience smoother for customers. To add this second action, click the ‘Add action’ button again in your recipe.

This time, select ‘WordPress’ as the integration.

Select WordPress as the action platform in Uncanny Automator

Once the list of actions appears, choose ‘Create a user.’

This tells WordPress to automatically create a new user account when the WooCommerce order trigger runs.

Choose create a user as WordPress action in Uncanny Automator

After selecting the action, you’ll see fields to map user details such as username and email.

Just like before, click the asterisk (*) icon next to each field to pull in data from the WooCommerce trigger.

For example, you can use the customer’s billing email for the email field. For the username, I usually select the billing first name or a combination of name and order data.

The key idea is that you’re reusing information the customer already entered during checkout, so nothing extra is required from them.

Map fields in WordPress action in Uncanny Automator

Next, you’ll see a separate field for the password. You can leave it blank, and Uncanny Automator will automatically generate a secure password for the new user.

Alternatively, you can set your own password if you prefer.

Set a password for new user in Uncanny Automator

After that, scroll down to the ‘User role’ setting. This is where you choose what role the new user should have in WordPress.

Here, I suggest selecting ‘Customer’ from the dropdown. This role is designed specifically for WooCommerce buyers. It gives them access to their account and order details without giving them any unnecessary permissions inside your WordPress admin area.

Choose customer as the user role in Uncanny Automator

It’s also important to check the ‘Send user notification’ box right below the user role setting.

This ensures your new users receive an email with their login details, allowing them to access their account automatically.

Note that if you add a delay (which I recommend in the next step), the email will arrive shortly after that wait period.

Check Send User Notification box in Uncanny Automator

After everything looks good, click ‘Save’ to store your settings.

At this point, the second action is complete. But there’s one more small improvement I recommend making.

Since your recipe now has multiple actions, you can add a delay before this user-creation step runs. This can be helpful in more complex workflows where actions depend on each other or when external services need a little time to finish processing.

To add a delay, click the ‘Delay’ button inside the Actions tab.

Select Delay in Uncanny Automator

A prompt will open, allowing you to enable the delay option and choose how long Automator should wait before running the action. You can set delays in minutes, hours, or even days.

I recommend setting a 10-minute delay. This gives WooCommerce enough time to fully process the order, handle payment confirmations, and complete any background tasks before the user account is created.

It also helps avoid edge cases where an order might fail or get refunded immediately after checkout.

With the delay added, this action will run 10 minutes after the first action, making your workflow more reliable and predictable.

Set an action delay in Uncanny Automator
Step 6: Save and Activate Your Recipe

Now that both your WooCommerce trigger and your actions—sending order data to Google Sheets and creating a new WordPress user—are set up, it’s time to make your automation live.

Before that, I recommend double-checking all your field mappings. Make sure the columns in Google Sheets match the correct WooCommerce data, and that the username, email, and user role are properly mapped for the new account.

Once you’re confident everything is correct, toggle the Trigger and Action switches to ‘Live.’ Then, in the right-hand column, switch the recipe status from ‘Draft’ to ‘Live.’

This is it—your automation is now active. From this point forward, every time someone purchases something in your WooCommerce store, Uncanny Automator will automatically add their order details to your Google Sheet and create a WordPress user account.

Save recipe in Uncanny Automator

I’ve tested this exact workflow myself, and setting it up took less than 10 minutes.

Compare that to n8n, where you’d need to configure multiple webhooks, parse JSON, handle API keys, and manage server infrastructure—this same automation could take hours, even for experienced users.

The great part is that the process is very similar for any other type of automation you want to set up in Automator.

Whether you’re connecting forms to email services, logging purchases, or triggering course enrollments, the workflow is consistent: select your trigger, choose your actions, map your fields, and go live. It’s that simple.

More Real-World Use Cases for WordPress Automation: What You Can Build (That’s Harder in n8n)

Uncanny Automator isn’t just for simple form-to-spreadsheet tasks. You can create powerful, real-world workflows that save hours of manual work.

Here are some examples that are much easier to set up in Uncanny Automator than in n8n:

1. Automatic Course Access Based on Purchases

If you run an online course site, enrolling students manually or juggling multiple platforms can be a headache. Automator lets you automate the entire process, from purchase to course access, in just a few clicks.

Here’s how it works:

Uncanny Automator workflow for automatic course access

For instance, when a user buys the “SEO Mastery Bundle” in Easy Digital Downloads, Automator automatically enrolls them in all three MemberPress courses.

It also adds them to a private Facebook group, notifies the course instructor on Slack, and tags them in Constant Contact to trigger follow-up emails.

MemberPress recipe in Uncanny Automator

🌟Why it’s easier than n8n: Each of these steps in n8n would require separate webhooks, JSON mapping, and API calls. Automator handles all of this in a few dropdown selections.

2. Lead Scoring & Smart Follow-Up

Keeping track of leads and following up personally can be time-consuming. Uncanny Automator helps you score leads and trigger smart follow-ups automatically, even using AI.

Here’s a simple workflow that you can use for it:

Uncanny Automator workflow for lead scoring and follow-up emails

For example, when a user downloads a lead magnet via WPForms, Automator records it in Google Sheets.

You can then set up specific triggers to add points when the user visits high-value pages, like your Pricing or Demo page.

Once a lead reaches 30 points, Automator sends a personalized AI-generated email via OpenAI and automatically creates a HubSpot CRM deal.

Set delay

🌟Why it’s easier than n8n: In n8n, connecting WPForms alone would require setting up a webhook for the form submission, parsing the JSON payload, mapping fields to Google Sheets, tracking page visits via additional triggers, and configuring API calls for both the AI email and CRM deal creation.

You can check out our beginner’s guide on email marketing automation to learn more tips for setting up smart, automated follow-ups.

3. Share AI Summaries on Social Media When a Post Is Published

I also recommend using Uncanny Automator to automatically create AI-generated summaries for your new blog posts and share them on social media. It’s a simple but powerful workflow that saves time and keeps your content visible.

Here’s an example of an automated workflow:

Uncanny Automator workflow for generating AI summary and publishing on social media

When a blog post is published, Automator sends the content to OpenAI, which creates a short summary suitable for social media.

The workflow then posts this summary automatically to your connected social accounts.

Uncanny Automator actions for OpenAI

🌟Why it’s easier than n8n: In n8n, you’d need multiple webhooks, JSON parsing, and separate API calls to OpenAI and each social network.

To get started with more automations, take a look at the following guides:

FAQs About Using Uncanny Automator vs. n8n

If you’re trying to decide between Uncanny Automator and n8n, these are the questions I see most often from beginners.

Does Uncanny Automator slow down my WordPress site?

No, it does not slow down your site. Uncanny Automator runs after your page has finished loading, not while visitors are waiting.

In simple terms, your page loads first for the visitor. Once everything is visible, Automator quietly runs in the background to send emails, update records, or trigger other actions. Because of this, visitors don’t experience slower page speeds.

Can I migrate my existing n8n workflows to Uncanny Automator?

Yes, but you’ll need to rebuild them manually. There’s no one-click migration tool because n8n and Automator work very differently.

The good news is that the process is simple:

  1. Write down what triggers your n8n workflow (for example, a form submission).
  2. List the actions that happen next (send email, add to CRM, update data).
  3. Recreate the same steps using Automator’s dropdown menus.

Most users find that this takes much less time than building the original n8n workflow, and ongoing maintenance becomes easier.

What happens if I run too many automations on my site?

Automator itself doesn’t limit you, but your hosting does. On most shared hosting plans, running a reasonable number of automations works fine.

If your site runs hundreds or thousands of automations per hour, you may need better hosting, like managed WordPress hosting or a VPS. Automator includes logs that help you see if a workflow is taking too long, so you can adjust or split it if needed.

Does Uncanny Automator work with custom post types and custom fields?

Yes, it does. If your site uses custom post types (like “Courses,” “Events,” or “Listings”), Automator can detect and work with them automatically.

It also supports popular custom field plugins like Advanced Custom Fields, Meta Box, Pods, and Toolset. This means you can trigger automations when a custom field changes or fill custom fields automatically—without writing code.

Can I use Uncanny Automator with WordPress multisite?

Yes, Automator works with multisite setups. You can activate it across the entire network or use it on individual sites, depending on your needs.

I hope this article helped you learn how to create n8n-like automation in WordPress. You may also want to see our guide on using AI to generate WooCommerce product descriptions and our top picks for the best AI automation tools for WordPress.

If you liked this article, then please subscribe to our YouTube Channel for WordPress video tutorials. You can also find us on Twitter and Facebook.

The post How to Add n8n Like Automation in WordPress (Easier & Cheaper) first appeared on WPBeginner.


from WPBeginner https://ift.tt/IVWYxre
More links is https://mwktutor.com