Friday, 31 October 2025

WPBeginner Spotlight 17: Big Moves in the WordPress Ecosystem — AI Tools, Improved Forms, and What’s Next in 6.9

October brought a wave of new AI tools and smart features across the WordPress ecosystem. From faster website creation to smarter SEO and form automation, there’s plenty of WordPress news for both beginners and pros to explore.

Each update this month focuses on saving time and improving everyday workflows—whether that’s creating content, collecting data, or optimizing visibility in search.

In this issue, we’ll cover what’s coming in WordPress 6.9, WPForms’s new Camera Field, and key updates from MonsterInsights, AIOSEO, SeedProd, and Charitable.

Let’s dive in!

WPBeginner Spotlight 17: Big Moves in the WordPress Ecosystem: AI Tools, Booking Forms, and What’s Next in 6.9

ℹ️ WPBeginner Spotlight brings you a monthly roundup of the most important WordPress news, updates, and community happenings. 📅✨

Got something to share? Whether it’s a new product launch, a significant update, or an exciting event, reach out to us through our contact form, and your news could be featured in the next edition! 💬

AIOSEO Adds AI Writing Assistant, Image Generator, and AI Search Tools

All in One SEO has released a major AI update with an AI-powered writing assistant, image generator, and LLM SEO optimization tools.

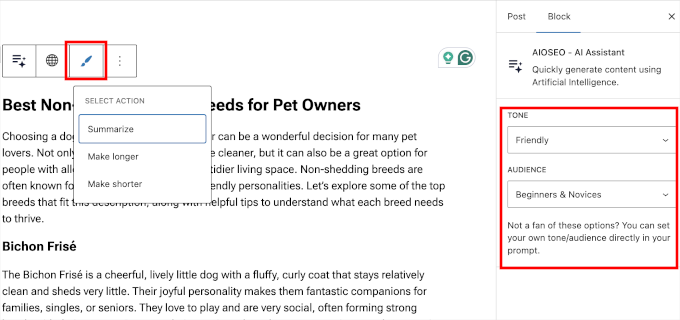
The AI Assistant lets you generate blog posts, product descriptions, and SEO content by simply typing in a prompt. It works directly inside the WordPress editor.

AIOSEO AI assistant block

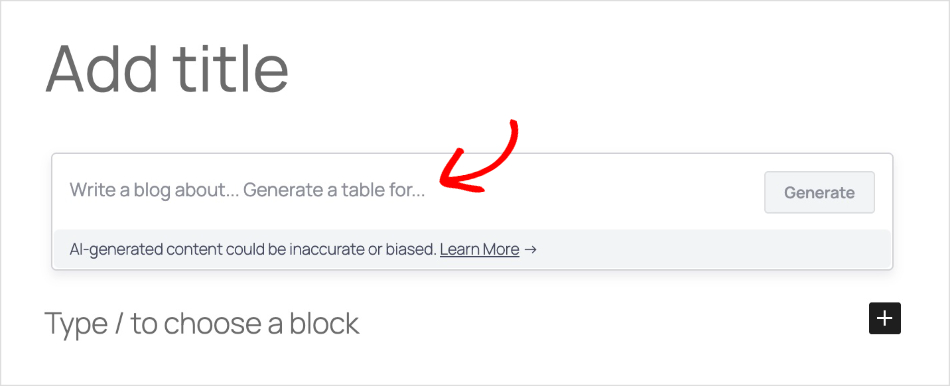
Just describe what you need help with, like writing a new blog post, creating tables, summarizing some text, or expanding on topics.

The AI assistant also allows you to:

  • Set the tone of the AI response.
  • Choose an audience type.
  • Make the generated text longer, shorter, or summarize it.
  • Translate the generated text instantly.
AIOSEO 's AI assitance options for tone and audience

Plus, its new Image Generator can create featured images and blog illustrations based on a text description.

The best part is that you can choose quality, style, and aspect ratio with a few clicks. This saves you from writing complicated, longer prompts to fine-tune the AI response.

Fine tune your AI image generation with built in options

The AIOSEO update also makes your site more discoverable by AI platforms.

It includes powerful ways to manage llms.txt and llms-full.txt files. These help search engines and AI tools understand which parts of your site to index.

Note: An llms.txt file is a new proposed standard that gives AI tools like ChatGPT or Claude a structured list of the website content you want them to use when generating answers. To learn more, see our guide on adding an llms.txt file in WordPress.

These updates are designed to help websites stand out in traditional and AI-based search results while reducing the time it takes to create content.

WPForms Introduces Camera Field for Seamless Photo and Video Capture

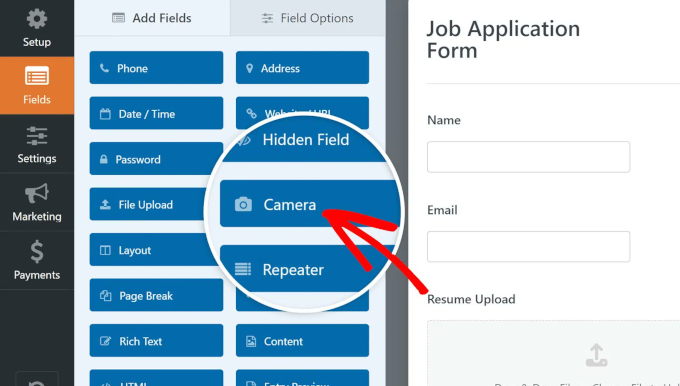
WPForms has launched a new Camera Field that allows users to capture photos or record short videos directly within a form, without needing to upload files or leave the browser.

WPForms camera field

Here are just a few examples of how site owners can use the Camera Field in real projects:

  • Customer onboarding: Let clients submit selfies or ID documents for account setup or access approval.
  • Support requests: Capture visual context for product issues, damage, or installation problems.
  • Job applications: Request a short intro video or live photo as part of applicant screening.
  • Contests and marketing: Collect media entries for campaigns, photo contests, or testimonials.
  • Field reporting: Allow remote staff to document site visits, deliveries, or inspections.

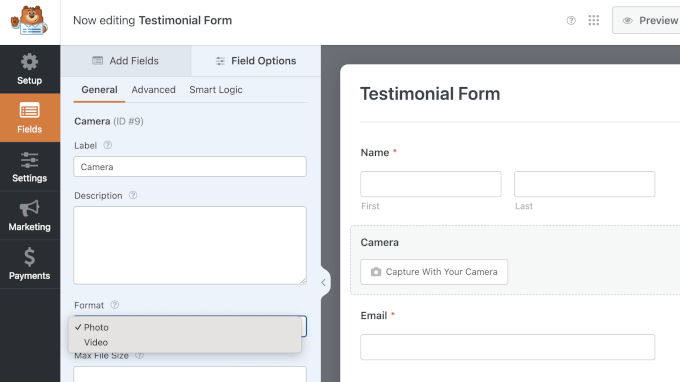
The Camera Field also includes thoughtful customization options.

Site owners can choose photo or video mode, limit file sizes and video durations, customize the capture button with branded text or icons, and select where files are stored—either in the Media Library or within secure folders in the WPForms directory.

WPForms camera field allows you to choose between video and photo

Plus, WPForms’ security features let admins restrict file access to logged-in users or require password protection. This makes it suitable for sensitive use cases like identity verification or HR forms.

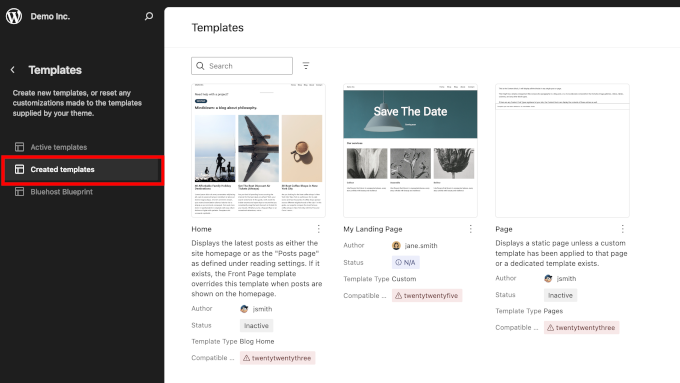
What’s Coming in WordPress 6.9: Collaboration and Performance

The upcoming WordPress 6.9 update will be the last major release of 2025. It is still in beta and available for testing.

This release will be focused on three major areas:

  • Improving the site editor
  • Adding new collaboration tools
  • Laying the groundwork for AI integrations.

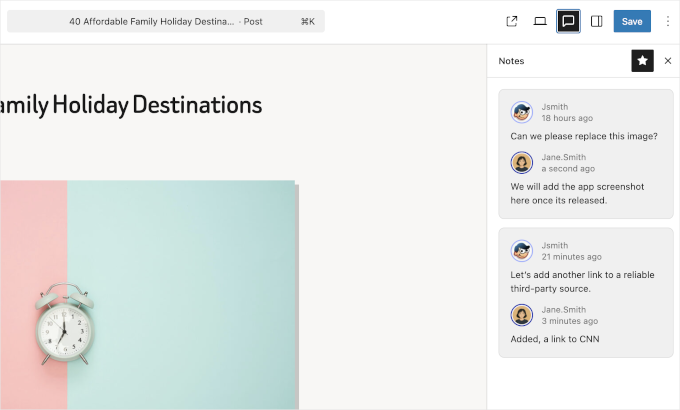
For collaboration, it will be adding one of the most anticipated features – Block-level commenting called ‘Notes’.

Adding note to a block in WordPress 6.9

Basically, users can leave notes for individual blocks when writing a post or page. And other users can reply to those notes.

This new update will be greatly helpful for content teams and editors to easily collaborate right inside the post editor.

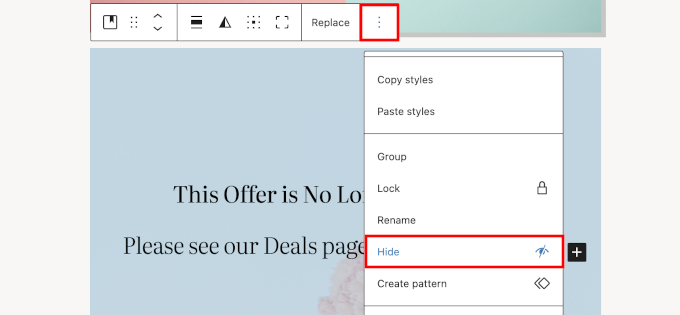
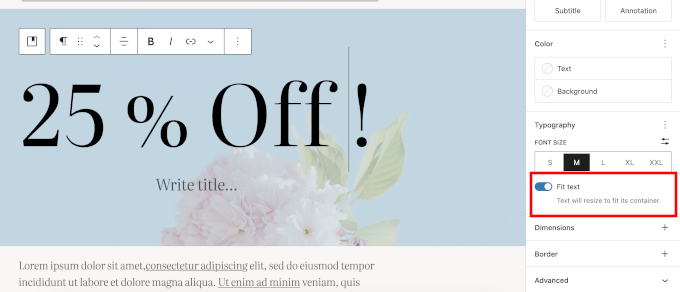
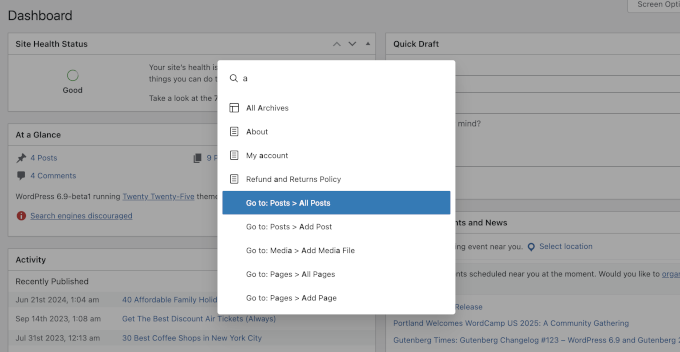
Other improvements include visibility toggles for blocks, new design tools, and a smarter Command Palette for faster navigation.

Show hidden block

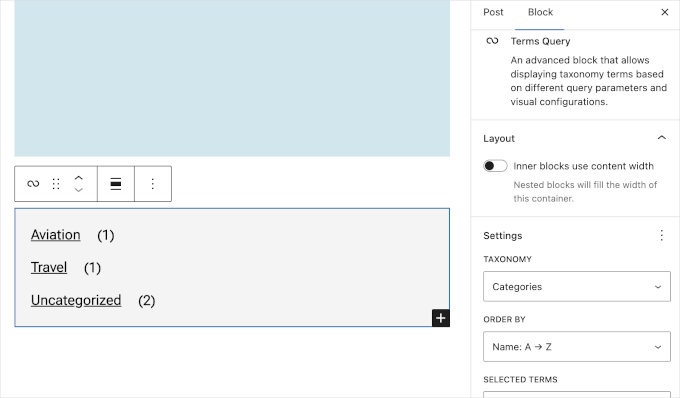
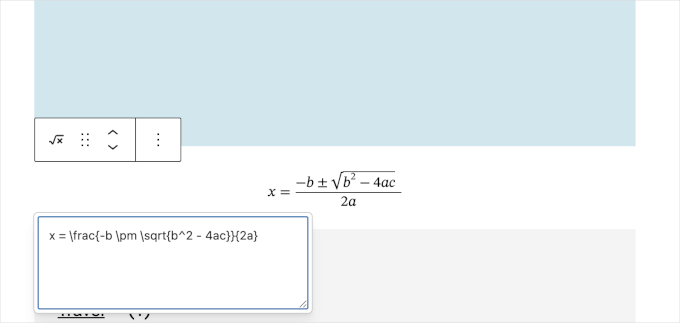
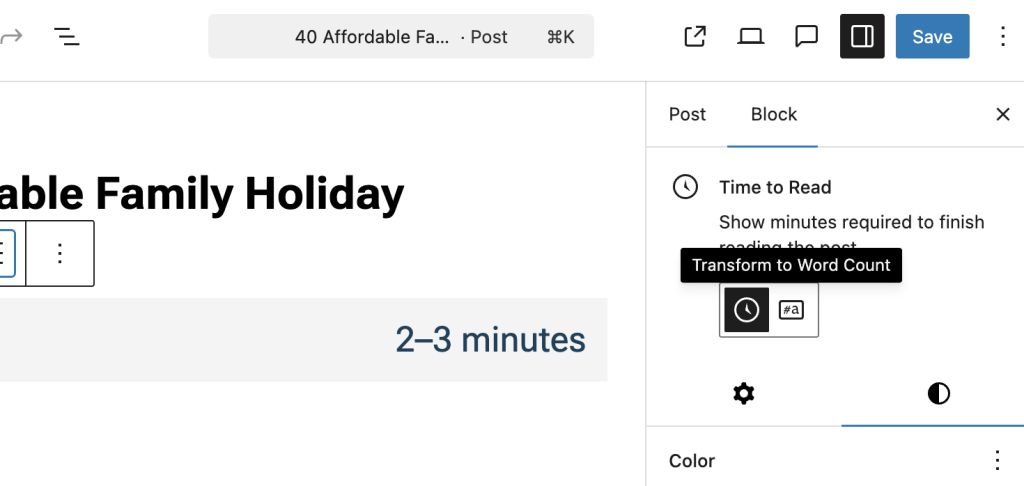
6.9 will also introduce several new blocks, including the “Time to Read” block, the Math block, and query filters based on taxonomy terms.

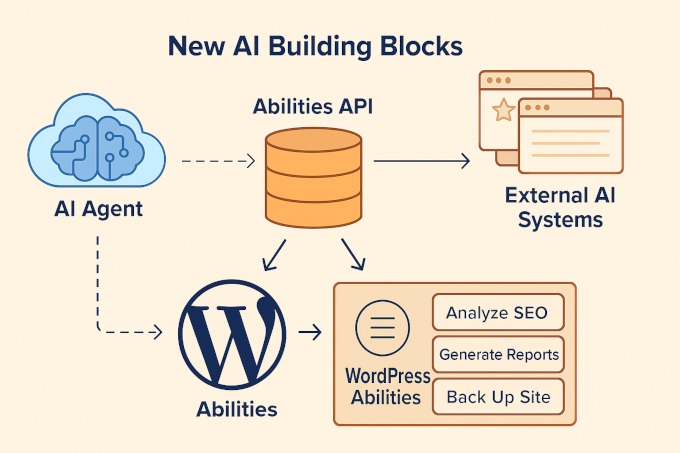
It will also ship with a new ‘Abilities’ API,  which is a registry of everything WordPress can do in a machine-readable format. This will open up WordPress for deeper AI integrations with LLM platforms, MCP servers, and automation software.

Build a WordPress Website in 60 Seconds with SeedProd’s AI Builder

SeedProd has launched a new AI Website Builder that can generate a complete WordPress website in under a minute, with no coding needed.

This is ideal for small businesses, freelancers, and agencies that need to launch new sites fast without hiring developers or designers.

Providing a small prompt to vibe code a small business website using SeedProd AI

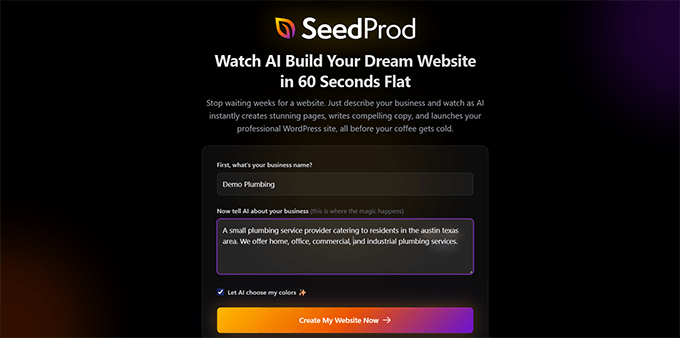
Just describe your business, and the builder will create a custom homepage, about page, contact page, and more using smart AI prompts.

The best part is that you can instantly customize the site using SeedProd’s drag-and-drop editor. Simply point and click on any element to edit or change it.

Edit your website with drag and drop AI website builder

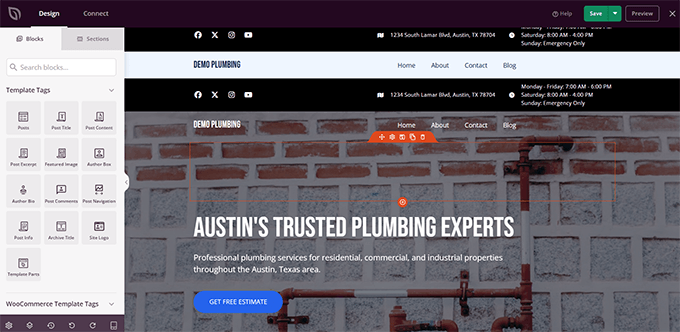
Overall, this feature can save hours of work while generating a professional-looking website without needing to write code or have lengthy back-and-forth conversations with an AI bot.

WordPress.com Sites Now Support MCP for Direct AI Assistant Access

WordPress.com has officially launched support for the Model Context Protocol (MCP). This allows users to connect their websites directly with AI assistants like Claude, ChatGPT, Cursor, and others.

This means WordPress.com users can now ask their AI tools to pull up real-time information about their sites — from recent post performance to site health stats — without needing to log in to the WordPress dashboard.

Enabling MCP integration in WordPress.com

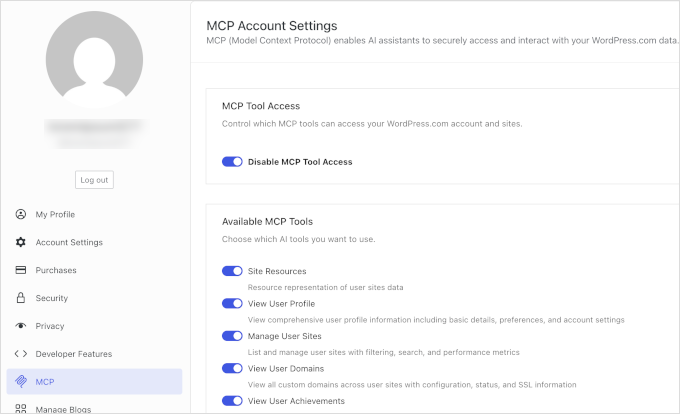
WordPress.com is the first major WordPress hosting provider to adopt MCP with OAuth enabled for all paid plans.

Currently, the MCP integration supports read-only access, meaning AI tools can display insights but can’t make changes — yet.

Writing capabilities are planned for future updates, which will open the door for AI assistants that can eventually draft posts, update settings, or manage content directly.

MonsterInsights Adds Visual SEO Reports and LinkedIn Ads Tracking

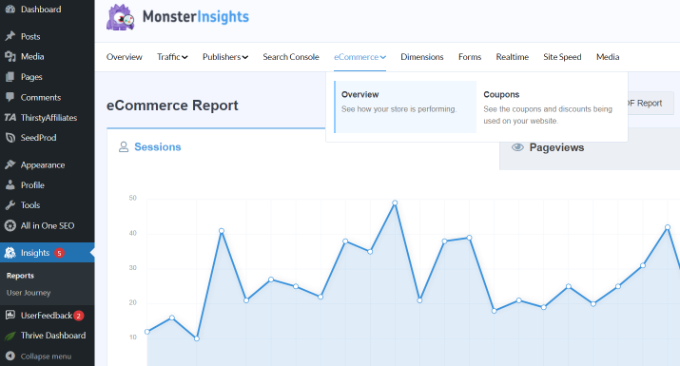
MonsterInsights introduced a big update designed to give site owners a complete view of both organic and paid marketing performance without switching between dashboards.

The update includes a fully redesigned Google Search Console Report with interactive graphs and trend visuals. It also comes with the ability to track LinkedIn Ads through the PPC Ads Tracking addon.

Redesigned Google Search Console report in MonsterInsights

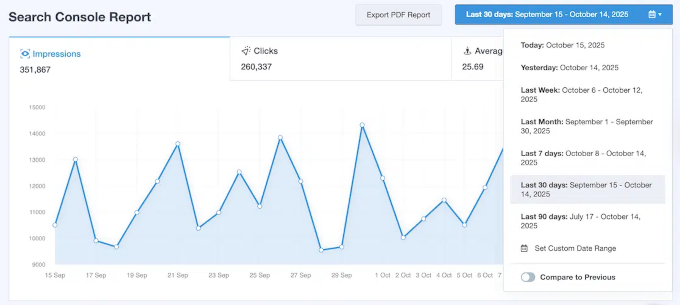
The new visual Search Console Report helps users spot SEO trends at a glance, replacing rows of data with a dynamic chart view.

You can track clicks, impressions, and average position over time, adjust the date range, view daily performance, and even export your report as a PDF for clients or internal teams.

This is especially useful for marketers and SEO professionals who present data to stakeholders or need to catch ranking drops and keyword dips before they impact traffic.

Meanwhile, the addition of LinkedIn Ads tracking enables users to monitor page views and purchase conversions from their campaigns directly within MonsterInsights.

MonsterInsights LinkedIn ads tracking

It works alongside existing support for Google Ads, Microsoft Advertising, Meta (Facebook) Ads, TikTok, and Pinterest.

WPForms Now Integrates with Airtable — Save Time and Automate Your Workflow ⚡

WPForms just launched their new Airtable Integration addon. This new feature enables you to automatically send form entries directly into your Airtable bases, with no need for third-party connectors, Zapier fees, or manual data entry.

WPForms airtable addon

Here’s what you can do with the new Airtable integration:

  • Instant Sync: Every form submission is automatically added to your Airtable table in real-time.
  • Custom Field Mapping: Choose exactly how your form fields align with Airtable columns — no messy data or mismatches.
  • Multiple Bases Supported: Connect different forms to different bases or tables, depending on how you organize your workflows.

The Airtable addon is available to all WPForms Elite users. It makes it incredibly easy to sync your website forms with the exact Airtable tables you use to manage your business, projects, and clients. Submissions appear instantly and are fully customizable to fit your workflow.

In Other News 🗞️

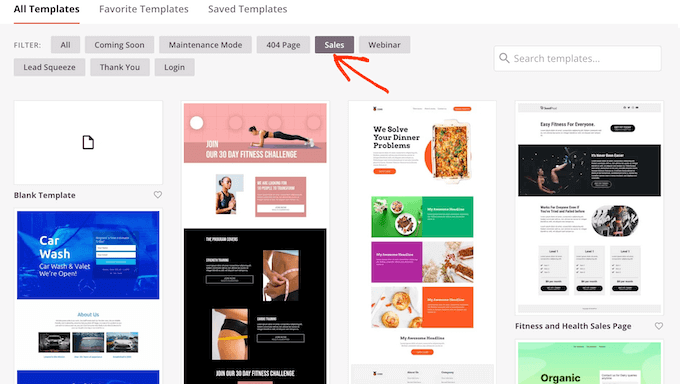
  • SeedProd has rolled out a redesigned dashboard aimed at improving user workflows. The new layout puts core tools like Coming Soon Mode, Landing Pages, and the Website Builder front and center, while simplifying navigation for faster, more focused site creation.
  • AffiliateWP now integrates with Charitable, allowing nonprofits to run affiliate-driven fundraising campaigns. Affiliates can promote donation drives, and their referrals are tracked just like eCommerce conversions, offering a new way to grow donor reach.
  • WordPress 6.8.3 was released with two important vulnerability fixes. This update addresses a data exposure bug affecting restricted content and an XSS issue in nav menus.

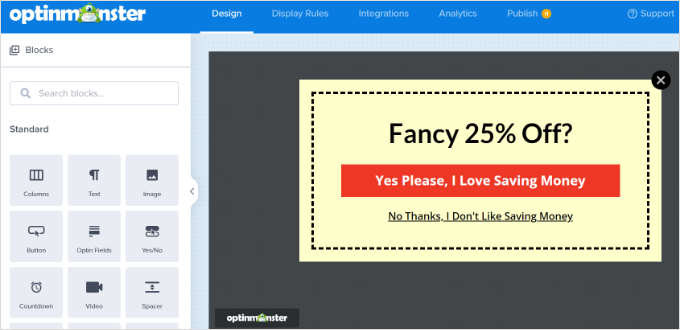
OptinMonster – Convert Visitors into Subscribers & Customers

OptinMonster

Grow your email list and boost conversions with popups, slide-ins, and behavior-targeted campaigns—all without writing a single line of code.

  • PushEngage now offers native integration with HubSpot, making it easier for users to sync subscriber data across platforms. It allows businesses to automatically add new push notification subscribers to HubSpot lists for targeted email marketing and CRM workflows. The integration works seamlessly without manual API setups or third-party connectors.
  • AdTribes now supports custom refresh intervals for product feeds. This update enables WooCommerce store owners to set specific update frequencies for each feed. This ensures that product data is synced accurately across platforms such as Google Shopping and Meta.
  • The latest updates to Charitable Pro introduce email personalization tools and a new CSV donation importer. It now supports dynamic tags in email templates, campaign titles, and other donation data. It also introduced a new CSV importer to bulk import donation records, match or create donor profiles, and migrate legacy data more easily.
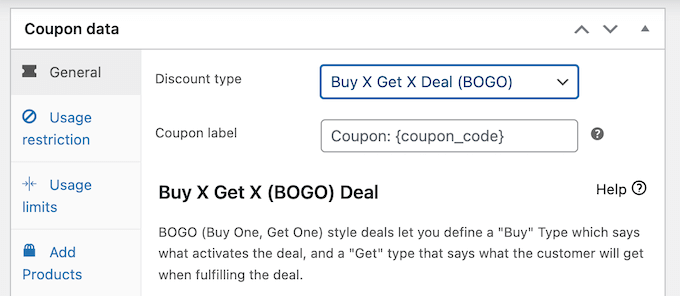
  • Advanced Coupons has introduced a new feature that allows customers to convert loyalty points into store credits. This update provides store owners with more flexibility in designing rewards programs by allowing users to redeem points directly at checkout. It also includes controls for point-to-credit ratios, minimum redemption rules, and customizable messaging.

Backup & Migrate WordPress Sites Using Duplicator

Duplicator

Duplicator makes it easy to migrate, back up, and clone your WordPress site. Whether you’re switching hosts, setting up staging, or scheduling automated cloud backups, Duplicator handles it all—no technical skills required.

  • Thrive Architect and Thrive Leads have rolled out a native webhooks integration, eliminating the need for third-party automation tools like Zapier. It lets users send form data instantly to CRMs, email platforms, or project tools, streamlining workflows and reducing manual data entry.
  • Easy Digital Downloads has released a new Elementor integration. It allows users to design their digital downloads checkout pages using the popular Elementor page builder plugin.

New Plugins & Tools

  • SeedProd AI – Instantly generate a full WordPress site including content, images, and layouts.
  • RewardsWP – Create reward-point loyalty programs inside WordPress with AffiliateWP.
  • WPChat – Add live chat and customer support tools to your WordPress site.

That’s a wrap for this month’s WPBeginner Spotlight! We hope you enjoyed catching up on the latest WordPress developments. 🎉

Have a product launch or feature update you’d like us to include next month? Send us a message.

We’ll be back next month with more news, product updates, and insights from around the WordPress ecosystem. Until then, keep building, keep learning, and stay connected with the community.

If you liked this article, then please subscribe to our YouTube Channel for WordPress video tutorials. You can also find us on Twitter and Facebook.

The post WPBeginner Spotlight 17: Big Moves in the WordPress Ecosystem — AI Tools, Improved Forms, and What’s Next in 6.9 first appeared on WPBeginner.


from WPBeginner https://ift.tt/weh64zQ
More links is https://mwktutor.com

Wednesday, 29 October 2025

I Ran a WooCommerce Flash Sale — Here Are My 10 Expert Tips

If you’ve ever felt the stress of planning a limited-time sale in your WooCommerce store, you’re not alone. Creating real urgency can be challenging without adding extra pressure or risking shoppers abandoning their carts before completing their purchases.

I’ve found that successful flash sales aren’t just about offering the biggest discount. The real results come from how you present your deals, build excitement in advance, and keep shoppers engaged all the way through checkout.

In this guide, I’ll share the exact tips and tools I use to run profitable flash sales in WooCommerce, stress-free.

You’ll learn how to attract more buyers, create urgency that actually converts, and even recover sales you might have otherwise lost.

How I Successfully Ran a Flash Sale in WooCommerce

In a hurry? Here are the key takeaways for running a successful flash sale:

  • Use Dedicated Landing Pages: A tool like SeedProd helps you create focused pages that convert better than standard product pages.
  • Create Urgency: Use OptinMonster to add countdown timers and floating bars that encourage immediate purchases.
  • Simplify Checkout: FunnelKit lets you build a fast, one-page checkout to reduce abandoned carts.
  • Build an Email List: Notify subscribers the moment the sale starts to get an initial rush of traffic.
  • Promote Your Offer: Announce your sale on social media and use popups to make sure every site visitor knows about it.

You can use the quick links below to quickly navigate through my tips in this article:

Plan Your Flash Sale Around a Clear Goal

Clear Goal

Before you start building landing pages or setting up discount codes, you need to define exactly what you want your flash sale to accomplish. Without a clear goal, you’ll struggle to make strategic decisions about timing, products, and pricing.

Many strategies for a successful flash sale are similar to what I use for bigger promotions, which you can read about in my guide on how to plan a holiday sale for your WooCommerce store.

Here are my main tips:

  1. Choose your primary objective. Are you trying to boost revenue, clear out old inventory, or attract new customers? Each goal requires a different approach. For example, revenue-focused sales work best with your popular products at a 20-30% discount, while clearing inventory may require deeper discounts of 40-50% off.
  2. Keep your sale short and urgent. Flash sales lose their impact when they last too long. The most effective sales run for 24-72 hours. This creates urgency without making customers feel rushed.
  3. Make sure your site is fast and ready for visitors. A successful flash sale can bring a huge traffic spike, and a slow website will frustrate customers and lead to lost sales. Use a tool like GTmetrix to test your site’s performance and fix any speed bottlenecks. A faster site can handle more simultaneous visitors, ensuring a smooth shopping experience.

    I also recommend checking with your WordPress hosting provider to confirm your plan can handle the expected increase in traffic. For complete guidance, see our tutorial on how to prepare your WordPress site for a high traffic event.
GTmetrix Detailed Report
  1. Choose your products carefully. Focus on items that are in demand and will still be profitable after a discount. Also, make sure you have enough stock to fill all the orders. Putting your entire store on sale can make the offer feel less special.

The key is to treat planning as the most important step. A clear goal and a well-prepared site turn a potentially chaotic event into a predictable, profitable promotion.

Create Eye-Catching Landing Pages

Scentbird's landing page

A dedicated landing page for your sale focuses all customer attention on your discounted products. Instead of sending traffic to your regular shop where visitors might get distracted, you can create a single destination that highlights exactly what’s on sale.

I recommend using SeedProd to build professional landing pages quickly. My team often uses SeedProd to build dedicated flash sale pages for our software products like WPForms and MonsterInsights.

The drag-and-drop builder lets you create a high-converting page in under 30 minutes, which is perfect when you need to launch a sale quickly. While SeedProd is my top pick, you can explore other options in our comparison of the best WooCommerce sales funnel plugins.

First, install and activate the SeedProd plugin (see our beginner’s guide). Then go to SeedProd » Landing Pages and click ‘Add New Landing Page.’

You can then choose a high-converting template from SeedProd’s library. Look for templates in the ‘Sales’ category that already include sections for countdown timers and product highlights.

SeedProd's ready-made templates

Here are some more tips for optimizing your landing page:

  • Add countdown timers prominently at the top of your page. These create visible urgency that pushes visitors toward immediate action. SeedProd’s countdown timer blocks automatically sync with your sale schedule and display the time remaining in hours, minutes, and seconds.
  • Include bold call-to-action buttons like ‘Shop Flash Sale Now’ or ‘Claim Your Discount’ that stand out from your page design. Use contrasting colors that grab attention without clashing with your overall brand.
  • Showcase your on-sale products with clear pricing. Display both the original price and sale price to emphasize the savings. Include high-quality product images and brief benefit-driven descriptions that focus on value rather than features.

Think of your landing page as the central hub for your entire sale. By creating a focused, distraction-free environment, you make it easy for customers to understand the offer and take action immediately.

Build Excitement Before the Sale Starts

Creating anticipation before your flash sale launches can double or even triple your opening-day results. People who know something exciting is coming are much more likely to be ready to buy when the time comes.

I use OptinMonster to capture leads before a sale starts. For example, a few days before one big sale, I used OptinMonster to add a floating bar to my website that announced the upcoming deal.

This strategy is a key part of how to convert WooCommerce visitors into customers because it builds an engaged audience that is ready to buy.

Here are some tips for successfully building excitement:

  • Add a floating bar to the top or bottom of your site announcing the upcoming sale. You can use a message like, ‘Flash Sale Coming Soon – Get Notified!’ to collect email addresses from interested visitors.
  • Use exit-intent popups to catch visitors just as they are about to leave your site. Offering people early access to the sale is a powerful way to get them on your email list.
Edit your campaign template
  • Run a teaser campaign on social media and email subscribers 3-5 days before the sale. You can share hints about the products or discounts to build curiosity without giving everything away.
  • Include countdown timers in your emails and on your site to show exactly when the sale begins. This creates a sense of anticipation and urgency.

The goal is to have a warm, engaged audience ready to purchase the moment your flash sale goes live, rather than starting from scratch when you launch.

Send Targeted Email Campaigns

Email marketing drives the highest conversion rates for flash sales because you’re reaching people who already know your brand and have shown interest in your products.

Constant Contact is one of the best email marketing services for managing your email campaigns. I use Constant Contact for flash sales because its automation features make it easy to set up an email sequence.

This lets me create all my messages at once —the announcement, a reminder, and a final-hour push —and schedule them to send at the perfect time.

Add another email to series

Pro Tip: A great email campaign is useless if your messages land in spam. I use WP Mail SMTP on all my sites to make sure my promotional emails are delivered reliably.

Here are the steps I follow when sending targeted email campaigns for WooCommerce sales:

  • Start with a launch announcement. Your first email should clearly state what’s on sale, the discount amount, and the exact date and time when the sale ends. Be sure to include a countdown timer and a link to your landing page.
  • Send a mid-sale reminder. You can send this to people who opened the first email but didn’t buy anything. A simple subject line like, ‘There’s still time to save 40%’, works well.
  • Create urgency with a final-hour email. In my experience, a ‘last chance’ email sent in the final hours often brings in a large portion of the total sales. Use a subject line like, ‘Last 3 Hours – Sale Ends Tonight!’
  • Segment your email list. You can send a slightly different offer to people who have bought from your store before, like early access or a special coupon. This makes them feel valued and encourages them to buy.
  • Use clear call-to-action buttons. Every email needs a clear, clickable button that goes directly to your sale. Use text like ‘Shop the Sale Now’ instead of a generic ‘Click Here’.
  • Test your email timing. Most sales emails do well when sent between 10 AM and 2 PM on weekdays. However, it’s a good idea to test different times to see what works best for your audience.

The key is maintaining consistent communication without overwhelming subscribers. Three strategically timed emails typically work better than daily messages, which could cause people to ignore your promotions.

Optimize Product Pages for Conversions

Product Page Example

Your WooCommerce product pages need to work harder during flash sales because customers are making faster decisions under time pressure.

Every part of your product page, from the images to the reviews, should make your customer feel confident and excited to buy right away.

Showcase Your Products Clearly

  • Use high-quality product photos. Include images from different angles and show the product in use. This helps customers imagine themselves using it.
  • Write benefit-focused descriptions. Instead of listing technical details, you should explain how the product helps your customer. During a flash sale, people need to quickly understand if it solves their problem.
  • Clearly show the original and sale price. Placing the regular price next to the sale price makes the discount feel more valuable.
  • Make sure your pages are mobile-friendly. Many people shop for flash sales on their phones. Test your product pages to make sure they load fast and the ‘Add to Cart’ button is easy to tap.

Trust & Social Proof

  • Show customer reviews to build trust. This is a great way to add social proof from other platforms. For example, you can use a plugin like Smash Balloon’s Reviews Feed to display your reviews from Google or Yelp directly on your product pages. This shows visitors that real people are happy with your products.

Urgency & Scarcity

  • Add flash sale badges to product images. A simple badge like ‘Flash Deal’ or ‘Limited Time’ makes your sale items stand out and increases the chances of customers adding them to their carts. For a step-by-step tutorial, see our guide on how to add product badges in WooCommerce.
WooCommerce's default Sale badge
  • Use stock counters to create scarcity. Displaying a message like, ‘Only 8 left at this price’, can encourage people to buy sooner.

Increasing Average Order Value

The goal is to answer every possible customer question and objection quickly so they can confidently add items to their cart without hesitation.

Use Smart Discounts and Coupons

The right discount coupons can significantly boost your average order value while creating the urgency that drives flash sale success. Smart coupon logic encourages customers to buy more while still feeling like they’re getting an amazing deal.

You can use Advanced Coupons for smarter discounts. WooCommerce’s built-in coupons are good for simple discounts, but for a flash sale, you need more control.

For Black Friday sales, many online stores use Advanced Coupons to set up ‘Buy One, Get One’ deals. One of my friends used this single strategy to increase average order value by 18%.

Creating a buy one, get one free coupon for your online store

We have a complete guide on how to create smart coupons in WooCommerce.

Here are some of the best strategies to get you started:

  • Set up BOGO (Buy One, Get One) deals. Offers like ‘Buy 1, Get 1 Free’ are a great way to increase your average order value while making customers feel like they’re getting a great deal.
  • Create bonuses for spending more. You can motivate customers to add more to their cart by offering free shipping or an extra discount after they spend a certain amount, such as $75.
  • Offer bundle discounts. Grouping related products together at a special price is a great strategy. This works well for things that are often bought together, like a camera, memory card, and case.
  • Reward loyal customers. You can offer an extra discount just for your repeat customers. This makes them feel appreciated and encourages them to keep coming back.
  • Apply coupons automatically to reduce friction. During a fast-paced sale, forcing shoppers to hunt for and type in a coupon code is a common reason they abandon their cart. Advanced Coupons lets you automatically apply discounts when a customer’s cart meets your rules, making the checkout process smoother and faster.
  • Schedule your sale to start and end automatically. Instead of manually applying and removing discounts, use your coupon settings to schedule the exact start and end time. Both WooCommerce’s built-in scheduling and Advanced Coupons let you set your sale to go live and expire automatically, so you don’t have to stay up late.

The goal here is to think beyond a simple discount. Smart coupons encourage customers to add more to their cart, boosting your average order value while making them feel like they’ve gotten an even better deal.

Make WooCommerce Checkout Fast and Simple

Checkout

During a flash sale, the best way to prevent abandoned carts is to use a sales funnel builder like FunnelKit to create a fast, one-page checkout. The default WooCommerce process has too many steps, and that friction can cost you sales when customers are in a hurry.

I recommend using FunnelKit to create a simple, one-page checkout because it has a beginner-friendly checkout builder and plenty of customization options.

enable express checkout on cart

Once you install and activate FunnelKit (see our beginner’s guide), just go to FunnelKit » Store Checkout to customize your checkout page.

Here are some ideas to get you started:

  • Enable one-page checkout. FunnelKit lets you put all the necessary fields on a single screen. This is important during a flash sale because it gives customers fewer chances to get distracted and leave.
  • Remove unnecessary fields. Only ask for the most important information: name, address, and payment. You can always ask for extra details, like a phone number, in a follow-up email after the purchase is complete.
  • Add express payment options. Including one-click payment methods like PayPal, Apple Pay, or Google Pay makes it much faster for customers to buy, especially on mobile.
  • Check for mobile-friendliness. Many people will shop your sale on their phones. Test your checkout process on a mobile device to make sure the form fields and buttons are easy to use.
  • Display trust signals. Adding security badges, a money-back guarantee, or a customer service number near the payment section can help reduce any last-minute worries.

Every click you remove from the checkout process is a potential sale saved. The goal is to eliminate any hesitation by making the final step to purchase as fast and frictionless as possible.

For complete guidance on checkout optimization, see our tutorial on how to create a faster checkout in WooCommerce.

Display Live Sale Activity

Live Sale Notification Example

Social proof becomes incredibly powerful during flash sales when customers are already feeling urgency. Real-time notifications about other purchases create fear of missing out (FOMO) that pushes hesitant visitors toward immediate action.

You can quickly add real-time purchase notifications with TrustPulse. This tool shows small popups to visitors when someone else makes a purchase in your online store.

To see exactly how to set it up, you can follow our guide on how to create a live sale notification for WooCommerce.

I also recommend following these tips:

  • Customize your purchase notifications. You can set them up to show messages like, ‘Sarah from California just bought the Flash Sale Bundle.’ This feels more authentic and creates a sense of activity on your site.
  • Show how many people are looking at an item. A notification like, ’23 people have viewed this item in the last hour,’ adds to the urgency and encourages visitors to act fast.
  • Use geographic information. Showing that people from nearby locations are buying can make the social proof feel more relatable to new visitors.
  • Control the timing of notifications. You could set TrustPulse to show a notification after a visitor has been on a page for 30 seconds or when they are looking at one of your most important sale items.
  • Make sure notifications look good on mobile. The popups should be small enough not to get in the way of the shopping experience on a smaller screen.

The goal is to create authentic urgency that shows real customer activity without feeling manipulative or overwhelming your site visitors.

Recover Abandoned Carts Quickly

Flash sales create a unique urgency that can work in your favor for cart recovery. Customers who abandon carts during limited-time promotions often return if you remind them quickly that the sale is going to end soon.

You can use FunnelKit Automations, the powerful automation engine included in the FunnelKit suite, for immediate cart recovery emails. For my own flash sales, I use it to send a recovery email exactly one hour after a visitor leaves.

For more ideas, see my guide on ways to recover WooCommerce abandoned cart sales.

First, you’ll need to install and activate the FunnelKit plugin (see our beginner’s guide on how to install a plugin).

Once it’s active, navigate to FunnelKit Automations » Automations from your WordPress admin dashboard.

FunnelKit's ready-made automation templates

This is where you can set up your cart recovery sequences:

  • Focus on urgency in your emails. Use subject lines like, ‘Your flash sale items expire soon,’ to remind people that the deal is ending.
  • Include a countdown timer in the email. A visual timer that shows exactly how much time is left is more effective than just text.
  • Mention low stock if it’s true. If an item in a customer’s cart is running out, a message like, ‘Only 2 left!’ can encourage them to complete their purchase right away.
  • Make it mobile-friendly. Your recovery emails should have a large, clear ‘Complete Your Order’ button that takes people straight back to their cart.
  • Set up a short email sequence. Sending 2-3 emails is often effective. You can send the first one after an hour, another a few hours later, and a final one on the last day of the sale.
  • Track your results. FunnelKit shows you how much revenue your recovery emails are generating, so you can see what’s working.

The key is to act fast. A shopper who abandons a cart during a flash sale may still be interested. So, a quick, automated reminder can be the final nudge they need to complete their purchase before the deal disappears.

Track Results and Learn for Next Time

Measuring your WooCommerce flash sale performance helps you understand what worked, what didn’t, and how to make your next promotion even more successful. Without proper tracking, you’re essentially flying blind.

I use MonsterInsights because it shows me exactly where my sales came from. I can see which email campaign or social media post drove the most revenue, which helps me decide where to focus my marketing budget for the next promotion.

View eCommerce report in MonsterInsights

Here are some important areas to look at:

  • Track which marketing channels worked best. Did more sales come from your email list, a Facebook post, or paid ads? Knowing this helps you plan your next sale more effectively.
  • See which products sold the most. The items that were popular during this flash sale will likely be good candidates for your next one.
  • Look at when people bought items. You’ll often see sales spike in the first and last few hours. This can help you time your reminder emails better next time.
  • Calculate your return on investment (ROI). You can use MonsterInsights to track your revenue and conversion data. Then calculate your ROI by subtracting the cost of discounts and ads from your total revenue, and dividing that net profit by your total cost. This shows whether the sale (or campaign) was genuinely profitable for your business.
    ROI (%) = (Net Profit ÷ Total Cost) × 100
  • Read customer feedback. Pay attention to common questions or issues that came up in support tickets. This can show you where to improve the customer experience.
  • Send a follow-up email. After the sale, thank your customers and ask for feedback. Happy customers might give you a great testimonial that you can use later.
  • Plan for your next sale. Use all this data to make your next promotion even better. For example, if you saw a lot of abandoned carts, you know to focus on simplifying your checkout next time.

The goal is to turn each flash sale into valuable learning that makes your next promotion more successful and profitable.

You can follow our complete guide on how to set up WooCommerce conversion tracking for details.

Bringing It All Together: Your Flash Sale Blueprint

Running a successful WooCommerce flash sale requires strategic planning, the right tools, and careful execution.

By following the steps in this article —from setting clear goals and building anticipation to optimizing checkout and tracking results —you can create urgency that drives real sales without overwhelming your customers.

The key is treating your flash sale as a complete customer experience, not just a discount event.

When you focus on building genuine excitement, removing purchasing friction, and creating real urgency, customers will look forward to your future promotions rather than waiting for better deals elsewhere.

I recommend starting with a simple 48-hour flash sale on a few high-demand products to test your systems and learn what connects with your audience.

Next, use the data from your first sale to refine your approach. You can then gradually experiment with longer sales, larger product selections, and more automated workflows.

Frequently Asked Questions About WooCommerce Flash Sales

I know that planning a flash sale can bring up a lot of questions. Here are answers to some of the most common ones I get from store owners.

1. How long should a WooCommerce flash sale last?

The most effective flash sales create a strong sense of urgency and typically last between 24 and 72 hours. This gives customers enough time to act without letting the offer drag on so long that it loses its impact.

2. What is a good discount for a flash sale?

The ideal discount depends on your goal. For boosting revenue on popular items, a 20-30% discount is often effective. If your goal is to clear out old inventory, you might offer a deeper discount of 40-50% or more.

3. What is the best way to create urgency during a sale?

The best approach is to use a combination of tactics. You should prominently display countdown timers on your landing pages, show low stock counters on product pages, and use live sale notifications to create authentic FOMO (fear of missing out).

4. How do I tell customers about my flash sale?

Start by building excitement a few days before the sale with teasers on social media and popups on your website to collect emails. Once the sale is live, use targeted email campaigns and floating bars to announce the deal to your subscribers and site visitors.

Additional Resources to Grow Your WooCommerce Store

Now that you know how to run a successful flash sale, here are a few more guides from our team that can help you continue to grow your WooCommerce store:

If you liked this article, then please subscribe to our YouTube Channel for WordPress video tutorials. You can also find us on Twitter and Facebook.

The post I Ran a WooCommerce Flash Sale — Here Are My 10 Expert Tips first appeared on WPBeginner.


from WPBeginner https://ift.tt/qJR902X
More links is https://mwktutor.com

Monday, 27 October 2025

What’s Coming in WordPress 6.9? (Features and Screenshots)

The first beta for WordPress 6.9 is now available for testing. When it’s officially released later this year, it will be the second and final major WordPress update of 2025.

This version will bring big improvements to writing, collaboration, and performance. For example, you’ll see block-level Notes for feedback, the ability to hide blocks on the front end, and a Command Palette that now works across the dashboard.

There will also be plenty of new blocks and noticeable speed boosts.

In this article, we’ll show you what’s coming in WordPress 6.9, complete with screenshots and examples of how each feature works.

Features and screenshots of the upcoming WordPress 6.9 release

ℹ️ Note: This beta release is for testing and development only. Please do not install, run, or test this version of WordPress on a production site (live website your visitors see) or mission-critical website.

Instead, we recommend using a staging site or a local install. You can test WordPress 6.9 Beta by installing and activating the WordPress Beta Tester plugin.

Here’s a quick overview of the changes coming in WordPress 6.9:

Collaborate with Block-Level “Notes”

WordPress 6.9 is taking the first step toward a more collaborative editing experience, similar to Google Docs.

A new feature called “Notes” (formerly known as ‘Block Comments’) lets you attach comments directly to individual blocks.

Simply click on a block and, under the block toolbar, click on the three-dot button and select the ‘Add note’ option to leave a note.

Adding note to a block in WordPress 6.9

Users can reply to a note by simply typing their reply below it. They can also click the check button to mark a note as resolved.

You can also view all the notes attached to a post or page by clicking on the Notes button at the top-right corner of the Edit screen.

View all notes attached to a post

From here, you can click on a note to view the block where the note was added.

This allows teams, agencies, and freelancers to leave feedback and share ideas directly within the editor. It’s perfect for real-time collaboration and helps create a more efficient editorial workflow.

But don’t worry, because these Notes are only for the editor and will not appear on your live site.

Hide Blocks on the Front End (Block Visibility)

Another major addition in WordPress 6.9 is the ability to hide blocks on your live site.

This new “Hide Blocks on Frontend” feature lets you keep blocks in the editor while making them invisible to your visitors.

To hide a block, just click the three-dot menu in the block toolbar and then select ‘Hide’.

Hide a block in WordPress 6.9

The hidden block will disappear from the block editor canvas. You can now save your post or page and preview it, and the block will not appear on your live site.

To restore a hidden block, click on the Outline button in the editor toolbar. There, you will see your hidden block. You can now click on the visibility button to make the block visible again.

Show hidden block

This is perfect for staging new content, exploring alternate designs, or leaving internal notes without creating separate drafts.

Improved Template and Theme Switching

Have you ever worked on a custom template in the Full Site Editor and later found it missing when you switched themes?

WordPress 6.9 will fix this problem. Your custom templates will be retained even when you switch themes, and you can reuse them with other themes.

Keep your custom templates when switching themes in WordPress 6.9

This update also gives you more control over your templates.

You can now create drafts before publishing, activate or deactivate templates as needed, and easily duplicate them.

Edit, duplicate, manage templates in WordPress 6.9

New and Enhanced Blocks

This release also expands your design options with several new blocks.

1. Accordion Block

Previously, many WordPress users were using the Details block to mimic the functionality of an Accordion element.

WordPress 6.9 now comes with an Accordion block, which is accessible and supports nested blocks.

Accordion block in WordPress 6.9

2. Terms Query Block

This new block allows you to display terms for a taxonomy.

For example, it can be used to display a list of categories and tags (two default taxonomies).

Terms query block in WordPress 6.9

3. Math Block

Currently, users need an external plugin to write math equations in WordPress.

With WordPress 6.9, this will be fixed with a Math block, which allows users to easily write math equations in the block editor. This can be helpful for educational blogs and online courses.

Adding math equations in WordPress 6.9

4. Time to Read Block

The new Time to Read block will allow users to display the time to read or the word count of an article. It can be added to individual posts or pages, or users can add it to their templates.

It’s a small touch that can make a big difference. When readers see how long a post will take to read, they’re more likely to click through and actually finish it.

Time to read block in WordPress 6.9

Enhanced Design Options in Several Blocks

Paragraph and heading blocks now have a “Fit text” formatting option.

This feature, also known as ‘Stretchy Type’, automatically scales your text to fill its container, which is perfect for hero sections.

Fit text option added to Typography in WordPress 6.9

AI Developments in WordPress Core

WordPress 6.9 will introduce the foundation for AI-powered workflows inside WordPress Core.

This effort is part of the new AI Building Blocks for WordPress initiative, which includes the Abilities API, PHP AI Client SDK, MCP Adapter, and the AI Experiments Plugin.

What is the new Abilities API?

Abilities API is a registry of everything WordPress can do in a machine-readable format.

For years, WordPress has offered thousands of functions through core software, plugins, and themes — but these were only accessible through code.

The Abilities API changes that by creating a shared language that both humans and AI systems can understand.

Each plugin or theme can “register” what it’s capable of — for example, analyze SEO content, generate reports, or back up your site — along with clear inputs, outputs, and permissions.

Abilities API diagram

Here’s what makes this important: once abilities are registered, AI tools can discover and use them automatically.

That means that an AI agent like ChatGPT or Claude could soon run WordPress tasks such as optimizing posts, creating pages, or triggering plugin actions — all safely and securely.

Developers can start experimenting with the Abilities API with WordPress 6.9. There is already an MCP integration available for WooCommerce.

Command Palette Available Everywhere

The Command Palette in WordPress is a huge time-saver. You can open it by pressing Ctrl + K on Windows or Command + K on a Mac.

It provides quick shortcuts for common actions on your website, like creating a new post or previewing a post in a new tab.

Command palette in WordPress dashboard

In WordPress 6.9, it will be available across the entire WordPress dashboard, not just the Site Editor.

This lets you quickly search, jump to specific admin screens, or trigger actions from anywhere, making navigation much faster.

Performance and Speed Upgrades

WordPress 6.9 also delivers major performance improvements for creating a smoother, faster experience for your visitors.

Here are some of the key upgrades:

  • Output Buffering: A new “template enhancement output buffer” function is introduced to improve performance. (#43258)
  • Faster Loading for Classic Themes: Block styles in classic themes will now load “on demand,” which means your site won’t load CSS for blocks you aren’t using on a page. [#64099]
  • Less Render-Blocking: The Emoji detection script has been moved to the footer, helping your pages render faster. [#64076]
  • Improved Server Performance: Cron jobs (scheduled tasks) will now run at shutdown instead of during page load. This helps reduce the impact on your server’s response time (TTFB). (#63858)

Under the Hood Changes (for Developers)

This release also brings several other powerful updates for developers.

  • Improvements to the Interactivity API will power client-side navigation. This will enable cool new features in the future, like instant search or submitting comments without a page reload. (#71603)
  • The Block Binding API has also been improved, allowing developers to bind more content, like image captions, to custom fields.

Finally, it’s important to note that WordPress 6.9 will not include a new default theme. The development team’s focus has been on improving the editor, APIs, and performance.

We hope this article helped you discover what’s coming in WordPress 6.9 and which new features you’d like to try out.

We are particularly excited about the collaborative Notes feature and the ability to hide blocks, which will streamline content workflows.

If you liked this article, then please subscribe to our YouTube Channel for WordPress video tutorials. You can also find us on Twitter and Facebook.

The post What’s Coming in WordPress 6.9? (Features and Screenshots) first appeared on WPBeginner.


from WPBeginner https://ift.tt/J3l0uh7
More links is https://mwktutor.com