Thursday, 31 March 2022

How to Add Ebook Downloads in WordPress

Do you want to add ebook downloads to your WordPress site?

WordPress makes it easy for you to upload your ebook files in PDF format and make them available for download. You can also sell ebooks or use them to get more email subscribers.

In this article, we will show you how to add ebook downloads in WordPress as well as how to make the most out of your ebooks.
How to add ebook downloads in WordPress

We’ll cover a few different methods, so simply click the links below to jump to the section you need:

Method 1. Direct Ebook Downloads in WordPress Posts

With this method, you can offer your ebook as a free download using the WordPress File block. This block can even display your ebook’s content directly in the WordPress post or page

First you need to edit the post or page where you want to add your ebook download. You can then find the spot where you want to display your ebook, and click on the + icon to add a new block.

In the popup that appears, type File to find the right block.
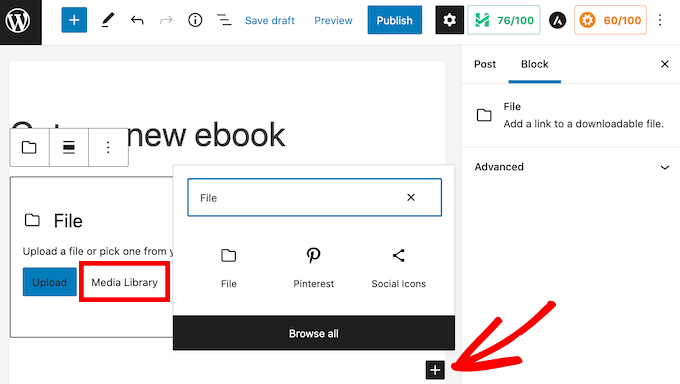
add file block and click on media library

Once you click on the File block, it will add the block to your page.

In the File block, click on the Media Library button, and a popup will appear.
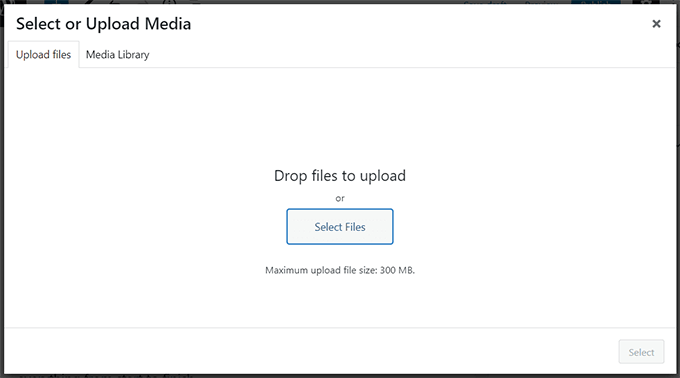
upload file to the media library

You can now select your ebook file, or drag and drop the file to upload it.

By default, the File block displays your ebook’s contents in a small PDF viewer.

It also has controls that visitors can use to scroll through your ebook, download the file, or even print your ebook.
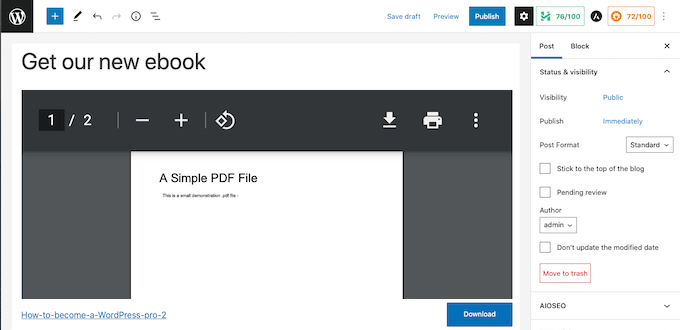
WordPress' embedded PDF viewer

Sometimes, you may not want to display a preview. For example, your ebook may span lots of pages or have images that you want visitors to see fullscreen. 

If you don’t want to include a preview, then you can find the PDF settings in the right sidebar of the content editor. You can then click to expand this section, and turn off the ‘Show inline embed’ slider. 
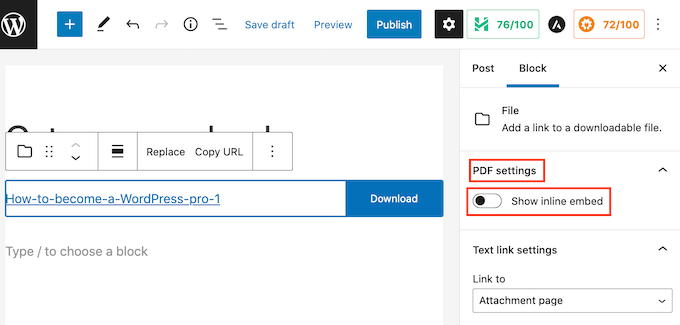
Customizing the WordPress File block

WordPress will now remove the preview, and display only a Download button and a link. 

Visitors can download this file to their local computer by clicking on the blue Download button, or open this ebook in a new tab, by clicking on the link.

If you prefer, you can remove the Download button. To remove it, first click on the ‘Download button settings’ section in the WordPress sidebar.

You can then click on the ‘Show download button’ slider to turn this setting off.
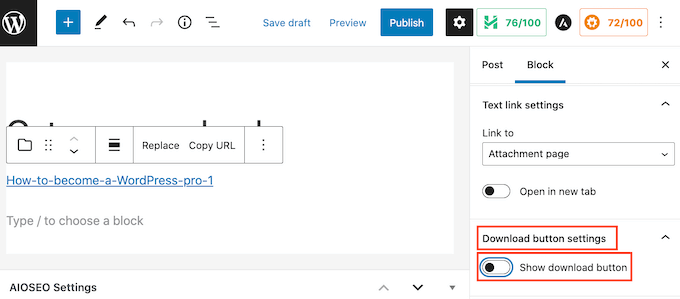
The 'Download button settings'

Without the download button, visitors can still download the file manually, but they would have to launch your ebook in a new tab first to find the download option.

As you’re making changes to your File block, you can see how it will appear to visitors by clicking on the Preview button at the top of the screen. 

Once you’re happy with your File block, you may want to add more blocks. For example, you might write some supporting text or add a call-to-action button to encourage visitors to download your ebook.
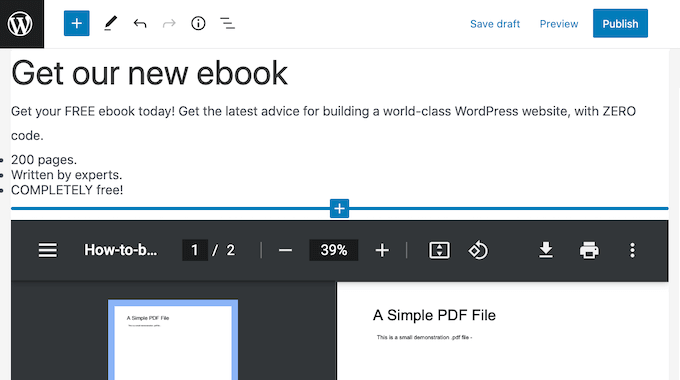
How to create an ebook marketing page

When you’re ready, don’t forget to make your changes live by clicking on the Update or Publish button at the top of the screen. 

That’s it! You have now successfully added your ebook download into a WordPress post. You can now visit your website to see it in action. 

Note: Want your visitors to be able to search for your ebook’s contents on your website? WordPress doesn’t do this by default, so we wrote a guide on how to add PDF indexing and search in WordPress.

Method 2. Use Ebook Downloads to Get More Subscribers

Uploading your ebook using the File block is an easy way to offer great content for free.

However, if you’re using your ebook to grow your email list or capture leads, then you’ll want to make sure your visitors can’t access the ebook until they share their email address.

To set that up, you’ll need OptinMonster. It’s the best lead generation plugin for WordPress.

Using this plugin, you can create high-converting opt in forms without hiring a developer. We use it on WPBeginner and have increased our conversions by over 600% with this plugin alone.

OptinMonster also comes with lots of ready-made templates that you can use to create high-converting popups.
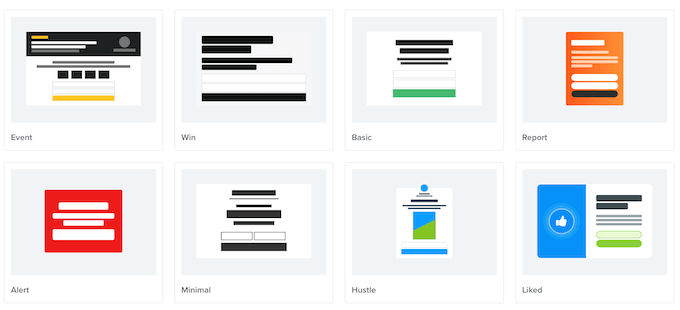
OptinMonster's template library

You can use these popups to ask visitors to perform an action before sending them to the ebook download. This marketing technique is sometimes referred to as offering lead magnets.

Basically, you offer free bonus content to your visitors in return for a small action like signing up to your mailing list.
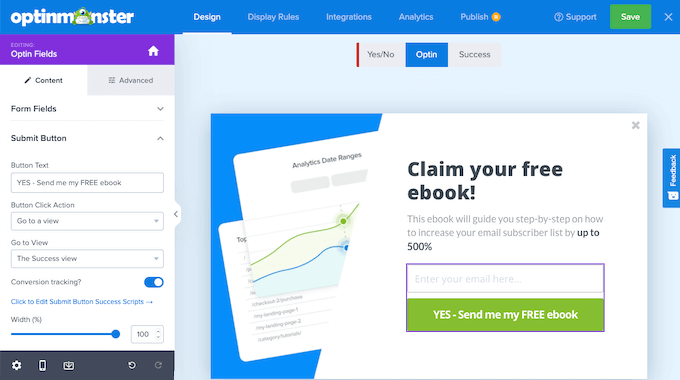
An ebook popup, created using OptinMonster

It’s a win win for both parties. You get a new lead or subscriber, and your users get a free ebook.

For detailed instructions, see our step by step guide on how to add content upgrades in WordPress.

Method 3. Sell Ebook Downloads in WordPress Using Easy Digital Downloads

There are lots of different ways to earn money from your WordPress website. One option is to sell digital products, such as ebooks.

To sell ebooks, you’ll need a plugin.

We recommend Easy Digital Downloads, one of the best eCommerce WordPress plugins. This beginner friendly plugin makes it super easy to sell any type of digital product including ebooks.

First, you’ll need to install and activate the Easy Digital Downloads plugin. You can follow our tutorial on how to install a WordPress plugin.

Upon activation, the first task is adding your ebook as a new product. To get started, head over to Downloads » Add New

On this page, type a name for your ebook into the ‘Enter download name here’ field. This will usually be the book’s title, but it can be anything that you want. 
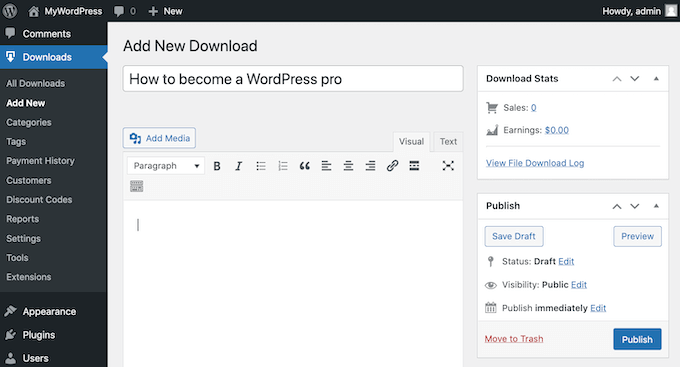
Adding a download to Easy Digital Downloads

Next, type a description for your ebook into the main section of the post editor. This could be a sales pitch that you’ve written to promote your book, or you might use the book’s blurb or summary.

To help visitors discover your ebook, you may want to create some categories and tags. You can add this information in the Download Categories and Download Tags sections.
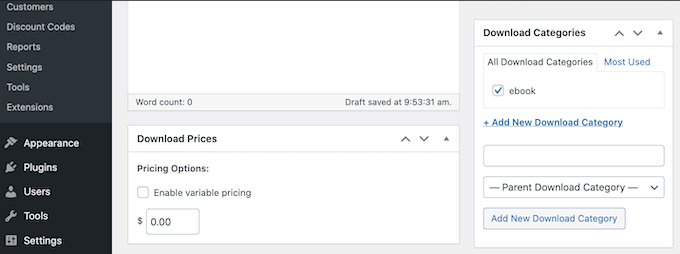
Creating categories and drafts in Easy Digital Downloads

After that, scroll down to the Download Prices section.

Here you can set a price for your ebook.

How to add ebooks in WordPress

Easy Digital Downloads also supports variable pricing. You might use variable pricing to sell other products alongside your ebook. For example, you could give customers the option to save money by preordering your next ebook at the same time.

If you want to offer variable pricing, then select the ‘Enable variable pricing’ checkbox. This adds a new section where you can set your different prices.
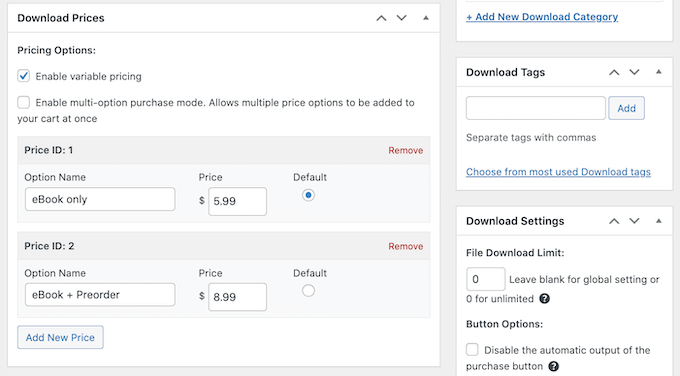
Creating variable pricing for an ebook in WordPress

Next, you need to upload your downloadable file. This is the ebook that your customers will purchase.

To do this, scroll to the Download Files section.
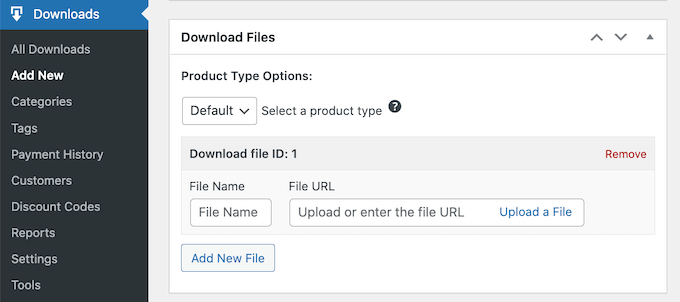
Easy Digital Download's download file settings

In the File Name field, type a name for your downloadable file. You can then click on Upload a file.

This will launch the WordPress media library where you can upload or select a book.

The final step is adding an eye-catching product image. This can help catch the visitor’s attention, and encourage them to buy your ebook.

For ebooks, you’ll typically want to use the book’s front cover as your product image. You can easily create a professional-looking cover using web design software such as Canva.

To add a product image, scroll to the Download Image section.
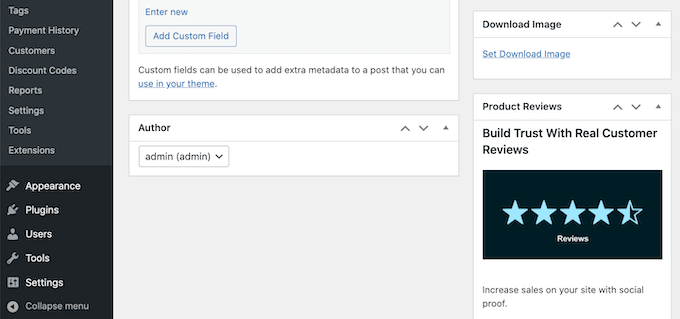
Adding a product image for your ebook in WordPress

You can then click on the ‘Set Download Image’ link. This launches the WordPress media library.

After choosing an image, there are some more settings that you may want to explore. However, this is all you need to do in order to create a downloadable ebook.

To see how your ebook will appear on your website, you can click on the Preview button. When you’re ready to publish your product, simply click on the Publish button.

By default, Easy Digital Downloads publishes your ebook as a new page. Your goal is to drive traffic to this webpage.

This might mean adding this product page to your website’s menu. You might also link to it from different areas of your website, such as a blog post or announcement bar.

To do this, you’ll need to know the product page’s URL. You’ll find this information just beneath the product’s title.
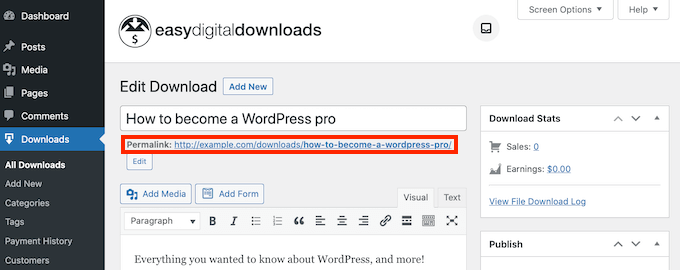
The download link for an Easy Digital Downloads product

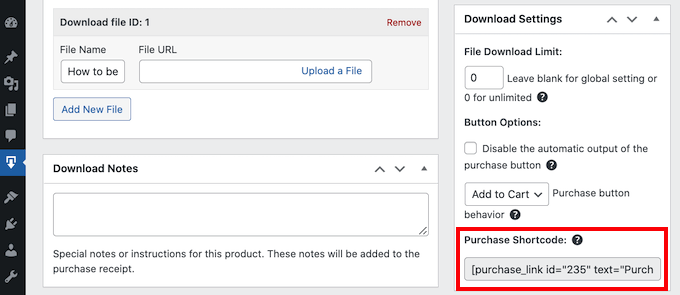
Another option is adding the product’s Purchase Shortcode to a page, post, or widget.

This code creates a Purchase button. 

A Purchase Shortcode for a downloadable ebook in WordPress

Whenever a visitor clicks on this button, it’ll add the ebook to their shopping cart.

The Purchase button will then change to a Checkout button.

The Easy Digital Downloads checkout button

Clicking on this button will take the shopper to the Easy Digital Download checkout page. This makes the Purchase Shortcode a great way to encourage sales from any area of your website.

To add a Purchase button to any page, post, or widget, scroll to the ebook’s Download Settings section. You can then copy the Purchase Shortcode.
How to add ebook downloads in WordPress, using Easy Digital Downloads

For more details on how to place the shortcode, you can see our guide on how to add a shortcode in WordPress.

We hope this article helped you learn how to add ebook downloads in WordPress. You may also want to see our list of 9 best PDF plugins for WordPress, and how to create a landing page with WordPress.

If you liked this article, then please subscribe to our YouTube Channel for WordPress video tutorials. You can also find us on Twitter and Facebook.

The post How to Add Ebook Downloads in WordPress first appeared on WPBeginner.


from WPBeginner https://ift.tt/7ORVBxX
More links is https://mwktutor.com
Wednesday, 30 March 2022

How to Restrict Usernames and User Emails in WordPress

Are you looking for a way to stop users from using specific usernames in WordPress?

If you allow people to register for your website, then there’s always a risk that people might register usernames that contain foul language, trademark words, official sounding names, or have other issues.

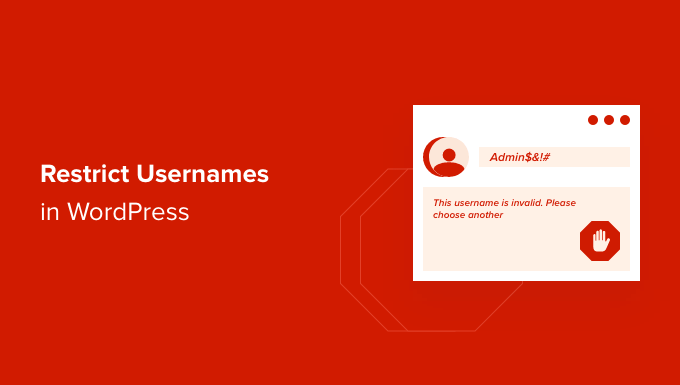
In this article, we will show you how to restrict usernames in WordPress.

Restrict usernames in WordPress

Why Restrict Usernames in WordPress?

When running a WordPress membership website or a community website, you’ll need to allow user registrations. When you do, new users can pick any username and email when they sign up.

That means that users can pick a username similar to the admins, moderators, and support staff. They could even pretend to be a member of your team, leading to a WordPress security risk.

Not to mention, users could also use offensive words or trademark words when registering an account on your WordPress website.

That’s why it’s best to restrict subscribers from using certain words in usernames and email addresses. It prevents the use of foul language and helps maintain high standards on your forums and communities.

Let’s see how you can limit usernames in WordPress.

Restricting Usernames in WordPress

The best way to prevent the use of certain words and phrases in usernames is by using the Restrict Usernames Emails Characters plugin.

It’s a free WordPress plugin that allows you to restrict certain usernames, email addresses, symbols, domain names, and more. The plugin even offers an option to allow the use of a certain language, like Latin, Arabic, Cyrillic, or any language.

First, you’ll need to install and activate the Restrict Usernames Emails Characters plugin. If you need help, then please see our guide on how to install a WordPress plugin.

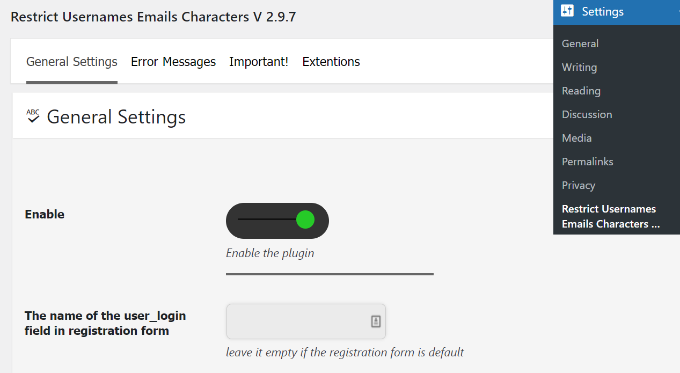
Upon activation, you can head over to Settings » Restrict Usernames Emails Characters from your WordPress dashboard. Under the ‘General Settings’ tab, ensure that the plugin is enabled.

Make sure the plugin is enabled

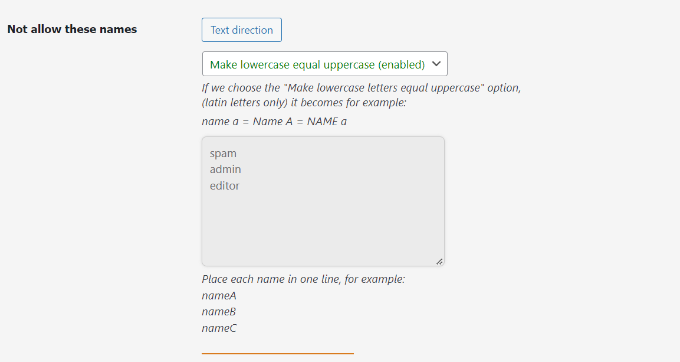
After that, you can scroll down to the ‘Not allow these names’ section in the plugin and enter words or phrases to restrict their use in usernames.

There’s also an option to ‘make lowercase equal uppercase’ in the plugin. By default, it will be enabled, but you can disable it from the dropdown menu.

Enter names to restrict username

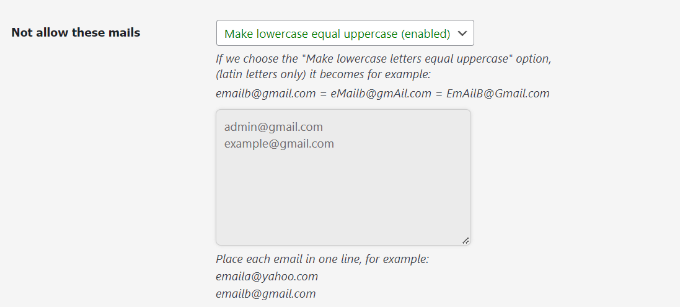
Similarly, you can also prevent the use of specific email addresses.

Under the ‘Not allow these emails’ section, simply enter the email addresses that users can’t use when registering. This will help filter out spam emails, and users will have to use their actual email addresses.

Not allow certain emails

Besides that, the plugin has more optional settings to customize the restrictions on usernames and email addresses.

For instance, you can prevent the use of certain email domains, restrict usernames containing certain words, avoid the use of characters and symbols that WordPress permits, and allow special characters.

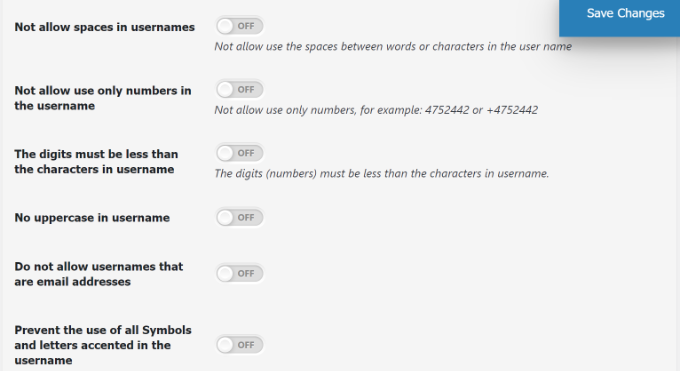
There are even options to limit the use of spaces in usernames, don’t allow users only to use numbers in the username, stop uppercase usernames, and more.

Prevent the use of space and numbers in username

Don’t forget to click the ‘Save Changes’ button when you’re done.

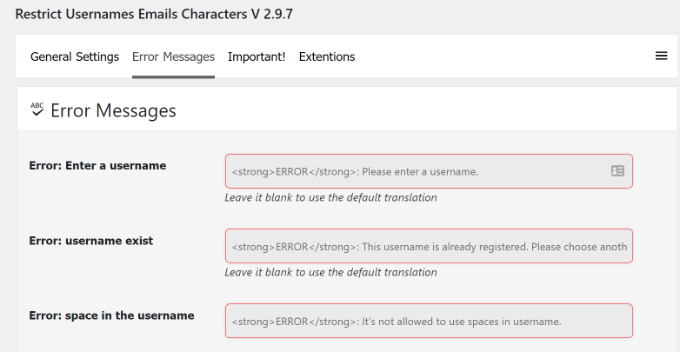
Next, you can go to the ‘Error Message’ tab in the plugin.

The plugin will already have pre-written error messages for different situations by default. However, you can customize any error message under this section.

Edit error messages

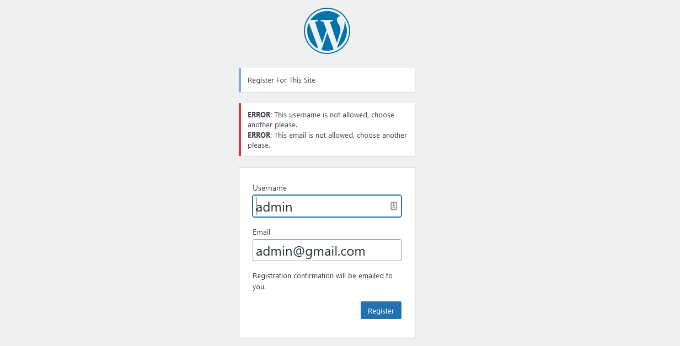
Now, if someone tries to enter a restricted username and email address when registering for your website, they’ll see an error message and will have to pick another username and email.

Here’s what it looked like on our demo website when we tried to register using a restricted username and email address.

Error message when restricted username is entered

We hope this article helped you learn how to restrict usernames in WordPress. You may also want to look at our guides on how to start an online store and the best AI chatbots software for your website.

If you liked this article, then please subscribe to our YouTube Channel for WordPress video tutorials. You can also find us on Twitter and Facebook.

The post How to Restrict Usernames and User Emails in WordPress first appeared on WPBeginner.


from WPBeginner https://ift.tt/8XH9feK
More links is https://mwktutor.com
Tuesday, 29 March 2022

How to Customize Your WordPress Theme (Beginner’s Guide)

Are you looking to learn how to customize your WordPress theme design?

Many WordPress themes come with built-in options to easily customize the design and layout. You can also add more customization options using plugins.

In this article, we’ll show you how to easily customize your WordPress theme and make it your own.

Customizing a WordPress theme for beginners

Following is a list of topics we’ll cover in this guide:

Ready? Let’s get started.

Why Customize Your WordPress Theme

WordPress themes are designed for generic website niches. For instance, there are themes for different types of small business websites, photographers, bloggers, and more.

After picking a theme, you’ll need to customize it to your own requirements.

For instance, you may want to use your own custom logo, brand colors, tweak the layout a little bit, change font sizes, use your own images, and more.

Some of these customizations are necessary to make a website that truly represents your business and brand, and doesn’t just look like everyone else’s.

Depending on which WordPress theme you choose, these options may vary a lot from one theme to another.

For instance, some themes may give you an option to move the sidebar from right to left while others may not even have a sidebar in their layout.

That being said, let’s take a look at how to easily customize your WordPress theme without writing any code, and take it to the next level without breaking your website.

Using the Default Theme Customizer

WordPress came out with a full-site editing experience in WordPress 5.9.

There are currently not very many themes on the market with full support for the new full-site editing feature.

However, we’ll show you how to use it to customize your WordPress theme. We’ll also show you how to use the legacy theme customizer as well as the complete WordPress site builder tool that we recommend for beginners.

Using the Full Site Editor in WordPress to Customize a Theme

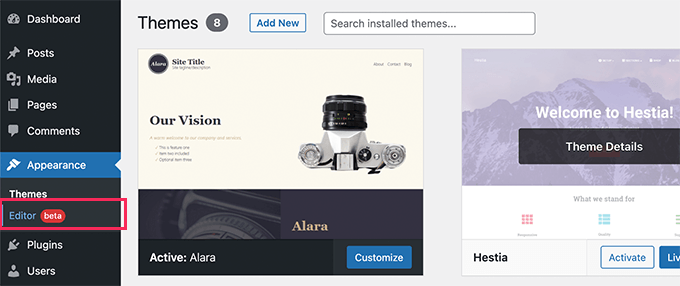
If your WordPress theme supports full site editor, then you’ll see the Editor menu under the Appearance option in the WordPress admin sidebar.

Launch new full site editor in WordPress

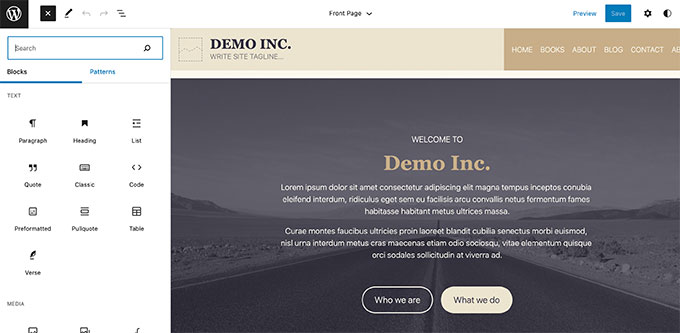
Clicking on it will launch the full site editor.

This editor is just like the block editor you use to write WordPress posts and pages.

Full site editor

You can add new elements to your templates by adding blocks. Apart from regular blocks, you can also use site-wide blocks like navigation, logo, post query loops, and more.

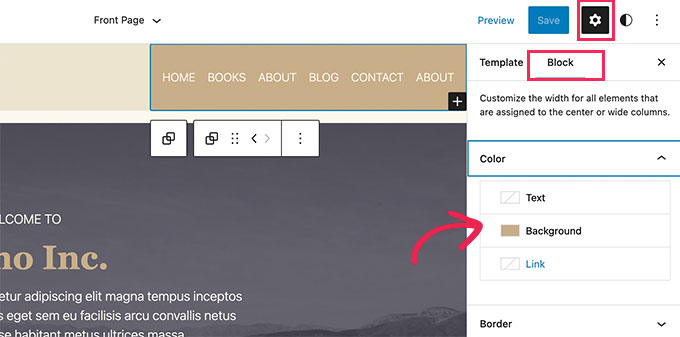
Each block comes with its own settings, where you can style it differently and change colors, typography, and other options.

Block settings

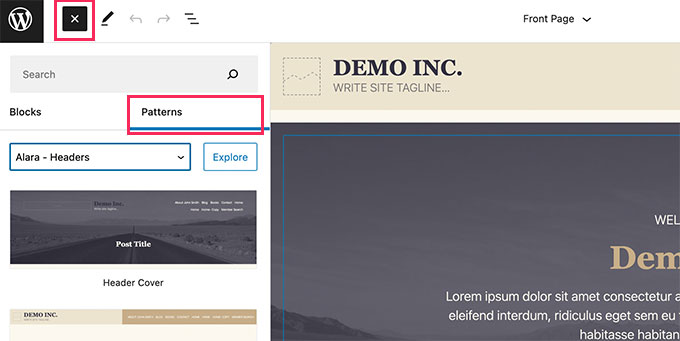
Your WordPress theme may also provide additional patterns that you can use to quickly create different sections.

You can find these under the Patterns tab.

Add patterns to your layouts

You can edit different areas of your website by clicking on the template name at the top and choosing a different template to edit.

To view more templates, you can click on ‘Browse all templates’ at the bottom.

Borwse templates

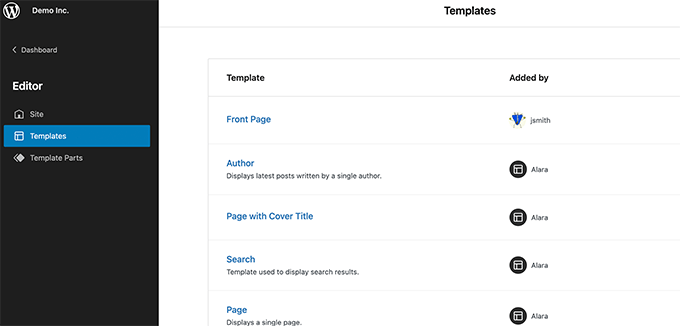
This will show you a list of templates available in your theme that you can edit.

Simply click on a template name to open it in the editor.

Select a template to edit

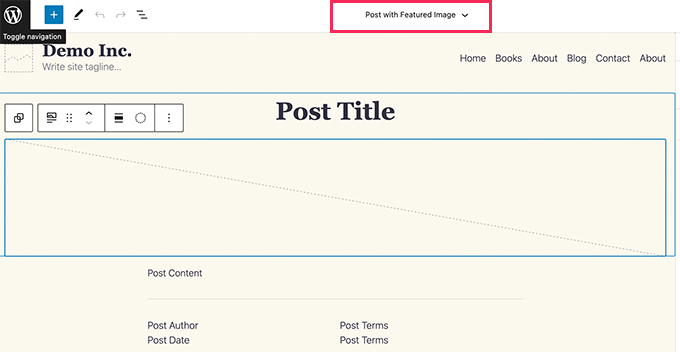
The template will open in the same block editor.

From here, you can edit it any way you want.

Editing posts template

Once you are satisfied with the changes you made to your theme, simply click on the Save button at the top to apply your changes.

Save changes to your theme

The full site editor is a powerful and flexible way to customize your WordPress theme.

However, it is a brand new feature and many WordPress themes don’t support it at the moment.

Using Legacy Theme Customizer in WordPress

If your WordPress theme doesn’t support the full site editor yet, then it will use the legacy theme customizer feature in WordPress.

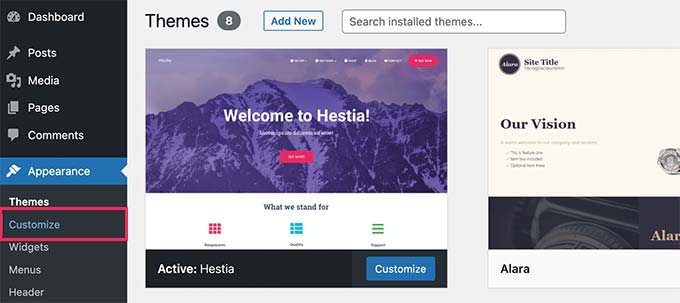
In that case, you can customize your theme by going to the Appearance » Customize page.

Launching WordPress theme customizer

Clicking on it will launch the Theme Customizer.

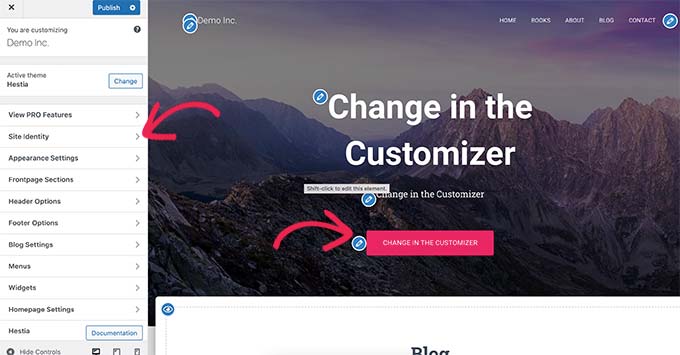
You’ll see customization settings on the left side of your screen, and the live preview of your website to the right.

WordPress theme customizer

The editable areas of your website will be highlighted with a pencil icon on the live preview.

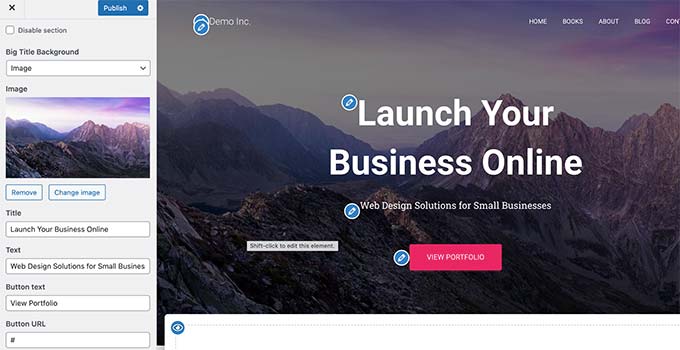
You can also expand each option on the left panel to change its settings.

expanded option in theme customizer

The number of options in the left panel will vary from one theme to another.

However, most themes will support the basics like your site’s tagline, widgets, homepage settings, menus, and Additional CSS settings.

For more details, view our guide on how to use the WordPress theme customizer to edit your theme.

Customize Your WordPress Theme with Full Control

The default WordPress theme customization options depend on which WordPress theme you are using.

If your theme supports a feature, you may be able to customize it using customizer or full site editor. This limits your ability to customize a WordPress theme.

What if you want to further customize or even create a custom WordPress theme for your website?

This is where SeedProd comes in.

It is the best WordPress website builder on the market. You can use it to create beautiful website layouts and even create a custom theme without writing any code.

First thing you need to do is install and activate the SeedProd plugin. For more details, see our step by step guide on how to install a WordPress plugin.

Upon activation, you need to enter your license key. You can find this information under your account on the SeedProd website.

After that, you need to choose whether you want to create a custom WordPress theme or create individual pages for your website.

SeedProd can do both and we’ll show you both approaches.

Customize Individual WordPress Pages with SeedProd

This approach is quite flexible and allows you to easily create on-demand page layouts.

For instance, you can design a custom landing page for a product or marketing campaign, or create a thank you page to send visitors after they sign up for your email list.

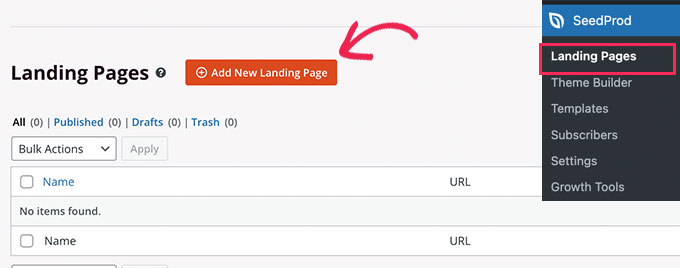
Simply head over to SeedProd » Landing Pages page and then click on the Add New Landing Page button.

Add new landing page

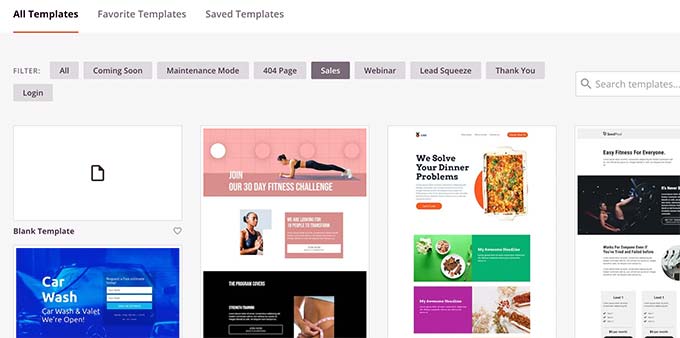
Next, you need to choose template for your page.

This template is used as an starting point, so you can change everything inside it later on. Alternatively, you can start with a blank canvas.

Select a template

Simply click on a template to continue.

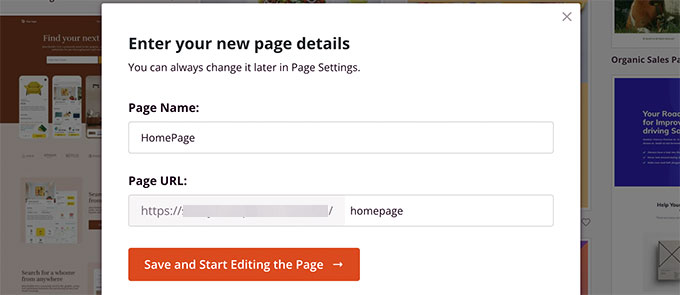
SeedProd will then ask you to provide a title for your page and choose a URL.

Page name and URL

After entering the required information,. click on the Save and Start Editing the Page button.

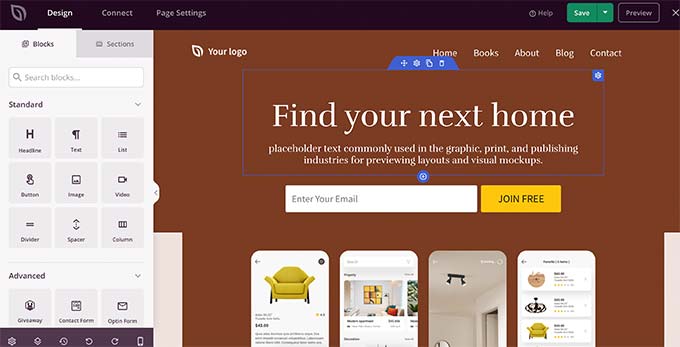
This will launch the SeedProd page builder interface. This is a drag and drop design tool.

Editing a page layout in SeedProd

To your left, you’ll see blocks and sections that you can add to your page layout with a live editable preview of the page to the right.

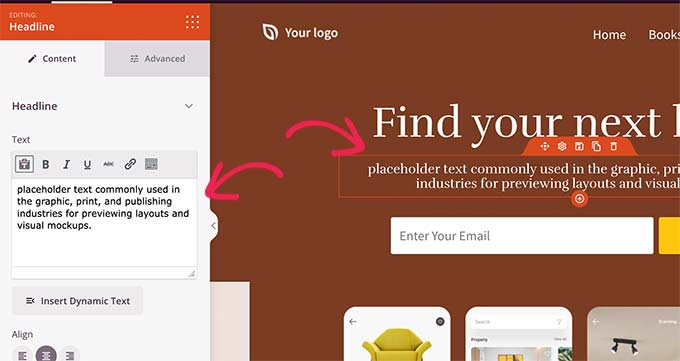
You can simply point and click on any element of your page to edit it.

Point and click to edit any element

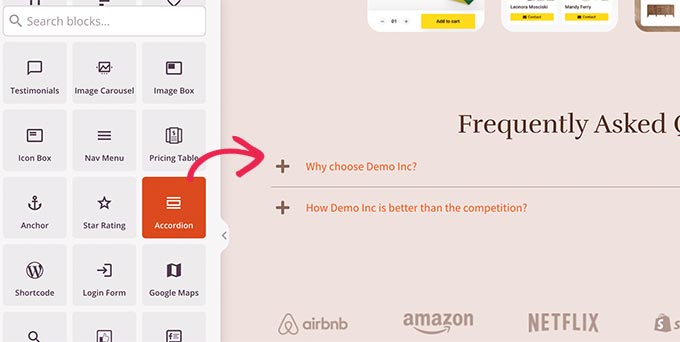
You can also add new blocks and even complete sections to your layout from the left column.

Add new blocks

SeedProd comes with all the popular web design elements that you’ll need to make your website. It includes contact forms, optin forms, login forms, testimonials, progress bars, accordions, navigation menus, icon box, and a ton more.

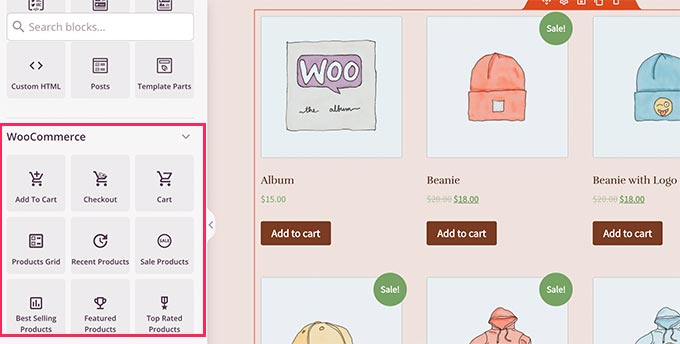
It also includes complete support for WooCommerce. You can use WooCommerce blocks to display products anywhere on your website, create a custom check out page, or design a cart page for your online store.

WooCommerce blocks

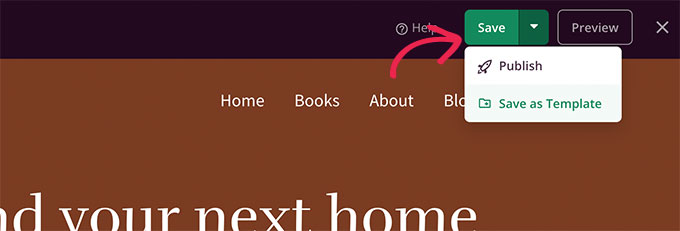
Once you are satisfied with your page design and layout, you can click on the Save button at the top right.

From here, you can also choose to publish the page or save it as a template.

Save or publish a page

That’s it! You can repeat this process to create more custom pages on your website.

Creating a Custom Theme in WordPress with SeedProd

This approach is highly recommended if you want to create a truly unique design for your blog, business website, or eCommerce store.

With this method, you’ll be designing your own custom WordPress theme from scratch using the same drag and drop page builder.

The best part is that your SeedProd custom theme will work no matter what theme you have installed on your site. That means you don’t need to worry about customizing a standard WordPress theme, but will have total freedom in creating your design.

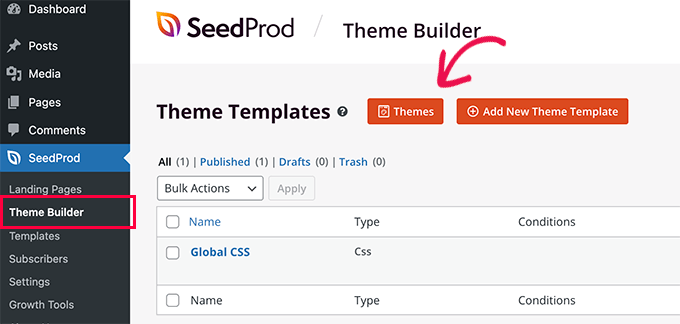
To get started, simply head over to SeedProd » Theme Bulder page and click on the Themes button.

Create SeedProd theme

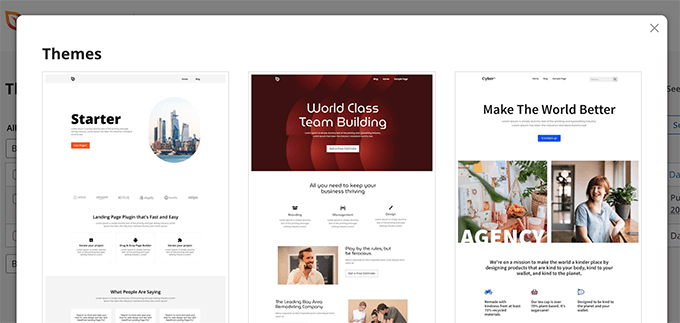
SeedProd will now now show you a bunch of starter themes to choose from.

You can completely modify every aspect of these themes.

Choose theme template

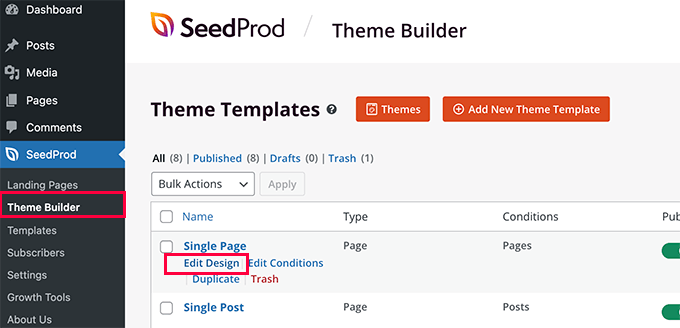
Once you have chosen a theme, SeedProd will generate all the theme templates.

Editing a theme template

Simply click on the Edit Design link below a template file to edit it.

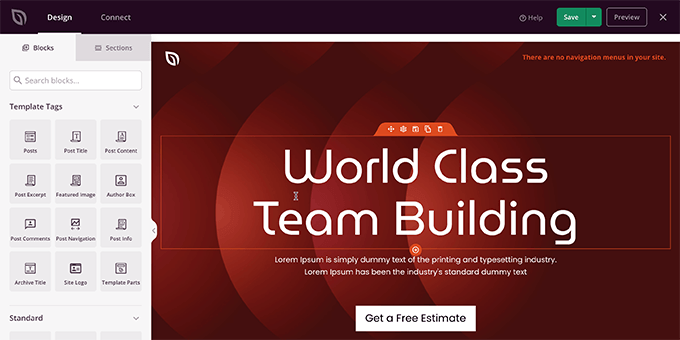
You’ll see a live preview of the template in the right column with an editing panel in the left column.

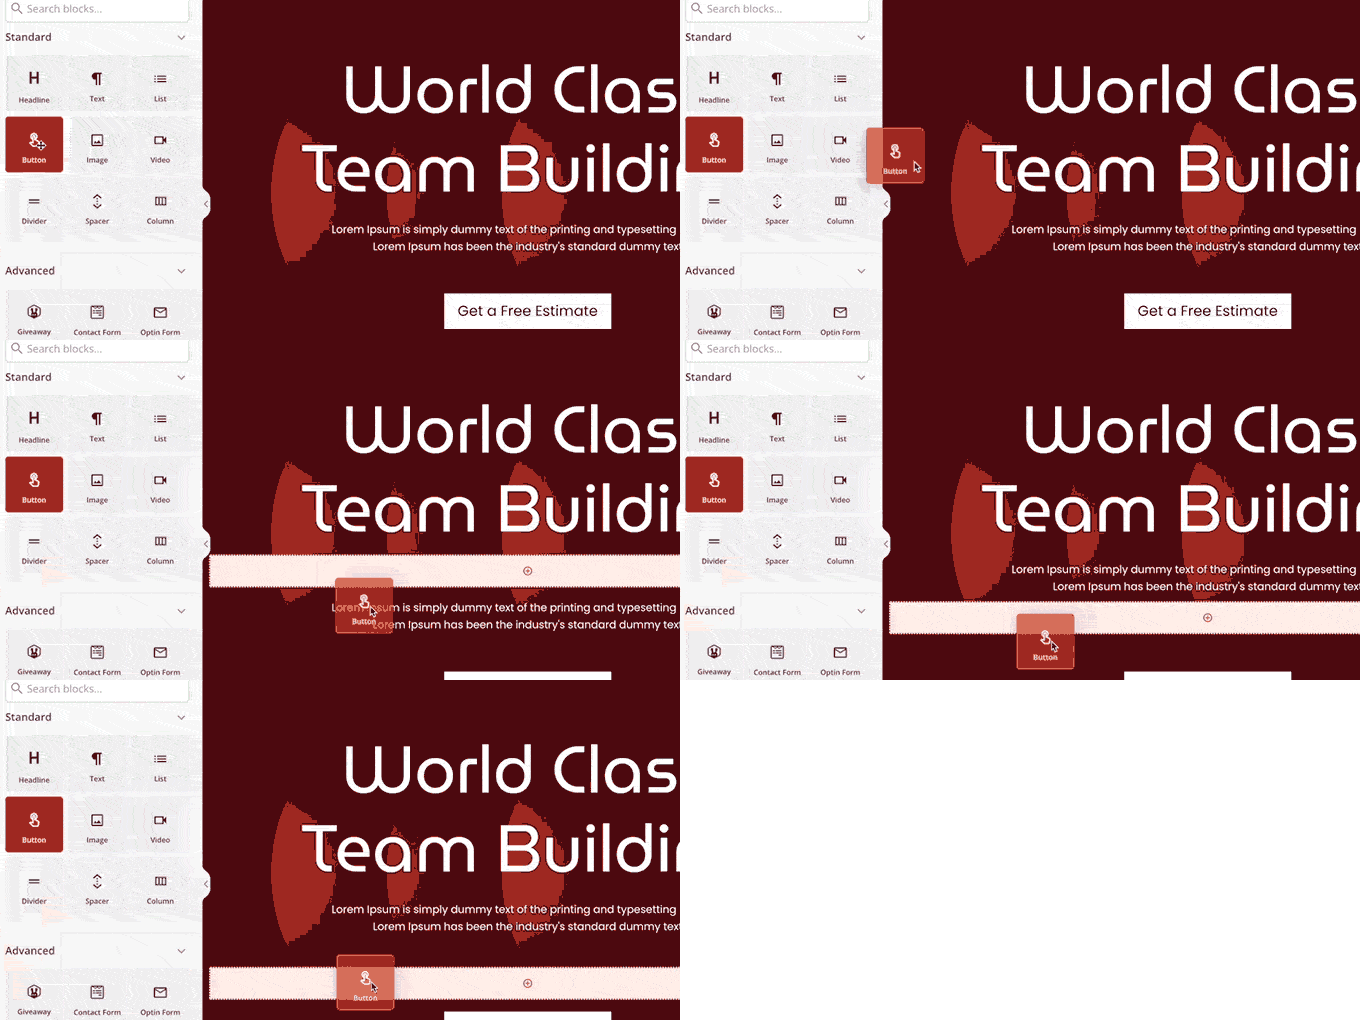
Simply point and click to edit any item or drop elements from the left column.

Add new block to your template

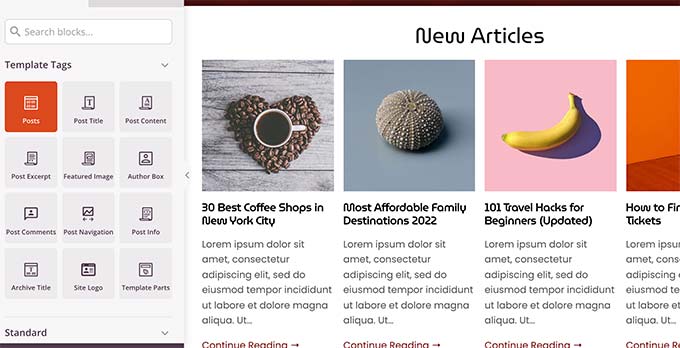
SeedProd also comes with blocks specific to site-wide editing.

These are dynamic blocks that you can use to display content loop (for blog posts), post title, featured image, and more.

Add template tag blocks

Once you are done making changes to a theme, don’t forget to Save your changes.

Repeat the process to edit other templates to your own liking.

Once you are finished, go to the SeedProd » Theme Builder page and toggle the switch next to the ‘Enable SeedProd Theme’ option to ‘Yes’.

Enable SeedProd theme

SeedProd will now replace your WordPress theme with the custom theme you just created.

To learn more about SeedProd WordPress theme builder, see our tutorial on how to create a custom WordPress theme without writing code.

We hope this article helped you learn how to customize your WordPress theme to your own liking.

You may also want to see our guide on how to create an email newsletter, or see our WordPress SEO guide to optimize your website for more search traffic.

If you liked this article, then please subscribe to our YouTube Channel for WordPress video tutorials. You can also find us on Twitter and Facebook.

The post How to Customize Your WordPress Theme (Beginner’s Guide) first appeared on WPBeginner.


from WPBeginner https://ift.tt/G4bwxBM
More links is https://mwktutor.com