Friday, 30 November 2018

16 Best WordPress Chrome Extensions that You Should Try

Are you looking for the best WordPress Chrome extensions to boost productivity? Browser extensions can help improve your WordPress workflow and make you more productive. In this article, we have hand-picked some of the best WordPress related Chrome extensions that you should try.
Best Google Chrome extensions for WordPress

Why You Need WordPress Chrome Extensions?

Google Chrome is the most popular web browser in the world. It comes with hundreds of add-ons to easily perform several tasks within your browser.

You’ll find many useful WordPress extensions that can help with the website development, editing blog posts, check for grammar and spelling mistakes, manage tasks, and more.

Since there are thousands of extensions available, it becomes difficult for beginners to find the right tools they need.

To help you with that, we did the research and picked the best Google Chrome extensions that you can try.

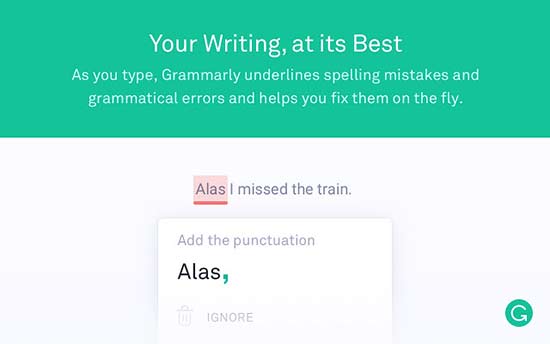
1. Grammarly

Grammarly

Grammarly is the most popular Chrome extension that you can use to check spelling errors and grammatical mistakes in your WordPress content. It helps you in writing and editing your blog posts easily. Grammarly also checks for contextual spelling errors and helps you improve readability of your content.

2. CloudApp

CloudApp

CloudApp is a popular tool to take screenshots, record screen, and share them with anyone. CloudApp’s Chrome extension makes it easy to take screenshots while browsing the web and insert them into your blog posts.

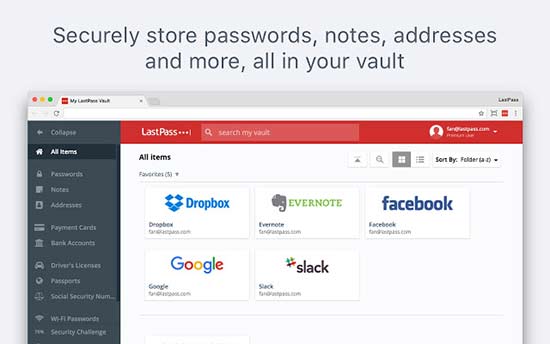
3. LastPass

LastPass

LastPass is the best password manager tool on the market. It works on Windows, Mac, Android, iOS, and more. It also comes with browser extensions for all top browsers including Google Chrome.

Using a password manager like LastPass allows you to choose strong and unique passwords for all your online accounts. It automatically fills in passwords for you so you don’t need to remember passwords.

4. Ahrefs

Ahrefs

Ahrefs is one of the most powerful SEO tools on the market. It helps you understand why your competitors are ranking so high and what you can do to beat them. It also helps you find out keywords and blog post ideas that you can use to boost your search traffic.

They have an SEO Toolbar available as a Chrome extension which gives you a bird’s eye view of any page you are viewing with in-depth SEO analysis and keyword reports.

5. SimilarWeb

SimilarWeb

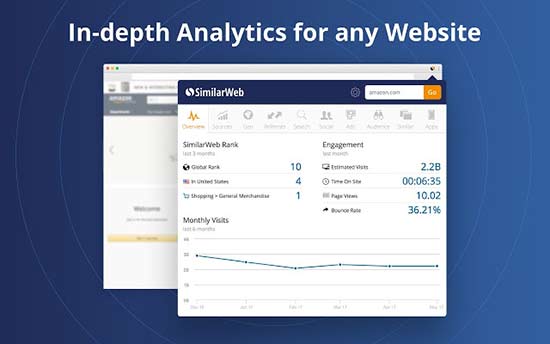
SimilarWeb is a Chrome extension for website traffic analysis. You can use this extension to see complete stats of your WordPress website including traffic sources, user engagement rate, keywords, and more. It gives an instant and detailed insight for any website with 1-click.

6. Evernote Web Clipper

Evernote

Evernote Web Clipper is a helpful Chrome extension for WordPress writers. It lets you clip the articles that you are reading and open them on any of your devices with Evernote. You can highlight the important content on any website and share it in emails or make a link out of it. Evernote is a bookmarking, social sharing, note taking, and task management tool combined in one app.

7. WhatFont

WhatFont

Wondering which font is used on the WordPress website you’re viewing? Simply add the WhatFont Chrome extension on your browser to find out the font by hovering on the text. It also shows the supported services for the web fonts like Typekit and Google Font API.

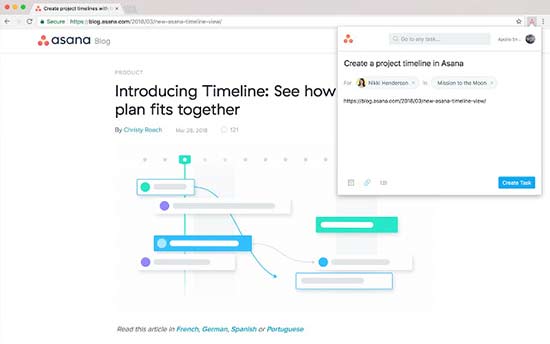
8. Asana

Asana

Asana is a popular productivity and task management tool. It also comes with a Google Chrome extension to manage your tasks easily from anywhere including from your WordPress website.

You can add and search tasks from any web page in your browser. It lets you create your own team and assign tasks with due dates. You can also add current URL as a task to read later or share it with your team members.

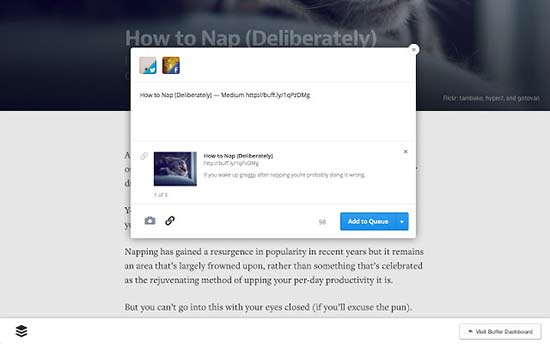
9. Buffer

Buffer

Buffer makes it easy to share your WordPress content on social media channels like Facebook, Twitter, LinkedIn, etc. It allows you to schedule blog posts and monitor the stats for better performance. You can add team members to work collectively and schedule your WordPress posts for social media websites.

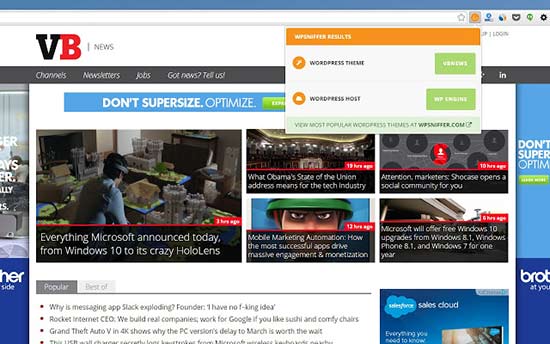
10. WPSniffer

WPSniffer

WPSniffer is a popular WordPress themes sniffer tool. You can use this Chrome extension to find out which theme is used on a WordPress website. It also displays the link of the active theme or redirects you to Google search with the theme name.

11. Dimensions

Dimensions

Dimensions is a Chrome extension for designers to measure different dimensions on a WordPress website. You can simply move your mouse between elements like images, text blocks, form fields, buttons, etc to find out the exact measurements. It can also help you convert JPEG and PSD files to web pages easily.

12. WordPress Keyboard Shortcuts

Keyboard shortcuts

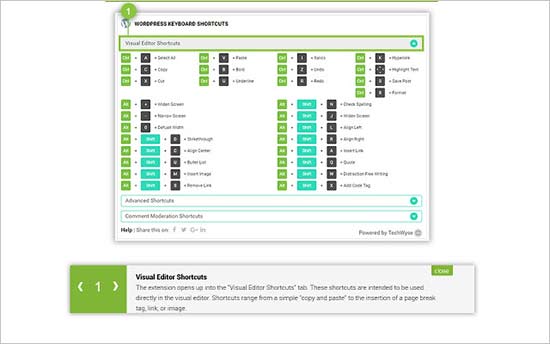
If you want to explore a new world of keyboard shortcuts for your WordPress site, then WordPress Keyboard Shortcuts is the perfect Chrome extension for it. This extension offers a complete range of keyboard shortcuts that work with WordPress and help you save time.

13. WordPress Style Editor

WordPress style editor

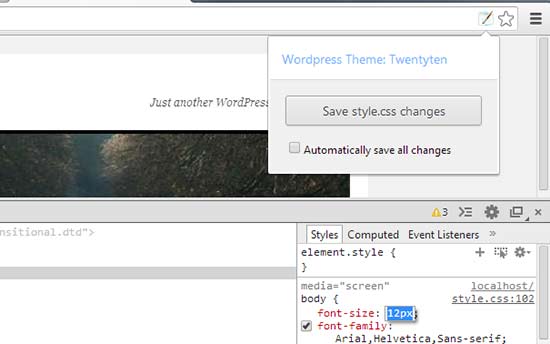
WordPress Style Editor is a useful Chrome extension that enables you to instantly save CSS changes that you make in the inspect tool of your browser. It saves a lot of time from checking the styles in the inspect tool and then manually updating your stylesheet. Make sure that you’re logged into your WordPress site to save the CSS properly.

Note: It works only with the style.css file of your WordPress theme. It makes the changes directly to the main CSS file, so make sure to keep a backup before you start editing.

14. Version Check for WordPress

Version check for WordPress

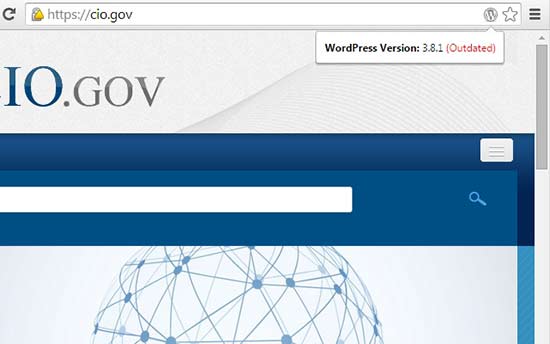
Version Check for WordPress is a simple Chrome extension that you can use to find out the version of any website built on WordPress. It displays the WordPress version in your browser while viewing a website. It also shows if the version used on the website is outdated.

15. WordPress Admin Switcher

WordPress admin switcher

WordPress Admin Switcher is a Chrome extension for WordPress websites. It allows you to switch to the WordPress login screen without typing the wp-admin in the browser tab. You can also directly switch to the post editor in your WordPress admin area while viewing a post on the website with 1-click.

Note: Mac users can press ‘Cmd + Shift + A’ and Windows users can press ‘Ctrl + Shift + A’ to switch to the admin login screen. You can also click on the extension icon in your browser to switch to your WordPress admin login page.

16. ColorZilla

ColorZilla

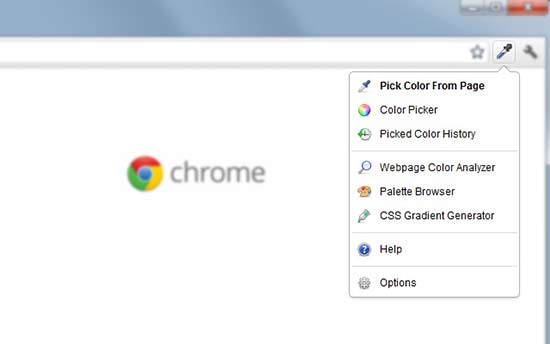
ColorZilla is an advanced Chrome extension to pick colors from your WordPress pages and posts. It lets you read the color code by using the eyedropper tool. You can also generate gradient colors CSS and use them in your stylesheets. It also maintains a history of recently picked colors.

We hope this article helped you find the best WordPress Chrome extensions to try. You may also want to see our list of the most wanted WordPress tips, tricks, and hacks to improve your website.

If you liked this article, then please subscribe to our YouTube Channel for WordPress video tutorials. You can also find us on Twitter and Facebook.

The post 16 Best WordPress Chrome Extensions that You Should Try appeared first on WPBeginner.


from WPBeginner https://ift.tt/2Rmsfs8
More links is https://mwktutor.com
Thursday, 29 November 2018

How to Add Dark Mode to Your WordPress Admin Dashboard

Do you want to add dark mode to your WordPress admin dashboard? A dark mode color scheme makes it easier to work during late hours by reducing white light emitting from the screen. In this article, we will show you how to easily add dark mode to your WordPress admin dashboard.

Adding dark mode to WordPress admin area

What is Dark Mode and Why Use it in WordPress?

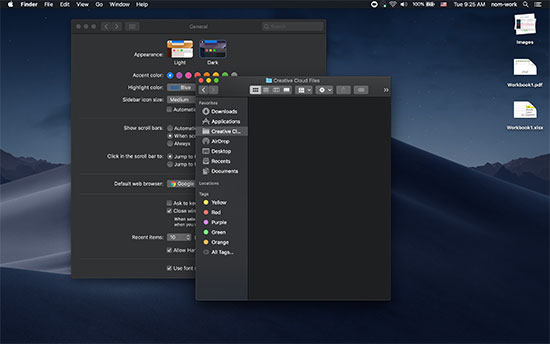
If you often work late at night, then the bright screen light of your computer causes strain on the eyes. Many apps, websites, and even operating systems come with a dark mode color scheme as an alternative.

Dark mode in macOS

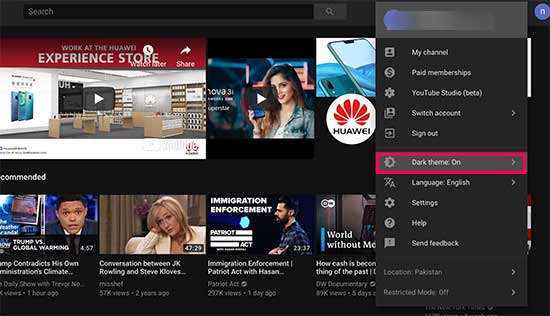
Popular websites like YouTube also offer a dark color scheme. This allows users to watch videos late at night with a more comfortable viewing experience.

YouTube dark theme

WordPress comes with admin color schemes, but none of the default color schemes reduce white light coming from your screen.

Luckily, there is a plugin that solves that.

Let’s take a look at how to easily add dark mode to your WordPress admin area for a more enjoyable user experience during late hours.

Adding Dark Mode to Your WordPress Admin Dashboard

The first thing you need to do is install and activate the Dark Mode plugin. For more details, see our step by step guide on how to install a WordPress plugin.

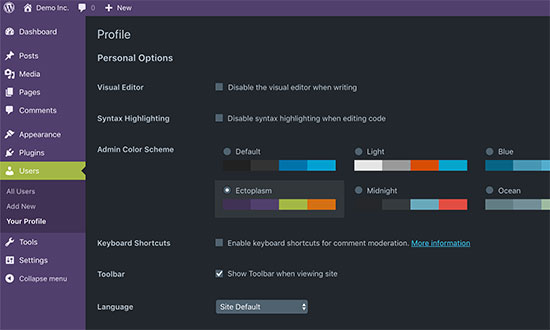
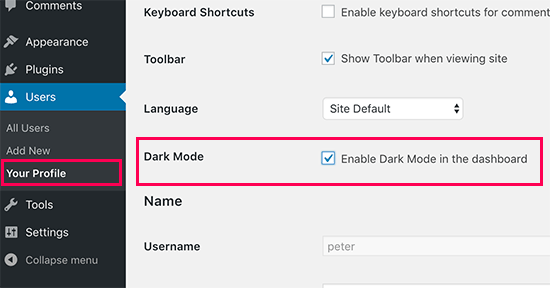
Upon activation, you need to visit Users » Your Profile page and check the box next to the ‘Dark Mode’ option.

Enable dark mode

Don’t forget to click on the save changes button to store your settings.

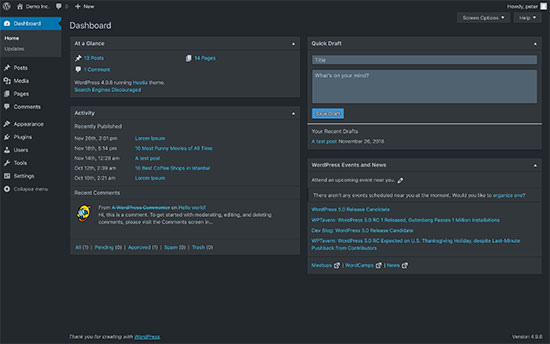
Your WordPress admin area will now switch to the dark mode.

Dark mode enabled

Since ‘Dark Mode’ is not an admin color scheme, you can easily use it in combination with an existing WordPress admin color scheme.

Admin schemes with dark mode

At the time of writing this article, the plugin was not compatible with the upcoming Gutenberg editor. However, when writing posts using the new editor, the plugin switches back to the regular admin colors.

It is expected to work with the new editor in an upcoming version. Meanwhile, you can switch to the classic WordPress editor for a consistent dark mode experience.

We hope this article helped you add the dark mode to your WordPress admin dashboard. You may also want to see our guide on the history of WordPress to see the evolution of WordPress interfaces.

If you liked this article, then please subscribe to our YouTube Channel for WordPress video tutorials. You can also find us on Twitter and Facebook.

The post How to Add Dark Mode to Your WordPress Admin Dashboard appeared first on WPBeginner.


from WPBeginner https://ift.tt/2DOviWd
More links is https://mwktutor.com
Lazy Loading Images: Complete Guide Plus 3 Ways to Implement It

As functionality and interactivity increase on the web, there has been a steady increase in web page size over the last few years. As of early 2018, the average page size on the internet stood at over 2 MB! How to battle this? A little something called lazy loading images is one of the better solutions.

from CodeinWP https://ift.tt/2RtsYrq
More View at https://mwktutor.com

Wednesday, 28 November 2018

How to Stop Search Engines from Crawling a WordPress Site

Recently, one of our users asked us how they can stop search engines from crawling and indexing their WordPress site? There are many scenarios when you would want to stop search engines from crawling your website or listing it in search results. In this article, we will show you how to stop search engines from crawling a WordPress site.

Stop search engines from crawling your WordPress site

Why and Who Would Want to Stop Search Engines

For most websites, search engines are the biggest source of traffic. You may ask, why would anyone want to block search engines?

When starting out, a lot of people don’t know how to create a local development environment or a staging site. If you’re developing your website live on a publicly accessible domain name, then you likely don’t want Google to index your under construction or maintenance mode page.

There are also many people who use WordPress to create private blogs, and they don’t want those indexed in search results because they’re private.

Also some people use WordPress for project management or intranet, and you wouldn’t want your internal documents being publicly accessible.

In all the above situations, you probably don’t want search engines to index your website.

A common misconception is that if I do not have links pointing to my domain, then search engines will probably never find my website. This is not completely true.

There are many ways search engines can find a website linked elsewhere. For example:

  1. Your domain name could have been previously owned by someone else, and they still have some links pointing to your website now.
  2. Some domain search site’s results could get indexed with your link on them.
  3. There are literally thousands of pages with just list of domain names, your site can appear on one of those.

There are a lot of things happening on the web and most of them are not under your control. However, your website is still under your control, and you can instruct search engines to not index or follow your website.

Blocking Search Engines from Crawling and Indexing Your WordPress Site

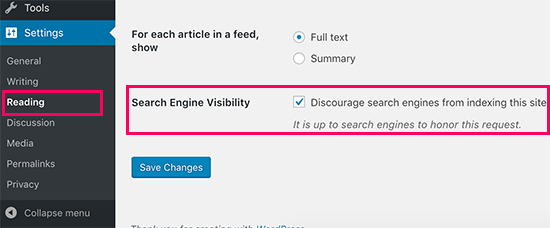
WordPress comes with a built-in feature that allows you to instruct search engines not to index your site. All you need to do is visit Settings » Reading and check the box next to Search Engine Visibility option.

Search engine visibility setting in WordPress

When this box is checked, WordPress adds this line to your website’s header:

<meta name='robots' content='noindex,follow' />

WordPress also modifies your site’s robots.txt file and add these lines to it:

User-agent: *
Disallow: /

These lines ask robots (web crawlers) not to index your pages. However, it is totally up to search engines to accept this request or ignore it. Even though most search engines respect this, some page or random image from your site may get indexed.

How to Make Sure Your Site Doesn’t Appear in Search Results?

The default WordPress visibility settings instruct search engines not to index your website. However, search engines may still end up crawling and indexing a page, file, or image from your website.

The only way to to make sure that search engines don’t index or crawl your website at all is by password protecting your entire WordPress site on the server level.

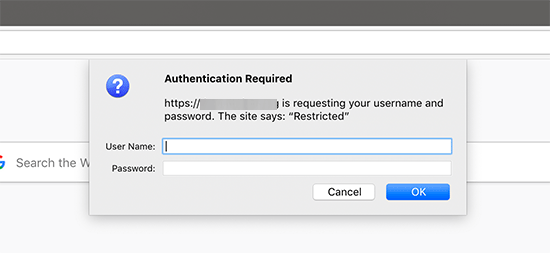
This means when anyone tries to access your website, they are asked to provide a username and password even before they reach WordPress. This includes search engines as well. Upon login failure, they are shown 401 error and the bots turn away. Here is how to password protect an entire WordPress site.

Method 1: Password Protecting an Entire Site using cPanel

If your WordPress hosting provider offers cPanel access to manage your hosting account, then you can protect your entire site using cPanel. All you have to do is log in to your cPanel dashboard and then click on ‘Password Protect Directories’ icon under the ‘Security’ section.

Password protect directories

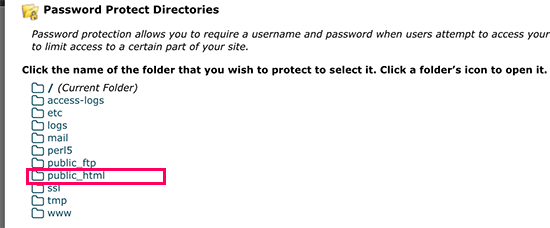
Next, you will need to choose the folder where you have installed WordPress. Usually, it is the public_html folder.

Select the root folder

If you have multiple WordPress sites installed under public_html directory, then you need to click on the folder icon to browse and select the folder for the website you want to password protect.

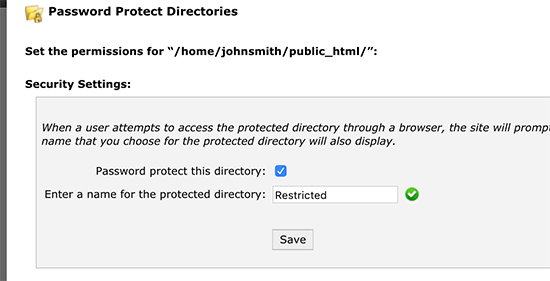
On the next screen, you need to enter a name for the protected directory and click on the ‘Save’ button.

Enter a name for protected directory

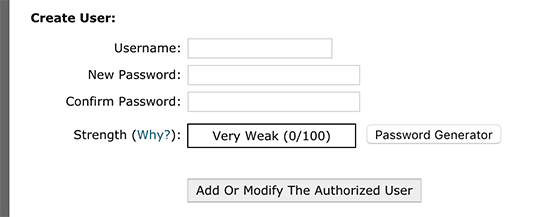
Your information will be saved and cPanel will reload the page. After that, you need to add an authorized user by entering a username and password.

Add authorized user

That’s all, you have successfully added password protection to your WordPress site.

Now, whenever a user or search engine visits your website they will be prompted to enter the username and password you created earlier to view the site.

Password protected website

Method 2: Password Protecting WordPress with a Plugin

If you are using a managed WordPress hosting solution, sometimes you don’t have access to cPanel.

In that case, you have the option to use different WordPress plugins to password protect your website. Below are the two most popular solutions:

  1. SeedProd – it’s the #1 coming soon and maintenance mode plugin for WordPress, used on over 800,000+ websites. It comes with complete access control and permissions features that you can use to hide your website from everyone including search engines. We have a step by step how-to guide for SeedProd.
  2. Password Protected – it’s a very simple way to password protect your WordPress site with a single password (no user creation needed). See our step by step guide on how to password protect a WordPress site.

We hope this article helped you stop search engines from crawling or indexing your WordPress site. You may also want to see our ultimate step by step WordPress security guide for beginners.

If you liked this article, then please subscribe to our YouTube Channel for WordPress video tutorials. You can also find us on Twitter and Facebook.

The post How to Stop Search Engines from Crawling a WordPress Site appeared first on WPBeginner.


from WPBeginner https://ift.tt/2SkZz33
More links is https://mwktutor.com

How To Install WordPress On Bluehost Hosting in 2018 – Complete Tutorial

Want to create a blog in WordPress?

This is a complete beginners guide that will help you to start your blog and do check the bottom section to learn how to use WordPress as well. All these pieces of information are free and feel free to take action and start building something new.

bluehost wordpress

This guide is for newbies to learn how to install WordPress on Bluehost hosting. I have shared exact steps that would help you create your blog using WordPress.

I have used Bluehost for my sites and my client sites, and what I like about them is they don’t oversell themselves. They’re simple, they’re innovating new stuff to make WordPress management easier, and they’re one of the best.

Many of you might not be knowing the fact that, Bluehost is one of the officially recommended hosts by WordPress, which is a big deal.

One thing I like about Bluehost is that they’ve scaled their server for optimum performance when running WordPress. They offer unlimited bandwidth, unlimited storage, premium support, and everything else you could possibly need to run a successful WordPress blog. Recently Bluehost made some major improvements in terms of WordPress management and that includes you can use free SSL, WordPress will be auto installed and they made WordPress more secure on their server.

Complete Guide To Create a WordPress Blog on Bluehost

The self-hosted WordPress platform is one of the best platforms to start blogging and making money.

We have already shared a complete guide on how to start a new blog, and you can refer to that guide to get started.

So why Bluehost?

Bluehost offers a standard cPanel hosting, which comes with Fantastico. Fantastico is one of the easiest ways to install WordPress, or you can use the manual WordPress installation method. Though, I would suggest using Fantastico because it’s really easy and effective.

If you’re still struggling to decide if Bluehost is right for you, I suggest to just go for it. It’s important that any WordPress web host meets certain technical requirements, and Bluehost perfectly meets these needs. It can handle any low-medium traffic site with ease. That said, I always recommend using a WordPress cache plugin when you are using shared/VPS hosting.

Assuming you already have a Bluehost account (if you don’t, get one here), you are ready to move ahead with this tutorial.

Bluehost has completely revamped their web-hosting and made it WordPress oriented. Unlike old times when you had to create your blog manually, these days Bluehost automatically install and setup WordPress for you. If you have followed the above guide and simply purchased hosting + free domain name from Bluehost, it will start installing WordPress for you automatically.

This could take anywhere between 5-50 minutes. In case if you see a screen like this

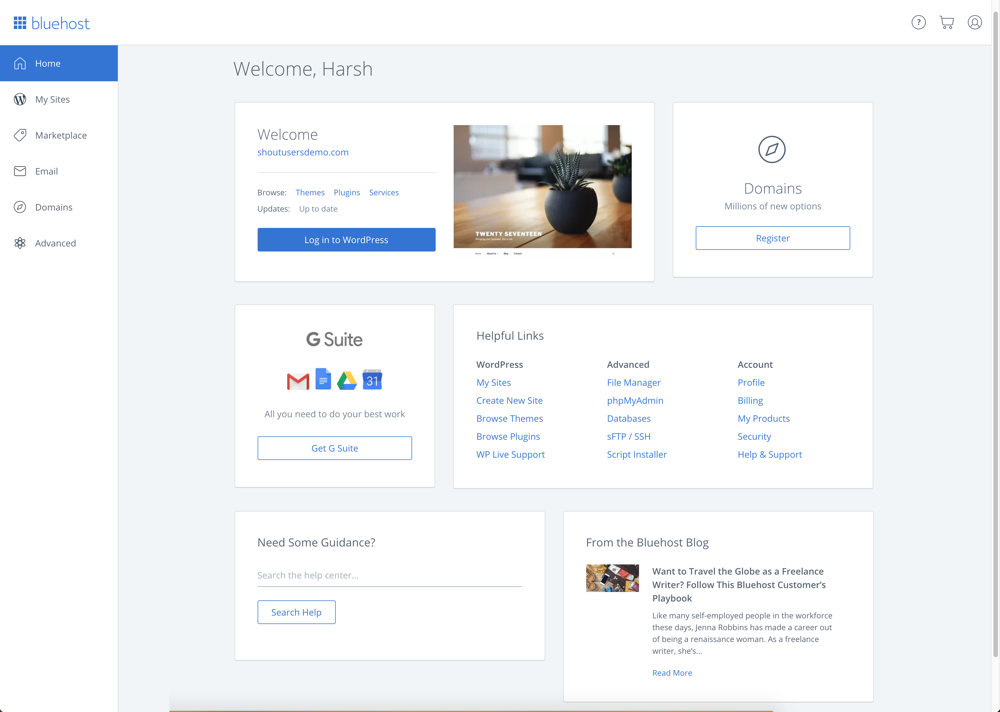
and you are stuck, login to your Bluehost Dashboard. This is how new Bluehost Dashboard looks like in 2018:

click on Login to WordPress to automatically login inside your WordPress Blog dashboard.

I’m creating few videos to help you understand the whole process. For now, this will help you to get started with WordPress on Bluehost hosting.

Installing WordPress Manually on Bluehost:

Now, for some reason you deleted your existing WordPress installation or want to install WordPress on a new domain (Addon domain), you can follow the steps mentioned to do so.

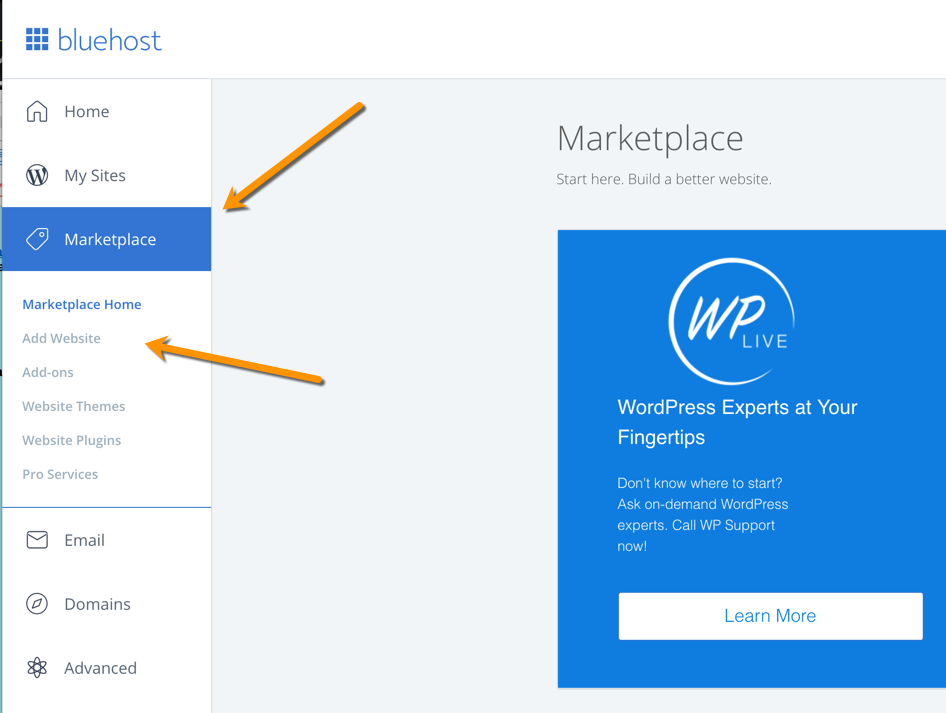
  • Login to your Bluehost Hosting Dashboard
  • Click on Marketplace

  • Click on Add Website
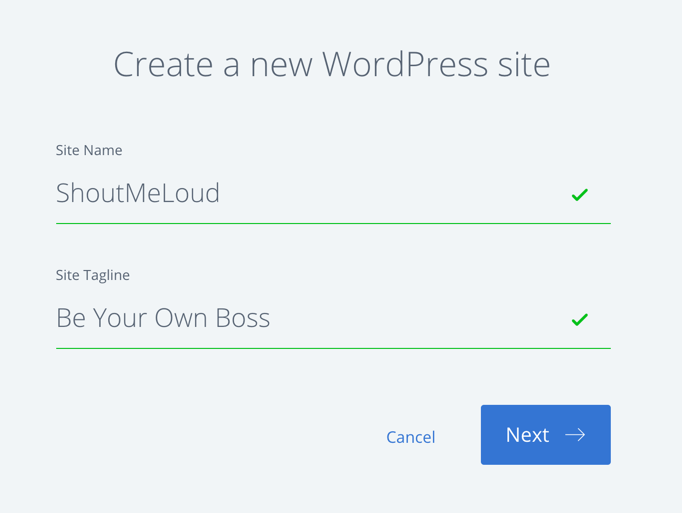
  • Enter details

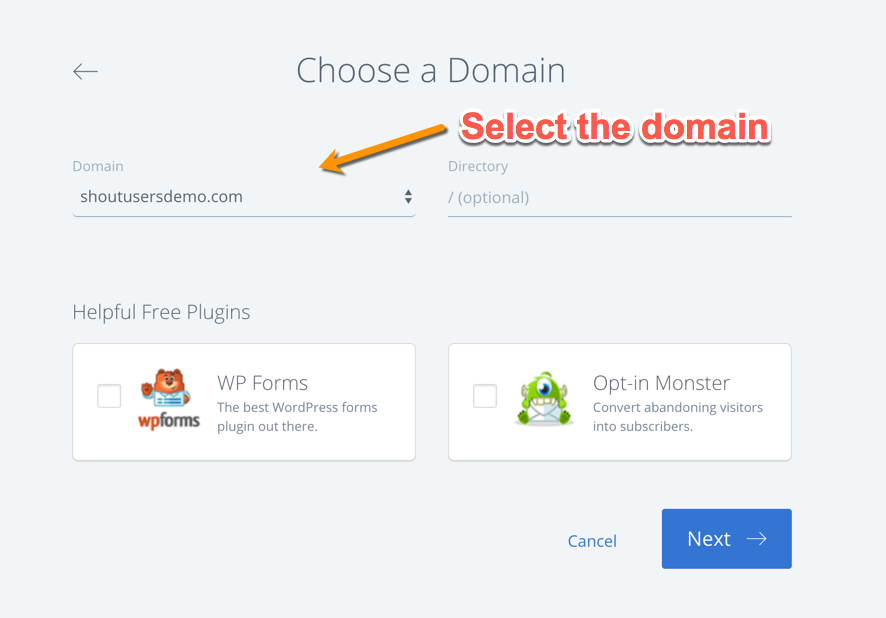
Click on next and select the domain on which you want WordPress to be installed.

Click on next and WordPress will be installed on your selected domain within 5 minutes.


That’s it!

Create your WordPress blog on Bluehost (includes a free domain name)

Here is a video tutorial which will show you the exact process of installing WordPress on Bluehost:

Things To Do After Installing WordPress On Bluehost:

Once WordPress is installed (on any host) there are a few things that you should always do.

This takes us to the next lesson in our series:

Part 4: Essential Things To Do After Installing WordPress

Let me know if you get stuck anywhere in the process. And let me know what you think about Bluehost. Share your thoughts and experiences in the comments below!

Here are a few more bonus articles to keep you inspired:

WordPress Plugins For Your WordPress Blog

Don’t forget to share this guide!

Subscribe on Youtube

How To Install WordPress On Bluehost Hosting in 2018 – Complete Tutorial is a post from ShoutMeLoud - Shouters Who Inspires


from ShoutMeLoud https://ift.tt/2hUv1mP
More View at https://mwktutor.com
How To Motivate Yourself For Blogging When You Are Feeling Demotivated

Motivate Yourself For Blogging

A few days ago, I was talking to a budding blogger on the phone, and he was telling me that he was worried about his motivation for blogging. Here are the first few lines of the conversation I had with him (I will refer to him as “Mister X”):

  • Me: What happened? Why are you so demotivated?
  • Mister X: Harsh, I have worked on my blog for many months, and this is my 4th blog and probably the last one. I’m still getting only 100 or so odd views and people are commenting just because of backlinks. Things like “nice post” and “useful posts”, and I even get negative comments from time to time and that discourages me a lot.
  • Me: Why did you start blogging?
  • Mister X: I started blogging because I like it and it’s my passion. I’ve been blogging for the last 4 years and I like when people like my posts and follow me. The secondary reason is money; it’s not the main one right now but it will become a major one later in my career.
  • Me: What kind of people do you follow on social networking sites?
  • Mister X: Mostly bloggers and internet marketers.
  • Me: How do you feel when people talk about their success stories on Facebook or Twitter?
  • Mister X: Some of them motivate me and a few of them demotivate me. People who started with me and are doing great demotivate me, whereas blogs like ShoutMeLoud and HellboundBlogger motivate me, as I want to be like them.

When I was having this conversation with Mister X, I was already aware of his problem. This is one common phase of the blogging life which most bloggers face. I faced it in the initial days of my blogging career, and I faced it again when ShoutMeLoud got hit by Panda.

Motivation for Blogging

At this point in the conversation, I shared a few of my experiences and gave him a few tips.

I’m sure many of you (especially if you are a budding blogger) are also facing the same issue. If so, you need to take action now, or you may end up among the multitude of start-up bloggers who eventually quit blogging.

In this article, I will be sharing a few tips which will help you to bring back the motivation for blogging.

Bringing Back Your Motivation For Blogging

Tip 1: Blog for yourself first and for others second.

You must have read a lot about the importance of writing for your readers. While this is a good thing to do, it is also true that in order to capture an audience for your blog, you need to write for yourself first.

One of the first and most common mistakes new bloggers make is to copy someone else’s style. Your blog is your personal space, and it reflects your identity and your individual voice. You might not capture thousands of fans in a day, in a month, or even in a year, but if your blog post is helping even one person, its creation has been worth your time.

Just stick to your niche and write anything that interests you within that niche.

One of the greatest misconceptions about blogging is that there is no point in writing about topics that have been written about hundreds of times before. But that’s not true.

The fact is that every day a new internet user is born, and your blog might be among the first sites that that new user will find! You could be the one to teach them about whatever it is they want to learn. That’s how you build authority.

So, in short: Stick to your niche and write for yourself.

Tip 2: Start with the basics, then move to more advanced topics.

Start with the basics

Many bloggers make the mistake of starting with information that is too advanced for a beginner.

For instance, if you are writing about blogging and your first post is about HostGator hosting, having never shared what web hosting is and why the reader needs a host for their site, you can not expect to build a sustainable readership base.

In order to create, interest, and engage your readership, you need to have a pile of content that makes a reader want to stay with your blog, and this means that what you write has to help them understand the topic.

For example, Mister X had written about one of the premium SEO plugins, and he was not happy with the comments he was getting. Well, the first few questions he should have asked himself in reviewing his post prior to publication were:

  • When you see blog content with affiliate links, how do you feel?
  • Have you covered other topics leading up to your current topic in the same niche?
  • Have you previously educated your readership on the benefits of SEO and why SEO is important for their blogs?

Solution: Sit down and plan a content strategy for your blog. Write down every subject from the most basic to the most advanced topics you can cover. This will help a beginner who lands on your blog to learn something new. And as your blog moves forward in content from beginner to intermediate to advanced, your blog readership will grow!

Tip 3: Blog without any materialistic view.

There is always a motive behind blogging, and when I started it was all about sharing knowledge.

I wrote about anything which interested me, and money and a fan following were never in my mind. The first few “thank you” comments I received helped to significantly motivate me to continue blogging and to write more and more. This is my story – perhaps yours is different.

When you blog with materialistic motives, you miss out on the most simple fundamental truth of blogging:

  • Bloggers blog because they love blogging!

Your blog is your personal space, and you should write anything that interests you on topics you understand and have a passion for. Sooner or later, like-minded individuals will find you and follow you, and they will love learning new things from you.

Don’t blog for money or to build a fan-following. Blog for yourself, and let your passion be your path to becoming an A-list blogger.

Tip 4: Forget social networking and focus on blogging.

Yes, I know social networking is important. But social networking is also a big demotivating factor for many bloggers.

When you sit in a room for hours and you see someone updating about their awesome trip to Las Vegas, you feel miserable.

To be honest, that’s how I feel when I read those updates! I want to get out of my office and take a trip to some new destination, too!

However, I know that that time will come for me, but for now, I need to stay focused on working toward that goal.

Constant social media updates can be very distracting and unhealthy. They will steer you away from the very goals you are trying to achieve.

If you are unable to use social media as a networking tool instead of the constant distraction it’s designed to be, then you need to stop using it.

Use social networking sites for networking to create real-life connections. Connecting with the right set of people and learning from them will benefit you. Focusing on what everyone else is doing and comparing yourself to them will not.

If you are using social media just for sharing links, and you are expecting hundreds of people to jump aboard your blog as a result, it’s not going to happen.

Your own blog commenting efforts will be more helpful. Comment on other related blogs; not only can it drive targeted traffic to your blog, but you will end up creating many genuine connections.

Another reason here for the demotivation of “Mister X” is the fact that his social networking site is full of bloggers, and they are already aware of the things he is writing about.

Obviously, their interest will be limited. Instead of focusing on other veteran bloggers, he should focus on people who are new to this field and want to learn more.

My story: Blast from the past 

When I started blogging in 2008, I commented on other blogs and sites a lot. I commented not for backlinks, but to participate in the discussions of issues that interested me.

I commented on blog posts which motivated me, which taught me something new or which triggered my thought process. I would comment with my perspective, with information which I felt was missing in the topic being discussed.

In this way, I generated a lot of additional comments. Yes, I got the benefit of branding and backlinks in the process, but I also created many important connections. And this is one of the biggest reasons for ShoutMeLoud’s growth!

Use social networking for the right reasons.

Use it for networking, and not for self-promotion.

Tip 5: Have a blog business plan.

Blog business plan

It is very important to have a business plan for your blog. If you wish to make money, have a plan to make money! Make a content generation plan, a blog monetization plan, a marketing plan, a growth plan, and so on.

With time, your blog plan will change according to your readership and the needs of your readers, so adapt your plan accordingly.

Things to keep in mind:

  • Don’t blog just for money.
  • Blog for passion and blog for yourself.
  • Before publishing a blog post, ask yourself one question: Is this post helping even one person? If the answer is “yes”, then hit the publish button.
  • Ignore other blogs and bloggers who discourage you instead of motivate you.
  • When you see other successful blogs, think about what actions you can take to reach that level of success, and start taking action!

Remember, success takes time to cultivate, and you can’t be the next  big thing in a day or two. You need to work hard and be smart to be successful.

Whenever you are feeling demotivated in your blogging, stop and take a minute to ask yourself:

  • Why did I start blogging and why am I blogging right now?

Go through your old content and read the positive comments showing you that you have helped others to learn or solve a problem.

Here is a motivational video message for you:


Now I want to hear from you: What are the kinds of things that demotivate you? What do you do to bring back the motivation? Share your thoughts with me and others in the comments below!

Like this post? Don’t forget to share it!

Subscribe on Youtube

How To Motivate Yourself For Blogging When You Are Feeling Demotivated is a post from ShoutMeLoud - Shouters Who Inspires


from ShoutMeLoud https://ift.tt/2ig5Q1Y
More View at https://mwktutor.com
Tuesday, 27 November 2018

How to Bulk Delete WordPress Posts (2 Easy Solutions)

Do you want to bulk delete WordPress posts? WordPress makes it super easy to manage posts from the admin area. However, if you want to delete a lot of posts then selecting and deleting them may take some time. In this article, we will show you two quick and easy solutions to bulk delete WordPress posts from your blog.

Bulk delete WordPress posts with two easy methods

Method 1. Bulk Delete WordPress Posts without Plugin

This method is easier and is recommended for all users. It uses the built-in WordPress functionality to quickly select a large number of posts and delete them.

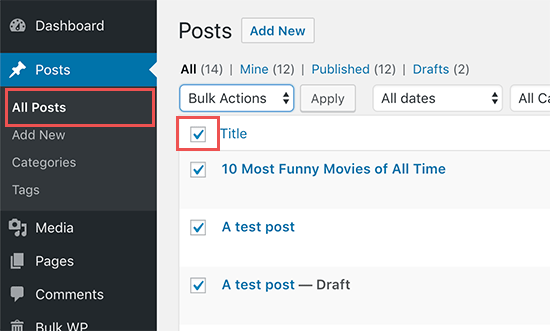
First, you need to visit Posts » All Posts page. From here you can click on the bulk select box on top to select all posts displayed on the page.

Select all posts

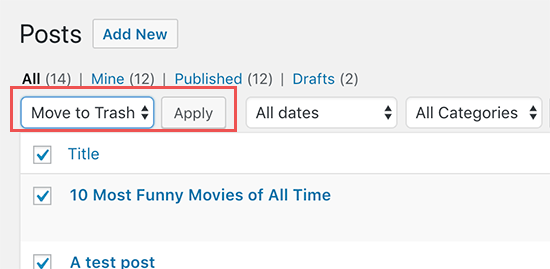
If you don’t want to delete all of the selected posts, then you can now go ahead and uncheck those posts. Otherwise, you can click on the ‘Bulk Options’ drop-down menu and select ‘Move to Trash’ option.

Move to trash option

Next, you need to click on the ‘Apply’ button to delete selected posts.

WordPress will now move the selected posts to trash.

Using this default method, you can only select 20 posts at a time. What if you wanted to delete hundreds of posts?

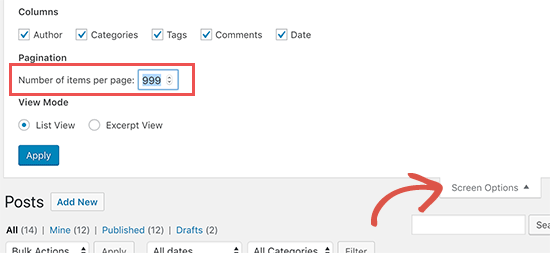
Simply click on the ‘Screen Options‘ button at the top right corner of the screen. This will bring a pull-down menu where you need to change the ‘Number of items per page’ to any number you want.

Change the number of posts to be displayed

Next, click on the Apply button and WordPress will display the number of posts you selected earlier. You can now go ahead and bulk delete posts as described above.

Note: Deleted posts will be moved to WordPress trash and will remain there for 30 days. After that, they will be permanently deleted from your WordPress database.

Bulk Delete Posts by Specific Author or Category

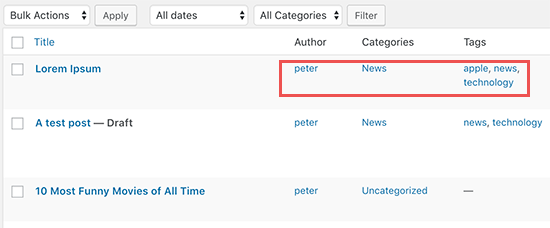
Now let’s suppose you want to delete posts filed under a specific category / tag or written by a specific author? You can simply click on the author, category, or tag links to display posts associated with them.

Display posts by author, category, or tag

For example, clicking on the ‘News’ category will show you the list of posts filed under that category. You can then select the posts and move them to trash by using the Bulk Options menu.

Method 2: Bulk Delete WordPress Posts using a Plugin

The default bulk delete options are quite adequate for most users. However, there are some cases where you may need more options to quickly select specific posts and then bulk delete them.

For example, if you want to delete posts filed within last few days or posts older than a certain number of days?

Luckily, there is a plugin that lets you bulk delete posts using advanced filters.

First, you need to install and activate the Bulk Delete plugin. For more details, see our step by step guide on how to install a WordPress plugin.

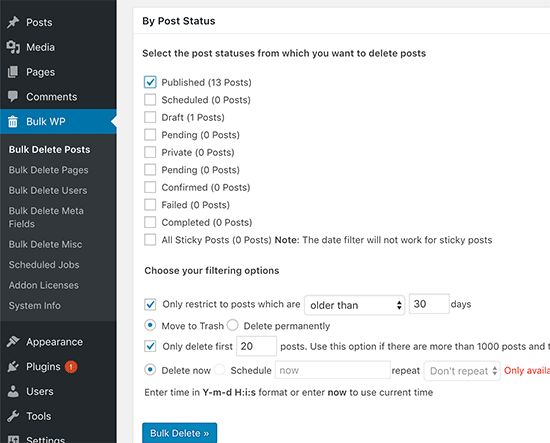
Upon activation, go to Bulk WP » Bulk Delete Posts page in your WordPress admin area to delete posts. The plugin offers multiple ways to filter and select posts that you want to delete.

Bulk WP Settings

You can filter posts by duration, select posts published in last x days, delete them instantly without sending to trash, and even schedule to delete later.

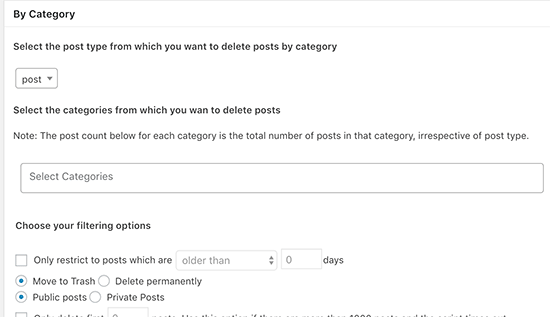
As you scroll down further in the settings screen, you will find more options to select and delete posts by categories, custom taxonomies, custom post types, and more.

Sort and select posts by category

Bulk Delete can also be used to bulk delete comments, pages, users, and custom fields.

We hope this article helped you learn how to easily bulk delete WordPress posts using these two methods. You may also want to see our list of the best WordPress plugins for business websites.

If you liked this article, then please subscribe to our YouTube Channel for WordPress video tutorials. You can also find us on Twitter and Facebook.

The post How to Bulk Delete WordPress Posts (2 Easy Solutions) appeared first on WPBeginner.


from Tutorials – WPBeginner https://ift.tt/2TQ4Vos
More View at https://mwktutor.com
How to Bulk Delete WordPress Posts (2 Easy Solutions)

Do you want to bulk delete WordPress posts? WordPress makes it super easy to manage posts from the admin area. However, if you want to delete a lot of posts then selecting and deleting them may take some time. In this article, we will show you two quick and easy solutions to bulk delete WordPress posts from your blog.

Bulk delete WordPress posts with two easy methods

Method 1. Bulk Delete WordPress Posts without Plugin

This method is easier and is recommended for all users. It uses the built-in WordPress functionality to quickly select a large number of posts and delete them.

First, you need to visit Posts » All Posts page. From here you can click on the bulk select box on top to select all posts displayed on the page.

Select all posts

If you don’t want to delete all of the selected posts, then you can now go ahead and uncheck those posts. Otherwise, you can click on the ‘Bulk Options’ drop-down menu and select ‘Move to Trash’ option.

Move to trash option

Next, you need to click on the ‘Apply’ button to delete selected posts.

WordPress will now move the selected posts to trash.

Using this default method, you can only select 20 posts at a time. What if you wanted to delete hundreds of posts?

Simply click on the ‘Screen Options‘ button at the top right corner of the screen. This will bring a pull-down menu where you need to change the ‘Number of items per page’ to any number you want.

Change the number of posts to be displayed

Next, click on the Apply button and WordPress will display the number of posts you selected earlier. You can now go ahead and bulk delete posts as described above.

Note: Deleted posts will be moved to WordPress trash and will remain there for 30 days. After that, they will be permanently deleted from your WordPress database.

Bulk Delete Posts by Specific Author or Category

Now let’s suppose you want to delete posts filed under a specific category / tag or written by a specific author? You can simply click on the author, category, or tag links to display posts associated with them.

Display posts by author, category, or tag

For example, clicking on the ‘News’ category will show you the list of posts filed under that category. You can then select the posts and move them to trash by using the Bulk Options menu.

Method 2: Bulk Delete WordPress Posts using a Plugin

The default bulk delete options are quite adequate for most users. However, there are some cases where you may need more options to quickly select specific posts and then bulk delete them.

For example, if you want to delete posts filed within last few days or posts older than a certain number of days?

Luckily, there is a plugin that lets you bulk delete posts using advanced filters.

First, you need to install and activate the Bulk Delete plugin. For more details, see our step by step guide on how to install a WordPress plugin.

Upon activation, go to Bulk WP » Bulk Delete Posts page in your WordPress admin area to delete posts. The plugin offers multiple ways to filter and select posts that you want to delete.

Bulk WP Settings

You can filter posts by duration, select posts published in last x days, delete them instantly without sending to trash, and even schedule to delete later.

As you scroll down further in the settings screen, you will find more options to select and delete posts by categories, custom taxonomies, custom post types, and more.

Sort and select posts by category

Bulk Delete can also be used to bulk delete comments, pages, users, and custom fields.

We hope this article helped you learn how to easily bulk delete WordPress posts using these two methods. You may also want to see our list of the best WordPress plugins for business websites.

If you liked this article, then please subscribe to our YouTube Channel for WordPress video tutorials. You can also find us on Twitter and Facebook.

The post How to Bulk Delete WordPress Posts (2 Easy Solutions) appeared first on WPBeginner.


from WPBeginner https://ift.tt/2TQ4Vos
More links is https://mwktutor.com