Tuesday, 31 July 2018

18 Most Important Things You Need to Do After Installing WordPress

We are often asked by users about what to do right after starting a blog? Once you have installed WordPress, there are still quite a few things you need to do to properly setup and launch your website. In this article, we will share the most important things that you will immediately want to do after installing WordPress.
Checklist of things to do after installing WordPress

1. Add a Contact Form

All websites on the internet need a contact form. It allows your website visitors to quickly contact you by simply filling out a form on your website.

By default, WordPress does not come with a built-in contact form.

This is where WPForms comes in. It is the best WordPress contact form plugin and allows you to easily create beautiful contact forms for your website.

They also have a WPForms free version that you can download from WordPress.org plugin repository.
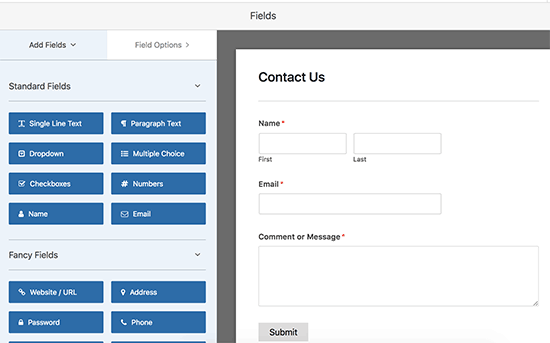
Creating a contact form in WordPress

See our step by step guide on how to create a contact form in WordPress.

2. Change Site Title, Tagline, and Timezone

Next, you need to change the site title, tagline, and timezone settings. Simply head over to Settings » General page and change these settings.

Change title, tagline, and timezone settings

3. Setup WordPress SEO

SEO, short for Search Engine Optimization, is used by website owners to get more traffic from Google and other search engines.

WordPress is pretty SEO friendly out of the box. However, there is a lot more that you can do to optimize your SEO and get more traffic to your website.

The best time to set up your website’s SEO is right after installing WordPress.

We recommend using the Yoast SEO plugin. It is the most comprehensive WordPress SEO plugin on the market, and it takes care of all the important SEO settings out of the box.
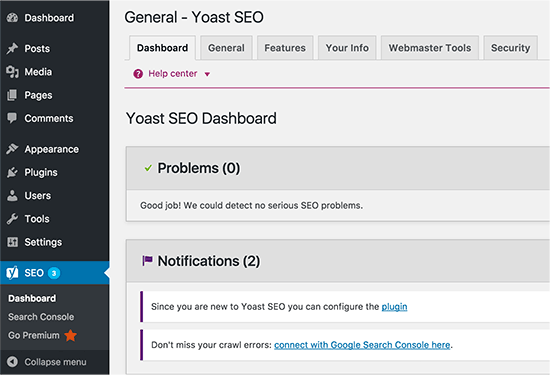
Yoast SEO installed in WordPress

For complete step by step instructions, see our ultimate WordPress SEO guide for beginners.

4. Install Google Analytics

As a website owner, you need to understand your audience, what they are looking for, and how you can help them find it. These insights help you make smarter decisions to grow your business.

This is where you need Google Analytics. It shows you how many people visit your website, where they came from, and what they did on your website.

The easiest way to install Google Analytics is by using MonsterInsights. It is the best Google Analytics plugin for WordPress and shows beautiful analytics reports right inside WordPress.
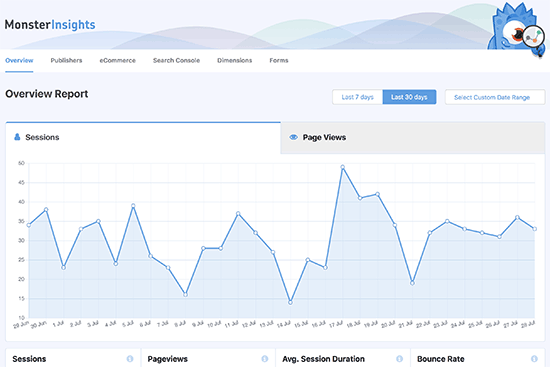
MonsterInsights reports

For the complete setup, see our beginner’s guide on how to easily install Google Analytics in WordPress.

5. Install Caching

Studies show that 1 second delay in page load time can lead to 7% loss in conversions, 11% fewer page views, and 16% decrease in customer satisfaction.
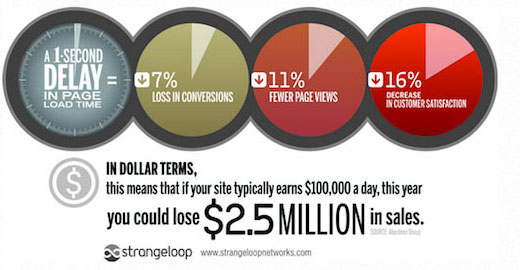
Strangeloop study

As a website owner, you need to make sure that your website is fast and performs well even under high traffic.

This is where caching comes in. It allows your website to quickly serve cached copies of your pages to users instead of generating them on the fly. This reduces server load on your website and improves your page load speed.

There are a lot of caching plugins available for WordPress, but we recommend using the WP Super Cache plugin. See our guide on how to install and setup WP Super Cache plugin for detailed instructions.

Caching alone can significantly improve your website’s speed. However, there are lots of other things you can do to make it faster. See our complete guide on how to improve WordPress speed & performance.

6. Setup Backups

Each year millions of dollars worth of damages are caused by data loss. Creating backups is the only way to make sure that you can easily recover your website in case of a disaster.

Some WordPress hosting companies offer limited backup services with their hosting plans. However, these backups are not guaranteed, and it is your responsibility to backup your website on your own.

Luckily, there are several great WordPress backup plugins that you can use to automatically create backups.

We recommend using Updraft Plus. It is the best WordPress backup plugin and allows you to setup automatic backup schedules. You can also store your backups securely on remote storage services like Google Drive, Amazone S3, Dropbox, and more.
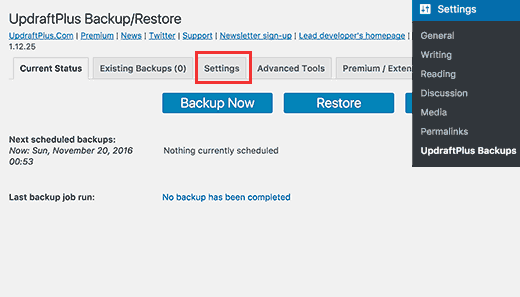
Setting up WordPress backups using UpdraftPlus

For step by step instructions see our step by step tutorial on how to backup and restore WordPress using UpdraftPlus

7. Setup WordPress Security

WordPress is quite secure out of the box. However, you still need to follow security best practices to keep your website secure.

Some of these best practices are quite easy to do on your own like using strong passwords, securing WordPress admin area, and installing updates.

For other things, you will need a plugin. There are some great WordPress security plugins that you can use.

We recommend using Sucuri. They are the industry leader in website security, vulnerability scanning, and malware protection.

The best part about using Sucuri, is that they offer the best WordPress firewall plugin. A website firewall blocks suspicious traffic from ever reaching your website.
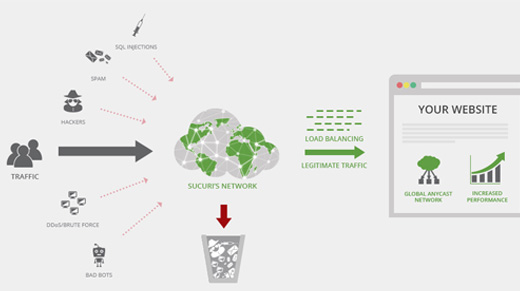
Sucuri website firewall

For complete instructions, follow the steps in our ultimate WordPress security guide for beginners.

8. Setup Spam Protection

Spam comments can be quite problematic. Most of them contain links to malicious websites known for distributing malware. Spam comments can affect your search rankings and your website’s reputation.

You can enable comment moderation in WordPress to prevent any comment appearing without approval. However, as the quantity of spam grows you will be spending considerable time moderating comments.

To fix this, you need to install and activate the Akismet plugin. It is a WordPress anti-spam plugin and one of the only two plugins that come pre-installed on every WordPress website.
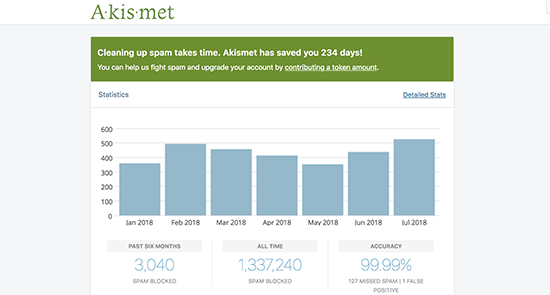
Akismet

To learn more, see our guide on how to setup Akismet anti-spam plugin in WordPress.

9. Delete Unused WordPress Themes

Most WordPress users will install and test a few themes before deciding on one that’s a keeper. Instead of leaving those unused themes installed, be sure to delete them. The reason for that is because even inactive themes will need updates.

We do recommend keeping at least one default theme installed. This theme will act as a fallback in case you have to to switch themes when troubleshooting for errors.

Go to Appearance » Themes page and click on an unused theme that you want to delete. This will bring up a popup showing theme details. In the bottom-right corner of the popup you will see the link to delete the theme.
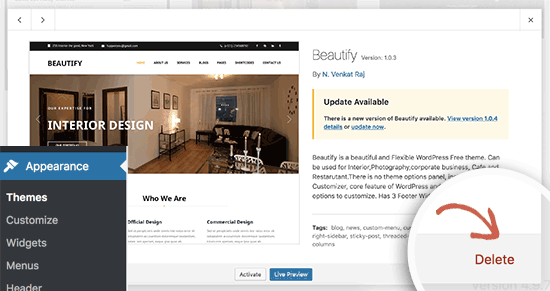
Delete unused themes

Repeat the process to delete all unused themes.

10. Setup WordPress Comments

Comments play an important role on most blogs. They are a good indicator of user engagement and allow you to build a community around your blog.

Simply go to Settings » Discussion page to setup comments. From here you can enable or disable comments, setup comment notifications, and enable comment moderation.
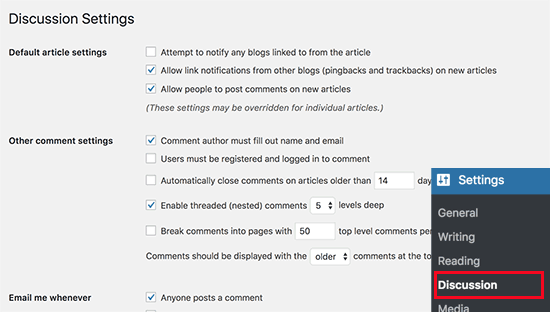
Comment settings

11. Delete Default Content

WordPress comes with some default content to be used as the placeholder items. This includes a blog post titled ‘Hello World’, a sample comment, and a sample page.

Simply go to Posts » All Posts page. Take your mouse to the ‘Hello World’ post and then click on the ‘Trash’ link.
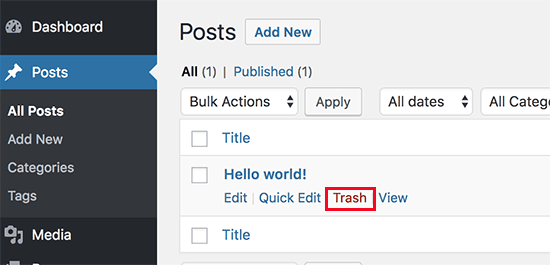
Delete default post

Next, go to Pages » All Pages page and then delete ‘Sample Page.

Lastly, visit the Comments page and then delete the default comment.
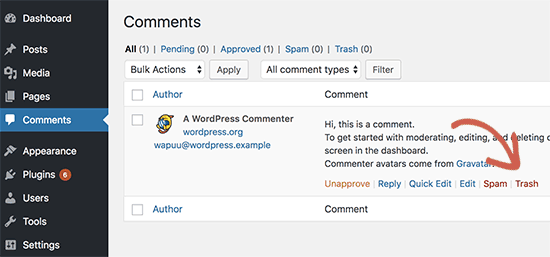
Delete default comment

12. Setup a Default Category

WordPress posts are required to be filed under at least one category. By default, WordPress uses the ‘Uncategorized’ category as the default category. If you don’t change the category when writing a blog post, then it will automatically be filed under the default category.

To change the default category, first, you need to visit Posts » Categories page to create a new category. This will be used as your new default category.
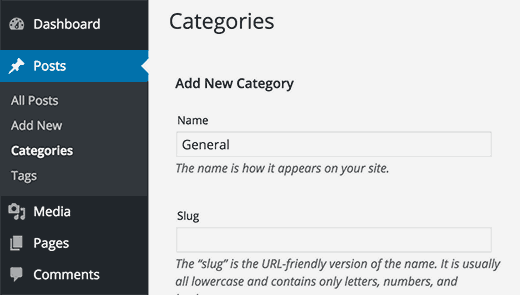
Add new category

After that, go to Settings » Writing page. Here you will see the default category option, you can go ahead and select the new category you created earlier.
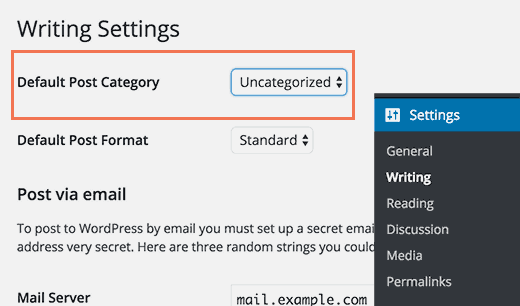
Change default category

Finally, you can go to Posts » Categories page and delete the ‘Uncategorized’ category.

To learn more, see our guide on how to change the default Uncategorized category in WordPress.

13. Setup Front and Blog Pages

By default WordPress displays your blog posts on the homepage. However, if you are making a small business website, then you would want to use a static page as your homepage.

Even most blogs want to use a static front page as their homepage. This allows them to create custom layouts for their homepage.

To set up these pages, you can simply go to Settings » Reading page and select the pages you want to use as your front page and blog page.
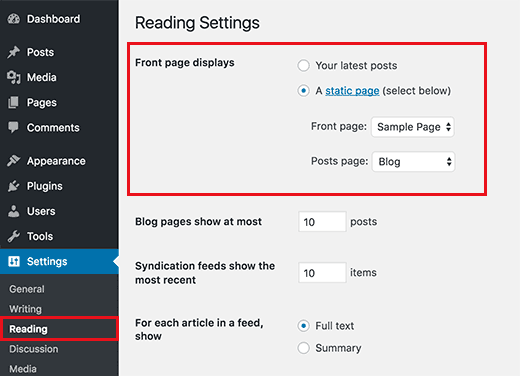
Select static front page and blog pages

For more details, see our article on how to add a separate page for blog posts in WordPress.

14. Upload Your Gravatar

WordPress uses Gravatar to display user photos in author bios and in WordPress comments. Gravatar is a profile image hosting service that allows users to use the same photo as their profile image across millions of website.

A WordPress website showing author photo

Simply go to the Gravatar’s website and create an account using the email address you have used in your WordPress account.

After that, you can use this email address to comment on millions of websites using Gravatar including your own site.

For more details, see our article on how to use Gravatar in WordPress.

15. Complete Your User Profile

Next, you would want to complete your WordPress user profile. Simply head over to Users » Your Profile page to update your profile information.
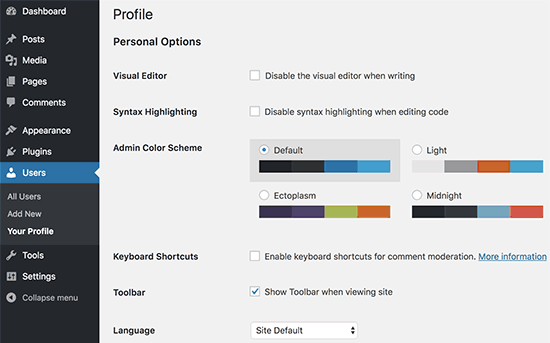
Update WordPress profile

By default, WordPress will use your username next to your blog posts and comments. You would want to replace it with your full name or nickname. See our article on how to add or change your full name in WordPress.

You would also want to provide your website link. Other plugins may also add their own custom fields to your user profile like social media links.

Lastly, enter a short bio of yourself. This would give your users a quick introduction and help them learn more about the author behind the articles.

16. Upload Favicon and Site Icon

Favicon or Site Icon is the tiny image that appears next to your website title in the browser. It helps your users identify your website and increases brand recognition among your most frequent visitors.

Favicons displayed in browser tabs

First, you will need to create an image of exactly 512×512 pixels in dimensions and save it in png, jpeg, or gif format.

After that, you need to visit Appearance » Customize and click on the ‘Site Identity’ tab. Under the ‘Site Icon’ section click on the ‘Select File’ button to upload your favicon.

Add favicon and site icon

For more details, see our article on how to add favicon and site icon in WordPress for step by step instructions.

17. Change WordPress Email Address

Most users add their own email address when installing WordPress. This means their first user profile and their website’s email address are the same.

To change this you can go to Settings » General page and enter the new email address you would like to use for the website.
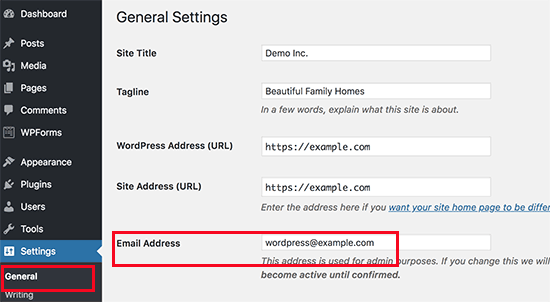
Change your site email

Make sure that the new email address is active, as WordPress will send a confirmation email to that address.

You can use any email address here. However, it would be best to use an email address that shows that this address is for automated emails sent from your website.

If you want to use email accounts using your own domain name, then please see our guide on how to create a free business email address for your WordPress website.

18. Setup Your WordPress Theme

The next step is to setup your WordPress theme. Most WordPress themes come with different features and customization options. However, there are some basic settings that are the same in all WordPress themes. In fact, they are common among most websites on the planet.

Let’s start with setting up navigation menus. It is the links menu that usually appears in the header section. It contains links to different areas of your website.
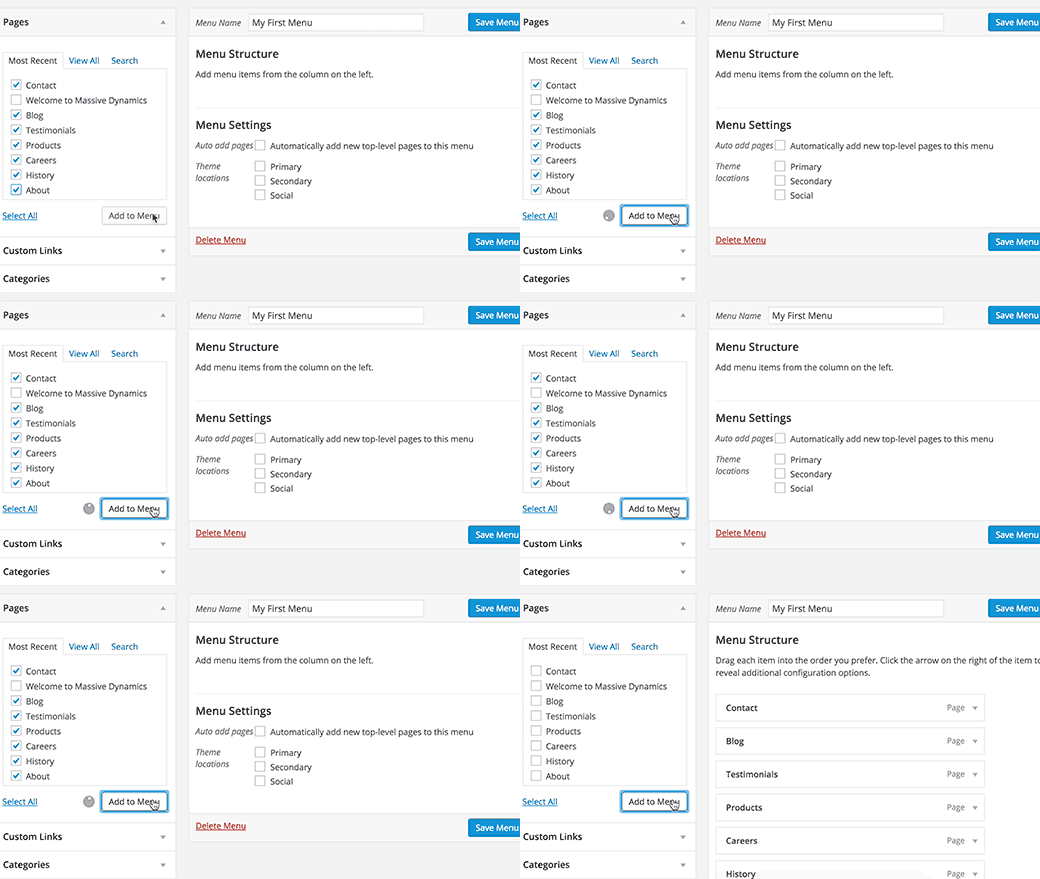
Adding navigation menus

For detailed instructions, see our beginner’s guide on setting up navigation menus in WordPress.

Next, you would want to add widgets to your WordPress. Widgets allow you to add different blocks to your website’s sidebar or widget ready areas.

By default, WordPress will display a few default widgets in your primary sidebar. You would want to rearrange them or add other widgets. Your theme may also come with its own custom widgets for social media and other features that you would want to use.

For detailed instructions, see our beginner’s guide on how to add and use widgets in WordPress

Your theme may also include plenty of other options like color schemes, layout choices, header styles, and more. Explore these options and set them up to your own liking.

We hope this article helped you learn things you will immediately want to do after installing WordPress. You may also want to see these actionable tips to drive traffic to your new WordPress site.

If you liked this article, then please subscribe to our YouTube Channel for WordPress video tutorials. You can also find us on Twitter and Facebook.

The post 18 Most Important Things You Need to Do After Installing WordPress appeared first on WPBeginner.


from WPBeginner https://ift.tt/2mXmKCB
More links is https://mwktutor.com
15 Best WordPress Resume Themes 2018

If you want to promote your skills and services online then creating a high-quality personal resume website is essential. Thanks to this collection of the best WordPress resume themes, launching such a website has never been easier. As many of the themes featured here include more than one pre-built resume website demo, there’s a good […]

The post 15 Best WordPress Resume Themes 2018 appeared first on aThemes.


from aThemes https://ift.tt/2AnLPjC
More View at https://mwktutor.com

21 Actionable Tips To Increase Affiliate Sales (Without Increasing Traffic)

Getting affiliate sales is not easy. But you can make it easier by using some tips and tricks. Back in 2014, I got hit by Google Panda. I lost almost 50% organic traffic overnight. While I knew that I could recover my traffic, but I was uncertain about my earnings. As affiliate marketing was the primary […]

The post 21 Actionable Tips To Increase Affiliate Sales (Without Increasing Traffic) appeared first on RoadToBlogging.


from RoadToBlogging https://ift.tt/2LLORTo
More View at https://mwktutor.com

Monday, 30 July 2018

How to Add One-Click Login With Google in WordPress

Do you want to add one-click login with Google to your WordPress site? Allowing users to login with their Gmail account saves them time because they wouldn’t have to remember their WordPress username and password. In this article, we will share how to easily add one-click Google login in WordPress.

How to add one-click login with Google in WordPress

Why You Should Add One-Click Google Login in WordPress?

Most internet users remain logged in to their Google accounts. This allows them to quickly access all Google apps like Gmail, Drive, Docs, Photos, and more without signing in separately for each app.

Having one-click Google login activated on your WordPress login page allows your users to quickly sign-in to your website using their Gmail account. It saves them time, and they wouldn’t have to enter their login credentials each time.

If your organization uses GSuite for professional business email addresses, then your team members can use your organization’s Google apps accounts for login.

If you run a simple WordPress blog, then you might not find this feature useful. However single sign-on feature like one-click Google login is very helpful for any websites that require users to login such as multi-author websites, membership websites, and websites selling online courses.

That being said, let’s take a look on how to easily add one-click login with Google to your WordPress website.

Adding One-Click Gmail Login in WordPress

First thing you need to do is install and activate the Google Apps Login plugin. For more details, see our step by step guide on how to install a WordPress plugin.

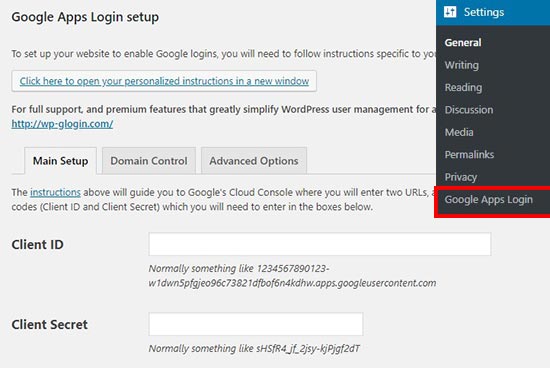
Upon activation, you need to go to Settings » Google Apps Login page in your WordPress admin area. Under the Main Setup tab, you’ll need to add Client ID and Client Secret code.

Apps login settings page

To get these details, you need to visit Google Developers Console. If you are not already logged in, then you will be asked to login with your Google account.

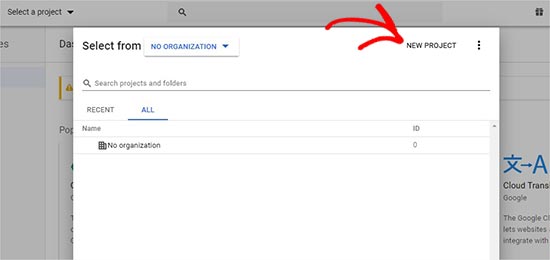
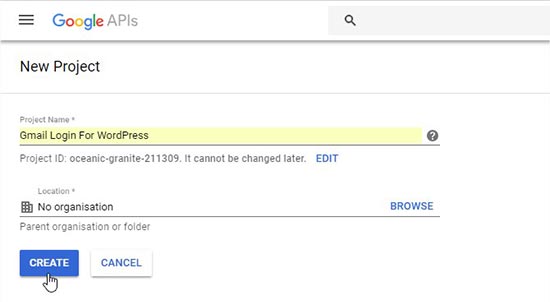
Next, you need to click on Start a project from the top menu. It will open a popup where you would click on New Project button to continue.

New project

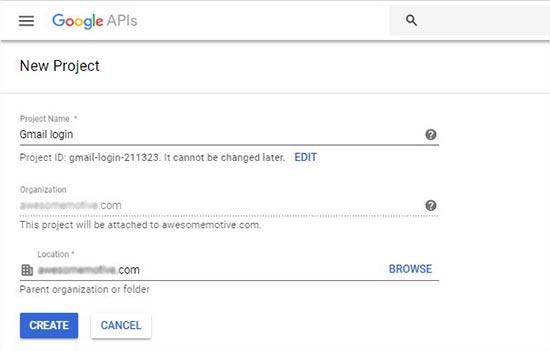
Now, you need to add a project name and select the location. Project name can be anything, and Location will be your organization’s domain name (example.com). If you are logged in with your company’s Google account or your GSuite account, then it will add the location and organization automatically.

Project, location, and organization name

However, if you are creating a project from your personal Google account, then you can leave the location with No Organization selected.

Project name and location

Next, click on the Create button to continue.

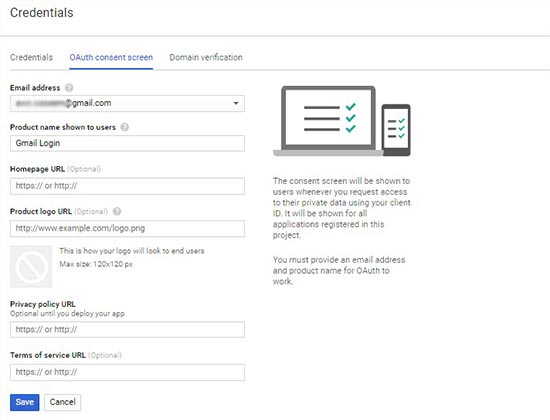
You’ll now be redirected to APIs & Services dashboard. On this page, you need to click on Credentials from the left menu and go to OAuth consent screen page.

In the Email Address field, you need to add your email address that you have used to create this project. Also you need to add your website URL in the Homepage URL field and click on the Save button.

OAuth consent screen

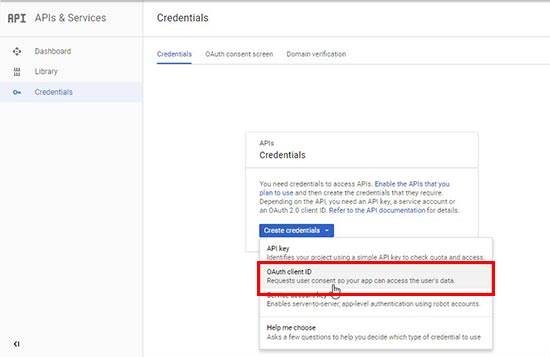
After that, it will take you to the Credentials page again. Go ahead and click on the Create Credentials button to select OAuth client ID option.

OAuth client ID

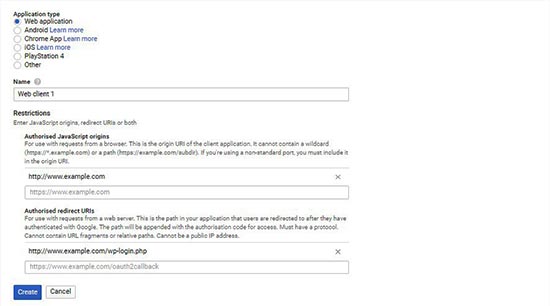
Next, you need to select Web application as an Application type. In the Authorised JavaScript origins field, you need to enter your website URL (http://www.example.com), and add WordPress login page URL (https://ift.tt/12fdRXe) in the Authorised redirect URLs field.

Web application type

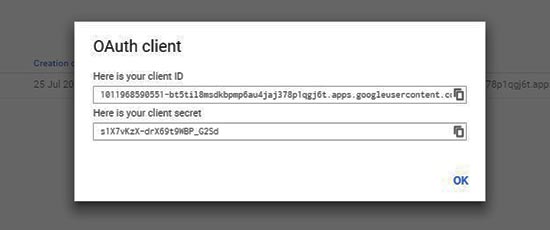
After that click on the Create button, and you’ll see your Client ID and Client Secret information in a popup.

Client ID and Client secret

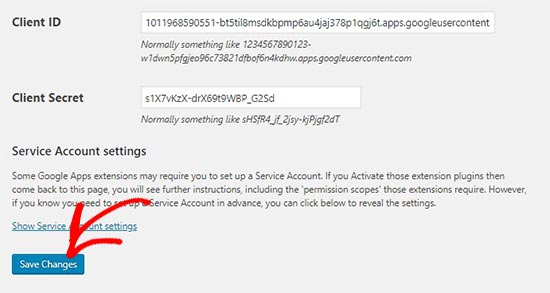
You need to copy and paste these keys on the plugin’s settings page in your WordPress admin area.

Add client ID and client secret in WordPress

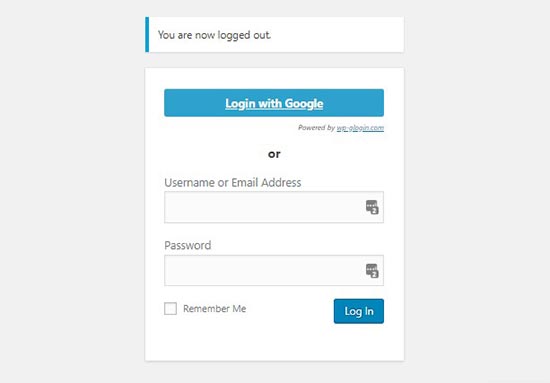
After that, you can simply logout from your WordPress admin account, and you’ll see a Login with Google button on your login screen.

Login with Google

Clicking on the button allows you to login with one-click into your WordPress account. However, keep in mind that users can only login with the Google account address that they have used on your website.

We hope this article helped you learn how to add one-click login with Google in WordPress. You may also want to see our guide on how to create a login popup modal in WordPress, and how to create a custom user registration form in WordPress.

If you liked this article, then please subscribe to our YouTube Channel for WordPress video tutorials. You can also find us on Twitter and Facebook.

The post How to Add One-Click Login With Google in WordPress appeared first on WPBeginner.


from WPBeginner https://ift.tt/2OnRvNL
More links is https://mwktutor.com
Sunday, 29 July 2018

How To Tackle And Counter Google Search’s DMCA Removal Notice

Tackle And Counter Google Search's DMCA Removal Notice

What do you do when someone copies your original content, be it an image, audio or video?

You file a DMCA complaint. Google takes these complaints very seriously and follows it up with strict actions. I have talked about the DMCA earlier, the details of which you can read in these articles:

Google has a DMCA transparency page where you can see the number of DMCA requests Google has processed. You can also enter your domain name to see how many DMCA takedown requests have been made against your domain and everything else related to it.

Even though Google tries its best to not make mistakes, there can be errors as the DMCA requests are processed by humans. In the video below, let us learn how Google processes the DMCA requests:

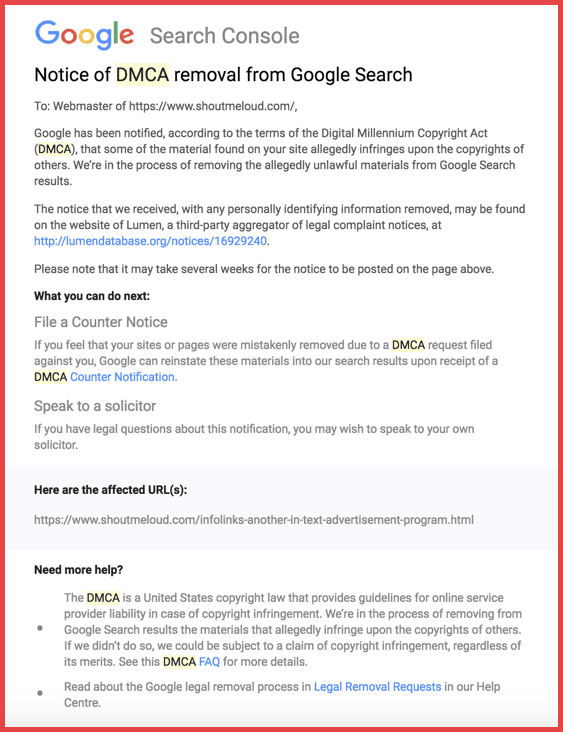
This is what happened to me this morning when I received an email from Google search saying:

“Notice of DMCA removal from Google Search”

That is when I investigated the issue further and discovered that there was some error for which I need to file a counter-notice.

Here is a screenshot of an actual email that I received:

Notice of DMCA removal from Google Search

None of us want to receive such emails, but if you have received one and you are not at fault, you can always submit a DMCA counter-notice to fix the issue. Also, do not take this lightly. It has been reported that DMCA can affect your search ranking:

Since we re-booted our copyright removals over two years ago, we’ve been given much more data by copyright owners about infringing content online. In fact, we’re now receiving and processing more copyright removal notices every day than we did in all of 2009—more than 4.3 million URLs in the last 30 days alone. We will now be using this data as a signal in our search rankings.

Note: Copying content, deleting it after receiving the notice, and then filing a counter-notice can have severe legal implications. Therefore, counter it only when you are not at a fault and know for sure that the DMCA notice is a mistake.

How To File A DMCA Counter-Notice To Google

If you have received an email like I did, the best place is to click on the link in the email to file the DMCA counter-notice. You can also use this direct link from Google’s help page to file the counter-notice.

For this tutorial, I assume you have received the email and click on the link under “What you can do next” section. (See screenshot below)

Counter notification Search

This will take you to the “DMCA counter-notification form” where you can fill up all the fields. This is an easy part and you should be able to fill it up easily. The only part that would require most of your attention is “Please provide more details to justify your request“.

DMCA Counter notification form filling

Depending upon the severity of your issue, you can add as many details as possible to help the reviewer assess the issue and take appropriate action.

Conclusion

If you ever find yourself in such a situation, the first thing to do is not panic. Evaluate the possibilities of errors on your part (including your team). If that’s not the case, grab a cup of coffee and follow the above steps to file the counter-notice.

There is a good guide on Moz blog that you can also refer to for more examples of filing the form.

Do write back and let us know if you have been slapped with a DMCA notice and how you tackled it. Look forward to seeing your comments below.

Also, here are a few hand-picked guides that must read next:

Subscribe on Youtube

How To Tackle And Counter Google Search’s DMCA Removal Notice is a post from ShoutMeLoud - Shouters Who Inspires


from ShoutMeLoud https://ift.tt/2NUDuFZ
More View at https://mwktutor.com

Friday, 27 July 2018

What is a Blog and How is it Different from a Website? (Explained)

We are often asked by beginners about what is a blog, and how is it different from a website? If you are thinking about starting a blog or a website, then understanding these terms will help you meet your goals. In this beginner’s guide, we will explain what is a blog and how is it different from a traditional website.

What is a blog and how is it different from a website?

What is a Blog?

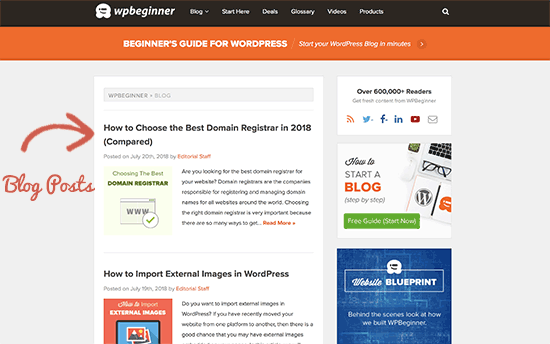
A blog is a type of website where the content is presented in a reverse chronological order (newer content appear first). Blog content are often referred to as entries or “blog posts”.

Blogs are typically run by an individual or a small group of people to present information in a conversational style. However now there are tons of corporate blogs that produce tons of informational and thought-leadership style content.

A blog page showing posts

Typical blog posts also have a comments section where users can respond to the article.

History of Blogs

Blogs evolved from online diaries and journals in the mid-90s. At that time, internet users were already running personal web pages where they published regular updates about their personal lives, thoughts, and social commentary.

The term weblog was first used during the late 90s, which later became ‘we blog’, and then just ‘blog’.

Due to the growing number of such web pages, several tools started to appear which made it easier for users to create online journals and blogs. These tools helped popularize blogging and made the technology accessible to non-technical users.

In 1999, the popular blogging website Blogger.com was launched, which was later acquired by Google in February 2003.

The same year, WordPress released its first version as a blogging platform in May 2003. Today, WordPress is the world’s most popular blogging platform powering over 30% of all websites.

What is The Difference Between Blog and Website?

Blogs are a type of website. The only real difference between a blog and other types of website is that blogs are regularly updated with new content displayed in a reversed chronological order (newer posts first).

Typical websites are static in nature where content is organized in pages, and they are not updated frequently. Whereas a blog is dynamic, and it is usually updated more frequently. Some bloggers publish multiple new articles a day.

Blogs can be a part of the larger website. Often businesses have a blog section where they regularly create content to inform and educate their customers. Because you can use WordPress to create a website and blog, a lot of business owners use WordPress to build their small business website.

In simple terms, all blogs can be a website or part of a website. However, not all websites can be called blogs.

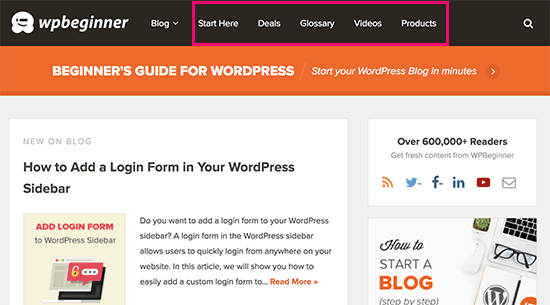
For example, WPBeginner is a blog and a website. Our website has other content which is published in a non-blog format like glossary, about us, and contact pages.

Non-blog content on a blog website

Now, let’s take a look at another example. This time a website called Awesome Motive. It is a business website and belongs to WPBeginner’s management company.

Awesome Motive

It does not have a blog or any content published in a sequential order. It uses pages to organize and present information about a business.

You can also say that blogs have articles that are organized using categories and tags. On the other hand, websites use pages to organize and display content.

What is The Difference Between Blog Posts and Pages?

WordPress is the most popular blogging platform, and it has two default content types: posts and pages. Often beginners get confused between the two.

Blog posts are displayed in a reverse chronological order (newest to oldest) on your blog page because they are timely content which means your users will have to dig deeper to view older posts.

Pages are static “one-off” type content such as your about page, contact page, products or services pages, and more.

To learn more, see our beginner’s guide on the difference between posts and pages.

Pages are usually used to create a website structure and layout. Even blogs can have pages alongside them (See our list of important pages that every blog should have).

Why Do People Blog? What are The Benefits of Blogging?

Each individual blogger has their own motivation for blogging. Many of them use it as an alternative to keeping a diary or journal. Blogging provides them with a venue to share their creativity and ideas to a wider audience.

Top brands and businesses create blogs to educate their customers, share news, and reach a wider audience. Blogging is an essential part of online marketing strategy for many businesses.

Following are just a few benefits of blogging.

  • Provides an avenue to organize your thoughts and ideas
  • Allows you to showcase your skills, creativity, and talents
  • Help individuals become an authority in their industry
  • Helps you socialize with interesting like-minded people online
  • Many bloggers make money from their blogs using various monetization methods
  • Businesses use blogging to bring more potential customers to their websites
  • Non-profits can use blogs to raise awareness, run campaigns, and influence public opinion

What are Some Examples of Good Blogs?

Blogging is huge!

Millions of individuals and businesses from all over the world have blogs. This means that there are blogs on just about any topic you can think of.

Here are some good blogs that you can check out as an example. We have hand-picked the best blogs in different industries to give you an idea of how diverse blogs are.

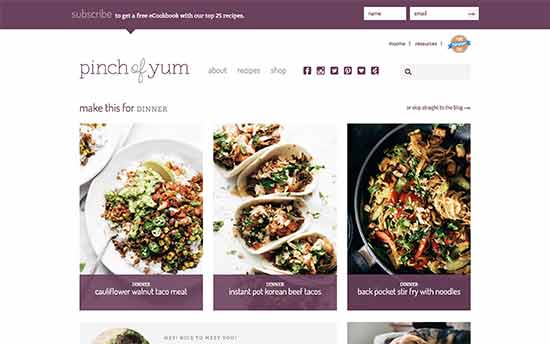
1. Pinch of Yum

Pinch of Yum

Pinch of Yum is one of the most popular food and recipe blogs online. Started by Lindsay, a high school teacher, the blog allowed her to quit her day job and become a full-time blogger.

2. WeTheParents

WeTheParents

WeTheParents is a popular parenting blog run by Neve and Keane (the parents). They share parenting tips for moms and dads and while doing so they make money by earning commission on products they recommend.

3. List25

List25

A popular edutainment blog that publishes interesting articles on a variety of topics in listicle format. It combines the pursuit of interesting and intriguing facts with the innate human desire to rank and list things.

4. We Wore What

We Wore What

Started by Danielle Bernstein, We Wore What is a popular fashion blog. With more than 1.5 Million followers, it covers everything from fashion to interior design to menswear.

5. Nerd Fitness

Nerd Fitness

A fitness blog started by Steve Kamb, Nerd Fitness is dedicated to helping people stay fit. It provides fitness advice, motivation, support, diet and exercise tips.

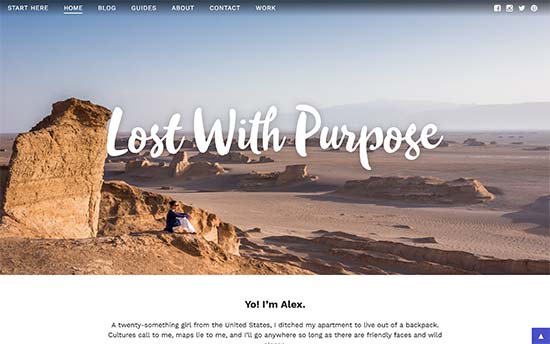
6. Lost With Purpose

Lost With Purpose

A popular travel blog run by Alex, who shares her journeys while offering travel tips, advice, and guides for other backpackers.

7. Tiny Buddha

Tiny Buddha

Tiny Buddha is a personal development blog created by Lori Deschene. The blog publishes content on happiness, love, relationships, mindfulness, spirituality, simplicity, minimalism, letting go, and more.

There are many more great blogs out there on many different topics. See our list of the most popular types of blogs for some more ideas.

How Do Bloggers Make Money?

Usually, people think of bloggers as hobbyists. Some of them are, but a large number of bloggers make money from their blogs. This enables them to focus more on their blog, quit their day jobs, and build a successful business.

The more successful bloggers can make six-figure, seven-figure, and even eight-figure from their blogs.

Below are a few ways that most bloggers use to make money from their blogs:

The most common and probably the easiest way to make money online is by displaying ads. However, as a new blogger you will not be able to contact advertisers directly or manage them on your own.

This is where Google AdSense comes in. It takes care of finding ads, displaying them, collecting payments from advertisers, and sending you those payments for a small cut.

Many bloggers also make money through affiliate marketing. Basically, they recommend products on their websites and earn a commission when users buy those products.

Other common monetization methods include memberships, selling online courses, or adding an online store to the blog.

See our list of proven ways to make money online from your blog for some more examples.

We also have a list of “easy-to-start” online business ideas that you can check out.

Can Anyone Start a Blog?

Yes, anyone who wants to start a blog, can easily do so.

In the early days of blogging, users needed coding skills to even update their blogs. Now, there are plenty of tools that allow you to easily create a blog without ever writing code. If you can point-and-click, then you can build a blog within minutes.

Choosing the wrong blogging platform to start a blog is the most common mistake that beginners make. However, since you are here, you will not be making this mistake.

We recommend using WordPress. It is the world’s most popular blogging platform and website builder. Over 30% of all websites on the internet are built using WordPress, just so you can get an idea of how popular it is.

There are two types of WordPress: WordPress.com, which is a hosted solution, and WordPress.org also known as self-hosted WordPress. See our guide on the difference between WordPress.com vs WordPress.org for more details.

We recommend using WordPress.org because it gives you instant access to all WordPress features. It also allows you to easily make money from your blog without any restriction.

Want to learn more about WordPress? See our complete WordPress review for detailed breakdown of its features.

You will need the following things to start your own WordPress.org blog.

  • A domain name (This will be your blog’s address and what users will type in their browser to visit it. For example, wpbeginner.com)
  • Website hosting account (This will be home of your blog’s files)
  • 20 minutes of your time

Normally, a domain name will cost you around $14.99 per year and website hosting $7.99 per month. Now if you are just starting out, this seems like a lot of money.

Thankfully, Bluehost has agreed to offer WPBeginner users a free domain and discount on hosting. They are one of the biggest hosting companies in the world and are officially recommended by WordPress.

Basically, you will be able to get started for $2.75 per month.

→ Click Here to Claim This Exclusive Bluehost Offer ←

After purchasing hosting, you can head over to our guide on how to start a blog for complete step by step instructions.

We hope this article helped answer your questions about what is a blog and what’s the difference between a blog and a website. You may also want to see our list of the most useful tools to manage and grow your WordPress blog.

If you liked this article, then please subscribe to our YouTube Channel for WordPress video tutorials. You can also find us on Twitter and Facebook.

The post What is a Blog and How is it Different from a Website? (Explained) appeared first on WPBeginner.


from WPBeginner https://ift.tt/2mLdiSG
More links is https://mwktutor.com
15+ Free and Premium VueJS Admin Templates Built With Bootstrap

If you’re in need of some good VueJS admin templates (built with Bootstrap) then have we got something for you! What follows is a list of the best ones out there.

from CodeinWP https://ift.tt/2LCMNgq
More View at https://mwktutor.com
Thursday, 26 July 2018

This Is How You Can Disable Comments On WordPress Posts

Disable Comments On WordPress Posts

The comment feature of WordPress CMS makes it one of the ideal platform for blogging. However, not every post of your blog needs the comment feature and you can always choose to disable it.

The customization feature of WordPress is what all of us enjoy the most. In WordPress, we have the option to:

  • Disable comments on specific posts
  • Disable comments on specific pages
  • Disable comments on all the pages

Depending upon your requirement, you can pick either of it.

A practical situation that I’m experiencing these days is that some of the popular posts on ShoutMeLoud are getting a lot of comments. The problem is, only 1% of the comments are genuine on those posts. The rest of the comments are spams or blunt self-promotion. Anti-spam comment plugins like Akismet and WordPress Zero spam are doing a decent job, but it is not enough. That’s when I thought of disabling comments on a few specific WordPress blog posts.

In this tutorial, you will learn exactly how to do it and you can use it now or in the future as and when you need this.

Sounds good?

Here we go.

Removing comment box on specific WordPress posts or pages

You can deactivate comments on already published posts or even on the posts which you are about to publish. Just follow the steps below.

  • Login to your WordPress dashboard
  • Go to Edit section of posts or pages on which you want to deactivate comments
  • Search for discussion tab (usually it’s next to the post writing section but you can use the search feature of your browser to find the text “Discussion“)
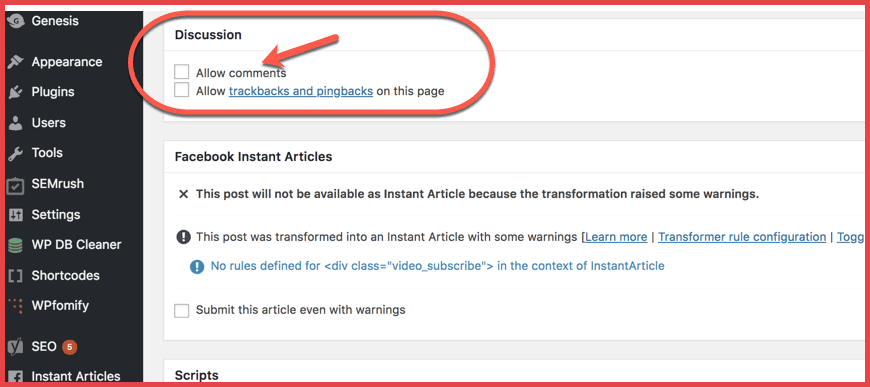
  • Uncheck the box that says allow comments. It should look like the screenshot below:

disable-WordPress-comments

Click on Update post and that’s about it. The comment box will be gone from the post/page.

Disabling comments on all of your WordPress website

If you wish to disable comments on your WordPress site temporarily or permanently, you can do that as well. This next tip will remove the comment feature from all of your WordPress blogs.

  • Go to Settings > Discussions in the WordPress dashboard
  • Under Default article settings, uncheck the option “Allow people to post comments on new articles

Remove-WordPress-comments

While you are on this page, there is one more setting that you should know about. You also have an option to disable comments on posts/pages which are older than “X” days.

On the same page, “Settings > Discussions“, you will see the option that says “Automatically close comments on articles older than“.

Simply define the number of days and this feature will enable you to close comment on all WordPress posts and pages which are older than the specified time.

WordPress-commenting-settings

Now, do not forget to save these settings by scrolling down the page and click on Save changes.

Conclusion: Deactivating comments on WordPress posts/Pages

There are so many features in WordPress which are hidden that you must learn and check out. You may stumble across some features as and when you troubleshoot. At times, reading more about WordPress will help you understand the possibilities it possesses.

For now, I hope this tutorial helped you understand the process of removing the comment box from specific WordPress posts/pages and also on an entire WordPress site. If you have any question related to this topic, feel free to ask in the comment section below. Only meaningful comments, please!

Also, here are a few hand-picked WordPress guides that you should read next to learn something new:

Subscribe on Youtube

This Is How You Can Disable Comments On WordPress Posts is a post from ShoutMeLoud - Shouters Who Inspires


from ShoutMeLoud https://ift.tt/2uTSBbK
More View at https://mwktutor.com