Wednesday, 30 April 2025

WPBeginner Spotlight 11: WordPress 6.8 Launch, Core Release Changes, and Major Plugin Highlights

Welcome to the April 2025 edition of WPBeginner Spotlight! The WordPress community has been buzzing this month with exciting updates, new tools, and important changes across the ecosystem.

These include everything from the launch of WordPress 6.8 to major plugin releases like RewardsWP, product milestones, and upcoming events. Overall, there’s no shortage of news for site owners, developers, and WordPress enthusiasts alike.

In this roundup, we’ll highlight the biggest announcements and latest developments in the WordPress world.

📝 WPBeginner Spotlight brings you a monthly roundup of the most important WordPress news, updates, and community happenings.

Got something to share? Whether it’s a new product launch, a major update, or an event, just reach out to us through our contact form!

WPBeginner Spotlight 11: WordPress 6.8 Launch, Core Release Changes, and New Plugin Highlights

aThemes, Maker of Popular WordPress Themes, Joins the WPBeginner Family of Products

WPBeginner has announced the acquisition of aThemes, a well-known provider of beautiful and easy-to-use WordPress themes.

aThemes is widely recognized for popular themes like Sydney and Botiga, which are favored by small businesses, freelancers, and creative agencies.

aThemes joins WPBeginner family of products

As aThemes is now part of the Awesome Motive family, users can expect faster innovation, enhanced customer support, and deeper integrations with other tools and plugins designed to make WordPress easier for everyone.

Syed Balkhi, CEO of WPBeginner, explained one of the reasons for the acquisition:

“In our annual WPBeginner reader survey, one of the user suggestions that we always get is to build a FREE WordPress theme that makes it easy to create stunning websites.”

Existing customers will continue to receive support and updates without disruption. WPBeginner plans to build on aThemes’ strong reputation and expand their offerings with additional features and design improvements over time.

WordPress 6.8 Released with Speed Boosts, Design Tools, and Security Upgrades

WordPress 6.8 is now officially available. It’s packed with a lot of exciting improvements for users and developers alike. This release focuses on performance gains, improved design tools, and stronger security protocols.

See the Full Story 🔗: What’s New in WordPress 6.8? (Features and Screenshots)

One of the standout features is the introduction of Speculative Loading. This new enhancement intelligently loads the next page that a user will likely access.

Speculative loading explained

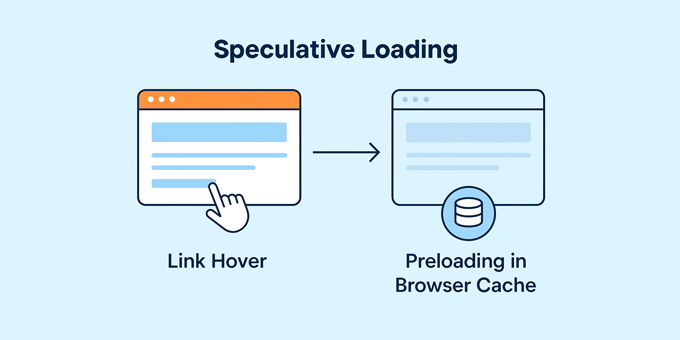
This results in a faster browsing experience and significantly reduced page load times.

The release also brings major updates to the Site Editor, including new design tools like section patterns, custom spacing presets, and enhanced typography controls.

These updates make it easier for users to create visually consistent and polished websites without needing custom code.

Shuffle between styles

Security enhancements include transitioning to bcrypt for password hashing, which offers stronger protection against brute-force attacks and aligns WordPress security practices with modern standards.

Developers will also appreciate the additional APIs, block editor refinements, and expanded options for building custom blocks and plugins.

Charitable Pro Launches with Donor Dashboard, Recurring Giving, and Peer-to-Peer Fundraising

Charitable, a leading WordPress donation plugin, has launched Charitable Pro, which is a major upgrade packed with powerful new fundraising features.

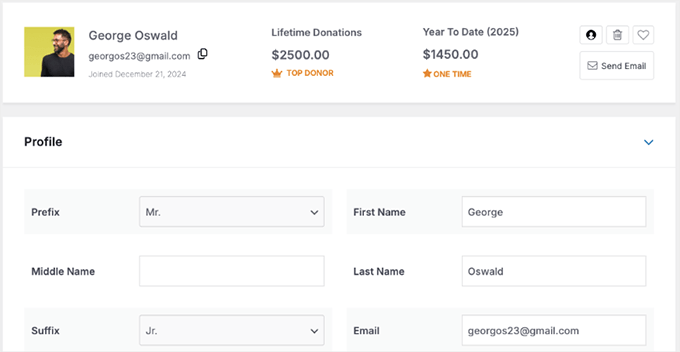
Charitable Pro introduces a streamlined Donor Dashboard. It allows supporters to manage their giving history, download receipts, and update payment information directly from the nonprofit website.

Charitable Pro let's donors manage their profiles

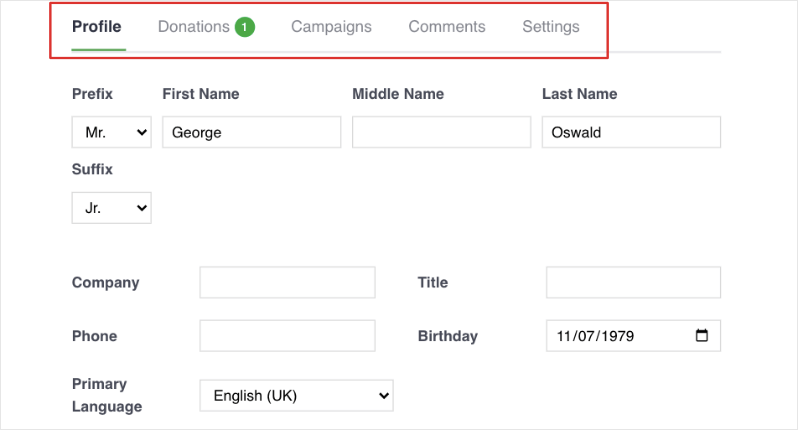
This improvement creates a better experience for donors and encourages them to make repeat contributions.

Organizations can also view detailed donor profiles, with options to easily download donor lists as CSV files, contact individual donors by email, and create more effective fundraising campaigns.

Charitable donor dashboard

The new recurring donation feature allows nonprofits to easily set up monthly or annual donation options. Supporters can also choose to give automatically, helping organizations build sustainable revenue streams.

Peer-to-peer fundraising capabilities have also been added. This enables individual supporters to create personal fundraising campaigns, which can help organizations reach a wider audience through their community.

Plus, Charitable Pro continues to offer zero transaction fees, giving nonprofits an affordable and flexible solution to boost their online fundraising efforts.

WordPress Core Shifts to Annual Major Releases, Starting with 6.8

The WordPress project has announced a major shift in its core release schedule. Beginning with version 6.8, WordPress will now move to a single major release each year.

This new model is designed to create a more predictable timeline, allowing contributors, developers, and site owners to better prepare for updates.

Related🔗: How You Can Get Involved With The WordPress Project

It will also allow more time for larger features and innovations to be fully developed and tested before deployment.

Commenting on the change, Mary Hubbard, Executive Director of WordPress.org, explained:

“This decision reflects current realities — particularly the energy and resources being diverted due to ongoing legal matters. If those lawsuits are dropped or resolved, we’ll revisit this cadence and strongly consider returning to a three-releases-per-year schedule. That remains the ideal for a fast-moving, community-driven project like WordPress.”

According to project leadership, the move will improve stability while encouraging more participation in the release process. Maintenance and security updates will continue throughout the year as needed.

WPConsent Now Blocks Third-Party iframe Content Like YouTube, Google Maps, and reCAPTCHA Before User Consent

WPConsent, the privacy compliance plugin for WordPress, has released a major update with a new Content Blocking feature.

This feature allows site owners to block embeds, such as YouTube videos, Google Maps, and reCAPTCHA forms, until users explicitly provide consent.

WPConsent allows you to block content before users give consent

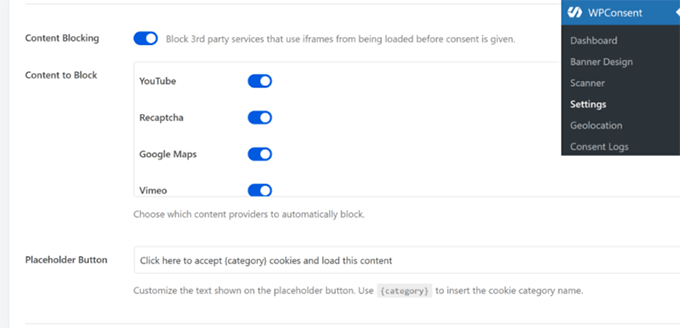
The new feature is an essential tool for improving compliance with the GDPR and other privacy regulations.

This update also includes a redesigned preferences panel that gives users more intuitive control over the data types they agree to share.

WPConsent prefrences panel

Overall, the updated interface aims to improve transparency and encourage informed consent among website visitors. This can help website owners meet global privacy standards with minimal effort.

AffiliateWP Launches RewardsWP: A Refer-a-Friend Plugin for WordPress and WooCommerce

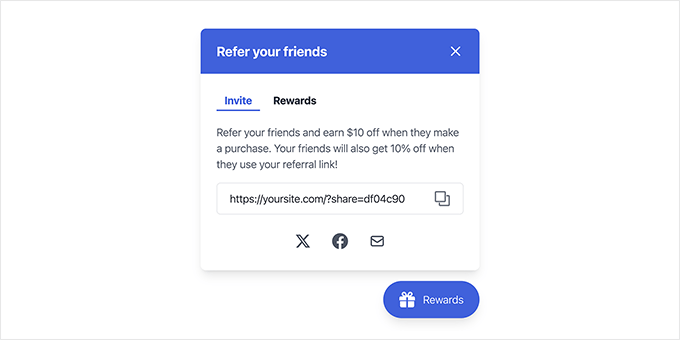
AffiliateWP, a leading WordPress plugin for creating and managing affiliate programs, has launched RewardsWP. It is a new refer-a-friend plugin designed specifically for WordPress site owners.

RewardsWP was created in response to user requests for a simple, customer-first referral solution that works directly inside WordPress.

RewardsWP - Refer a friend widget

It runs as a standalone plugin, meaning you don’t need AffiliateWP to use it. However, the two plugins work smoothly together if both are installed.

With RewardsWP, customers are automatically enrolled in referral programs after purchase. A customizable Rewards Widget appears across the site, allowing customers to share referral links via social media or email and redeem earned rewards without leaving the site.

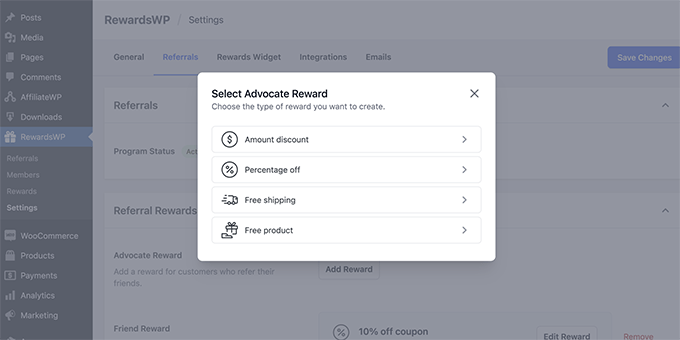
The plugin supports a range of reward types, including discount coupons, free products, free shipping, and percentage-based discounts.

RewardsWP - Reward types

It also includes features like automatic enrollment for new and existing customers, guest purchase support, fraud prevention safeguards, and automated email notifications.

Plus, RewardsWP works out of the box with WooCommerce and Easy Digital Downloads. This makes it easy for store owners to launch customer referral programs without relying on third-party platforms.

WordPress.com Launches AI Website Builder for Instant Site Creation

WordPress.com has introduced a new AI Website Builder that is designed to help users create fully personalized websites in minutes using artificial intelligence.

The AI Website Builder asks users a few simple questions about their goals, preferred styles, and content needs.

WordPress.com AI website builder

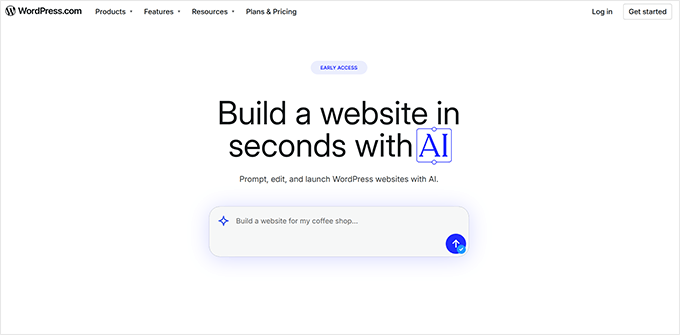
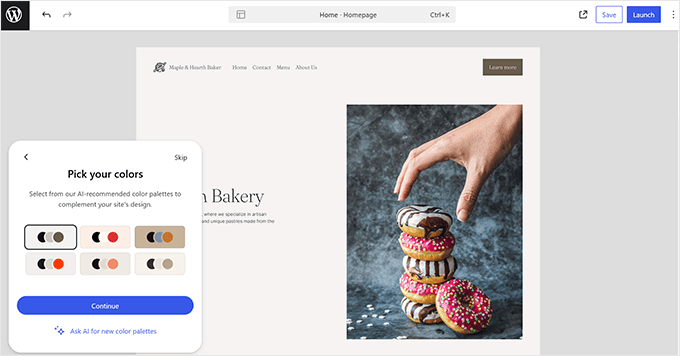
Based on this information, it automatically generates a custom website layout, including recommended pages, starter text, images, and navigation menus.

This new tool aims to simplify the website creation process, especially for beginners and small businesses that want to get online quickly without having to design from scratch. After generation, users can still customize the results using WordPress.com’s standard editing tools.

WordPress.com customize your website

WordPress.com says the AI Builder will continue to evolve with more advanced features over time, helping site owners launch, adapt, and scale their websites more quickly and efficiently.

The feature is available now for WordPress.com users and will roll out additional customization options in future updates.

Related🔗: Best AI Website Builders for WordPress (Expert Picks)

In Other News 🗞️

  • Uncanny Automator released a new update that adds support for Facebook Lead Ads, new Bluesky triggers, and more automation options for platforms like LearnDash and LifterLMS.
  • WordCamp volunteers can now earn profile badges on WordPress.org that recognize their important contributions to WordPress events and community-building efforts.
  • WPCode’s Search & Replace Everything released an update that brings media backup features, smarter image detection, and drag-and-drop support for replacing content across WordPress sites.

💾 Backup, Transfer, or Clone Your WordPress Site with Duplicator

Duplicator

Duplicator makes it effortless to migrate your site, create full backups, or stage a new version — no technical skills required!

Whether you’re switching hosts, launching a redesign, or backing up for safety, Duplicator handles it all in just a few clicks.

  • Thrive Themes introduced a new built-in Font Library. This gives users GDPR-compliant typography management without relying on third-party font providers.
  • WordCamp Europe 2025 tickets are now available, with this year’s event taking place in Basel, Switzerland. It will feature workshops, networking sessions, and keynotes from top WordPress leaders.
  • AdTribes added a new Product Feed Validator tool to help WooCommerce store owners catch listing errors early and ensure smoother marketplace submissions.
  • MonsterInsights introduced TikTok Ads tracking with a one-click pixel setup, making it easier for WordPress site owners to track ad conversions directly in their dashboards.

🔧 Get WordPress Experts to Maintain Your Website ⚙️

WPBeginner's WordPress Maintenance Services

WPBeginner’s WordPress Maintenance Services can handle all your updates, backups, and security so you can focus on growing your business.

No more errors, slow speed, or downtime. Get peace of mind and better performance today.

New Plugins 🔌

  • RewardsWP 🔥– A powerful refer-a-friend plugin for WooCommerce and Easy Digital Downloads. It lets you create customizable referral programs that reward both the referrer and the referee.
  • Acknowledgify – A lightweight plugin that lets developers and agencies acknowledge their work on a website with a virtual humans.txt file, meta tag, and front-end attribution.
  • Meet the Team Lite – A simple, responsive plugin that lets you display team members with photos, bios, and social links using Gutenberg blocks or shortcodes.

That’s a wrap for this month’s WPBeginner Spotlight! 🎉 We hope you enjoyed catching up on the latest news and updates from the WordPress ecosystem.

Got a product launch, feature update, or cool project you think we should cover? Send us a message, and we might feature it in our next edition.

We’ll see you again next month with another round of WordPress news. Thanks for reading and being part of the WPBeginner family!

If you liked this article, then please subscribe to our YouTube Channel for WordPress video tutorials. You can also find us on Twitter and Facebook.

The post WPBeginner Spotlight 11: WordPress 6.8 Launch, Core Release Changes, and Major Plugin Highlights first appeared on WPBeginner.


from WPBeginner https://ift.tt/7RSTbaX
More links is https://mwktutor.com

Monday, 28 April 2025

How to Automatically Post to Threads From WordPress

Since Threads launched in 2023, I’ve been experimenting with different ways to share my WordPress blog posts there automatically. Like many website owners, I initially posted manually, but that quickly became time-consuming as I managed multiple sites and social channels.

Between summarizing content, researching the right hashtags (and even emojis!), and formatting everything, I was losing valuable time that could be better spent growing my business. 

That’s why I started looking for an alternative that could speed up the entire process. And after testing a few different tools, I found a plugin that allows you to automatically post from WordPress to Threads — no coding required.

In this guide, I’ll walk you through straightforward steps that connect your WordPress site to Threads, allowing you to grow your audience and say goodbye to tedious manual posting.

How to automatically post to Threads from WordPress

Why Share Your Content on Threads?

For small business owners, one of the best ways to grow and get traction is to build a loyal community. One easy way to do that is by engaging with your users directly on social media platforms, including X, Facebook, Instagram, LinkedIn, and now Threads. 

Threads launched in 2023 as a Meta (formerly Facebook) product to compete directly with X (previously Twitter).

Within 5 days, Threads had over 100 million users, making it the fastest-growing consumer application in history. Plus, at the time of writing, there were over 320 million active users every month.

With those types of numbers, you can assume that many of your users and customers are active on Threads!

While there are many similarities to X (Twitter), Threads has some key differences:

  • There’s a higher character limit than with X’s free accounts (500 vs. 280).
  • There’s no advertising.
  • Direct messaging isn’t supported.
  • The interface is simpler and more streamlined.
  • Only 1 tag is allowed per post.

Of course, the biggest reason to integrate your WordPress site with Threads is that you can do so with very little cost and effort. With an automation plugin like Uncanny Automator, you can set up an automated workflow that posts periodically to your Threads account with no oversight needed.

This is exactly what I do on my own small business website. As new blog posts are published, I share them automatically on Threads.

I also use Automator to share occasional tips about buying and selling secondhand clothes. And in this article, I will show you how to create these types of recipes on your own WordPress site.

Related Posts: Learn how to automatically post your WordPress content to Facebook, LinkedIn, and Instagram.

Step 1: Install Uncanny Automator on Your Website

In this tutorial, I will show you how to use Uncanny Automator to automatically publish from WordPress to Threads.

Uncanny Automator is the best WordPress automation plugin that lets you build automated workflows with no code. It connects with hundreds of plugins and third-party apps, including social platforms like Facebook, LinkedIn, Threads, X, and more.

You can read this complete Uncanny Automator review for more information.

Uncanny Automator

By connecting your WordPress site to Automator, it can automatically generate and share your posts in the background while you create content on your WordPress site. 

Besides Threads, Uncanny Automator also connects directly with OpenAI, which is how we will create shareable, high-converting posts on Threads. The post content will be generated automatically based on guidance we send to OpenAI, with no user oversight needed.

You can use the free version of Uncanny Automator for this tutorial, along with an OpenAI API key. The free plugin license uses a credit system, and if you need a higher posting limit, then Uncanny Automator Pro licenses provide unlimited posting credits. 

First, you need to go to Plugins » Add New Plugin and search for the free Uncanny Automator plugin. Click to install and activate it.

Install Uncanny Automator free plugin

This will then launch the onscreen setup wizard.

You can either continue with a free account or sign up for a paid Uncanny Automator account. Just follow the onscreen instructions to finish the setup.

The Uncanny Automator setup wizard

If you need any help, see this guide on how to install a WordPress plugin.

Step 2: Connect WordPress to Threads

After setting up Uncanny Automator, the next step is to connect Threads to your WordPress site. You must have a Threads account set up and ready to use with Automator.

To connect your Threads account, just go to Automator » App integrations.

Uncanny Automator app integrations

In the list of integrations on the left side of the page, scroll down to ‘Threads’.

You have to click that to see the details for the integration, and then click the ‘Connect Threads account’ button at the bottom of the frame.

Uncanny Automator app integration Threads

You will be directed to Threads to sign in and give Uncanny Automator access to your Threads account.

Just follow the prompts to connect Threads to Uncanny Automator.

After allowing the connection, you will be returned to your website, and you can start using the Threads integration in your Automator recipes.

Step 3: Connect to OpenAI

Next, we need to connect OpenAI, which you’ll use to generate the content for your social posts on Threads.

Note: If you don’t already have an OpenAI account, then you need to create one on the OpenAI website.

While still on the App integrations page in Uncanny Automator, scroll up to ‘OpenAI’ in the menu on the left. Then, follow the ‘Setup instructions’ by clicking the button. This will walk you through the process of connecting your OpenAI account to Uncanny Automator.

Uncanny Automator OpenAI instructions

Make sure that your OpenAI API account has been funded (this is different from a ChatGPT account) and that there’s a balance available so that you can access the latest GPT models. 

After generating and copying your API secret key, paste it into the ‘Secret key’ field and click ‘Connect OpenAI account’.

Step 4: Create a Trigger to Post From WordPress to Threads

Now that the Threads and OpenAI accounts are connected, we can create the automation that will automate our Threads posting. In Uncanny Automator, this is known as a “recipe”.

On my website, one of my objectives with Automator and Threads is to automatically share summaries of new blog posts with my followers on Threads.

So, that’s what we’ll be covering in this recipe example: an automated workflow that is started whenever a new blog post is published (the “trigger”) that generates suitable content for a social post that is then shared on Threads (the “actions”).

Once the recipe is set up, it will run automatically for all future blog posts.

To create this recipe, you need to go to Automator » Add new recipe.

OpenAI add new recipe

Uncanny Automator offers a choice of recipe types.

Because this recipe will start when a WordPress user publishes a new blog post, it will always be linked to an account (the account linked to the user publishing the post). So, choose ‘Logged-in users’ and click ‘Confirm’.

Choose recipe type in Uncanny Automator

Choose a title for the recipe and enter it. For this example, we’ll use ‘Share new blog posts on Threads’.

In the Trigger section, you need to choose ‘WordPress’ because the recipe will run when an activity happens on WordPress (in this case, when a user publishes a post).

Connect WordPress to Uncanny

In the list of available WordPress triggers, you need to choose ‘A user publishes a post’.

Just click on it to select it

WordPress trigger Uncanny Automator

We want to make sure that the recipe runs for blog posts only, so it’s important to narrow the scope of the trigger to the ‘Post’ section in the ‘Post type’ field.

After selecting the post type, simply click ‘Save’ in the trigger.

Choose post type in Uncanny

Step 5: Set Up Actions for Posting to Threads From WordPress

We need to add actions to the recipe next, which define what happens when new blog posts are published.

To get started, click the ‘Add action’ button in the ‘Actions’ section of the recipe.

Add action in Uncanny Automator

The OpenAI action must be added first, because it will generate the content to share on Threads. The order of actions in a recipe is important since we need to use the output of the first action in the second action.

Choose the ‘OpenAI’ integration to see a list of possible actions.

We’ll use the ‘Use a prompt to generate text with the GPT model’.

This is because it provides the most flexibility and model options.

OpenAI action in Uncanny

Inside the OpenAI action, several fields are required, and others are optional.

Here’s an outline of how we’ll use the fields in this recipe:

  • Model: To keep costs down but still return high-quality output, we’ll use the gpt-4o-mini model. OpenAI models change periodically, so you may not see this model as available.
  • Temperature: A value of ‘0.5’ balances creativity with a focused response.
  • Maximum length: Blog posts on many websites are typically under 2,000 words. We’ll use ‘4000’ tokens as a safe upper limit (and also to keep costs a bit lower).
  • System message: We won’t use one for this example.
  • Prompt: These are the instructions we’re sending to the OpenAI model that will yield a response. 

Writing a great prompt is perhaps the hardest part of this recipe. It should include clear instructions for OpenAI so that it understands exactly what to do.

Ensure that it also understands that the response will be posted as-is to social media and won’t be reviewed by a human.

Here’s a basic prompt that we might use for this purpose:

OpenAI prompt in Uncanny

You may also want to see this roundup of the best ChatGPT prompts for bloggers, marketers, and social media for more inspiration.

In the image above, you will notice some dynamic values identified by grey oval shapes. These are called ‘tokens’, and they’re used in Uncanny Automator recipes to add dynamic data.

In this example, we’re pulling in records related to whichever post triggered this recipe. 

Start by adding the prompt you want to use into the ‘Prompt’ text area in the action.

Then, to add the tokens you need, you must click the asterisk (*) icon to the right of the ‘Prompt’ field.

OpenAI token Uncanny Automator

Clicking the asterisk shows all available tokens for the action, grouped by token type.

After adding the post title, you have to move your cursor to the location in the prompt where you want to populate the post body.

Next, click the asterisk again to choose a token, and this time choose ‘Post content (raw)’ from the tokens in the ‘A user publishes a post’ list. 

Once your prompt is set up with your instructions, click ‘Save’ in the action.

That’s all we need to do for that section.

Next, we need the Threads action to take the response from OpenAI and post it to our Threads account.

So, we need to click on ‘Add action’.

Post to Threads with Uncanny

Next, choose the ‘Threads’ integration.

You can just click to select it from the list of integrations.

You have to choose the ‘Create a thread post’ action to add it to the recipe.

Click to select it.

The action requires the ‘Content’ for the post first, so we’ll click on the asterisk again to choose tokens for our post body. 

Since we want to use the OpenAI response primarily in the body, just expand the OpenAI action tokens section and choose the ‘Response’ token.

We also want to include the URL of the post in the body.

So, consider adding some text and then a token for the post URL (from the trigger) to the body as well.

In the ‘Image URL or Media library ID’, you need to click the asterisk to show a list of available tokens.

In the ‘Trigger’ section, expand ‘A user publishes a post’ and choose the ‘Post featured image URL’ token.

Assuming that your post has a featured image, completing this step will include the image in your Threads post.

Now that you’ve followed all these steps, your ‘Create a thread post’ action should end up looking something like this:

Create a Threads post in Uncanny

To save your changes, just click ‘Save’ in the action.

The recipe isn’t live yet, but we have added the triggers and actions that we need for the automation.

To take the recipe live, you need to look for the ‘Draft’ toggle on the right side of the page and click it so that it says ‘Live’.

Once the recipe is live and the switch is a solid blue, all new blog articles will generate posts on Threads automatically!

Make Uncanny recipe live

For example, on my website, this recipe runs about 4 times per month as new posts are published about buying and selling secondhand clothing.

Posting to Threads manually previously took me about 15 minutes per post, so taking 20 minutes to set up this one recipe saves our organization approximately 12 hours per year!

If your business posts more frequently, then this automated workflow can save you even more time and let you invest your time more productively instead.

Bonus: How to Publish Automated, Recurring Posts on Threads

With the Pro version of Uncanny Automator, you get more triggers and actions, unlimited posting, and lots of additional features.

One of those extra features is the Schedule integration, which allows recipes to run automatically on a recurring basis. 

For instance, we use a recipe with the Schedule integration as a trigger to post content automatically on Threads. Every few days, we share thrifting and resale tips on our Threads profile. This allows us to generate content automatically and engage with our users without any extra manual work.

Here’s what the Trigger part of the recipe looks like:

Recipe trigger for recurring posts to Threads on Uncanny

And here is the first part of the Actions section.

It has the OpenAI prompt to create the content for the Threads post.

OpenAI prompt for recurring content on Threads

Finally, this is the final Action.

It actually posts this content to Threads.

Create Threads post

This recipe won’t work for all industries, of course, but it’s a useful example of how you can generate and post social content automatically. This type of recipe will also become a lot more useful when the OpenAI API supports external sources and calling URLs directly. That way you can pull content directly from your website.

We hope this article helped you learn how to automate posting to Threads from your WordPress website. You may also wish to see our post on how to add your social media feeds to WordPress or our expert pick of the best social media plugins for WordPress.

Note: This is a guest post from Kelly at Ultimate Thrifting. She publishes insider tips, tools, and stories to help people make money from thrifting and reselling secondhand clothing.

If you liked this article, then please subscribe to our YouTube Channel for WordPress video tutorials. You can also find us on Twitter and Facebook.

The post How to Automatically Post to Threads From WordPress first appeared on WPBeginner.


from WPBeginner https://ift.tt/8XFQuUT
More links is https://mwktutor.com

Friday, 25 April 2025

How to Require Login to View a Page in WordPress (2 Easy Ways)

“How do I make this page private for members only?” That’s one of the most common questions I get asked by my friends who use WordPress. I remember asking the same question myself when we were building our video membership site at WPBeginner.

Luckily, it’s surprisingly easy to restrict page access to logged-in users in WordPress. You don’t need to hire a developer or learn complex coding. As long as you have the right plugin, you can set it all up in almost no time.

After helping different website owners solve this exact problem, I’ve narrowed it down to 2 foolproof methods that work for any WordPress site. Let me show you how to make WordPress login required to view a page or even your entire website.

Require Login to View a Page in WordPress

When Should You Require Users to Log In to View a Page?

Not every page on your website needs to be locked, but in some cases, requiring users to log in is the best way to protect your content.

Here are a few situations where requiring user login is a good idea:

  • Membership Sites & Online Courses – If you offer exclusive content, tutorials, or training materials, then requiring a login ensures only paying members can access your premium content.
  • Private Client Portals – If you are sharing confidential documents, project updates, or invoices in client portals, then restricting access keeps sensitive information secure.
  • Exclusive Blog Content – Some websites offer premium articles, guides, or research reports to registered users or subscribers only. This can help grow your email list and boost engagement.
  • Community Forums & Discussion Boards – If you run a members-only forum, then requiring login helps keep the conversation private and relevant to your audience.
  • Company Intranet & Team Resources – Businesses often use WordPress to share internal documents, training materials, or announcements with employees. Requiring login for access keeps this information secure.

If any of these apply to your site, then setting up a login requirement is a smart move.

Now, let’s take a look at 2 easy ways to require login to view a page in WordPress. I’ll show you how to do this with both specific pages and all pages.

You can use the quick links below to jump to the method you want to use:

Method 1: Require Login to View a Page in WordPress With MemberPress (For Specific Pages & Posts)

If you’re looking for an easy and powerful way to restrict access to specific pages or posts, then MemberPress is a great choice.

With MemberPress, you can easily control who gets access to your content, whether it’s for members, subscribers, or paying customers. It allows you to create a powerful membership website that fits your specific needs.

In my opinion, it’s the best content protection plugin for WordPress. It makes it super simple to require users to log in before viewing a page.

At WPBeginner, we used MemberPress to create our free video membership website where only subscribers can access the lessons. For details, see this guide on how WPBeginner uses a free video membership site to grow our email list.

Now, to get started, you’ll need to install and activate the MemberPress plugin. For step-by-step instructions, see our tutorial on how to install a WordPress plugin.

Once you’ve activated the plugin, head over to the MemberPress » Settings page to enter your license key. You can get this information in your account area on the MemberPress website.

Adding a license key to your MemberPress plugin

Then, you need to switch to the ‘Payments’ tab to add a payment gateway. The plugin comes with built-in support for PayPal and Stripe.

Go ahead and click the ‘+ Add Payment Method’ button and choose the gateway of your choice. If you need step-by-step instructions, see this tutorial on how to accept Stripe payments in WordPress.

Adding payment methods to a pay-per-view website

Once you have set up your payment methods, you will need to create different membership levels. With each membership, you can specify the level of access a user has for viewing restricted content.

To get started, go to the MemberPress » Memberships page from the WordPress admin panel and click the ‘Add New’ button.

Adding membership levels to your WordPress website

This will open the membership editor, where you’ll need to add a name and description for your membership.

Then, set the price and expiration for your membership plan. For instance, you can select the billing type as recurring or one-time and choose the interval to be yearly, monthly, weekly, or custom.

Creating a paid membership subscription using MemberPress

If you are new to using MemberPress, then you can check out WPBeginner’s ultimate guide to creating a membership website for more instructions.

After you’re happy with your membership plan, click the ‘Publish’ button to store your settings. You can now repeat the process to add as many membership levels as you like.

Next, you have to restrict access to your content so that only logged-in users can view it. To do this, head over to the MemberPress » Rules page from the WordPress dashboard.

Here, click on the ‘Add New’ button at the top.

Adding a new rule to your WordPress membership site

This will take you to a new screen, where you must choose the ‘A Single Page’ option from the ‘Protected Content’ dropdown menu.

Next, enter the slug (URL) of the page where you want to require users to log in before being able to view the content.

Choose content to protect from the dropdown menu

Note: Although using MemberPress is ideal for having granular control over restricted content, you can also choose the ‘All Pages’ option from the dropdown menu to require WordPress login for all pages on your site.

Now, you need to set a condition for the kind of members who can view this page.

To do this, select ‘Member’ from the dropdown menu and type ‘logged in’ in the field next to it. This means that anyone with the Member user role can access this content once they log in.

Configure access condition

After that, scroll down to the ‘Unauthorized Access’ section and choose the ‘Show’ option for the login form from the dropdown.

Then, click the ‘Save Rule’ and ‘Publish’ buttons at the top.

Choose the Show option for the login form

At this point, you’ll need to create the login page that users will see when they try to access your restricted content.

To do this, head over to Pages » Add New Page from the WordPress admin sidebar.

This will open the block editor, where you can customize the page. Once here, I recommend giving the page a descriptive title, like ‘Unauthorized’ or ‘Login Here,’ to make it clear to users why they are seeing the page.

Below the title, you might also want to add a simple message like “You cannot view this page because you haven’t logged in.”

Next, click the ‘Add Block’ (+) button and choose the ‘Login Form’ block.

Add login form block

Wondering where this handy block came from? MemberPress creates it automatically, so you don’t have to. This is just another perk of using the plugin.

Adding the login form here allows users to sign in quickly so they can view your exclusive page.

Once you’ve added the login block to your page, I highly recommend including a link to your main signup or pricing page using the link icon in the toolbar. This gives visitors a clear next step if they’re not members yet.

You can add a short, friendly message along with the link to encourage signups — something like: “New here? Visit our Sign Up Page to choose your membership plan.”

Add sign up page link

Make sure your message is clear, inviting, and matches the tone of the site. If you’re not sure how to insert a link, see our step-by-step tutorial on how to add a link in WordPress.

Then, when you’re happy with your changes, click the ‘Publish’ button in the top right corner of your editor to make your login page live.

Now, copy the URL of your new login page. You’ll need it in a moment.

💡 Haven’t created your signup page yet? Check out our in-depth MemberPress review to learn more about the plugin’s built-in registration features and how they can save you time.

Visit MemberPress » Settings » Pages from your admin sidebar and scroll down to the ‘Unauthorized Access’ section.

Now, simply check the ‘Redirect unauthorized visitors to a specific URL’ option.

Add URL for the unauthorized page

Then, add the URL for the published page that you copied earlier and click the ‘Update Options’ button to save your changes.

Now, when users try to visit your page with exclusive content without logging in, they will be automatically redirected to the ‘Unauthorized’ page.

Here, they can log in to view the locked content on this page.

Login page preview

If a new visitor lands on this page, they can simply click the signup link to be taken directly to your registration or membership plans page.

Now that your ‘Unauthorized’ page is set up with clear login and signup links, it’s easy for visitors to take action — whether they are returning users or new to your site.

But what if you want to go a step further and give new visitors a glimpse of what they’re missing if they don’t sign up? That’s where MemberPress really shines.

It lets you go beyond simply locking pages. You can actually show a snippet or preview of your content using the Excerpts feature.

Creating a custom unauthorized access message for your membership site

This is perfect for teasing blog posts, lessons, or gated resources.

For example, you might display the first few paragraphs of an article to everyone, but then prompt them to register or upgrade their plan to continue reading.

This approach not only improves user experience but can also boost your conversions since visitors get to see the value of your content before signing up.

For more information about this feature, see our guide on how to create paywall options in WordPress (with preview options).

Alternative: While I highly recommend MemberPress, there are other options for creating members-only content. For more recommendations, see my expert pick of the best WordPress membership plugins.

Method 2: Require Login to View All Pages in WordPress With My Private Site (For All Pages & Posts)

If you are looking for a free and simple way to restrict access to your entire website, then using My Private Site is a great option.

This free plugin locks down your WordPress site, requiring users to log in before they can view any page. However, keep in mind that it doesn’t allow you to choose which pages you want to make private, so it won’t be suitable unless you want to require login for your entire website.

First, you need to install and activate the My Private Site plugin. For details, see this tutorial on how to install a WordPress plugin.

After you activate the plugin, you need to head over to the My Private Site » Site Privacy page from the WordPress dashboard and check the ‘Enable login privacy’ box.

Enable login privacy

Then, click the ‘Save Privacy Status’ button to store your changes. Now, users will need to log in to view any page on your website.

Next, go to the ‘Landing Page’ section. This is where you decide where users should be redirected after they log in.

You can choose to return them to the same URL, so they land back on the page they were trying to access, or you can redirect them to the home page. You can also send users to the WordPress dashboard after they log in.

If none of those options work for you, then you can set a custom URL instead. This way, you can redirect users to a specific page, like a welcome page or members-only content area.

Make sure to click the ‘Save Landing Page’ button to store your changes.

Choose the landing page where logged in users will be redirected

After that, switch to the ‘Home Page’ tab.

Here, you can check the ‘Allow site home page to remain accessible without requiring login’ box if you want the home page to remain accessible to everyone.

Then, click the ‘Make Page Public’ button.

Allow home page to be accessible for everyone

Now, when you visit your website, your home page will be visible to everyone.

However, when users try to access any other page without logging in, they will be taken to the default WordPress login page, where they can add their details.

WordPress Login Screen

Looking for more tips and tricks to manage your membership site or user login pages? Check out these useful guides below:

If you liked this article, then please subscribe to our YouTube Channel for WordPress video tutorials. You can also find us on Twitter and Facebook.

The post How to Require Login to View a Page in WordPress (2 Easy Ways) first appeared on WPBeginner.


from WPBeginner https://ift.tt/aHX1MAn
More links is https://mwktutor.com