March has been a busy month across the WordPress ecosystem. We’re excited that WordPress 6.8’s first release candidate (RC1) is now available for testing, and we’ve also seen innovative new features roll out for popular plugins.
AI continues to be a recurring theme — from smarter form calculations in WPForms to StoreAgent’s automated WooCommerce helpers.
There’s also a wave of quality-of-life improvements worth mentioning. Uncanny Automator now integrates with Discord and RSS, AIOSEO added new crawl controls, and WP Simple Pay has made Stripe compliance easier for users.
Whether you’re a developer, site owner, or just like keeping up with the latest tools, there’s plenty to catch up on this month.
ℹ️ WPBeginner Spotlight brings you a monthly roundup of the most important WordPress news, updates, and community happenings. 📅✨
Got something to share? Whether it’s a new product launch, a significant update, or an exciting event, reach out to us through our contact form, and your news could be featured in the next edition! 💬
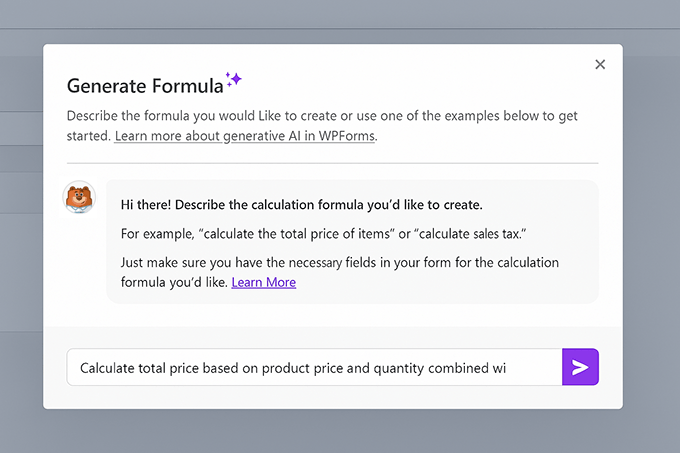
WPForms Adds AI-Powered Calculations for Smarter Forms 🪄
Creating complex calculation forms just got a whole lot easier. WPForms now includes a powerful AI Calculations feature that builds custom formulas for you.
You can chat with the WPForms AI Assistant to create dynamic, real-time formulas in seconds. Just describe what you want to calculate in simple terms — no syntax or logic-building needed.
It works great for eCommerce pricing, event quotes, tuition fees, and more. Simply type in your request, and the AI does the rest.
This new feature builds upon WPForms’ existing AI tools. You can generate entire forms with a single prompt, fill in field choices automatically, and even translate forms into other languages in seconds.
WordPress 6.8 Release Candidate Now Available. Final Release Expected April 15, 2025 🎉
The first Release Candidate (RC1) for WordPress 6.8 is now available for testing. This marks a significant step toward the final release, which is scheduled for April 15, 2025.
This update brings a lot of enhancements aimed at improving site performance, security, and user experience.
Key features in WordPress 6.8 include:
Speculative Loading: This feature predicts and preloads resources that users are likely to access next. This results in faster page load times and a smoother browsing experience.
Enhanced Password Security with bcrypt: WordPress 6.8 transitions to bcrypt for password hashing. This provides improved security against brute-force attacks and aligns with modern security standards.
Block Editor Improvements: Users will benefit from better block interactions, more style controls, and an improved editing experience. These features will make content creation more intuitive and flexible within the block editor.
Developers and testers are encouraged to explore the Release Candidate now. This will allow you to get familiar with the new features and ensure compatibility with themes and plugins ahead of the final release.
StoreAgent Launches AI Assistants for WooCommerce Stores 🤖
Josh Kohlbach, a longtime name in the WordPress and WooCommerce space, has launched StoreAgent — a set of AI-powered tools designed to save store owners time and effort.
Instead of just chatting with AI, StoreAgent acts like a smart co-worker that can handle real tasks for your online store.
These AI agents can write product descriptions, create short summaries, suggest tags, and even monitor your store’s content. They can also summarize reviews and help with customer Q&As, all from inside your WooCommerce dashboard.
Josh says the goal was to go beyond ChatGPT-style chatboxes and build something that feels more like an actual assistant.
StoreAgent is the first step in that direction—a collection of AI agents that do the boring work, help you stay creative, and suggest ways to improve your product pages.
StoreAgent works on a pay-as-you-go credit system, and new users get 500 credits for free. A Shopify version and other platform extensions are also in the works.
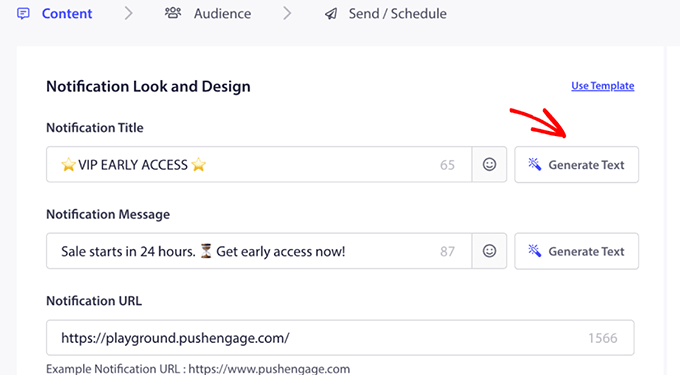
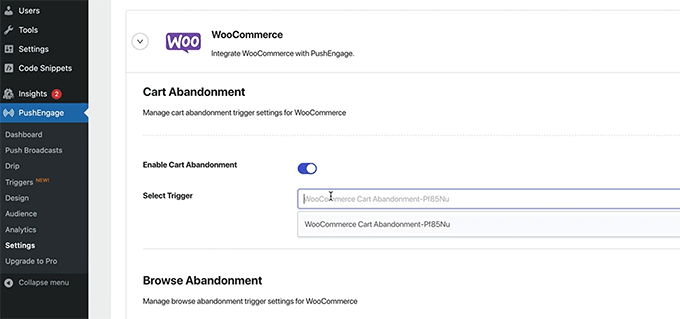
PushEngage Adds AI Campaigns and WooCommerce Order Notifications 🔔
The new AI tool helps you write high-converting push messages in seconds. Just enter your goal, and the system generates optimized text that’s ready to send.
It’s ideal for marketers who want results without spending hours on copywriting. ✍️
The WooCommerce update is even more exciting for store owners. You can now send push alerts for order events like purchases, processing updates, and delivery notifications.
This helps keep customers in the loop, reduces support tickets, and even alerts your team internally.
You can also recover abandoned carts or request reviews automatically with follow-up campaigns. Overall, these new features are designed for store owners who want more repeat traffic and fewer missed sales.
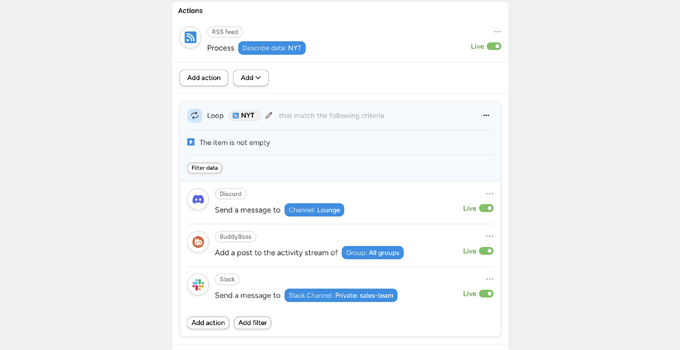
Uncanny Automator Adds RSS and Discord Integrations ⚙️
Uncanny Automator, the most powerful WordPress automation plugin, has added two new integrations. It now allows users to automate actions using RSS feeds and send automated messages straight to Discord channels.
The new RSS integration lets you trigger actions when a feed updates or create a feed from actions on your site. For example, you could automatically post new blog content to Slack, Discord, or a newsletter tool — all without touching a line of code.
On the other hand, the Discord integration is great for online communities. You can set it to send channel messages when users complete a course, submit a form, or place an order.
It’s perfect for membership sites, LMS platforms, or WooCommerce stores that want to keep their audience informed in real time.
Plus, these new features work seamlessly with Automator’s existing integrations. That means you can connect RSS and Discord with tools like LearnDash, WPForms, BuddyBoss, WooCommerce, and more.
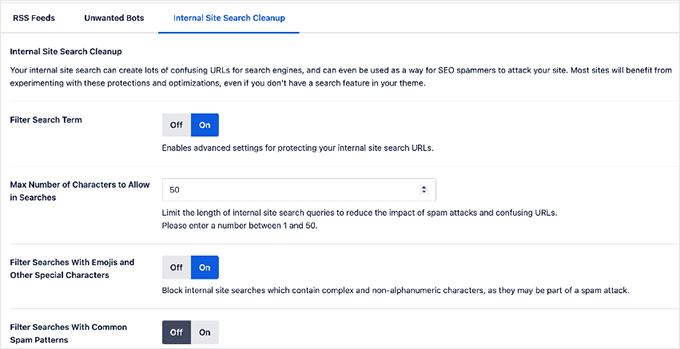
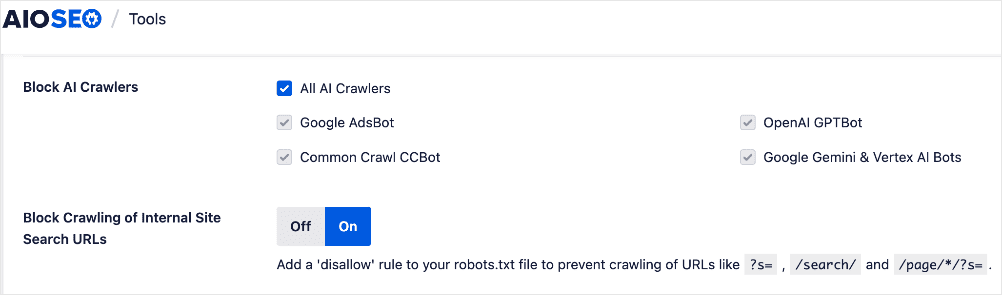
AIOSEO Adds Advanced Crawl Controls for Better SEO 🚀
All in One SEO, the popular WordPress SEO toolkit, just got a major update. This new release brings powerful new tools that help you clean up crawl data, block unwanted bots, and improve your site’s performance.
One standout feature is the upgraded Crawl Cleanup. It lets you limit the length of internal search URLs. You can also remove emojis and spam patterns from search terms. Plus, it can redirect pretty search URLs to raw formats.
You can now also stop search engines from crawling internal search pages entirely. AIOSEO automatically adds disallow rules to your robots.txt file for common search query patterns like ?s= and /search/.
AI Crawlers are on the rise, and all this crawling could affect website performance. AIOSEO’s new bot-blocking feature lets you block known bad bots or AI crawlers that may use your content for training without permission. These settings are built directly into the plugin’s robots.txt editor for easy access.
AIOSEO also updated its Query Arg Monitor to improve how UTM parameters are handled. Now, UTM links automatically redirect using # fragments instead of ?. This setup keeps analytics intact while avoiding duplicate URLs in search results.
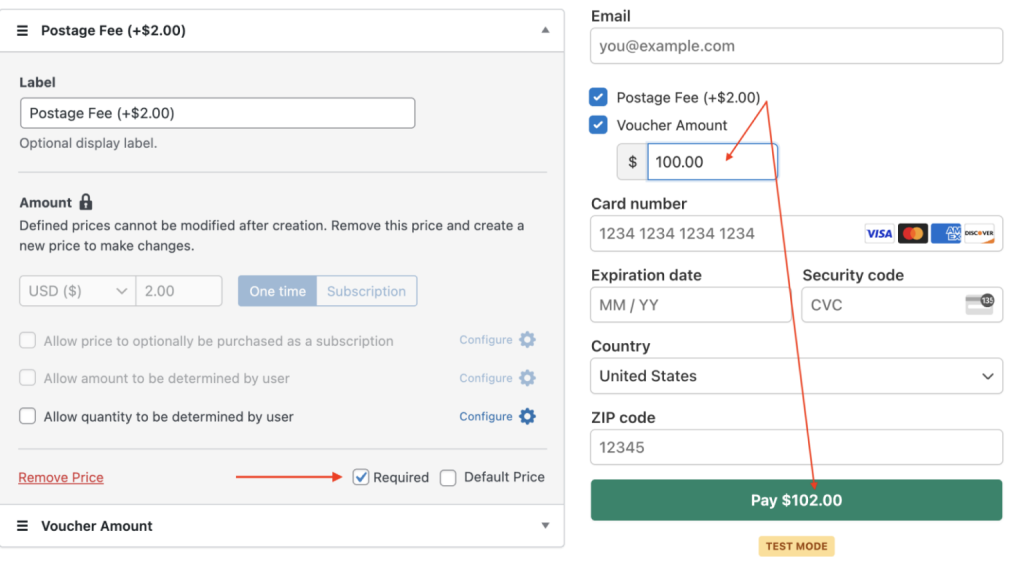
WP Simple Pay just rolled out new features to help WordPress users manage Stripe payments more confidently.
The latest update includes Stripe alerts within the WordPress dashboard, flexible pricing rules, and payment limits to keep your checkout forms clean and compliant.
The standout feature is the in-plugin Stripe account notifications. Instead of checking your Stripe dashboard every day, you’ll now see important alerts directly inside WordPress. These include payment verification issues, compliance reminders, and other account requirements — all in real time.
They’ve also introduced required price options, letting you add mandatory fees or add-ons to any payment form.
This is perfect for things like support fees, booking add-ons, or one-time setup charges. You can build more transparent and flexible pricing models without writing custom code.
And if you’re worried about fraud or regulatory limits, there’s a new feature for setting custom amount maximums. You can cap donation sizes, limit gift card values, or prevent accidental overpayments — all directly from the visual payment form builder.
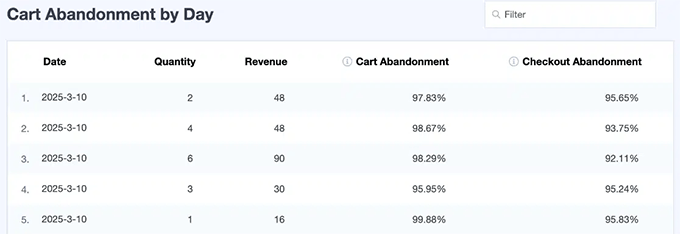
MonsterInsights Adds Cart Abandonment Reports to Help You Recover Lost Sales 📈
MonsterInsights, the #1 Google Analytics plugin for WordPress, has introduced new Cart Abandonment reports that give store owners more visibility into what’s being left behind.
Instead of guessing which products are getting dropped at checkout, you can now see exactly what’s being abandoned — and when.
The new reports are split into two key sections. The Products report shows which items are being abandoned, how often, and how much revenue is potentially being lost.
On the other hand, the Daily report helps you spot trends by showing peak abandonment times and revenue impact by day.
It’s a helpful tool for store owners, marketers, and product managers who want to fine-tune their strategy and recover missed sales. The insights can guide inventory planning, promotional timing, and even design changes at checkout.
If you’re using MonsterInsights Pro, just update to the latest version and head to eCommerce » Cart Abandonment in your WordPress dashboard to start exploring your reports.
In Other News 🗞️
WPConsent, a powerful privacy compliance plugin for WordPress, now supports Google Consent Mode V2. It can now automatically adjust Google tags based on user consent to improve privacy compliance. The update also introduces improved consent log management by allowing easy export of records in CSV format.
The popular WordPress page builder plugin, SeedProd, has added 15 new industry-specific themes. They have also upgraded their Image Carousel block with support for custom headers, subheadings, and clickable buttons.
WooCommerce is preparing Product Editor v3 to align with WordPress Data Views and Forms. They also advise developers to pause beta work for now.
The popular WordPress backup and migration plugin, Duplicator, has introduced new features to streamline backup management. These include automatic backup log cleanups and one-click deletion options.
UpdraftPlus, a leading WordPress plugin developer, have expanded their portfolio by acquiring Burst Statistics, a privacy-friendly analytics plugin. This acquisition follows UpdraftPlus’s commitment to improving website management tools while prioritizing user privacy.
OptinMonster helps you grow your email list and boost conversions with high-converting popups and campaigns. Use smart targeting and a drag & drop builder to show the right message to the right person at the right time — no coding needed.
Hostinger, the popular WordPress hosting company, has launched Horizons. This AI-powered web app builder enables users to create custom web applications without coding knowledge.
HeroThemes has launched the Heroic KB Chrome Extension, which allows users to access their knowledge base directly from the browser toolbar. This tool is designed to enhance productivity by allowing customer support teams to quickly search and view knowledge base articles without switching tabs.
The popular WordPress code snippets plugin, WPCode, has introduced a Snippet Shortcode Finder. It allows users to locate where specific shortcodes are used across their WordPress site. Additionally, the update improves the WooCommerce integration by allowing users to run code snippets based on cart contents.
Formidable Forms has introduced a GDPR Compliance field, which makes it easier to get explicit user consent in WordPress forms. This feature makes sure that data collection aligns with privacy regulations.
Envira Gallery has added a Search Addon and a Vertical Focus Layout to improve image browsing and presentation. The search feature helps users find photos quickly using tags or descriptions. Meanwhile, the new layout highlights a featured image alongside a scrollable thumbnail strip for a more immersive gallery experience.
Let us take the stress out of maintaining your WordPress site. With our WordPress Site Maintenance service, we handle everything — from backups and speed checks to ongoing security and updates. You stay focused on your business, while we keep your site in top shape.
Wholesale Suite has introduced a new interface for its WooCommerce Invoice System, which allows store owners to manage invoices directly within the Payments tab. This update streamlines the invoicing process by grouping invoice tracking, payment status monitoring, and PDF invoice downloads in a single, user-friendly location.
Smash Balloon has introduced integrations with WPForms and Formidable Forms, which allow users to collect and display customer reviews directly on their WordPress sites. This feature lets users make custom review submission forms and provides greater control over user-generated content.
WP Mail SMTP has introduced push notifications that alert users immediately on their devices when emails fail to send. This feature makes sure that critical alerts are not missed.
WPForms has introduced File Upload Restrictions, which lets users control access to files uploaded via forms. This feature allows for restrictions based on WordPress user roles, individual users, or password protection.
New Plugins
WPConsent – A lightweight yet powerful WordPress plugin for managing user consent and complying with privacy laws like GDPR and CCPA. It supports multiple consent types and integrates with popular cookie plugins.
Duplicate Post by AIOSEO 🔥 – Finally, a powerful Duplicate Post plugin for WordPress that allows you to easily duplicate posts and pages with a single click. It also features scheduled revisions for seamless content updates without affecting the live version.
ClassifAI – A free plugin that uses AI to automate tasks like content tagging, image labeling, and more. It integrates with ElasticPress, WordPress core features, and many popular plugins.
Remove Empty Shortcodes – A simple plugin that automatically strips out empty shortcodes from post content to keep things clean and error-free without making changes to the database.
That’s a wrap for this month’s WPBeginner Spotlight! We hope you enjoyed catching up on the latest news and updates from the WordPress ecosystem.
Got a product launch, feature update, or cool project you think we should cover? Send us a message, and we might feature it in our next edition.
We’ll see you again next month with another round of WordPress news. Thanks for reading and being part of the WPBeginner family!
If you liked this article, then please subscribe to our YouTube Channel for WordPress video tutorials. You can also find us on Twitter and Facebook.
We used to obsessively check Google Analytics multiple times a day to see if anything important had changed on our blog. It was time-consuming and, honestly, pretty inefficient.
That’s when we discovered how to set up custom email alerts – and it completely changed how we monitor our website performance.
Custom email alerts give you real-time notifications, delivered straight to your inbox. This way, you can see all of the important changes on your WordPress site as soon as possible.
Google Analytics 4 (GA4) offers built-in custom alerts, but setting them up can be tricky. That’s why we use MonsterInsights on WPBeginner because it allows you to configure everything in just a couple of clicks.
In this article, we’ll walk you through 2 methods for how to get a custom email alert in Google Analytics. One uses GA4’s native features, and the other uses MonsterInsights for a more user-friendly approach. 🙌
What Are Custom Email Alerts in Google Analytics? And Why Do You Need Them?
Imagine waking up one morning to find out that your website traffic has suddenly dropped. Or your social media post went viral overnight, bringing in thousands of new visitors.
Wouldn’t you want to know right away? That’s exactly what custom email alerts in Google Analytics (GA4) do for you! 🚨
These alerts are called Custom Insights in GA4. They automatically notify you of big changes in your website data, so you don’t have to check analytics all the time. GA4 refers to these changes as anomalies.
With Custom Insights, you can create alerts for key anomalies, like:
These alerts help you act fast, whether to fix an issue or make the most out of a new opportunity.
How to Get a Custom Email Alert in Google Analytics
Now that you know the benefits of custom email alerts in Google Analytics, let’s go over two ways to set them up.
If you use WordPress, then the easiest option is the MonsterInsights plugin. It sets up alerts for you so you don’t have to deal with complex settings. Plus, you can manage everything right from your WordPress dashboard.
If you don’t use WordPress or prefer a hands-on approach, then you can also set up alerts manually in Google Analytics. This method takes more steps but works for any website.
Feel free to use these jump links to go to your preferred method:
Note: You will need a Google Analytics account before following either of our tutorial methods. If you don’t have one yet, then please see our guide on how to install Google Analytics.
Method 1. Get Custom Email Alerts Using a Google Analytics Plugin
Navigating Google Analytics can be confusing at times. If you’re looking for an easy way to create custom Google Analytics email alerts, then this method is for you. That said, do note that this will only work for WordPress users.
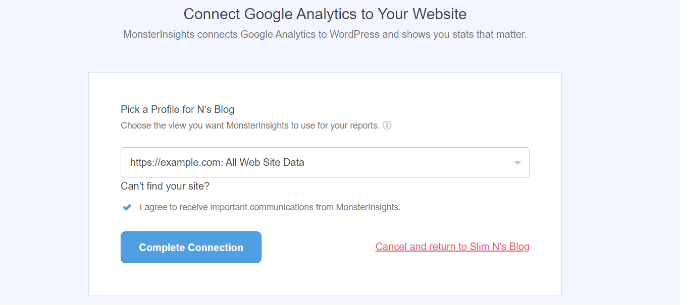
Here, we’ll be using MonsterInsights, which is the best Google Analytics plugin on the market. It brings Google Analytics 4 (GA4) right into your WordPress dashboard and makes reports much easier to understand for beginners.
Plus, it has the Exception addon that automatically spots unusual spikes or drops in your data. With this addon, you’ll always be in the loop without the extra work!
✋ At WPBeginner, we trust MonsterInsights to track everything across our website, including our form, button, and referral link conversions. Learn more about the tool in our complete MonsterInsights review and see why we love it!
Step 1. Install and Activate the MonsterInsights Plugin
First, let’s create a MonsterInsights account. On the website, you can simply click on the ‘Get MonsterInsights Now’ button and choose your plan.
After that, simply follow the instructions for the checkout process.
✏️ Quick note: In this tutorial, we’re using the MonsterInsights Agency version since it includes the Exceptions addon (which we’ll need in Step 3). However, if you’re just getting started, then the free MonsterInsights version is a great option to try out!
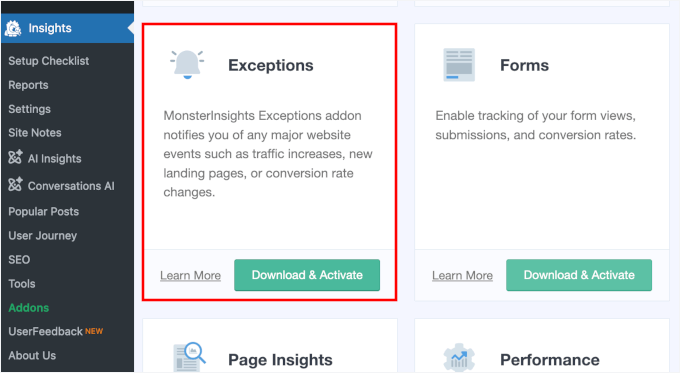
Step 3. Set Up the MonsterInsights Exceptions Addon
In this step, we’ll add the Exceptions addon to track 16 types of unusual activity, such as sudden drops in traffic, conversion spikes, unexpected bounce rate changes, and more!
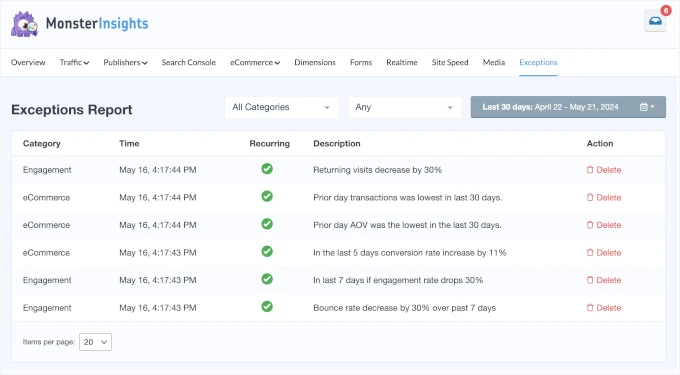
Whenever something ‘exceptional’ happens, you’ll get a detailed record in your Exceptions report. This means you can spot issues early and take action before they turn into bigger problems.
To get the Exceptions addon set up, let’s go to Insights » Add-ons.
In the ‘Exceptions’ box, you can click the ‘Download & Activate’ button. Then, simply click on the switch when it appears.
Upon activation, the addon will start tracking irregularities.
You can see the report by navigating to the dedicated ‘Exceptions’ tab from your ‘Reports’ page.
Note: Not using a MonsterInsights Agency account? No worries – you can still monitor your site’s key metrics right from your WordPress dashboard. 💡
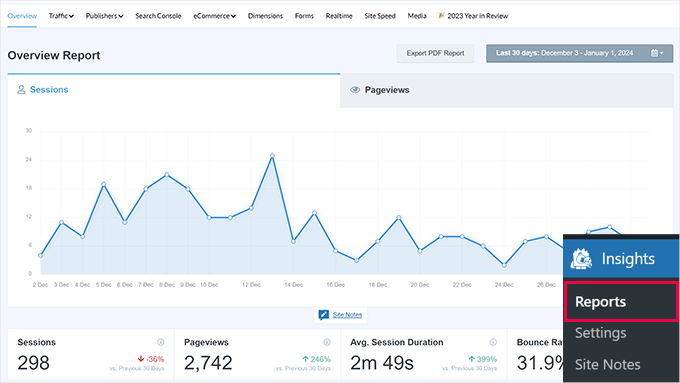
Just go to the Insights » Reports page, where you’ll find useful insights on your website’s traffic, campaigns, and site speed, for example.
Step 4. Get MonsterInsights Exception Alerts
Now, it’s time to set up email alerts to keep track of sudden shifts on your site.
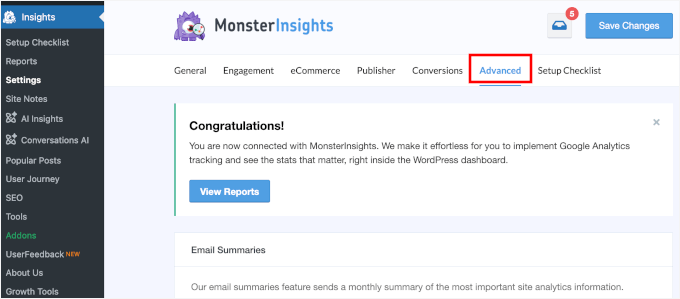
To do this, you can head over to Insights » Settings » Advanced.
From here, let’s locate the ‘Exception Alerts’ section.
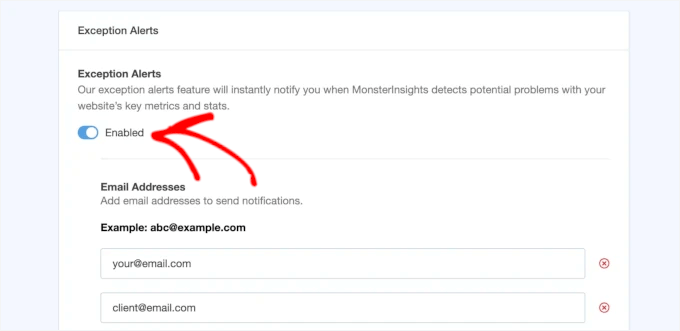
To get alerts, simply toggle the switch to ‘Enabled.’
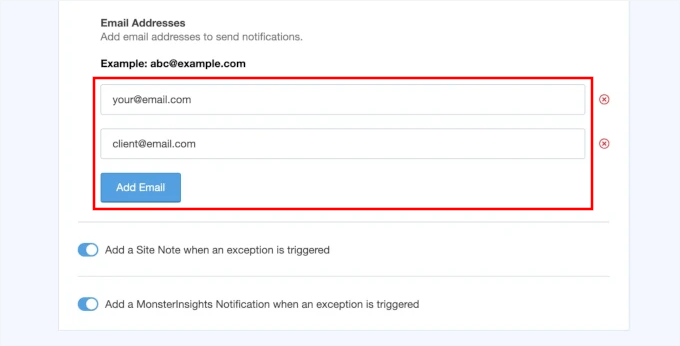
Next, you can add the email addresses that should receive notifications.
You can enter up to 5 email addresses. Just click the ‘Add Email’ button to include more.
With that done, you’ve successfully set up Exception Alerts using MonsterInsights. Note that you’ll start getting alerts one day after an exception is detected.
📌 Expert Tip: Once your notification emails are set up, it’s a good idea to send a test email to make sure everything is working smoothly. If you run into any issues, then you can follow our guide on how to fix WordPress not sending emails.
Across our company, we use WP Mail SMTP to make sure our emails reach users’ inboxes and not the spam folder. Check out our full WP Mail SMTP review to see all the features!
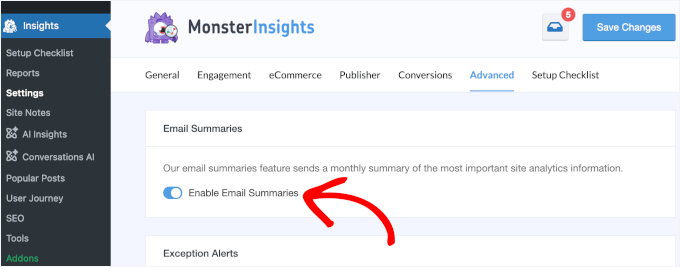
Bonus Step: Set Up Weekly Email Summaries
With MonsterInsights, you can also receive weekly email summaries to track your WordPress site’s performance.
You can start by enabling the ‘Email Summaries’ feature under Settings » Advanced.
Next, you’ll have to add email addresses to receive notifications and customize the email header for your alerts.
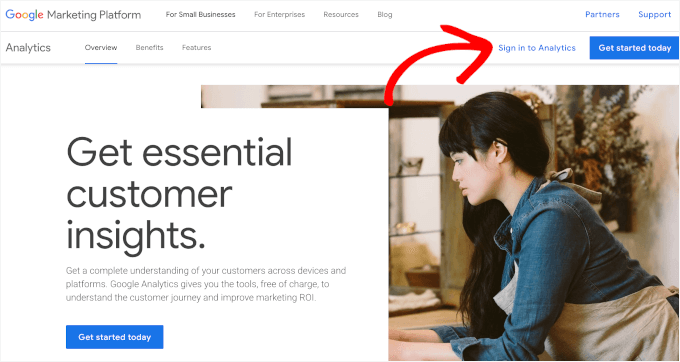
Method 2. Get Custom Email Alerts in Google Analytics
With this method, we’ll show you how to set up email alerts directly in the Google Analytics dashboard.
This approach works for any website, making it a great option if you don’t use WordPress or prefer to manage everything inside GA4. However, it requires more manual setup, which takes more time and effort.
Before we start, let’s look at the 2 types of GA4 insights you can use for tracking important changes:
Automated Insights – Google’s machine learning helps identify trends and unexpected changes for you.
Custom Insights – You define the conditions to track exactly what matters most to your business.
Simply click on the ‘Sign in to Analytics’ button and enter your credentials.
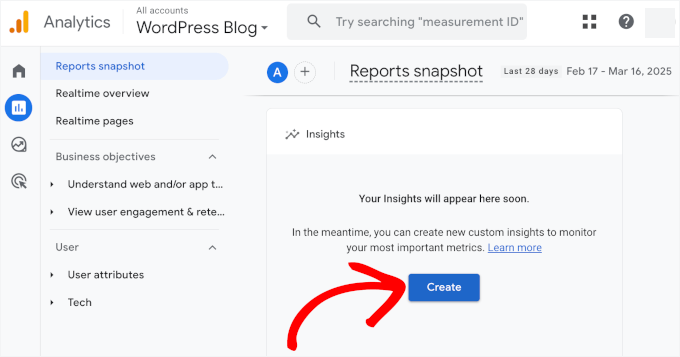
From here, let’s go to the ‘Reports’ tab.
Scroll down to the ‘Insights’ section and click on the ‘Create’ button.
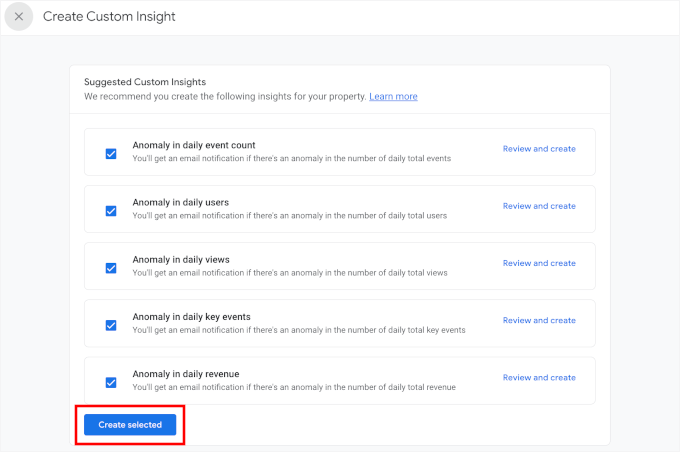
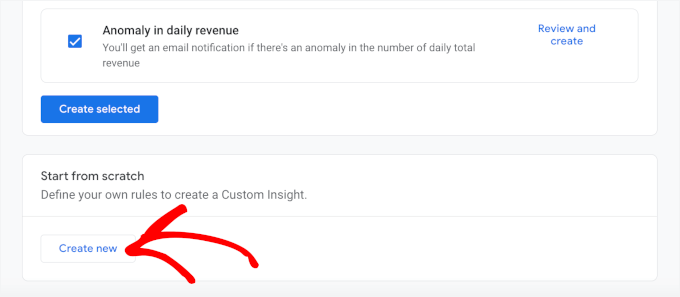
On the next screen, you’ll see Google’s suggested alerts. These include unusual activity related to daily events, users, views, and revenue.
Here, you can check the ones you want. For example, we checked all the boxes like this:
With that done, go ahead and click ‘Create selected’ to activate your suggested insights.
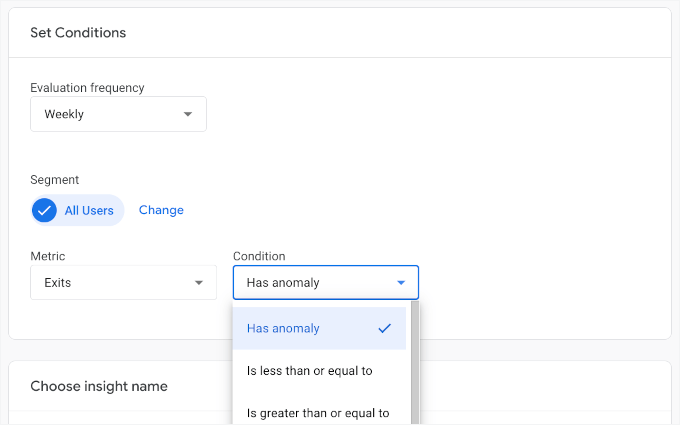
Step 2. Set Up Custom Google Analytics Insights
If you scroll down this page, you’ll see that Google Analytics lets you create custom alerts from scratch or use suggested insights.
If you want full control over what triggers an alert, then click ‘Create new’ under the ‘Start from scratch’ section. This lets you set your own conditions based on the metrics that matter most to you.
Expert Tip: You don’t have to choose between custom and suggested insights. You can use both to stay on top of key changes in your data! 🚀
Next up, you’ll need to set your conditions:
The ‘Evaluation frequency’ can be hourly, daily, weekly, or monthly. This means how often Google Analytics will look at the data to see if it matches the conditions you set up.
‘Segment’ lets you focus on a specific group of visitors for your alert.
‘Metric’ allows you to set factors to track. For example, you might focus on conversions, page views, and revenue.
The ‘Condition’ dropdown is where you set a trigger for your alert. This might be an anomaly (something that is higher or lower than usual) or a specific number for the metric you choose.
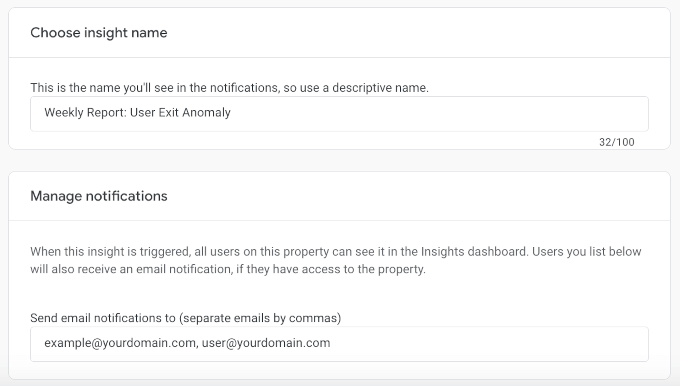
After defining your rules, you can name your alert.
This is the name that will appear in your email notifications, so make sure it’s obvious and easy to refer to.
Then, go ahead and enter your email addresses for notifications.
Once everything looks good, don’t forget to click the ‘Create’ button in the top right corner to save your custom alert.
And that’s it – you’ve set up custom email alerts in Google Analytics!
Step 3. Manage Google Analytics Insights Alert
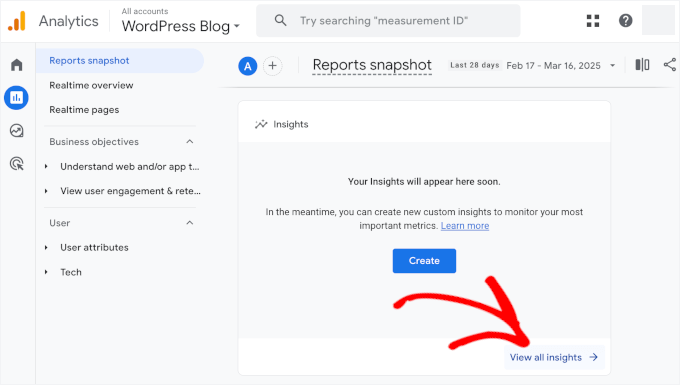
In this step, we’ll show you how to manage your custom Google Analytics insights alerts. This will enable you to turn alerts on and off, edit them, and delete them.
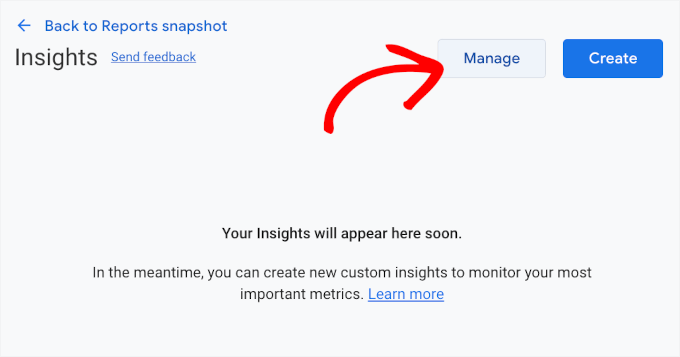
To do this, let’s navigate to Insights » View all insights from your ‘Reports snapshot’ screen.
Once inside, you can click the ‘Manage’ button.
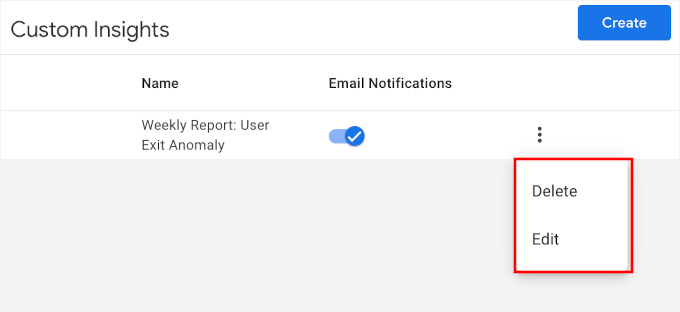
This will open a slide-in menu to see all your custom alerts.
Here, you can toggle email notifications on or off as needed.
You can also click the three dots to edit or delete an alert.
And if you want to create more alerts, simply use the ‘Create’ button and repeat the process.
Further Reading: More Analytics and Tracking Guides
Want to dive deeper into analytics and tracking? Here are more helpful guides to level up your insights and help you make data-driven decisions:
Many WooCommerce store owners make the mistake of enabling every available payment method. But we’ve learned that having too many payment options can actually confuse your customers and even lead to abandoned carts.
While running WooCommerce stores, we’ve found that strategically limiting payment options can improve conversion rates and streamline your checkout process. For example, you might want to disable certain payment methods based on shipping locations, product types, or even order totals.
The good news is that you can use the WooCommerce default settings or a plugin to control which payment methods your customers can use. You just need to know where to look and which settings to adjust.
In this guide, we’ll show you several proven ways to disable payment methods in WooCommerce. We’ll cover many different scenarios, whether you want to remove payment options completely or conditionally hide them based on specific rules.
When to Disable WooCommerce Payment Methods 💳
Managing payment gateways in WooCommerce isn’t just about offering as many payment options as possible. Sometimes, you need to restrict payment methods to improve your business operations and avoid high transaction fees.
Limiting available payment methods can even improve the customer journey because offering too many choices at checkout can be confusing.
In our experience, keeping it simple with just Stripe for credit cards and PayPal works best for most international stores.
However, if you’re serving specific markets with local payment preferences, then you might need more control over when and how to display different payment options.
Here are common scenarios when you might want to have a WooCommerce payment disabled:
Cart Total – For instance, you may require specific payment methods for larger orders. This can help reduce transaction costs for payment gateways that charge percentage-based fees. Or, you might disable cash on delivery for high-value orders.
Customer Location – Some payment gateways only work in specific regions. In that case, you may need to hide them from customers who live outside of those areas. Similarly, some charge more in specific regions, so you might not want to offer them in certain regions.
User Role – You can set up payment gateways based on user roles, such as offering wholesale customers different payment options than regular buyers. Again, this can be useful to reduce transaction fees or risk for orders with higher price tags.
Special Periods – You might need to change payment options during holiday sales events, especially if those payment methods could slow down order processing.
All that said, let’s look at five different ways you can disable payment gateways in your WooCommerce store.
You can use the quick links below to skip to your preferred method:
Option 1: Disable Payment Methods Using WooCommerce Settings (For All Customers)
WooCommerce actually has built-in settings to disable payment methods, so you won’t need to install a WooCommerce plugin for this approach. That said, the steps here will depend a little on what you want to do.
We’ll show you how to disable your main payment methods, PayPal-specific options, and Stripe methods. That way, all your bases are covered.
Please note that we recommend only following one of the methods in this section if you want to completely disable a payment option for all customers.
That’s because these methods don’t allow you to hide payment options based on specific criteria like user roles or product categories.
How to Disable Your Main Payment Methods
You can disable one of your main payment methods (such as an entire payment gateway or direct bank transfers) directly in your WooCommerce settings.
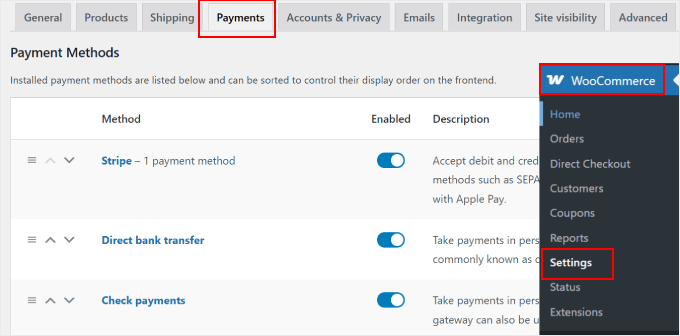
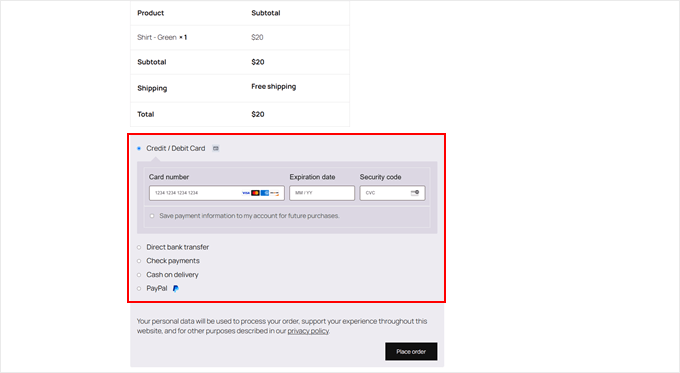
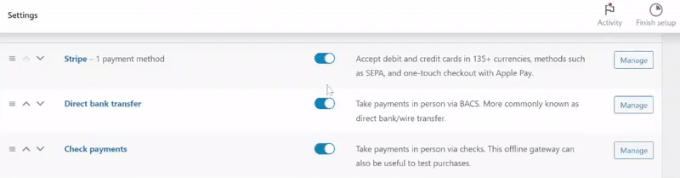
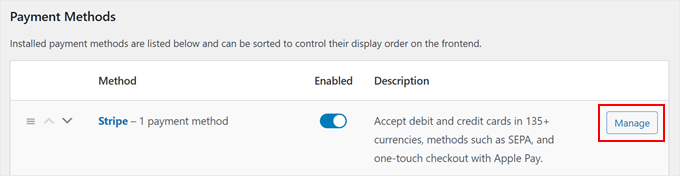
Simply go to WooCommerce » Settings. Then, navigate to the ‘Payments’ tab. Once there, you’ll see all available payment gateways in WooCommerce.
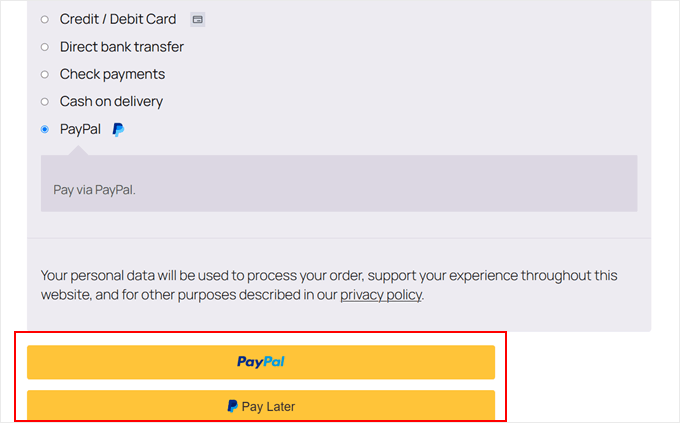
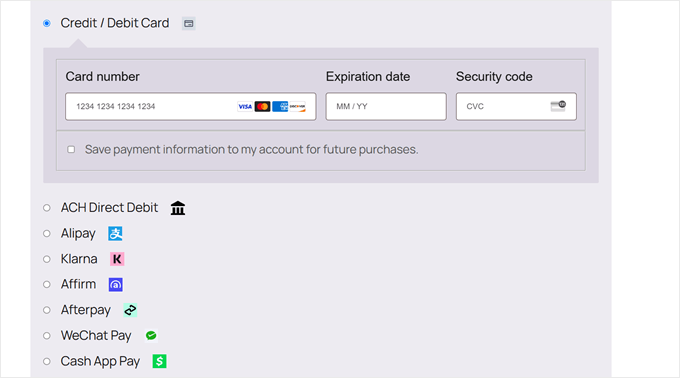
We have enabled the following payment methods: Stripe for credit and debit cards, direct bank transfer, check payments, cash on delivery, and PayPal.
Here’s what the checkout looks like to customers when all of those options are active:
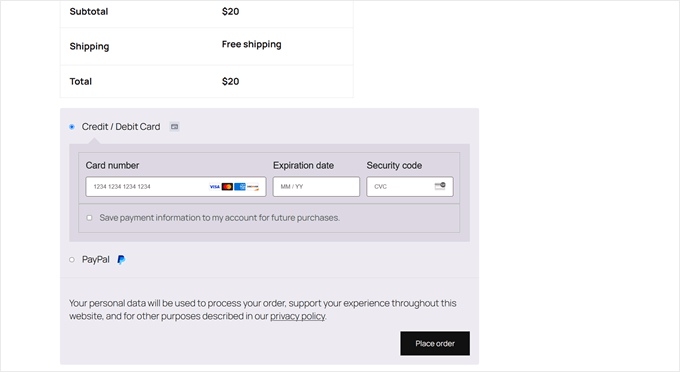
To disable a WooCommerce payment, simply click the toggle switch under the ‘Enabled’ column for any active payment method.
Now, the payment option will no longer appear on your checkout page.
If you decide you want to enable some of those payment methods again later, you can always return to this page to reactivate them.
When you visit your checkout page, you should no longer see the disabled payment methods:
How to Disable PayPal’s Alternative Payment Methods
If you have multiple payment methods enabled via PayPal, then you can easily restrict them, too. For instance, your business might not be able to accept Venmo payments, so you may want to turn off this option.
First, you can use the same method we discussed above.
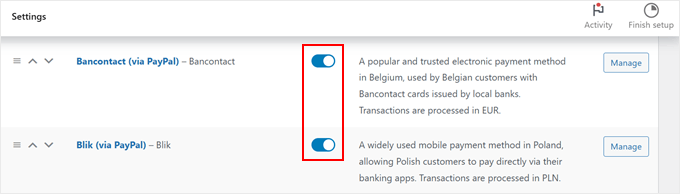
Go to WooCommerce » Settings»Payments. Then, you can click the toggle switch for any payment method labeled ‘(via PayPal).’
Alternatively, you can click the ‘Manage’ button next to the PayPal option.
This will take you to the PayPal settings page.
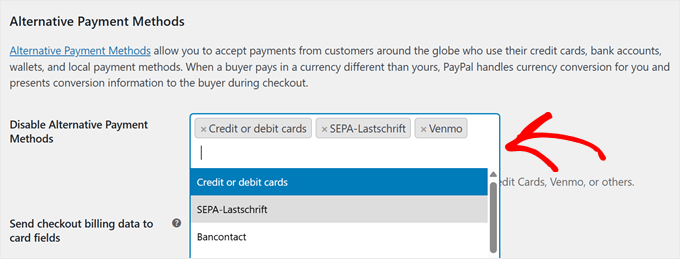
On the PayPal settings page, scroll down until you find the ‘Alternative Payment Methods’ section.
In the ‘Disable Alternative Payment Methods’ field, type in the specific WordPress payment methods you want to hide from your checkout page.
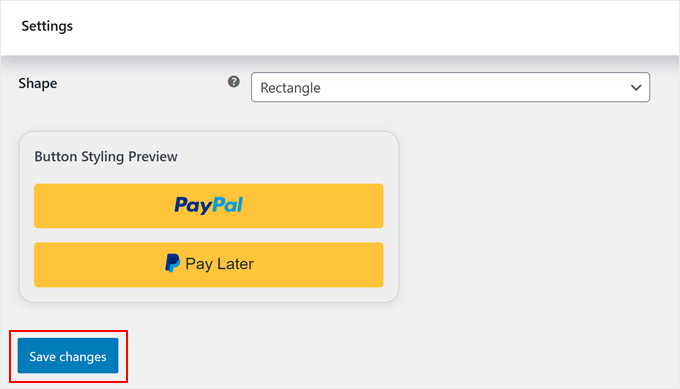
Once you’ve made your choices, scroll down and click ‘Save Changes.’
Now, your chosen payment methods will be disabled.
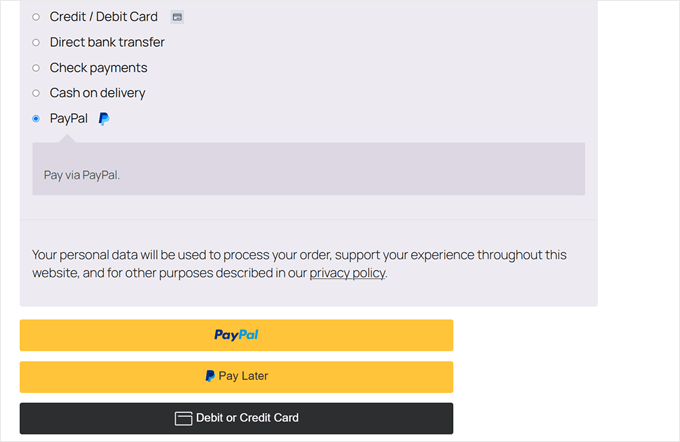
At this stage, you can go to your checkout page to see if your alternative payment methods have disappeared.
Here’s what happens if we disable the credit or debit cards option as a PayPal alternative payment method:
👋 Note: PayPal automatically shows location-specific alternative payment methods to your customers. For example, customers in the Netherlands will see iDEAL as a payment option, while customers in other regions will only see payment methods relevant to their location.
How to Disable Payment Methods Enabled by Stripe
When using Stripe as your payment gateway in WooCommerce, it automatically enables multiple payment options. These include credit cards, debit cards, and even some local payment options based on your region, like Alipay and WeChat.
To improve the customer experience, you might want to restrict payment methods to only those your customers actually use.
This way, people don’t get confused or accidentally run into issues after choosing a method that won’t work for them.
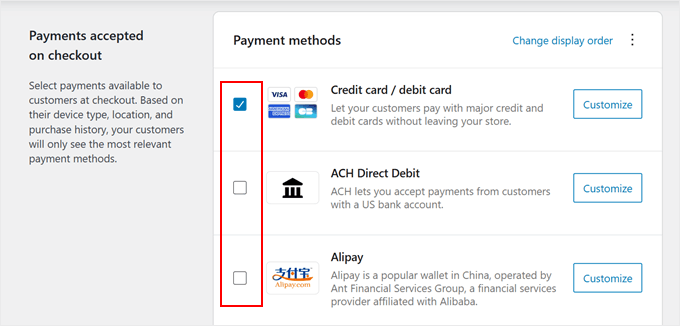
To do this, go to WooCommerce » Settings»Payments. Then, click the ‘Manage’ button next to the Stripe option.
On the next page, scroll down to the ‘Payments accepted on checkout’ section.
Here, you can disable payment methods by unchecking the ones you don’t want to offer.
Stripe offers numerous payment gateways in WooCommerce, including Apple Pay, Google Pay, Alipay, Klarna, Affirm, and AfterPay.
Be sure to only enable the specific payment options that make sense for your business and your customers.
Once you’ve selected your preferred payment methods, scroll down and click ‘Save Changes.’
👋 Note: Stripe displays payment methods based on your store’s currency settings. For example, SEPA Direct Debit will only appear as a payment option when your store is set to use EUR (Euro) as its currency.
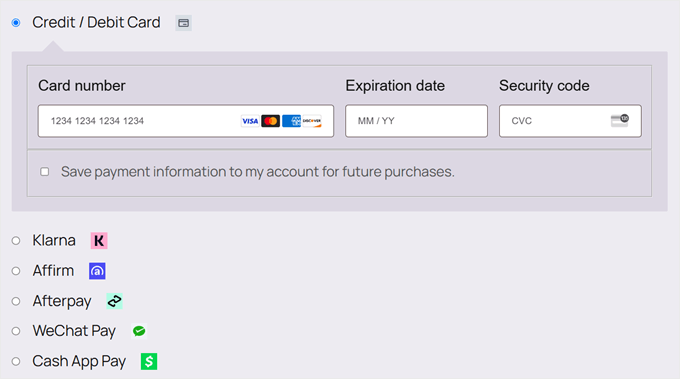
Here’s what our checkout page looks like after ACH Direct Debit and Alipay are disabled:
Option 2: Set Up Conditional Payment Gateways With a Free Plugin (Easy + Customizable)
Have you ever wanted to show different payment options to different customers? That’s exactly what conditional payment gateways do – they show or hide payment methods based on specific “if/then” rules.
For example, you might want to:
Disable cash on delivery for international customers (because this isn’t operationally possible).
Disable bank transfers for digital products (since these items are delivered instantly, this can help prevent fraud).
Disable certain payment options for larger orders (to reduce transaction fees).
This is perfect for businesses like international retailers that need different payment methods by country, luxury brands that want secure payment options for high-value purchases, and wholesale stores that offer special payment terms for bulk buyers.
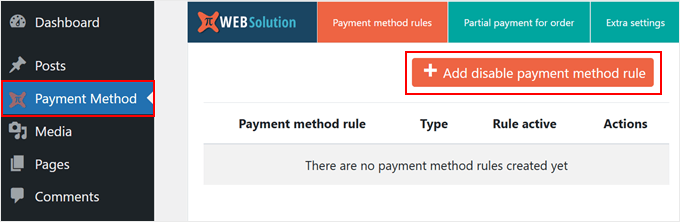
The free Disable Payment Method for WooCommerce plugin makes setting up conditional payment options easy and free. You can create rules based on shipping zones, cart totals, user roles, time of day, and more, without touching any code.
First, you need to install and activate the plugin. If you’re new to this process, check out our step-by-step guide on how to install a WordPress plugin for beginners.
After you activate the plugin, go to ‘Payment Method’ in your WordPress admin area. Then, click the ‘+ Add disable payment method rule’ button to start customizing your WooCommerce payment methods.
Now, let’s explore the basic settings. At the top, you’ll find the ‘Status’ switch. This activates or deactivates each rule to disable payment methods.
Under ‘Rule type,’ you can choose between two options: disable specific payment methods or charge extra fees for payment processing. For this tutorial, we’ll pick the first option.
That being said, the second option is great if you want to pass processing fees for certain payment methods – for example, adding a small fee for credit card payments.
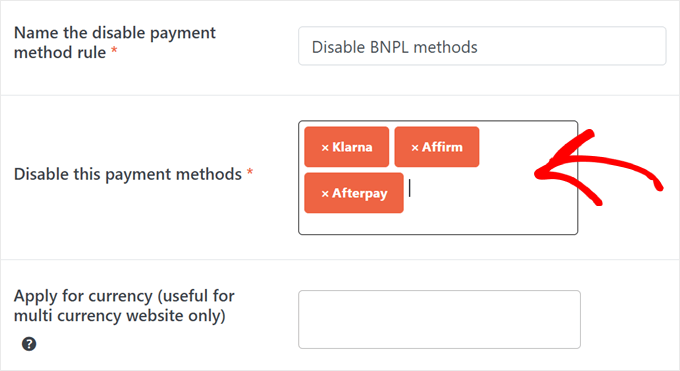
Next, let’s give the rule a descriptive name. Using clear, descriptive names for your payment rules makes it easier to manage multiple conditional payment settings later.
For example, if you’re disabling Buy Now Pay Later options, you might name it ‘Disable BNPL methods.’
Now, in the ‘Disable this payment methods*’ box, select which options you’d like to disable.
In the box below that, you can also optionally disable payment methods for specific currencies, which is great if you run a multi-currency WooCommerce store. This option is particularly useful for international stores where certain payment gateways only work with specific currencies.
In our example, we’ll disable payment gateways like Klarna, Affirm, and Afterpay, as these are all Buy Now Pay Later services.
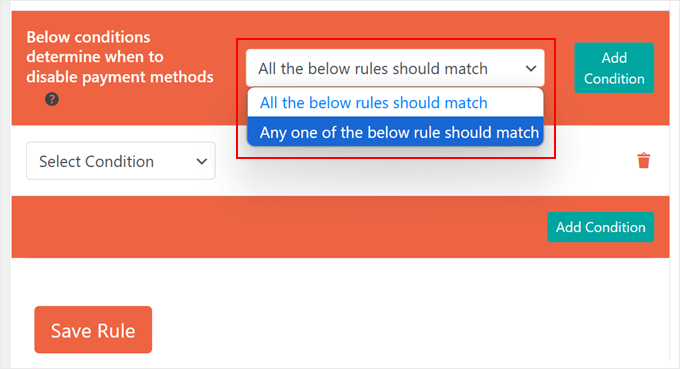
Moving down, you’ll find the section for setting up conditional payment rules. In ‘Below conditions determine when to disable payment methods,’ you have two options.
‘All the below rules should match’ means that every condition you set must be true for the payment method to be disabled. For example, if you set conditions for both cart total and user role, then customers must meet both conditions before the payment method disappears.
‘Any one of the below rule should match’ means the payment method will be disabled when just one condition is met. So, if you set rules for either cart total or user role, meeting just one of these conditions will hide the payment option.
For this example, we will use the first option.
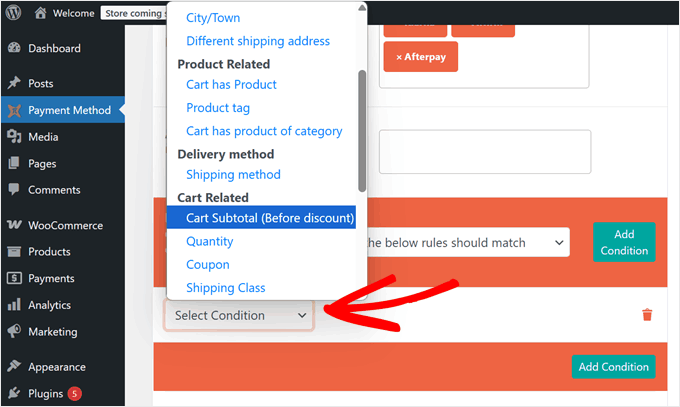
Now, click on the ‘Select condition’ dropdown menu. Here, you’ll find several categories to create conditional payment rules, including location, product, delivery method, cart total, date and time, and user role.
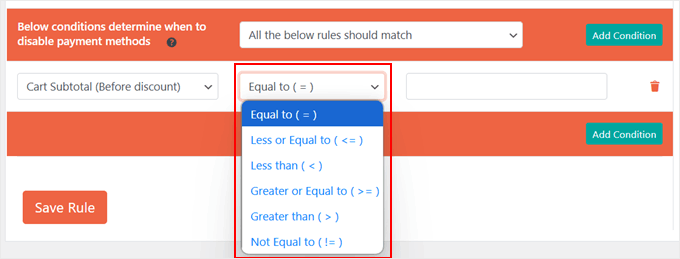
As an example, let’s set up a payment gateway for specific cart values. We’ll choose ‘Cart Subtotal (Before Discount)’ from the ‘Cart Related’ category to disable payment methods like Buy Now Pay Later options when orders exceed a certain amount.
Next, you can choose whether to disable payment methods when the condition is:
Equal to (=)
Less or Equal to (<=)
Less than (<)
Greater or equal to (>=)
Greater than (>)
Not equal to (!=)
In our example, we’ll use ‘Greater or equal to’ since we want to disable certain payment gateways in WooCommerce when orders reach or exceed our threshold amount.
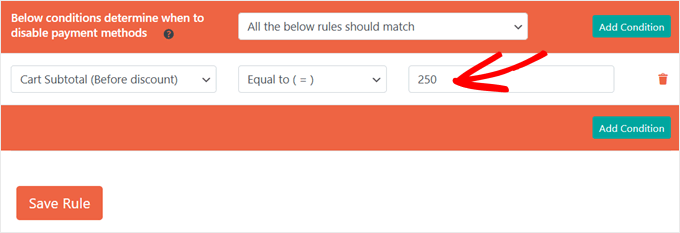
Finally, enter your target value in the last field.
In our case, we’ll type in ‘250.’ This means that when a customer’s cart reaches $250 or more, WooCommerce will disable the Buy Now Pay Later payment methods we selected earlier.
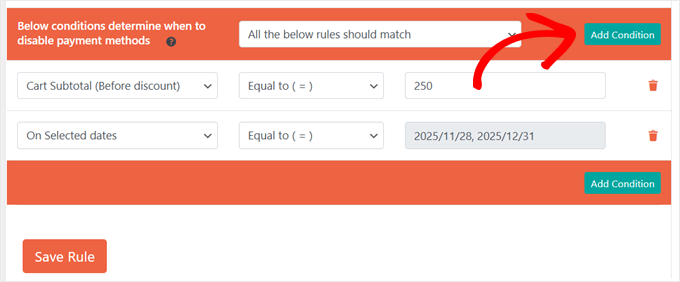
One thing we love about this plugin is that you can create complex conditional payment rules by combining multiple conditions.
For example, you could restrict payment options based on cart totals and specific dates. This would work perfectly for managing payment methods during holiday sales periods.
To add another condition to your WooCommerce payment rules, simply click the green ‘Add Condition’ button. After that, follow the same steps.
Each new condition helps you fine-tune exactly when and how payment methods appear on your checkout page.
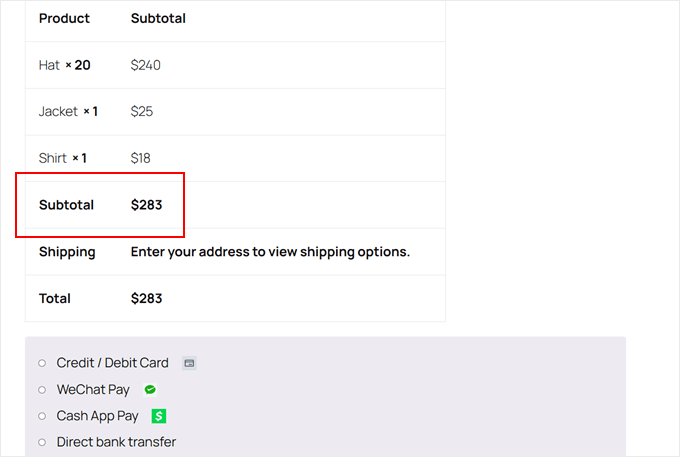
Once you’re happy with your conditional payment rules, click ‘Save Rule.’
The payment methods you’ve selected will automatically be hidden in your WooCommerce checkout when customers meet your specified conditions.
Now, let’s look at a few examples of how to set up payment gateway rules for other business needs:
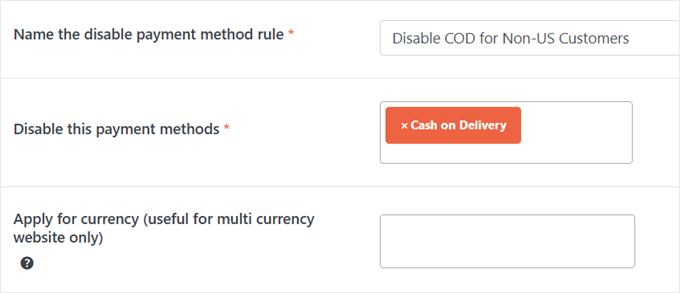
How to Disable Cash on Delivery for International Customers
Do you sell products internationally and offer cash on delivery?
If so, you should disable this payment method for international customers. This will avoid payment collection issues and reduce shipping risks.
To do this, you can create a new rule and name it something like ‘Disable COD for Non-[Country Name] Customers.’ Then, select ‘Cash on delivery’ in the payment methods section.
For the condition, choose ‘Country’ from the location options and select ‘Not Equal to (!=).’
After that, enter your store’s country.
Now, the cash-on-delivery payment method will only appear for local customers. At the same time, it will be automatically hidden for anyone ordering from other countries.
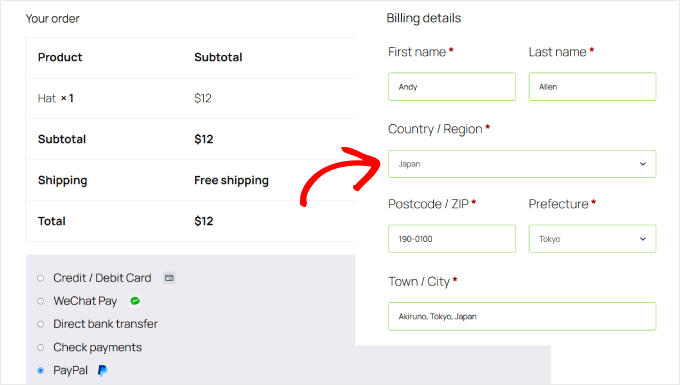
Here’s how our checkout page appears when viewed as a customer from Japan:
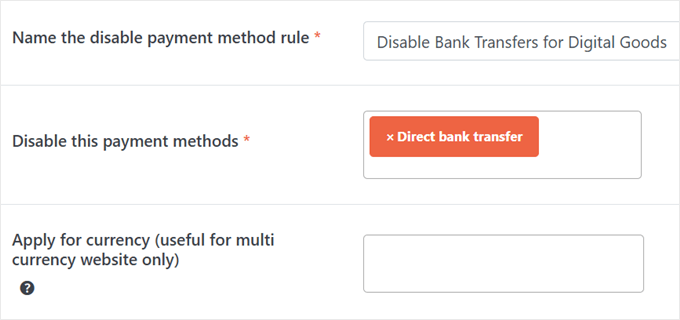
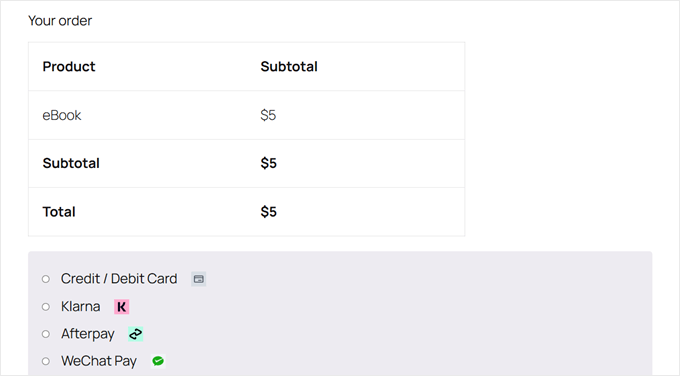
How to Disable Bank Transfers for Digital Products
Digital products need special care because they’re delivered right away, and bank transfers can be risky due to slow processing times. For this reason, we recommend disabling this payment option for your digital goods.
Then, create a new rule and name it ‘Disable Bank Transfer for Digital Products.’ Pick ‘Direct bank transfer’ as the payment method you want to disable.
For the condition, you can choose ‘Cart has product of category’ from the product options.
Now, when someone buys an item from the digital product category, they won’t see the bank transfer option at checkout.
How to Disable Specific Payment Methods for Large Orders
If you have ever processed large orders in your WooCommerce store, then you know that percentage-based payment gateway fees can take a huge chunk out of your profits.
For example, PayPal charges 2.99% + a fixed fee. On a $1,000 order, that’s around $30 in fees!
So, here’s how to set up conditional payment gateways to offer more cost-effective payment options for high-value purchases.
For this example, we’ll focus on PayPal since its percentage-based fees can become particularly expensive for small business owners handling large transactions.
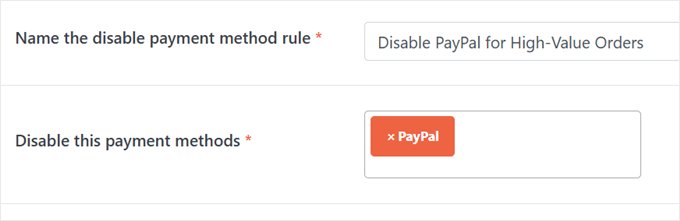
First, create a new rule and name it ‘Disable PayPal for High-Value Orders.’ Select ‘PayPal’ from your WooCommerce payment methods.
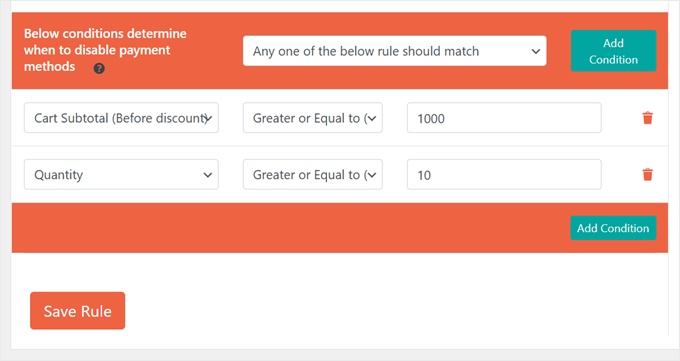
In ‘Below conditions determine when to disable payment methods,’ choose ‘Any one of the below rule should match.’
For the first condition, you need to pick ‘Cart Subtotal (Before discount),’ select ‘Greater or equal to,’ and enter ‘1000’ (adjust this amount based on your payment gateway fees).
For the second condition, choose ‘Cart quantity,’ select ‘Greater than or equal to,’ and enter ’10’ (or whatever number makes sense for your business).
Now, when a customer’s order meets either condition – spending $1000 or more, OR ordering 10 or more items – PayPal won’t appear as a payment option at checkout.
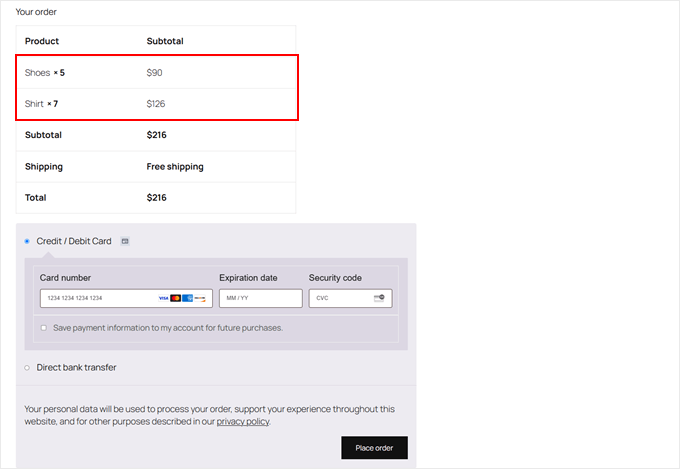
You can place a test order and go to your checkout page to see if the rules work:
Option 3: Use Wholesale Suite to Restrict Payment Methods (For Wholesale Customers)
If you offer wholesale pricing, then you’ll likely want to set different payment gateways based on user role. You may want to offer regular customers all the standard payment methods but limit them for wholesale customers.
This way, you can maximize your profits and minimize any payment security risks.
For instance, wholesale customers often make very large purchases, and certain payment options (like PayPal) have higher fees. To avoid these steep fees cutting into profits, you could disable PayPal for wholesale users.
Similarly, you might turn off Buy Now Pay Later options so you don’t have to wait for an extended period for large sums of money (or risk never receiving them).
While you can set up conditional payment gateways using the plugin from Option 2, wholesale plugins typically already include this feature.
The Wholesale Suite plugin bundle, for example, has built-in plugins to manage payment methods based on wholesale user roles. This can improve the customer experience for your B2B buyers.
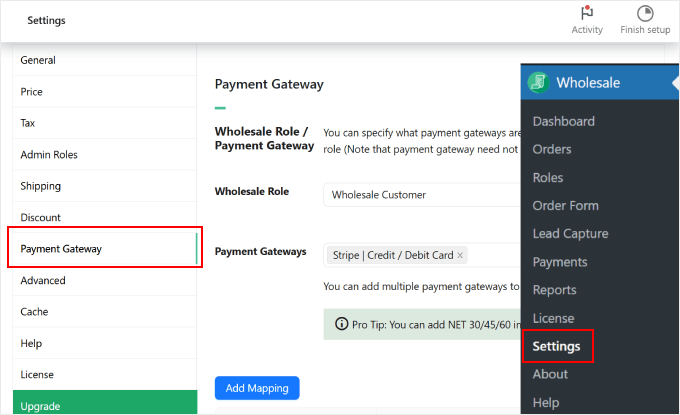
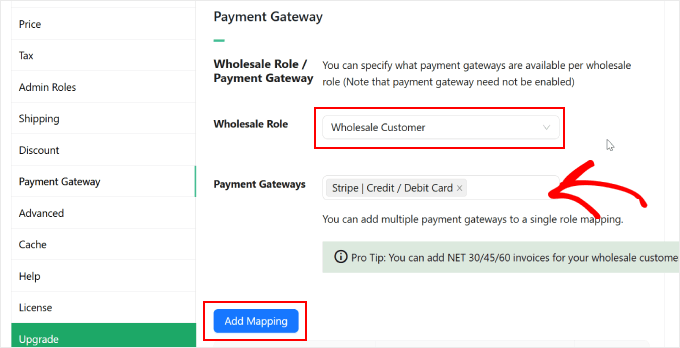
To restrict specific payment methods to wholesale customers, you can go to Wholesale » Settings. Then, select ‘Payment Gateway.’
Next to ‘Wholesale Role,’ select the ‘Wholesale Customer’ role that the plugin has set up. Then, type in the payment gateways you want to enable.
Once done, just click ‘Add Mapping.’
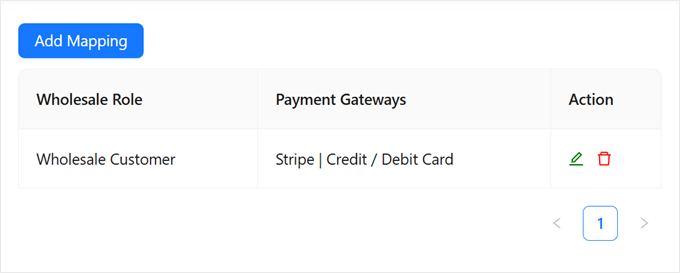
You should now see all of the enabled payment gateways in the table below.
Like so:
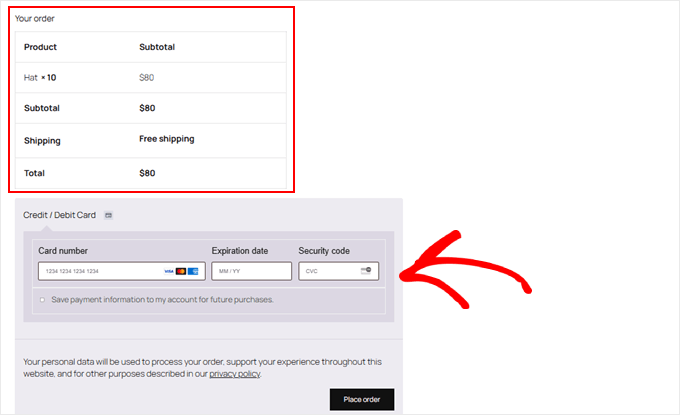
Now, if the user logs in as a Wholesale Customer, they will only see this specific payment method on their checkout page.
Here’s an example:
Option 4: Use Advanced Coupons to Restrict Payment Methods (For Specific Coupons)
Want to offer rewards for using certain payment methods?
You can do this by creating coupons tied to specific payment options, which encourages customers to use those preferred payment methods.
While the plugin from Option 2 in this guide can handle this task, coupon plugins like Advanced Coupons include this feature by default. We love this plugin because it lets you create detailed rules and customizations for your payment-specific discounts.
The premium version is paid, but you’ll need it to restrict payment methods and create advanced coupon rules. For more information, check out our complete Advanced Coupons review.
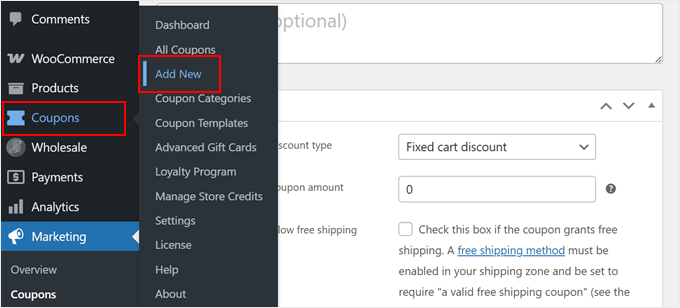
Next, set up your coupons by going to Coupons » Add New.
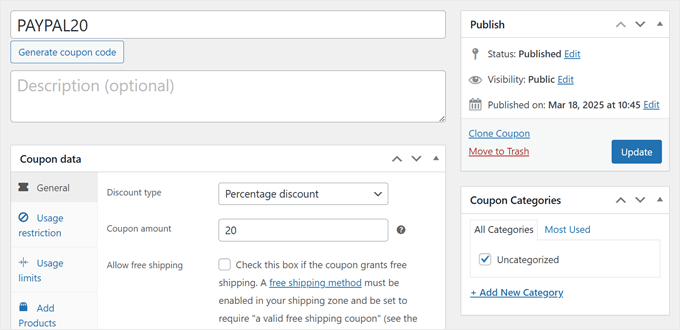
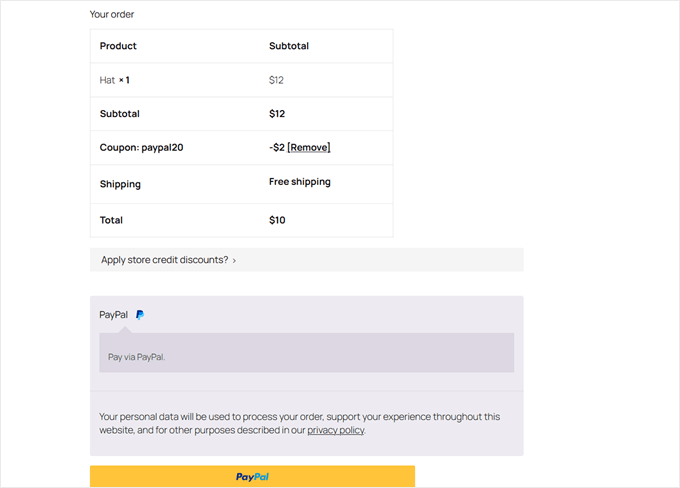
For this tutorial, we’ll focus on creating payment-specific discounts. We’ll create a coupon code called PAYPAL20 that gives customers a 20% discount when they choose PayPal as their payment method.
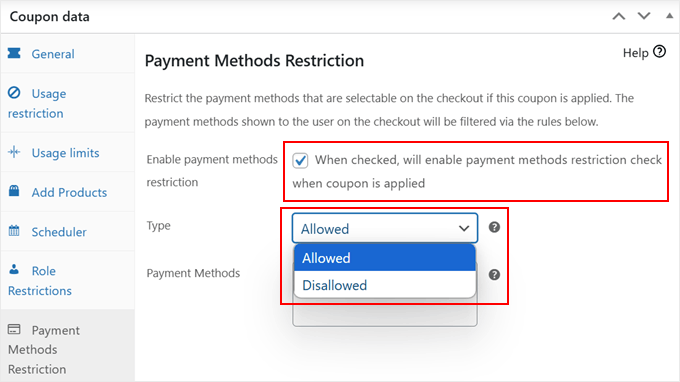
To restrict the payment method for the coupon, scroll down and find the ‘Payment Methods Restriction’ tab. Check the box that says ‘When checked, will enable payment methods restriction check when coupon is applied.’
For the ‘Type,’ you have to select ‘Allowed.’
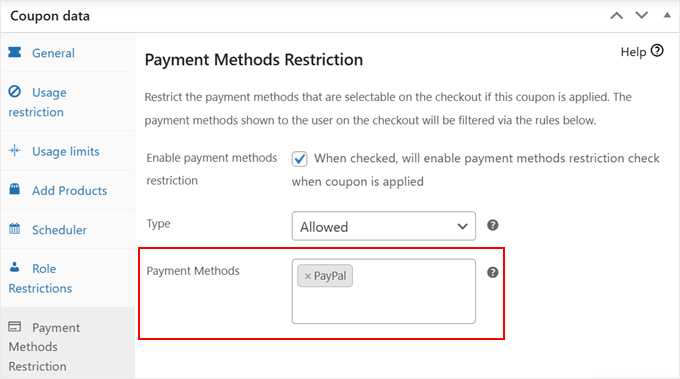
Then, in ‘Payment Methods,’ enter PayPal.
After that, feel free to continue setting up your coupon. For example, you can create an auto-apply coupon URL and share it with your potential customers.
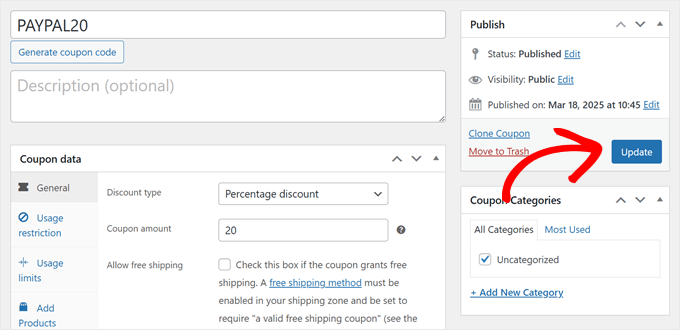
Once you’re finished configuring these settings, click ‘Update’ or ‘Publish’ to save your coupon.
It’s as simple as that!
When customers use this coupon, they’ll see PayPal as the only payment method.
The discount will also be applied to their order summary.
Option 5: Add Custom Code to Disable Payment Methods (Advanced + No Plugin)
If you don’t want to use a dedicated payment plugin, then you can also get the same results with several lines of custom code. We’ll show you how to disable payment methods based on two common scenarios: customer location (country) and cart total.
Keep in mind that this approach is more technical than the previous options. It requires adding code to your functions.php file, which controls how your WordPress website behaves.
However, we don’t recommend editing your functions.php file directly, as making even a small mistake can break your entire website. Instead, we suggest using WPCode, which is a code snippet manager that helps you add custom code safely.
While it is a plugin, it’s a lightweight tool for many customizations beyond payment methods, such as adding tracking codes, custom functions, or analytics.
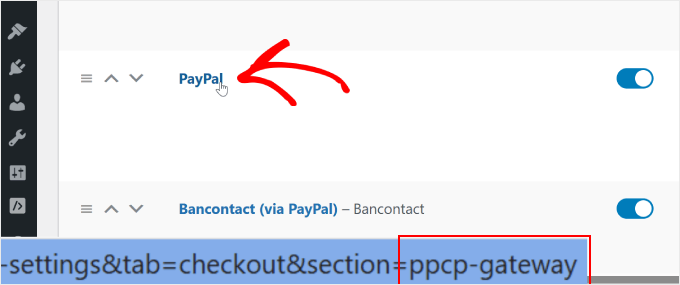
Before we start, we need to know the ID of the payment gateway that we want to disable. To do this, just go to WooCommerce » Settings and switch to the ‘Payments’ tab.
Then, hover your cursor over one of the payment methods.
As you do this, pay attention to the URL preview that appears at the bottom of your browser. It should look something like this: https://example.com/wp-admin/admin.php?page=wc-settings&tab=checkout§ion=payment-gateway-id
The part at the end that follows §ion= is your payment gateway ID. So, for example, if you hover over the PayPal option, then the ID is ppcp-gateway.
Make sure to take note of this information, as you will need it in the next steps.
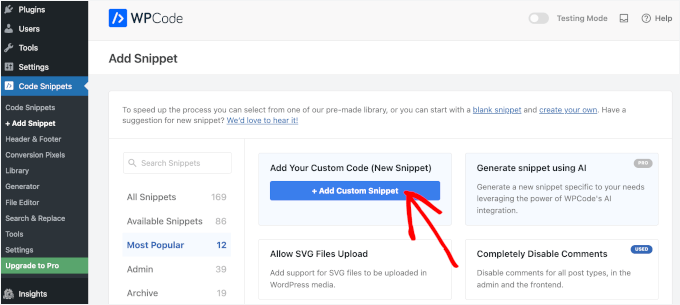
Now, install WPCode on your WordPress site. You can read our step-by-step guide on how to install a WordPress plugin for detailed instructions.
Next, go to Code Snippets » + Add Snippet. Then, choose ‘Add Your Custom Code (New Snippet)’ and click on the ‘+ Add Custom Snippet’ button.
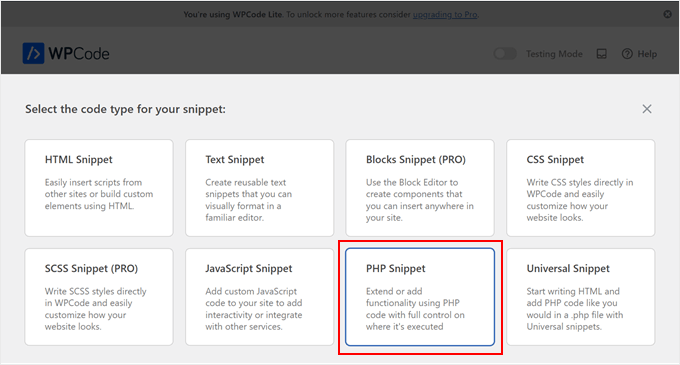
After that, you’ll need to choose a code type.
For this tutorial, select ‘PHP Snippet.’
Now, let’s look at two code snippets you can add to disable specific payment methods in WooCommerce.
How to Disable Payment Methods Based on Country
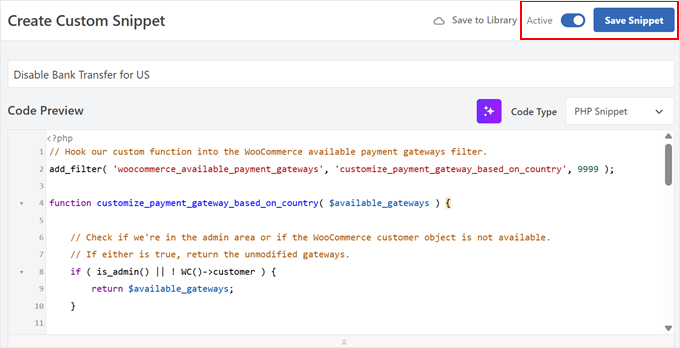
To do this, you need to give your code snippet a name like ‘Disable [Payment Method Name] for [Country Name].’
After that, you can paste the code snippet below into the ‘Code Preview’ box:
// Hook our custom function into the WooCommerce available payment gateways filter.
add_filter( 'woocommerce_available_payment_gateways', 'customize_payment_gateway_based_on_country', 9999 );

function customize_payment_gateway_based_on_country( $available_gateways ) {

    // Check if we're in the admin area or if the WooCommerce customer object is not available.
    // If either is true, return the unmodified gateways.
    if ( is_admin() || ! WC()->customer ) {
        return $available_gateways;
    }

    // -----------------------------------------------------------------------
    // CUSTOMIZATION 1: Payment Gateway ID
    //
    // Replace 'your_gateway_id' with the ID of the payment gateway you want to target.
    // For example:
    //   - To target Stripe, replace with 'stripe'
    //   - To target PayPal, replace with 'paypal'
    //
    $gateway_id_placeholder = 'your_gateway_id';
    // -----------------------------------------------------------------------

    // -----------------------------------------------------------------------
    // CUSTOMIZATION 2: Country Code
    //
    // Replace 'XX' with the desired country code where you want to disable the gateway.
    // Country codes are based on ISO 3166-1 alpha-2.
    // For example:
    //   - To target the United States, use 'US'
    //   - To target the United Kingdom, use 'GB'
    //
    $target_country_code = 'XX';
    // -----------------------------------------------------------------------

    // Check if the specified payment gateway exists within the available gateways.
    if ( isset( $available_gateways[ $gateway_id_placeholder ] ) ) {
        // Retrieve the billing country of the current customer.
        $customer_country = WC()->customer->get_billing_country();

        // Compare the customer's billing country with the target country code.
        if ( $customer_country === $target_country_code ) {
            // If the customer's country matches the target, remove the payment gateway.
            unset( $available_gateways[ $gateway_id_placeholder ] );
        }
    }

    // Return the (possibly modified) list of available gateways.
    return $available_gateways;
}
Now, you’ll need to customize two parts of this code.
First, find the $gateway_id_placeholder variable and replace ‘your_gateway_id’ with the ID of your payment gateway.
Find the $target_country_code variable and replace ‘XX’ with your target country’s two-letter code. For example:
US – United States
GB – United Kingdom
CA – Canada
AU – Australia
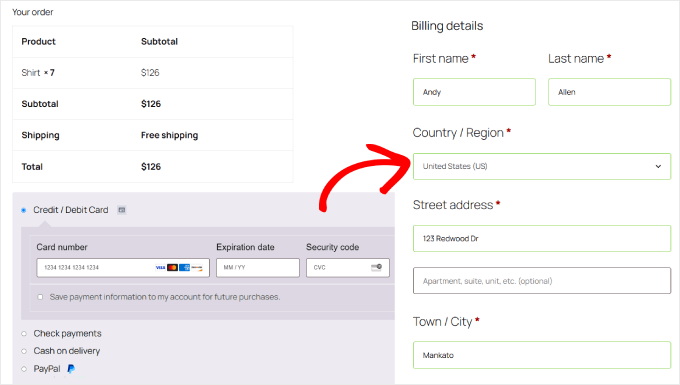
So, let’s say you want to disable direct bank transfers for customers in the United States. If so, then your code should look like this:
// Hook our custom function into the WooCommerce available payment gateways filter.
add_filter( 'woocommerce_available_payment_gateways', 'customize_payment_gateway_based_on_country', 9999 );

function customize_payment_gateway_based_on_country( $available_gateways ) {

    // Check if we're in the admin area or if the WooCommerce customer object is not available.
    // If either is true, return the unmodified gateways.
    if ( is_admin() || ! WC()->customer ) {
        return $available_gateways;
    }

    // -----------------------------------------------------------------------
    // CUSTOMIZATION 1: Payment Gateway ID
    //
    // Replace 'your_gateway_id' with the ID of the payment gateway you want to target.
    // For example:
    //   - To target Stripe, replace with 'stripe'
    //   - To target PayPal, replace with 'ppcp-gateway'
    //
    $gateway_id_placeholder = 'bacs';
    // -----------------------------------------------------------------------

    // -----------------------------------------------------------------------
    // CUSTOMIZATION 2: Country Code
    //
    // Replace 'XX' with the desired country code where you want to disable the gateway.
    // Country codes are based on ISO 3166-1 alpha-2.
    // For example:
    //   - To target the United States, use 'US'
    //   - To target the United Kingdom, use 'GB'
    //
    $target_country_code = 'US';
    // -----------------------------------------------------------------------

    // Check if the specified payment gateway exists within the available gateways.
    if ( isset( $available_gateways[ $gateway_id_placeholder ] ) ) {
        // Retrieve the billing country of the current customer.
        $customer_country = WC()->customer->get_billing_country();

        // Compare the customer's billing country with the target country code.
        if ( $customer_country === $target_country_code ) {
            // If the customer's country matches the target, remove the payment gateway.
            unset( $available_gateways[ $gateway_id_placeholder ] );
        }
    }

    // Return the (possibly modified) list of available gateways.
    return $available_gateways;
}
This code will hide the direct bank transfer option when customers from the United States visit your checkout page.
Once you’ve customized these parts, switch the toggle from ‘Inactive’ to ‘Active,’ then click ‘Save Snippet.’
Now, you can go ahead and place a test order to see if the code works.
Here’s what our checkout page looks like when we use the sample code snippet for disabling PayPal for US-based customers:
How to Disable Payment Methods Based on Cart Total
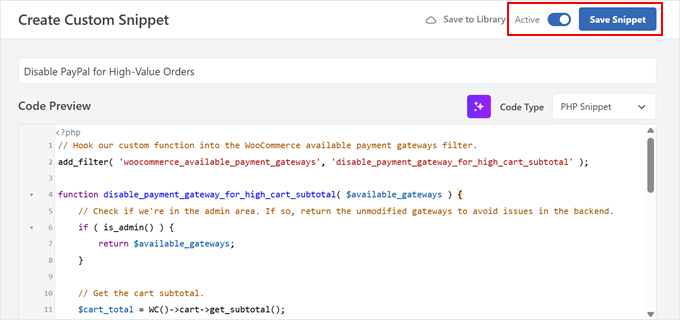
First, create a new code snippet and give it a descriptive name, like ‘Disable [Payment Method] for High-Value Orders.’
After that, paste the following code snippet into the ‘Code Preview’ box:
// Hook our custom function into the WooCommerce available payment gateways filter.
add_filter( 'woocommerce_available_payment_gateways', 'disable_payment_gateway_for_high_cart_subtotal' );

function disable_payment_gateway_for_high_cart_subtotal( $available_gateways ) {
    // Check if we're in the admin area. If so, return the unmodified gateways to avoid issues in the backend.
    if ( is_admin() ) {
        return $available_gateways;
    }

    // Get the cart subtotal.
    $cart_total = WC()->cart->get_subtotal();

    // -----------------------------------------------------------------------
    // CUSTOMIZATION 1: Minimum Cart Subtotal
    // Replace 123 with the desired minimum cart subtotal above which you want to disable the gateway.
    // -----------------------------------------------------------------------

    // -----------------------------------------------------------------------
    // CUSTOMIZATION 2: Payment Gateway ID
    // Replace 'your_gateway_id' with the ID of the payment gateway you want to target.
    // For example:
    //   - To target Stripe, replace with 'stripe'
    //   - To target PayPal, replace with 'ppcp-gateway'
    // -----------------------------------------------------------------------


    // Check if the cart total meets the minimum and if the specified payment gateway is available.
    if ( $cart_total >= 123 && isset( $available_gateways['your_gateway_id'] ) ) {
        // Remove the payment gateway.
        unset( $available_gateways['your_gateway_id'] );
    }

    // Return the (possibly modified) list of available gateways.
    return $available_gateways;
}
You’ll need to customize two parts of this code. First, find the cart subtotal value in this line: if ( $cart_total >= 123 && isset( $available_gateways['your_gateway_id'] ) ) {
Simply replace ‘123’ with your desired minimum amount (don’t include currency symbols).
Next, find ‘your_gateway_id’ and replace it with your payment gateway ID like before.
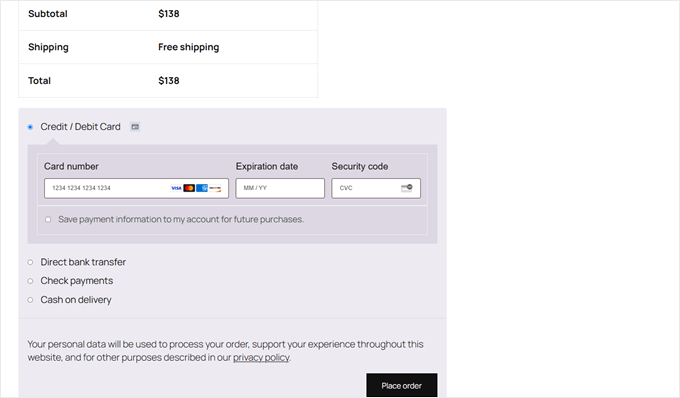
So, if you want to disable PayPal for orders over $100, you would set the value to ‘100’ and use ‘ppcp-gateway’ as the gateway ID.
Here’s what the full code snippet would look like:
// Hook our custom function into the WooCommerce available payment gateways filter.
add_filter( 'woocommerce_available_payment_gateways', 'disable_payment_gateway_for_high_cart_subtotal' );

function disable_payment_gateway_for_high_cart_subtotal( $available_gateways ) {
    // Check if we're in the admin area. If so, return the unmodified gateways to avoid issues in the backend.
    if ( is_admin() ) {
        return $available_gateways;
    }

    // Get the cart subtotal.
    $cart_total = WC()->cart->get_subtotal();

    // -----------------------------------------------------------------------
    // CUSTOMIZATION 1: Minimum Cart Subtotal
    // Replace 123 with the desired minimum cart subtotal above which you want to disable the gateway.
    // -----------------------------------------------------------------------

    // -----------------------------------------------------------------------
    // CUSTOMIZATION 2: Payment Gateway ID
    // Replace 'your_gateway_id' with the ID of the payment gateway you want to target.
    // For example:
    //   - To target Stripe, replace with 'stripe'
    //   - To target PayPal, replace with 'ppcp-gateway'
    // -----------------------------------------------------------------------


    // Check if the cart total meets the minimum and if the specified payment gateway is available.
    if ( $cart_total >= 100 && isset( $available_gateways['ppcp-gateway'] ) ) {
        // Remove the payment gateway.
        unset( $available_gateways['ppcp-gateway'] );
    }

    // Return the (possibly modified) list of available gateways.
    return $available_gateways;
}
Once you’ve customized these parts, switch the toggle from ‘Inactive’ to ‘Active.’
Then, click ‘Save Snippet.’
Finally, try creating a test order to see if the code works.
Here’s what you should see on your checkout page if you disable PayPal for orders above $100:
More Ways to Improve Your WooCommerce Store
Now that you know how to manage payment methods in WooCommerce, here are other things you can do to build a better online store:
🚨 Ready to take your online store to the next level? Let our WPBeginner Pro Services team help you build a professional WooCommerce store. We’ll set up your payment gateways, optimize your checkout process, and ensure your store runs smoothly. Plus, you’ll get a dedicated project manager to oversee every detail of your store setup.