Are you looking for ways to make your online course more engaging and valuable for your students? We recommend offering group learning.
The benefits of group learning are clear: Students engage better, collaborate more, and often experience more success when they learn together. Overall, this setup helps students stay connected and feel motivated.
After testing various online course plugins, MemberPress and AccessAlly stood out to us as the best options for creating a WordPress group learning experience that keeps students on track.
Ready to set up your own group-based courses?
In this guide, we’ll walk you through all the steps for setting up cohort-based online courses on WordPress. We’ll cover everything from choosing the right course platform to designing your syllabus and setting up group learning features.

What Are Cohort-Based Online Courses, and Why Should You Offer One?
Cohort-based online courses are a structured way to deliver learning to multiple students. Participants progress through the course together as a group, often with set start and end dates.
Here’s an example of a cohort-based online course by WordPress.org:
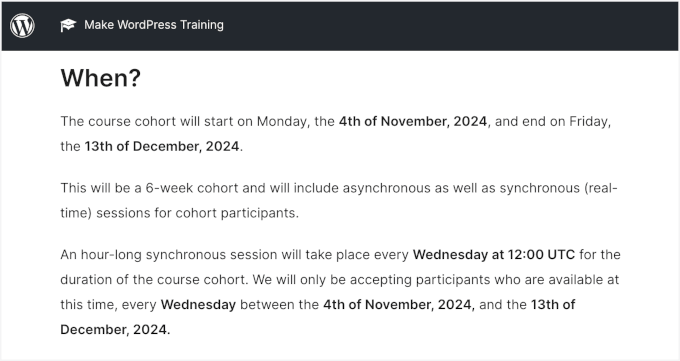
This type of online course creates a sense of community and encourages accountability. Students also get the chance to interact with instructors and fellow learners, which makes the learning experience more engaging and collaborative.
Offering a group course has these perks:
- It’s perfect for learners who thrive on group interaction and want the structure of a schedule.
- It helps you create a more intimate learning environment where you can offer personalized support and encourage stronger relationships between students.
- The group dynamic motivates students to stay on track, ensuring they get the most out of your course.
Why Use WordPress to Offer Group Learning?
If you want to offer a group course that stands out and creates a strong, supportive community for learners, then you’ll need the right platform to build it on.
We recommend WordPress.
WordPress is one of the best platforms for creating and managing group learning courses. It gives you all the tools and flexibility you need to design your course exactly how you want.
With WordPress, you can use powerful LMS plugins like MemberPress or AccessAlly to set up your courses, handle student registrations, and even create interactive lessons.
Plus, you’re in full control of your content and revenue. Unlike third-party platforms, WordPress doesn’t take a cut of your earnings or restrict how you run your course.
Another big perk? Customization.
Whether you want to add discussion forums, private messaging, or live video sessions, WordPress makes it easy to tailor your site to fit your group learning needs.
Note: When we talk about WordPress, we mean the self-hosted WordPress.org platform. It gives you complete ownership of your site and the ability to customize it without limitations. For more information, see our comparison article on WordPress.com vs. WordPress.org.
How Do You Make a Cohort Syllabus?
When designing a group-based online course syllabus, you should focus on encouraging collaboration and teamwork. Unlike self-paced courses, this type of learning thrives on shared experiences.
You can start by outlining key learning objectives for the group. Then, think about including activities like group projects or peer reviews to help students interact and give feedback on each other’s work.
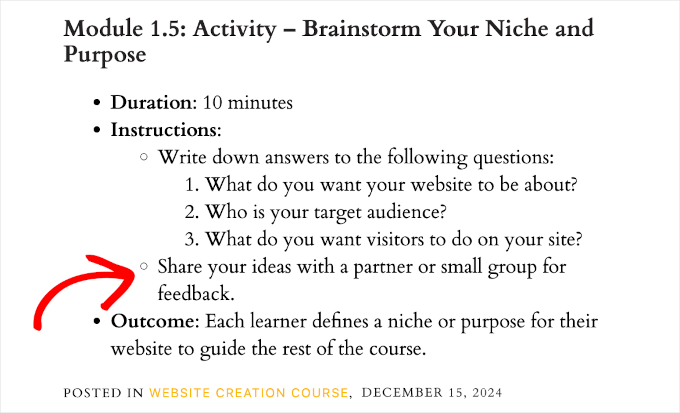
Regular discussion opportunities, like live sessions, forums, or group chats, also help students stay engaged and connected.
With that in mind, we’ll now share how you can create WordPress group learning on your site.
You can simply use the quick links below to jump straight to the method you want to use:
Let’s get started!
Method 1: Offer WordPress Group Learning Using MemberPress CoachKit™ (Best for Coaches and Small Businesses)
If you want to create group learning with a central hub for live discussions and membership access control, then MemberPress with the CoachKit™ addon is a great choice.
With MemberPress, you get everything you need to create, sell, and manage any type of membership program. It’s an all-in-one plugin that simplifies the process. You can check out our in-depth MemberPress review for more details.
The CoachKit™ addon takes it a step further by letting you create unlimited group coaching programs on WordPress. You can set milestones and habits to track your learners’ progress and host live discussions or consultations, too.
Creating Memberships using MemberPress
To start, let’s install and activate MemberPress. If you need help, then you can see our guide on how to install a WordPress plugin.
Upon activation, you just need to follow the setup wizard.
Then, the first thing you’ll need to do is to set up your payment methods. To do this, you can head over to MemberPress » Settings and select the ‘Payments’ tab.
From here, you’ll want to click the ‘+ Add Payment Method’ button to add your preferred payment gateway.
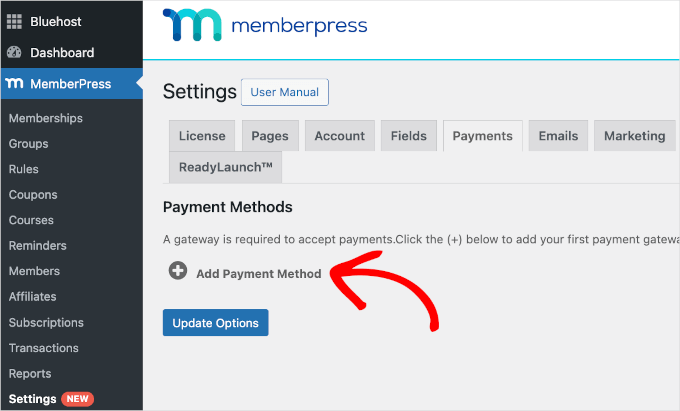
MemberPress lets you connect to PayPal and Stripe. This also means that you can easily accept credit card payments for your WordPress group learning programs.
To complete the setup, simply enter your payment gateway account details. When you’re done, don’t forget to click the ‘Update Options’ button.
The next step is creating membership plans for your group learning website. These are the paid plans that students will sign up for to access your online courses.
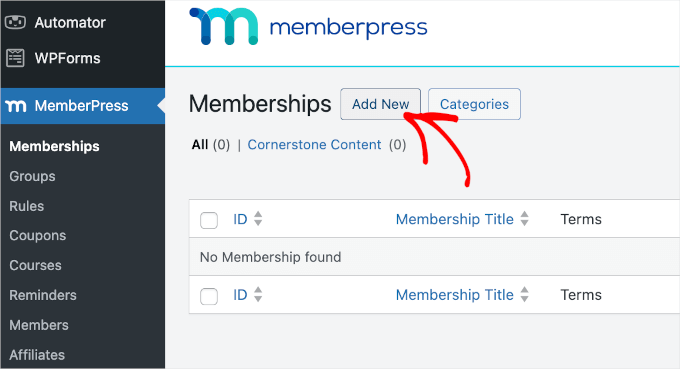
To get started, you can go to MemberPress » Memberships page and click ‘Add New.’
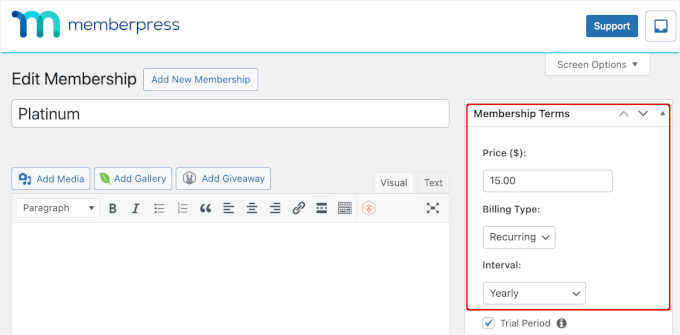
On the next screen, you’ll enter a title and details for the membership plan.
Then, you can set the pricing, billing type, and expiration for the plan under the ‘Membership Terms’ section.
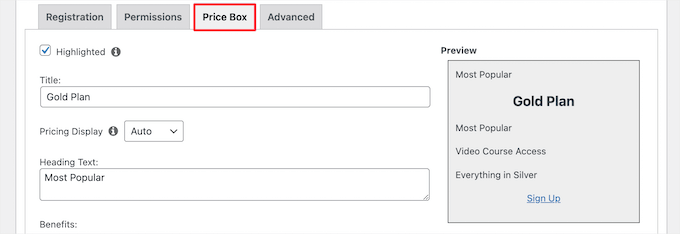
If you scroll down the editor, you’ll find more customization options.
For example, in the ‘Price Box’ tab, you can add details to your pricing page, such as a headline and plan benefits.
For details on how to do this, you can follow our ultimate guide to creating a membership site.
Creating Your Online Courses
After you’ve set up your membership plans, it’s time to prepare your online course materials.
In this step, you’ll use the MemberPress Courses add-on to create and store your online courses, which will be helpful when adding resources for your group learning in CoachKit™.
To start, simply go to the MemberPress » Courses page. Then, you can click the button to install and activate the Courses Addon.
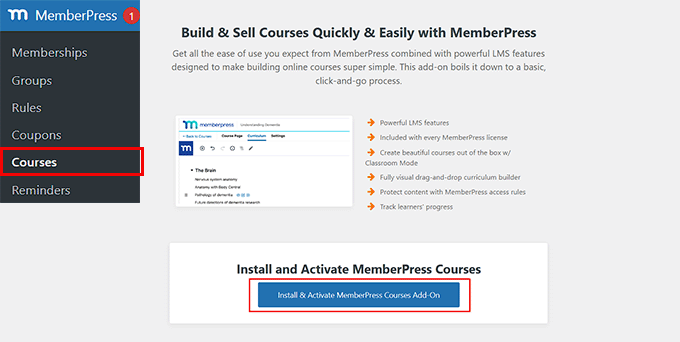
After you activate the MemberPress Courses add-on, you’ll be redirected to the course builder. Here, you’ll notice you’ll notice that it uses the WordPress block editor, making it easy to create your course.
To get started, you can click the ‘Add New’ button.
On the ‘Course Page,’ let’s first add the course title and description in the available space.
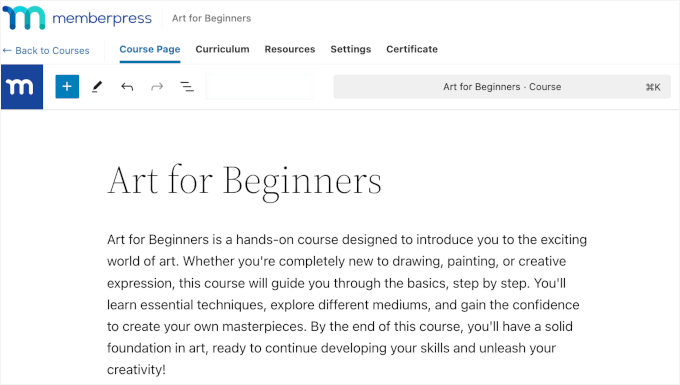
In the ‘Curriculum’ tab, you can click on the ‘Add Section’ button to create a new course outline. To be clear, a section is like a module.
Then, you can click on the ‘Add Lesson’ button under the section. Feel free to list as many lessons as you want, as long as it’s relevant to the parent section.
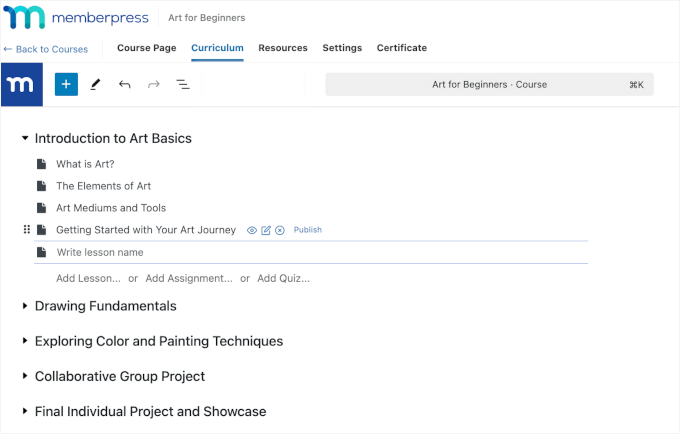
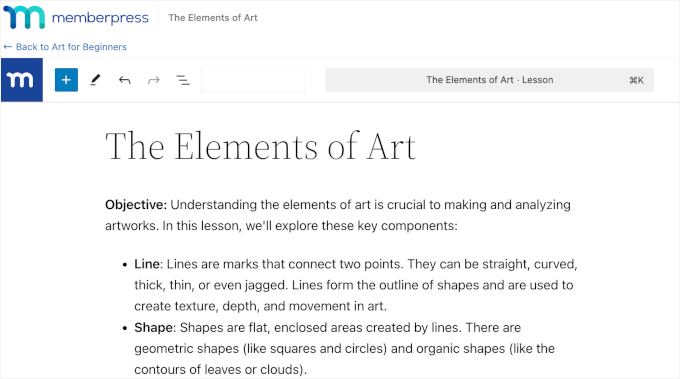
For each lesson, you can hover over it and click ‘Edit.
This will take you to the lesson editor, where you can add your learning materials for the lesson.
With MemberPress Courses, you can also add quizzes and assignments for each lesson. For a detailed guide, you can check out our guide on how to create and sell online courses.
Installing and Configuring the CoachKit™ Addon
Now, you are ready to install the CoachKit™ addon, so let’s navigate to MemberPress » CoachKit™.
You’ll then see the button to install and activate the addon. Go ahead and give it a click.
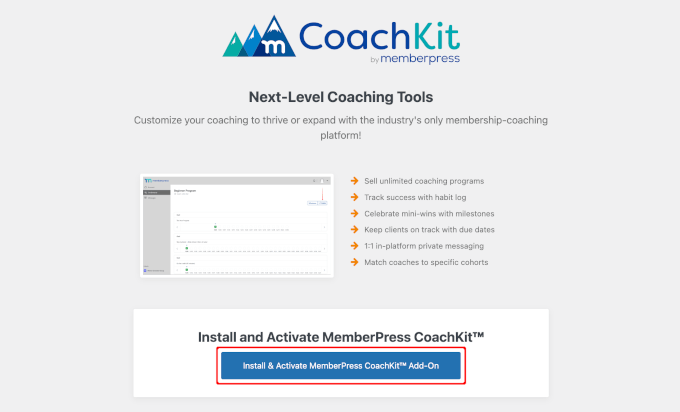
This will add an ‘MP CoachKit™’ menu item to your WordPress dashboard.
Before you start creating your first WordPress group learning programs, you’ll need to configure a few settings.
MemberPress automatically generates a ‘Coaching’ page where you can manage clients and monitor their progress. To review this, you can go to MemberPress » Settings and navigate to the ‘Pages’ tab.
In the ‘MemberPress Coaching Page*’ field, you’ll find that ‘Auto Create New Page’ is selected by default in the dropdown menu.
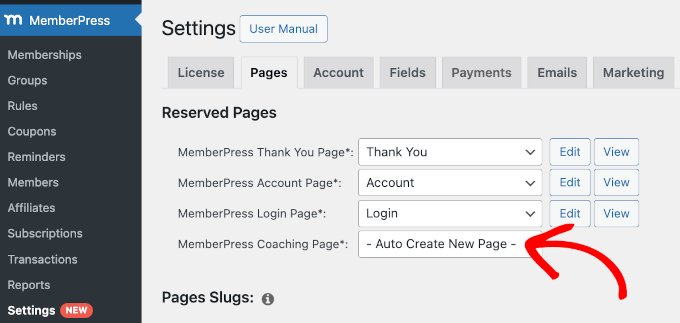
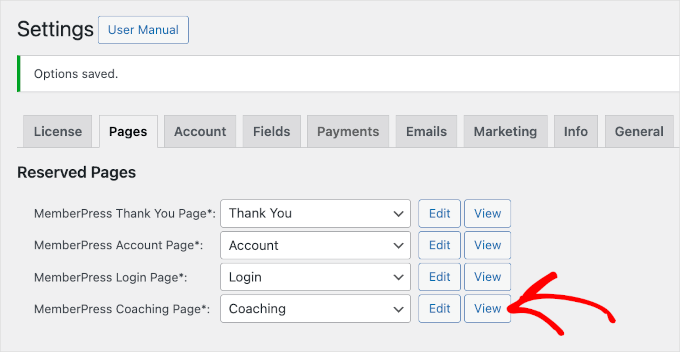
From here, you’ll need to click on the option to create the page. Remember to click on the ‘Update Option’ button at the bottom.
Once you do that, you’ll see the ‘Edit’ and ‘View’ buttons for your MemberPress coaching page like this:
After this, you can switch to the ‘CoachKit™’ tab.
We suggest turning on the live chat ‘Messaging’ feature so you can communicate directly with learners from your site and vice versa.
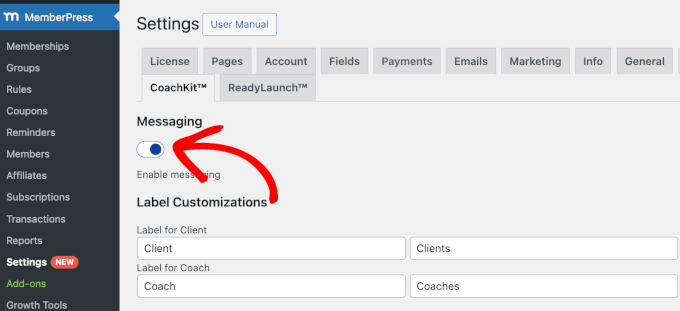
You can also send both private and group messages. This means that you can provide personalized feedback to individual students or share general updates and encouragement with the entire group.
Offering Client Consultations (Optional)
Before you jump into creating your group learning course, it’s a good idea to let clients book private consultations with you. This is especially helpful if you want to offer some one-on-one guidance.
The best way to do this is by using WPForms. It’s the best form plugin on the market, and it’s also the plugin we use on our website to embed our contact and annual survey forms. For more information about the plugin, you can check our WPForms review.
To start, you can install the WPForms plugin. If you need help, then you can check out our guide on how to install a WordPress plugin.
Note: To create an appointment form using a ready-made template, you’ll need WPForms Pro. But there’s a free WPForms version you can install, choose a near-perfect template, and adjust the fields as you go.
Upon activation, you’ll want to head over to WPForms » Add New.
On the next screen, you can enter the form title and choose a template.
Since WPForms has 2000+ ready-to-use templates, you might want to use the search feature to filter them out. Here, we use the keyword ‘Appointment.’
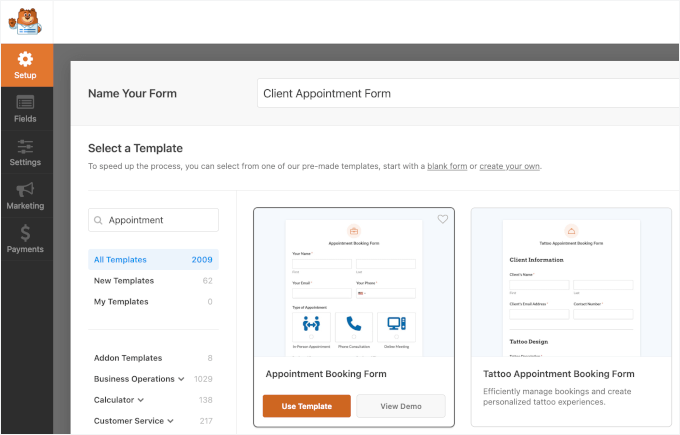
Once you’ve found a good template, you can hover over it and click ‘Use Template.’
This will take you to the drag-and-drop editor.
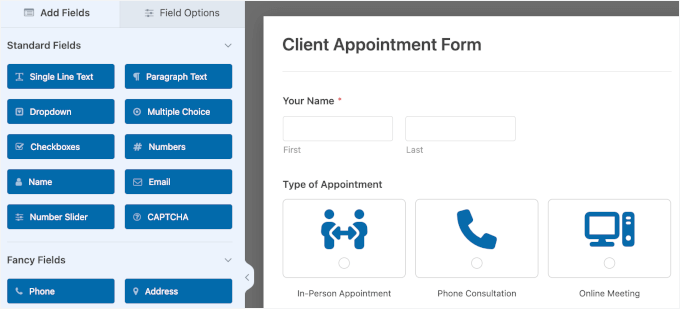
From here, you can adjust the form fields and other settings.
Once you’re done, simply hit ‘Embed’ to publish the form on an existing page or a new one. For example, we publish ours on a new page. We recommend you to the same so since we’re going to need the URL in the next step.
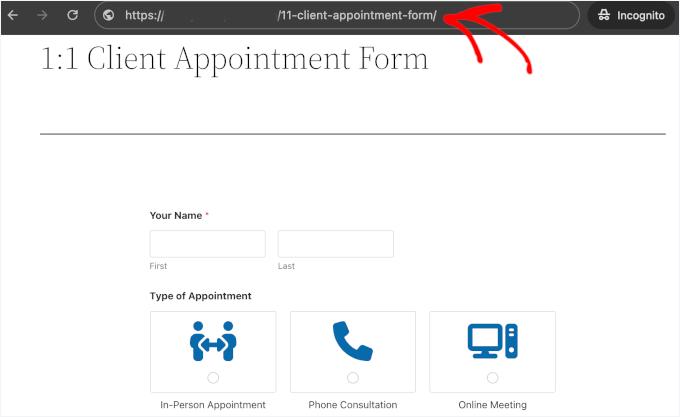
You can read our guide on how to create a booking form for detailed instructions from creating to embedding.
Note: You can use Simply Schedule Appointments with MemberPress Courses to handle scheduling. Just keep in mind that it’s a third-party plugin, so you’ll need to buy it separately from their website. For more information about the plugin, you might want to check out our Simply Schedule Appointments review.
Creating Your First WordPress Group Learning Course
In this step, you’ll create your group learning course. You can include interactive elements like group projects, peer reviews, and discussions.
To start, let’s go to MP CoachKit™ » Programs and then click the ‘Add New Program’ button.
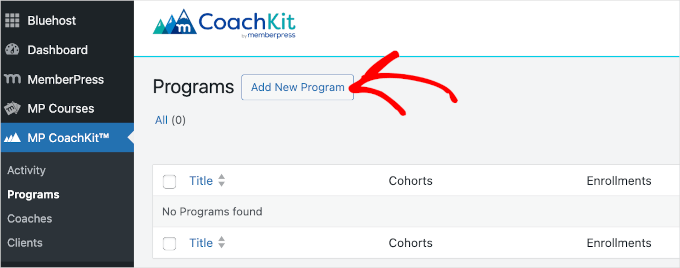
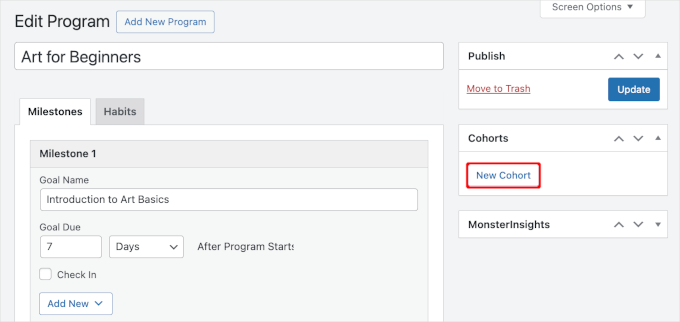
On the next screen, start by giving your program a name. For this tutorial, we’ll create a simple cohort-based course called ‘Art for Beginners.’
From here, you’ll then add a new cohort.
To the right of the ‘Milestones/Habits’ tabs, let’s click the ‘New Cohort’ button in the ‘Cohorts’ section.
You can enter the cohort name in the pop-up that appears. For example, we’ve named ours ‘Program: Art.’
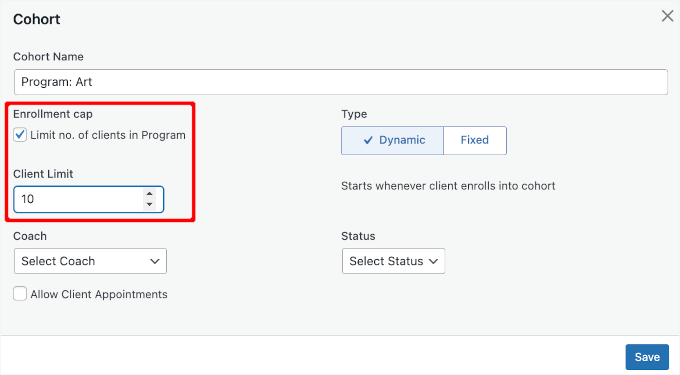
Below that, there’s a configuration setting to limit the number of clients.
If you want to set a limit, click on the check box next to ‘Enrollment Cap.’ Then, simply enter the number in the ‘Client Limit’ field when it appears.
After that, you’ll choose the cohort type: ‘Dynamic’ or ‘Fixed.’
- By choosing dynamic, you’ll allow clients to join anytime, and their program will start the day they enroll.
- The fixed type will need you to add the start and end dates so that clients can follow a structured timeline. With fixed dates, participants will know exactly when to expect new lessons, activities, and milestones, which helps create a sense of accountability and commitment throughout the course.
Letting students skip ahead in a cohort-based course doesn’t really make sense. The whole point is for everyone to study the same lesson at the same time. So, we recommend choosing the fixed type.
Go ahead and enter the start and end dates in the available fields.
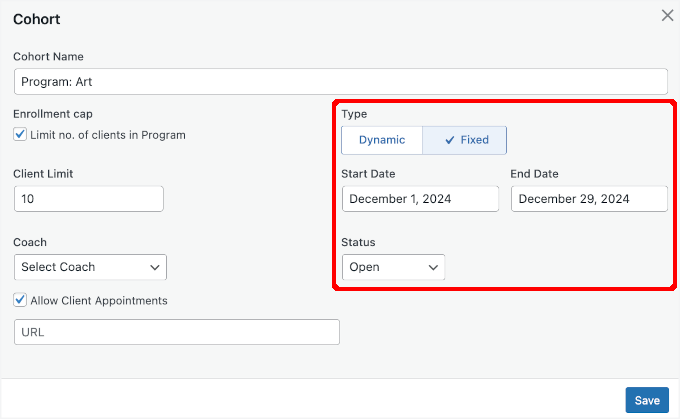
Then, the ‘Status’ dropdown lets you open or close the cohort for registration.
Here, you’ll want to choose ‘Open’ to make the course accessible. If the start date is still in the future, you can select ‘Close’ instead and set a reminder to open the course closer to the start date.
To the left, you’ll see an option to select the coach. Simply click on the dropdown to select one from one of your registered users.
Finally, by checking the ‘Allow Client Appointments’ box, you can attach a link to your client appointment form.
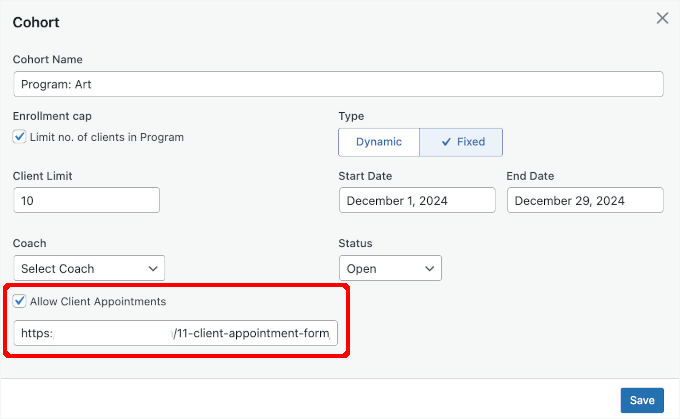
Don’t forget to click the ‘Save’ button to store your configuration.
When creating programs with CoachKit™, you’ll have options to add milestones and habits. Here’s a simple explanation of each:
- Milestones are time-based goals for each program that help track progress. You can set as many milestones as needed in a specific order, each with a due date.
- Habits are tasks that repeat regularly, and you can track them over time. These tasks are added on specific dates based on how often they repeat, and they fit within the timeframe of the milestones you’ve set.
Let’s start with milestones. To create one, just click the ‘+ New Milestones’ button.
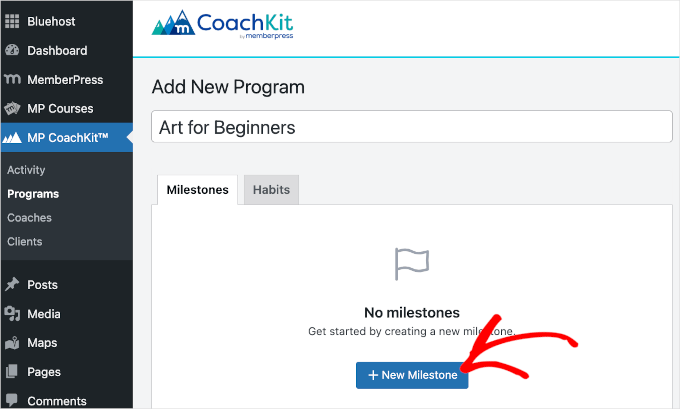
After that, you can start filling out the milestone goal name and due.
For example, we named our first milestone ‘Introduction to Art Basics,’ and the goal is to have it completed 7 days after learners start the program.
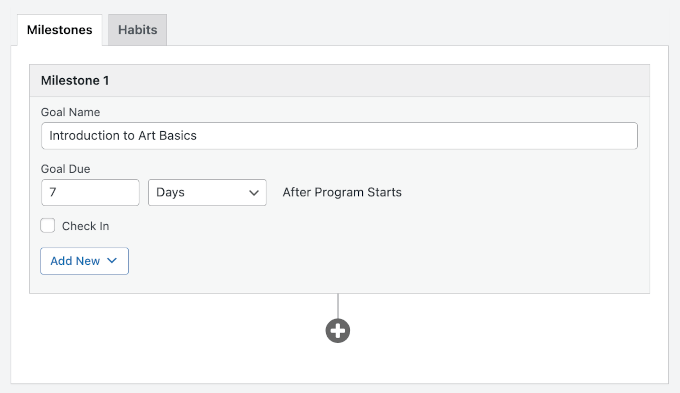
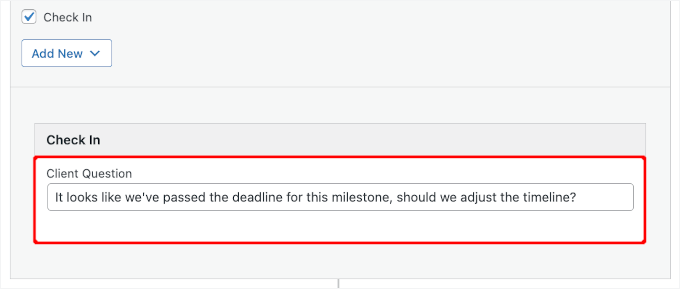
Then, enabling the ‘Check-In’ feature will trigger milestone or habit reminder emails. These emails are sent when a client misses a milestone or habit deadline.
Once you check the box for ‘Check In, you’ll see a ‘Client Question’ field. Here, you can write down a custom title for the email.
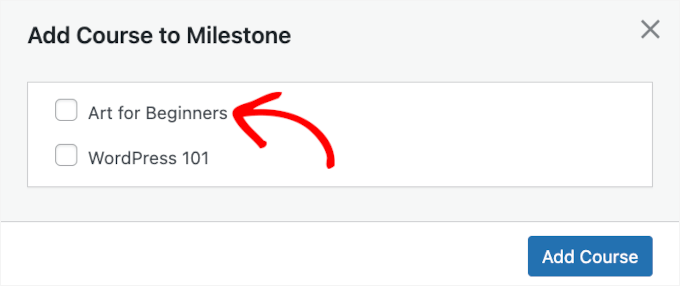
Next, you’ll want to open the ‘Add New’ dropdown menu. This is where you can add the online course you created using the Courses add-on.
Once you click the button, a popup will appear with a list of all of your courses. Simply check the box next to the relevant one and click ‘Add Course.’
To add more milestones, you can click the ‘+’ icon and repeat the process.
Once you’re done with milestones, you’ll want to switch to the ‘Habits’ tab and click the ‘+ New Habit’ button to start adding habits.
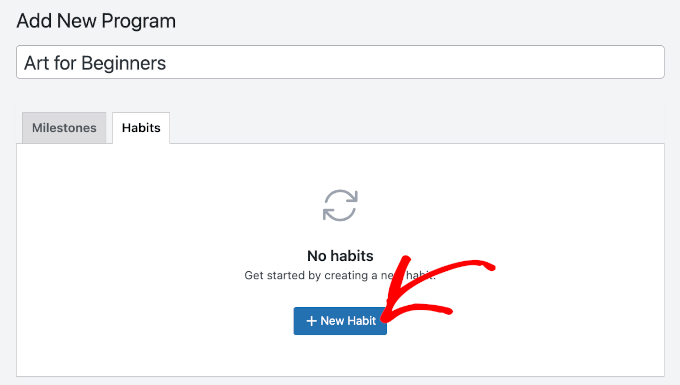
After that, you can add the name of the habit and set up the condition.
Here’s an example:
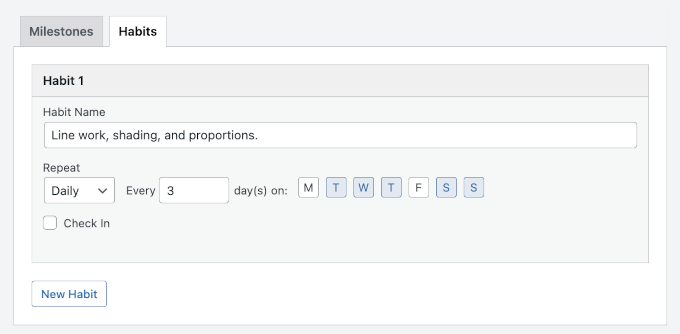
This means that clients will have to repeat practicing line work, shading, and proportions daily or every 3 days if the day is Monday or Friday.
Then, you can go ahead and click the ‘Publish’ or ‘Update’ button.
Enrolling Clients Through a Membership Program
Once you’ve set up your WordPress group learning courses, it’s time to enroll clients. You can do this through your membership programs.
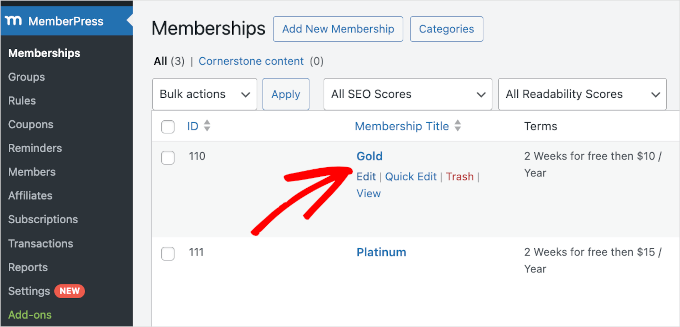
To get started, you’ll want to head over to MemberPress » Memberships and hover over the membership you want to add your program(s) to.
For example, in this step, we’ll select the ‘Gold’ membership to include in the courses program. So, we’ll hover over it and click ‘Edit’ to open its settings.
In the ‘Membership Options’ section down the page, you’ll need to switch to the ‘CoachKit’ tab.
Then, go ahead and pick the program you want to assign to this membership.
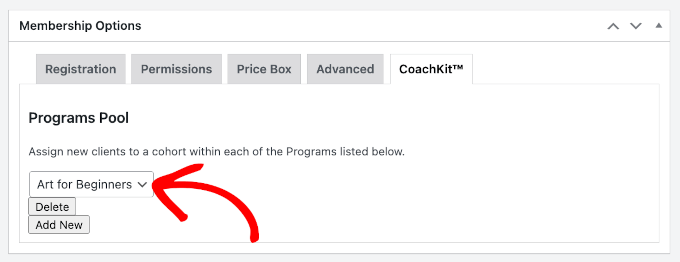
If you want to add more programs to the membership plan, just click the ‘Add New’ button and repeat the previous steps.
Once done, you can click the ‘Publish’ or ‘Update’ button.
Now, anyone who signs up for that membership will automatically be enrolled in all the programs you’ve assigned to it.
Also, when clients enroll, they’re randomly placed into one of the available cohorts in each program. CoachKit™ starts filling cohorts by assigning new clients to the one with the most open seats first.
Once you have learners joining, your ‘Coaching’ page will display a list of your clients and the number of programs they are enrolled in.
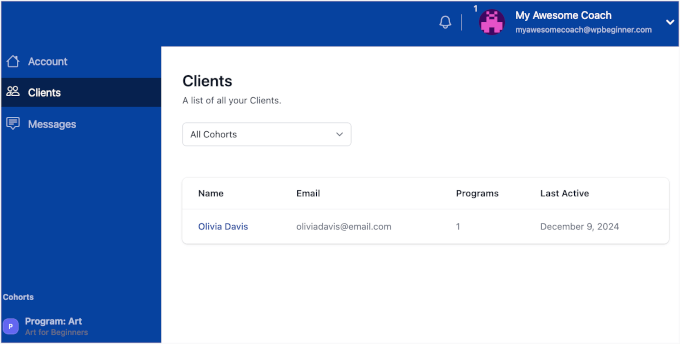
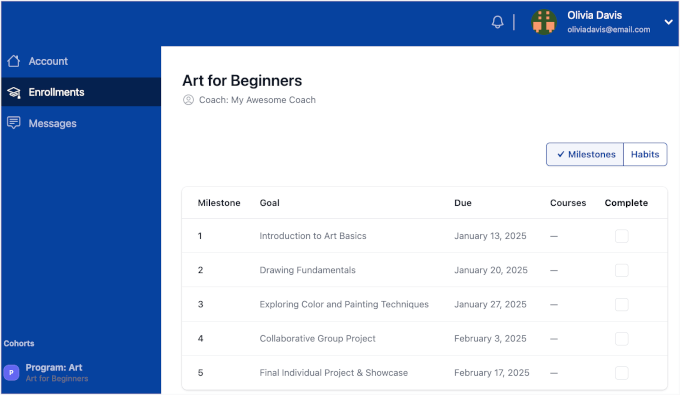
On the learner’s end, the ‘Clients’ tab is replaced with an ‘Enrollments’ tab. Here, they can access all the milestones and habits associated with the program they’re enrolled in.
Here’s what the learner dashboard looks like:
And that’s it!
You’ve successfully created and offered group learning online courses using MemberPress.
Method 2: Offer WordPress Group Learning Using AccessAlly (Best for Powerful Online Communities)
AccessAlly is another great choice for cohort-based learning. Its CommunityAlly feature creates a space where students can connect and collaborate, building a strong and engaging community.
Installing the AccessAlly Plugin
Since AccessAlly is a premium plugin, you’ll need to purchase a plan before creating your group learning. Keep in mind that if you want to create community and discussion groups for your group learning courses, then you’ll need the AccessAlly Community plan.
Simply click the ‘Get Started Today’ button in your chosen plan and follow the checkout process.
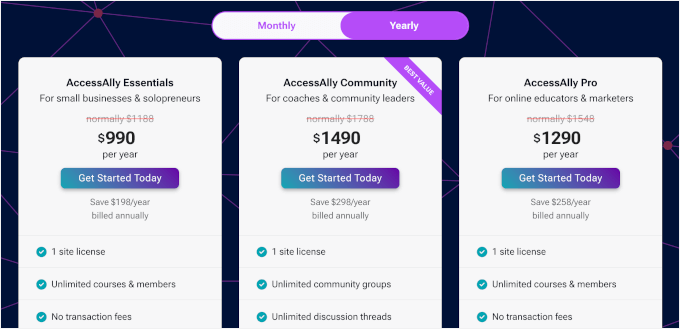
After purchasing, simply go to your AccessAlly account and click the ‘Download License’ button. If you’re using AccessAlly Pro, download the ProgressAlly.zip file as well.
Once downloaded, you can upload the AccessAlly.zip file to your WordPress site and activate the plugin as usual. If you need help, follow our guide on how to install a WordPress plugin.
Upon activation, you can connect your WordPress site to your AccesAlly account.
In the setup wizard, AccessAlly will ask for your registered email address and license key. Once you’ve filled out the fields, click ‘Next.’
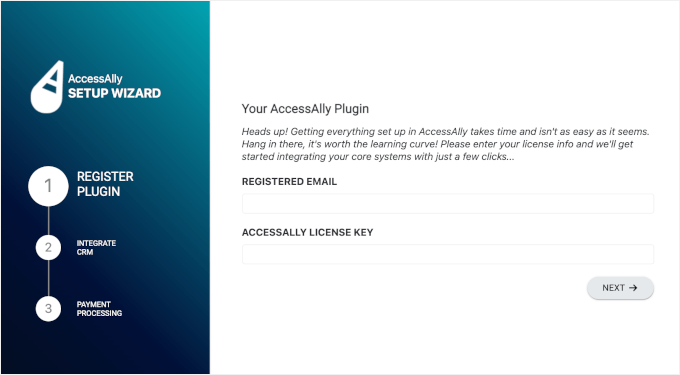
On the next screen, you’ll need to choose a customer relationship manager (CRM) tool you want to integrate.
AccessAlly has several options, including ActiveCampaign, Kit, Drip, and the built-in AccessAlly Managed.
Simply click ‘Next’ to complete the CRM integration process.

After that, you’ll set up your payment processors. AccessAlly allows you to connect to Stripe, Paypal, or both.
- To use both, simply check the ‘Enable’ boxes for each.
- If you prefer to offer just one option, go ahead and check the ‘I don’t want to integrate with Stripe/PayPal’ box.
After deciding on your payment processing, you can hit the ‘Next’ button.
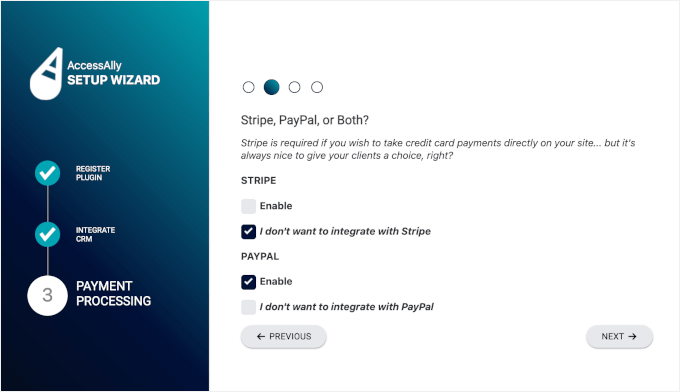
On the next screen, AccessAlly will ask you to connect your Stripe or PayPal account(s). You can just follow the process to finish the setup.
Once done, you’ll see a ‘Congratulations!’ message.
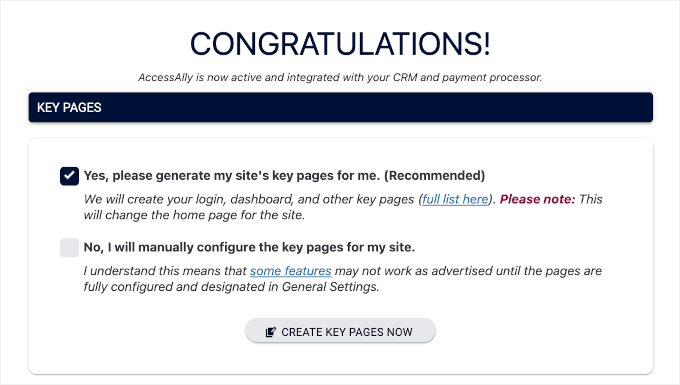
Here, you can choose to autogenerate key pages or manually configure them. For this tutorial, we’ll choose ‘Yes, please generate my site’s key pages for me. (Recommended)’ for an easier process.
AccessAlly will then auto-generate key pages, which include:
- Log-in page: This is where your members or students can log into your learning website using their credentials.
- The ‘Please login first before accessing the site’ page: If a visitor tries to access restricted content without logging in, they’ll be redirected here. It reminds them to log in before proceeding.
- Dashboard: The central hub for your users. It displays important information, such as progress tracking, available courses, and quick links to different sections of the site.
- My Account/Profile: A personalized page where users can update their profile information, change passwords, and manage account details.
- My Orders: This page has the user’s purchases, subscriptions, or transactions on your site.
- Insufficient Permissions: If someone tries to access the content they don’t have permission for, they’ll land here. This page explains why access is restricted and may include options to upgrade or purchase access.
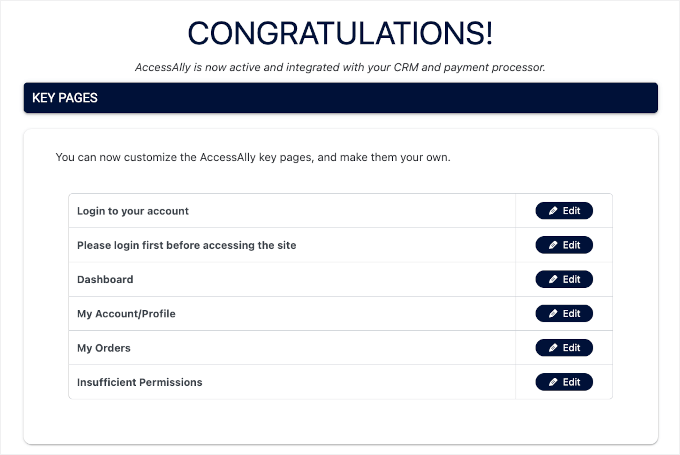
For now, you can leave them as is. You can always adjust later.
If you scroll down the page, you’ll find the ‘What’s Next’ section where you can click ‘Go To Dashboard’ or ‘Re-run Onboarding Steps.’

With that done, you’ve successfully set up AccessAlly on your WordPress website.
Creating an Online Course Using AccessAlly
The next step is to develop your group learning course materials.
You can start by designing a clear curriculum that provides students with an overview and actionable content right from the beginning. Then, you’ll want to deliver your best materials to keep students engaged and make your course stand out.
💡 Expert Tip: Don’t feel pressured to make the course perfect the first time. You can always edit or re-record sessions for future cohorts.
To start adding your learning materials, let’s click ‘Go to Dashboard’ from the last screen.
Then, you can navigate to the ‘Offerings’ menu and click ‘Create.’
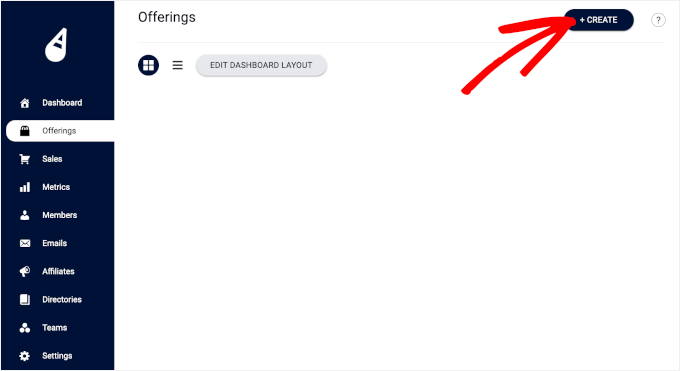
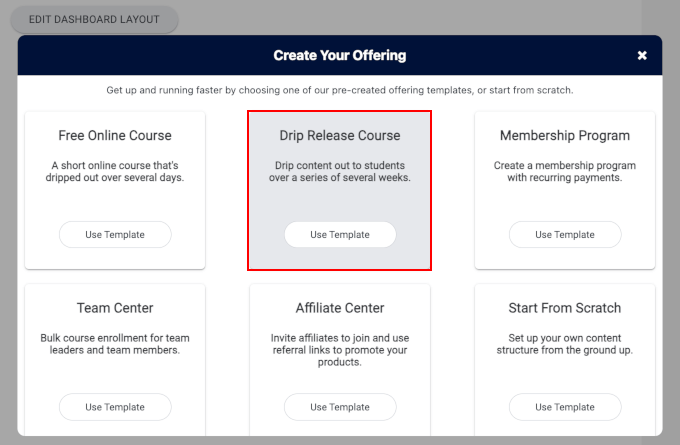
This will open the ‘Create Your Offering’ pop-up window, where you must choose an offering template.
We’ll use the ‘Drip Release Course’ model because it works best for group learning. By gradually releasing modules, you make sure students progress together within a specified time frame.
Simply click the ‘Use Template’ button in the relevant box.
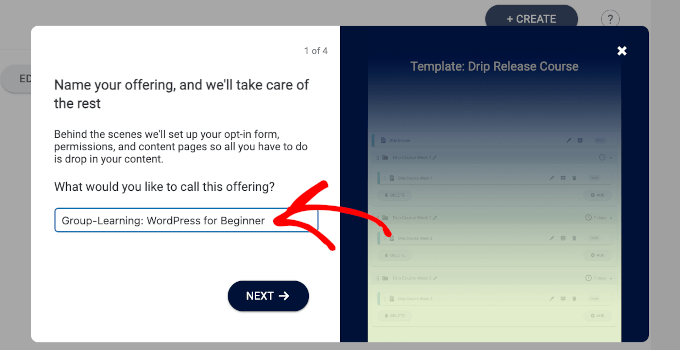
On the next screen, you’ll name your offering in the ‘What would you like to call this offering?’ field.
💡 You’ll want to make sure the name is clear, as your potential students will see this on the front end.
For example, we named ours ‘Group-Learning: WordPress for Beginners’
After that, you’ll choose your payment option.
AccessAlly offers various options, including a one-time fee, recurring payment, and payment plan with a free trial, among others.
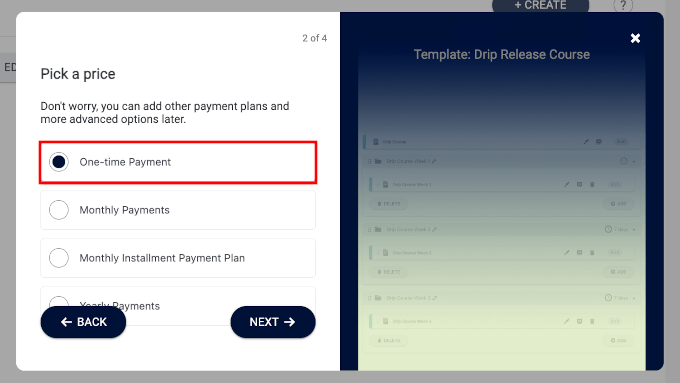
For this tutorial, we’ll choose the one-time fee method.
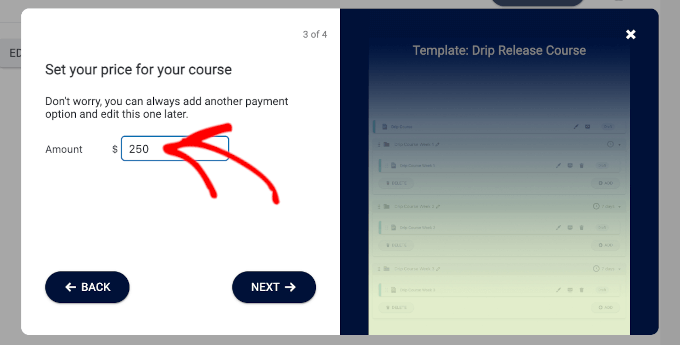
In the screenshot below, we set the price for our course in the ‘Amount’ field.
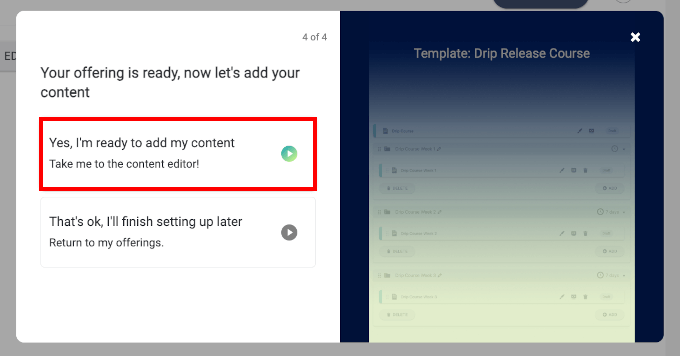
In this final step, you’ll either go to the content editor or leave it for later.
Let’s select the ‘Yes, I’m ready to add my content’ to start developing your group learning online courses.
This will take you to the ‘Content’ page.
Once inside, you’ll see that AccessAlly has generated the entire course structure for you. You can go through each section one by one and click the brush icon to edit.
For example, we’ll click the brush icon to edit the ‘Base Module’ section.
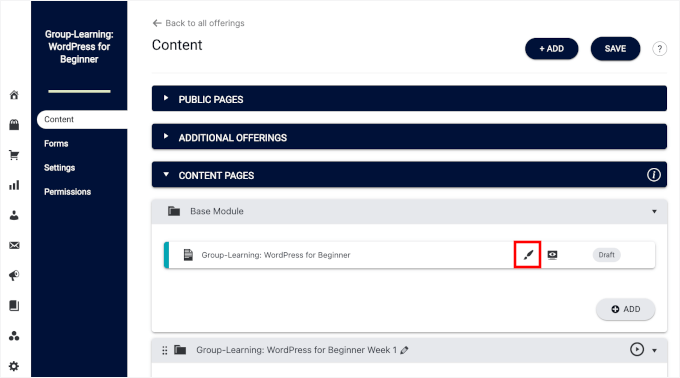
You’ll then be redirected to the WordPress content editor.
Here, you can start by converting to the block editor if you want.
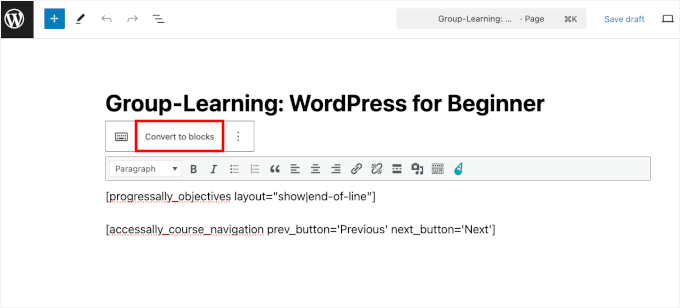
After that, go ahead and add your content.
For the base module, you might want to write the course description so potential students know what to expect from this course.
You can also add a featured image so it looks more put together.
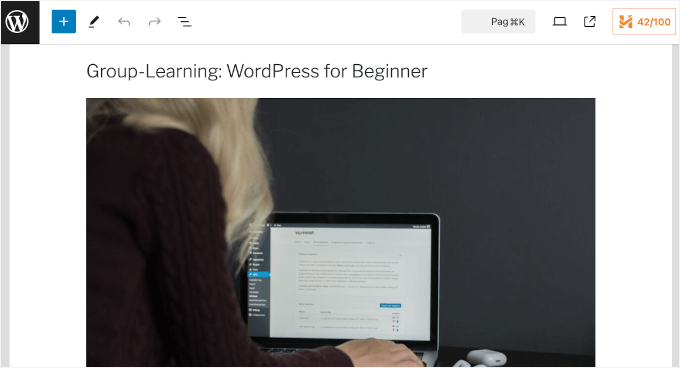
You can then preview and publish the post if everything looks good already.
With that done, it’s time to add your learning materials.
You can go through each of the 5-week course outlines and update the content. Just click the brush icon to access the content editor.
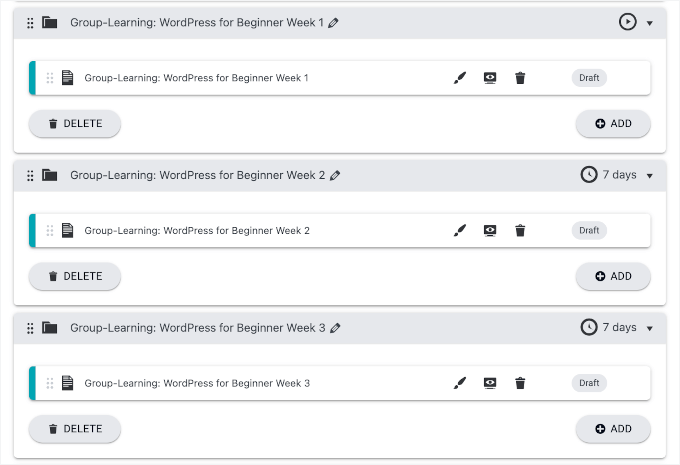
Inside the content editor, you can add descriptions, activities, or instructions – anything that’s necessary for the course.
You can also upload multimedia or embed videos to improve the learning experience.
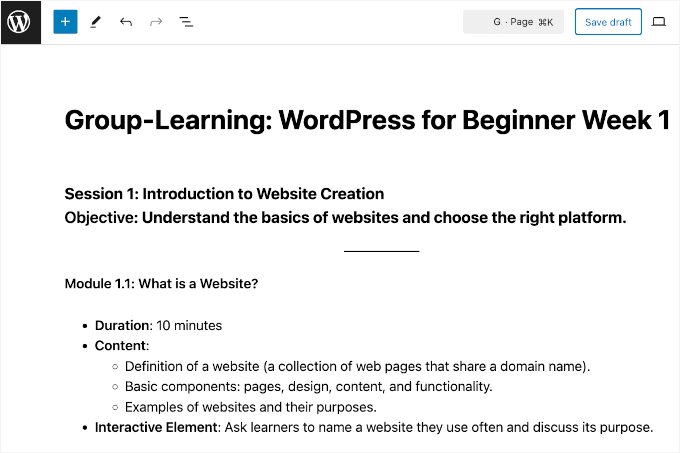
Simply hit the ‘Publish’ button when you’re happy with everything.
You can now repeat this process for all your courses.
Once everything is set, you’ll see the green ‘Published’ label on your dashboard like this:
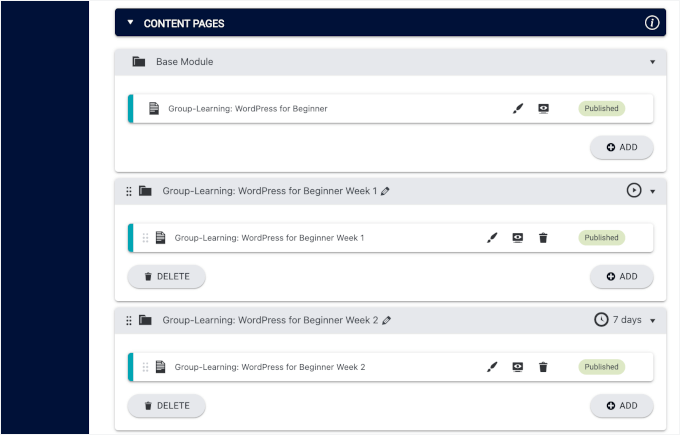
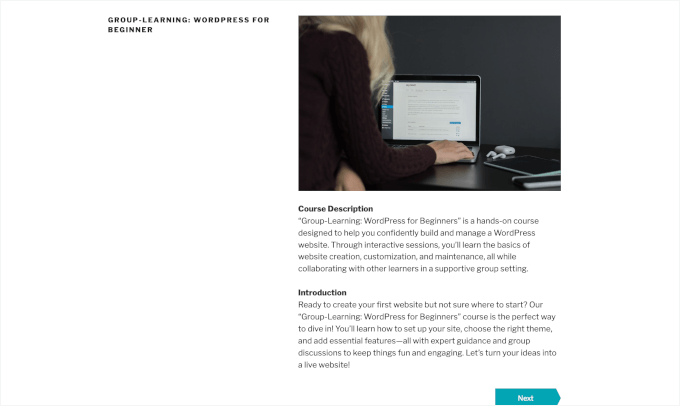
To see what it looks like on your site’s front end, simply click on the ‘Preview’ icon.
Here’s what our course looks like on our demo site:
Building Your Cohort Enrollment Page
The next step is to set up the group learning enrollment page.
💡 But first, you’ll need to decide how you want to manage enrollments. For example, you can set specific start and end dates as well as limit the number of students per cohort.
Then, you can switch to the ‘Forms’ page and click on the ‘+ Add’ button to start.
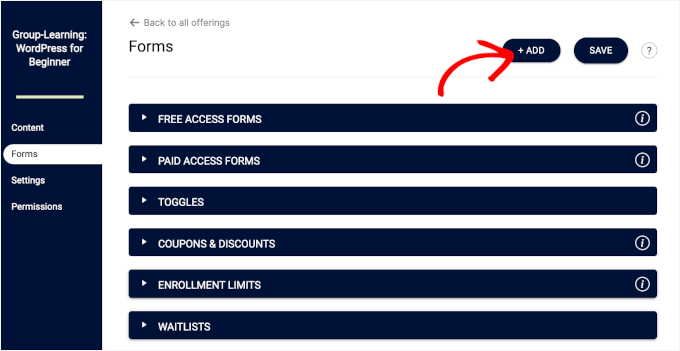
In the pop-up that appears, you’ll see a lot of templates for your AccessAlly course. These templates vary from payment and coupon codes to those related to course enrollment.
But the one you’ll need is ‘Enrollment Limit.’
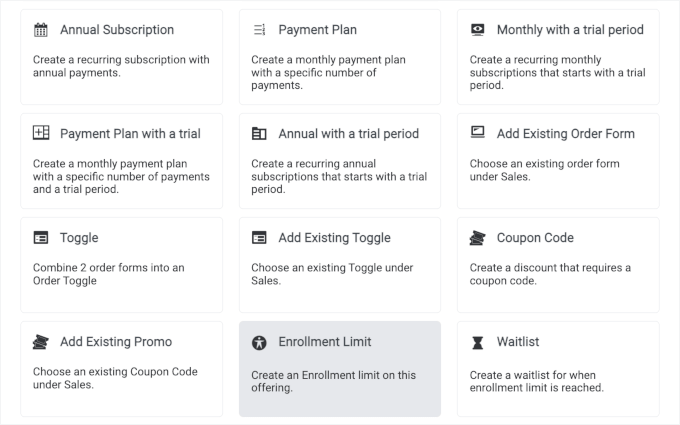
On the pop-up that appears, you’ll see 2 tabs: ‘Settings’ and ‘Order form message.’
In the ‘Settings’ tab, you can add the cohort name, specify the course enrollment time frame, and limit the number of participants.
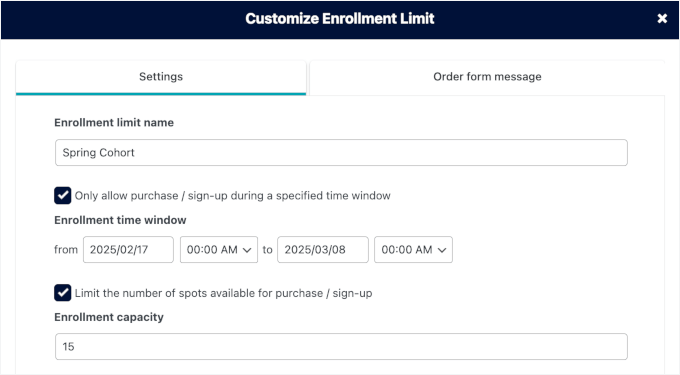
Setting the ‘Enrollment capacity’ means that once the cohort limit is reached, your order form will automatically turn into a waiting list page.
This automation helps you collect emails from those who missed the current cohort so that you can invite them to the next one.
Next, you can switch to the ‘Order form message’ tab.
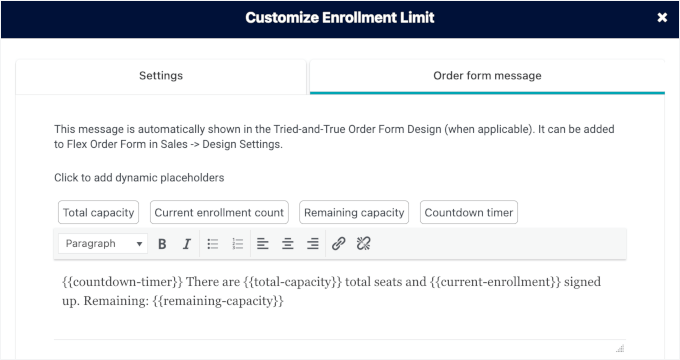
Here, you can see that AccessAlly has a ready-made order form message for you.
If you want to create a custom one, then you can take advantage of the available placeholders to add to your message. These placeholders allow you to automate details such as:
- Countdown timer: Add a live timer to show how much time is left before registration closes.
- Total capacity: Display the maximum number of spots available in your course or program.
- Current enrollment count: Automatically show how many people have already signed up.
- Remaining capacity: Highlight the number of spots still open to create urgency for potential sign-ups.
If you scroll down the pop-up, you can find a preview.
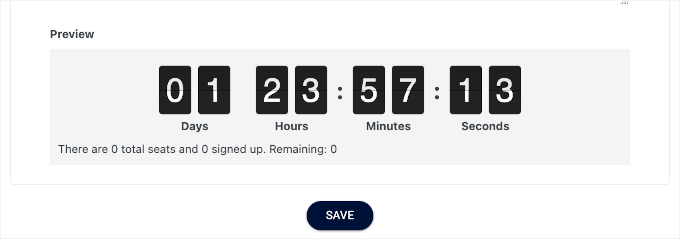
Go ahead and click ‘Save’ to close the window.
Now, if you go to the ‘Forms’ page in your AccessAlly dashboard, you’ll see that your settings are saved under the ‘Enrollment Limit’ section.
And because we set the enrollment capacity, AccessAlly has automatically created the ‘Waitlists‘ settings for you.
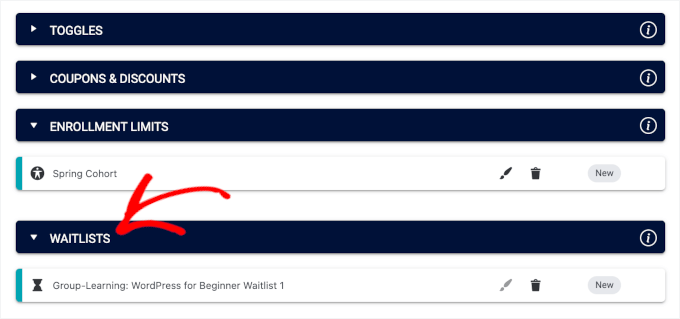
Don’t forget to click ‘Save’ on the top right corner to store your settings.
Setting Up a Community for Group Discussions
Finally, you can create a private space for your students using CommunityAlly.
Setting up a community for group discussion is a great way to boost engagement and make learning more interactive. It gives your participants a place to ask questions, share ideas, and support each other.
Plus, as the course organizer, you can easily spot where people might need extra help or clarification.
Let’s get started by installing and activating the CommunityAlly plugin.
You can download the .zip file directly from your AccessAlly dashboard and then upload it to your site. If you need a little help along the way, you can check out our guide on how to install a WordPress plugin.
Upon activation, you can go to the ‘Content’ page and click ‘+ Add.’
This will open the ‘Add New Content’ popup.
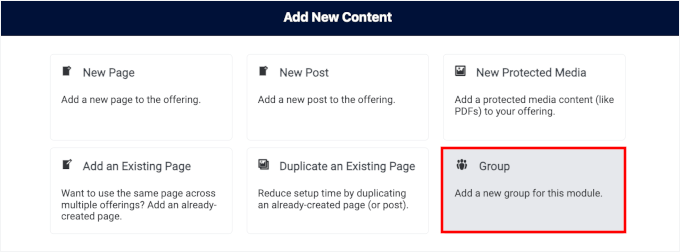
From here, you can click on ‘Group’ to select it.
On the next screen, CommunityAlly will ask you to create the group name. Simply add the name to the relevant field and click ‘Create Group.’

And that’s it!
CommunityAlly will auto-generate the page for you – hassle-free.
Now, if you visit your ‘Content Pages’ section, you’ll see the CommunityAlly group you just created.
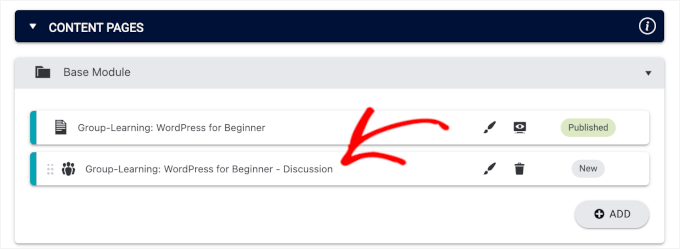
Go ahead and click the ‘Save’ button to publish the group.
After that, you can click the ‘Preview’ icon to preview it on your front end, where you’ll find 3 buttons:
⭐ Star: This button lets you mark a group or discussion as a favorite, making it easier to find later.
✉️ Message: This button opens a chat where you can send messages directly to group members or admins.
🔔 Notifications: This button lets you manage your notifications for updates, new messages, or group activities.
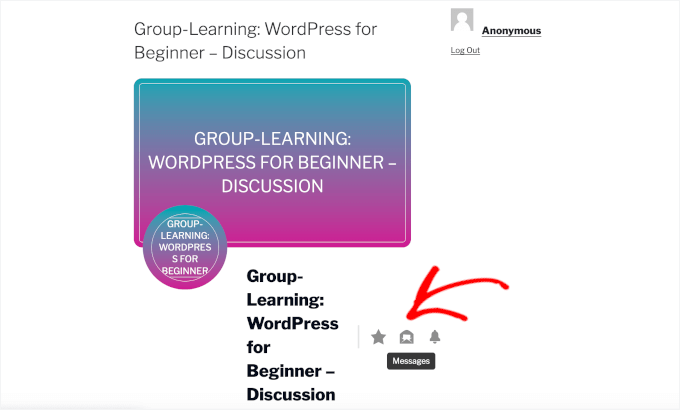
Then, if you scroll down the page, you’ll find a few tabs.
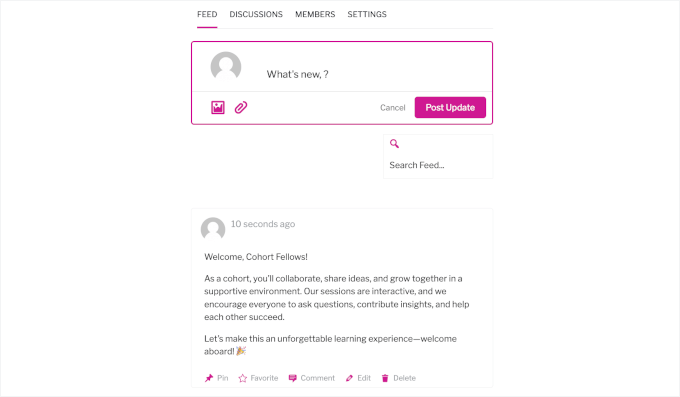
The ‘Feed’ tab is where you’ll see all the latest posts and updates from your group members, including discussions, announcements, and shared content.
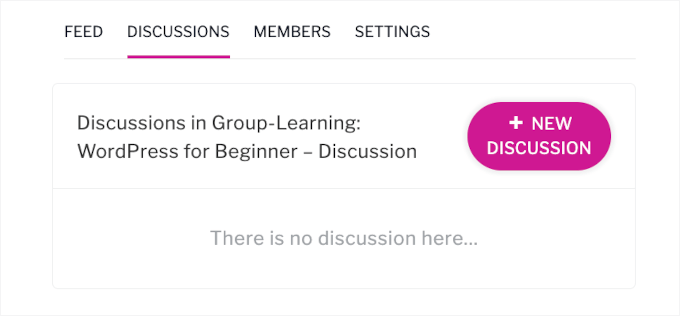
Then, there’s the ‘Discussion’ tab.
Here, you can provide discussion prompts and set up smaller groups or projects to spark deeper interactions.
The ‘Members’ tab shows a list of all the members in the group. This allows you to connect and see their profiles.
In the ‘Settings’ tab, you can edit the group name and description. You can also upload a cover image to personalize the look of your group page.
And that’s all! You have now successfully created a group learning platform with powerful community discussion features.
Cohort-Based Online Courses / WordPress Group Learning FAQs
If you’re considering starting a WordPress group learning website, then here are some common questions and answers that can help guide your journey.
What is group learning?
Group learning is when a group of students moves through a course together, often with set schedules, assignments, and regular interaction with instructors and peers. This method helps keep everyone on track and encourages teamwork and accountability.
How do you create a group learning course?
To create a group learning course, you can start by choosing the right learning management system (LMS), like MemberPress or AccessAlly, that supports cohorts.
Then, you’ll need to plan your course with a clear start and end date, break it up into modules, and add activities like group discussions or projects to get everyone involved.
When is the best time of year to start a group learning course?
The best time to launch your group learning course really depends on your audience. Many course creators find that starting in January after the new year or in the fall works well since people are often more motivated during these times.
💡 Make sure to consider when your target learners are most likely to engage.
What are the main features of LMS for group learning courses?
When using an LMS for group-based courses, you’ll want features like scheduled content releases, progress tracking, group management, communication tools for interaction, and automatic reminders.
These features help keep students on track and make the course experience more interactive.
What is the best platform to upload my group learning online courses?
WordPress, with LMS plugins like MemberPress or AccessAlly, is the perfect platform for uploading group learning courses. These tools can give you all the features you need to create and manage courses while keeping everything organized and easy for students to track.
We hope this guide has helped you offer group learning in WordPress. Next up, you might want to see our detailed instructions on how to run a virtual classroom online or how to add a learning management system in WordPress.
If you liked this article, then please subscribe to our YouTube Channel for WordPress video tutorials. You can also find us on Twitter and Facebook.
The post How to Offer Cohort-Based Online Courses — WordPress Group Learning first appeared on WPBeginner.
from WPBeginner https://ift.tt/8L4Qpem
More links is https://mwktutor.com