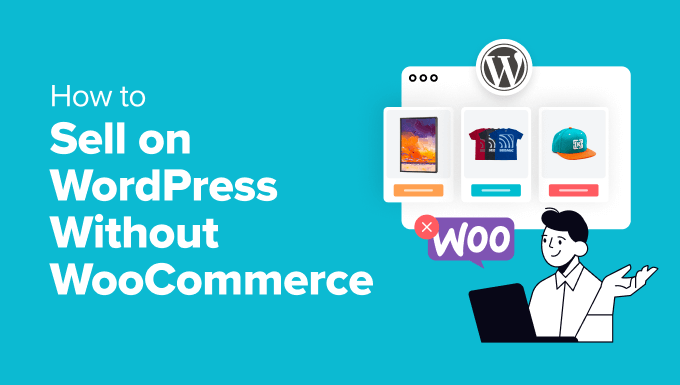
WooCommerce is a popular and powerful plugin for creating online stores with WordPress. However, it is not the only option available.
While WooCommerce excels at selling large collections of physical products, there are better choices for selling digital goods, personal services, subscriptions, and more. In fact, here at WPBeginner, we’ve used WooCommerce alternatives like Easy Digital Downloads to successfully sell our software products for over a decade.
In this article, we’ll show you how to easily sell on WordPress without WooCommerce. We’ll explore various approaches and when to use them. This way, you’ll be able to make an informed decision when choosing your preferred strategy.
When Should You Sell on WordPress Without WooCommerce?
WooCommerce is an amazing ecommerce platform that is completely free, scalable, and flexible. However, it is not the ideal choice if you don’t plan to sell multiple physical products.
For instance, if you want to sell digital downloads like ebooks, music, or PDFs, then we recommend Easy Digital Downloads. This WordPress plugin is specifically designed for selling downloadable products and also has a free plan.
Similarly, if you want to sell subscriptions, then WP Simple Pay is the better alternative. This is because the tool lets you create a simple payment form with subscription plans, manage and cancel subscriptions, and allow recurring payments.
On the other hand, you may want to sell a single product on your website. For instance, you may have a food blog where you also plan on selling one or two food supplements.
In that case, using such a complex ecommerce platform is completely unnecessary, and it can be overwhelming. Instead, you could add a beginner-friendly payment form with WPForms.
What Do You Need Before Starting a Store in WordPress?
Before you start selling your products, you will first need to set up your website. To do this, you’ll have to buy a domain name. This is the web address where people will find your site, like www.wpbeginner.com or https://ift.tt/BHu84KD.
Then, you’ll need to purchase a hosting plan. This will provide your website with the resources it needs to be on the internet.
You may consider choosing Bluehost, which is a popular hosting provider that’s officially recommended by WordPress.org.
Their plans are highly affordable. Plus, they offer a huge discount to WPBeginner readers, along with a free domain name and SSL certificate.
Now, let’s see how to sell in WordPress without WooCommerce. For this tutorial, we will be discussing three methods. You can use the links below to jump to the method of your choice:
Method 1: How to Sell Digital Downloads in WordPress
If you want to sell digital goods in WordPress, then this method is for you. You will need Easy Digital Downloads, which is the best ecommerce plugin for digital products.
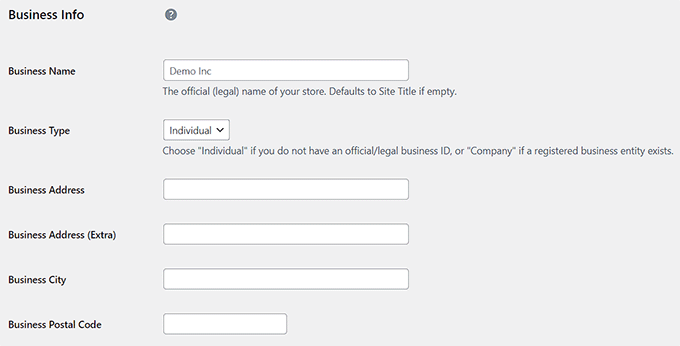
Upon activation, visit the Downloads » Settings page in the WordPress dashboard. Here, you can start by adding your business name, type, address, city, country, and region. Then, click the ‘Save Changes’ button.
Next, switch to the ‘Currency’ tab to add the currency you accept in your store.
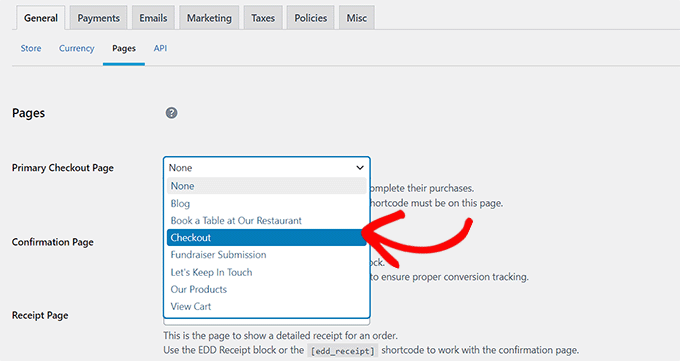
By default, EDD also creates some pages for your online store. However, if you want to redirect users to a page that you made previously, then you can switch to the ‘Pages’ tab.
Here, use the dropdown menu to use a pre-existing page like a checkout page, confirmation page, receipt page, etc.
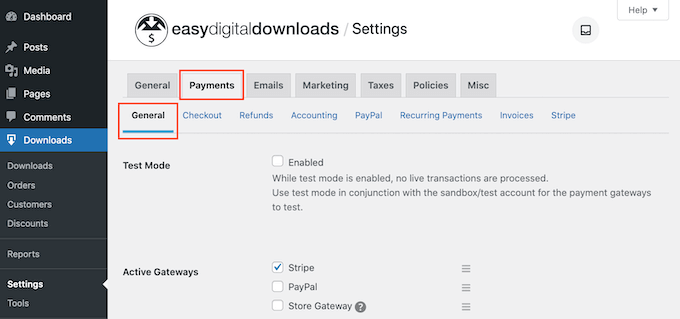
Now switch to the ‘Payments’ tab from the top and check the boxes for the payment gateways that you want to add to your site.
Once you do that, you will need to enter your Stripe or PayPal account details to complete the integration. You can then also select a default gateway, configure checkout page options, and set up invoices using different settings.
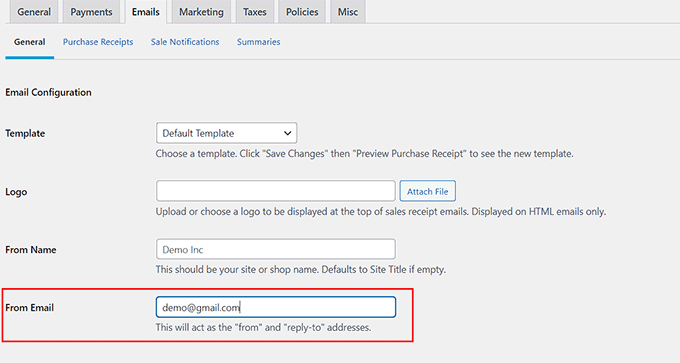
After that, move to the ‘Emails’ tab and add the email address and name that will be used when sending email messages to customers.
Finally, click the ‘Save Changes’ button to store your settings. You can also configure other options according to your liking or leave them as they are.
Now visit the Downloads » Downloads page from the WordPress dashboard and click the ‘Add New’ button.
This will open the block editor, where you must add a name for your digital product. Then, in the block panel on the right, you can select a category, add tags, and embed an image for your digital product.
You can also add a description for the product according to your needs.
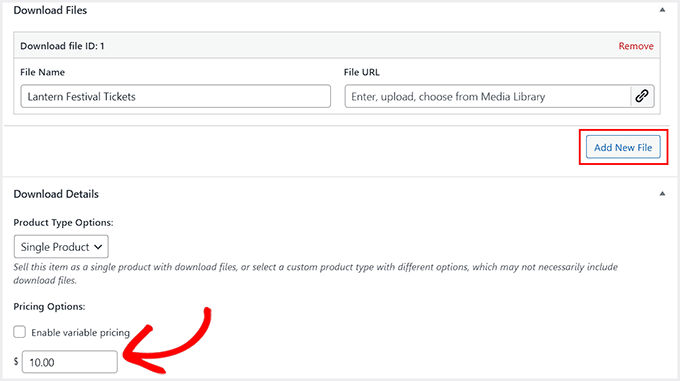
Then, scroll down to the ‘Download Files’ section and type a name for the file. Next, click the ‘Add New File’ button and upload the PDF, music file, or ebook from your computer.
Once that is done, scroll down to the ‘Pricing Options’ section and add a price for it.
Finally, click the ‘Publish’ button to store your settings. Now, repeat the process to add more products to your online store.
Then, visit your WordPress site to see the ecommerce website in action.
If you plan to sell subscriptions or personal services, then this method is for you.
You can use WP Simple Pay, which is the best WordPress Stripe plugin on the market. It comes with a visual builder, premade templates, and integration with numerous payment gateways, making it an ideal choice.
Note: WP Simple Pay has a free plan that you can use. However, upgrading to the pro version will give you access to more payment gateways, fee recovery, and more.
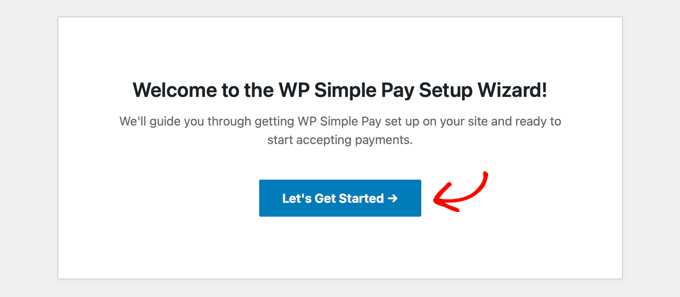
Upon activation, a setup wizard will open up on your screen. Go ahead and click the ‘Let’s Get Started’ button.
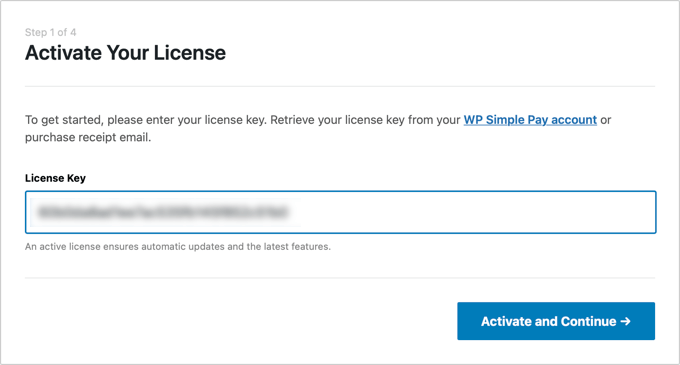
This will take you to a new page where you must enter your license key. You can find this information in your account on the WP Simple Pay website.
Next, click the ‘Activate and Continue’ button.
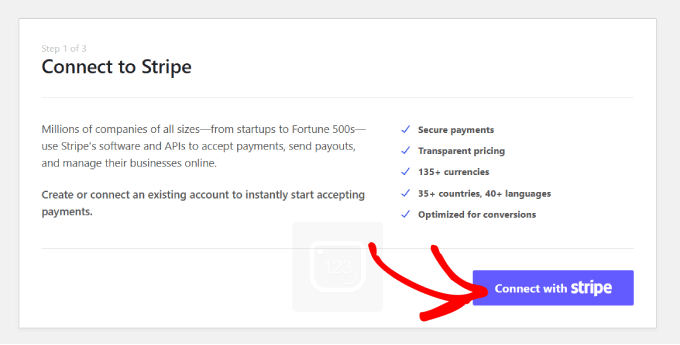
You will then be asked to connect your plugin with Stripe. To do this, click the ‘Connect with Stripe’ button.
This will direct you to another screen, where you must log in to your Stripe account to connect it with WP Simple Pay. If you don’t have an account yet, then you can create one by visiting the Stripe website.
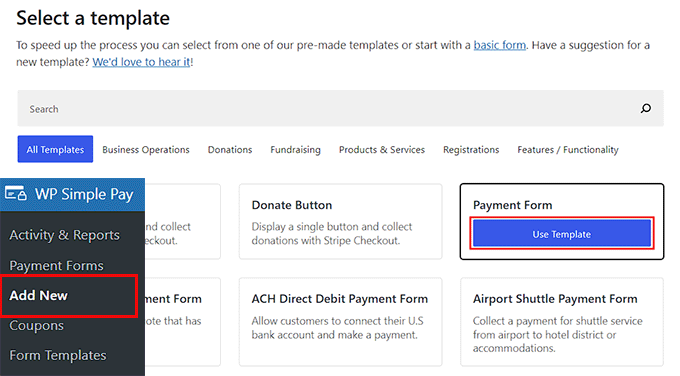
You will now be asked some other details that you can fill in according to your liking. Once that is done, you can go to the WP Simple Pay » Add New page in the WordPress dashboard.
Here, you will see a list of premade templates. Go ahead and click the ‘Use Template’ button under the ‘Payment Form’ template.
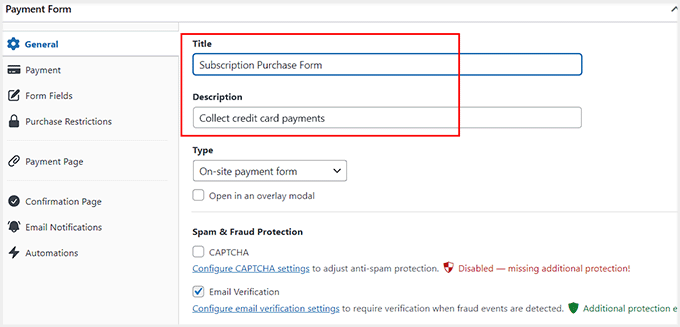
You will now be taken to the ‘Add New Payment Form’ page, where you can add a name and description to your form.
After that, choose ‘On-site payment form’ as your form type.
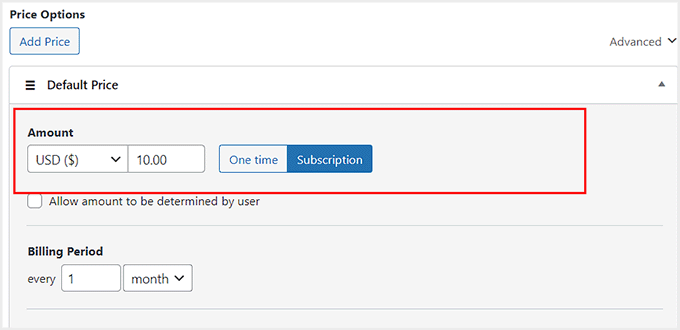
Next, switch to the ‘Payments’ tab from the left column and scroll down to the ‘Price Options’ section. Then, toggle the switch next to the pricing field to ‘Subscription’.
After that, add the pricing and configure the billing period according to your liking. For example, if you want to charge customers every month for a subscription, then you can choose 1 month as the billing period.
If you want to add multiple subscription plans for sale, then you can click the ‘Add Price’ button at the top. This will open another prompt where you can add pricing details for your other subscription plan.
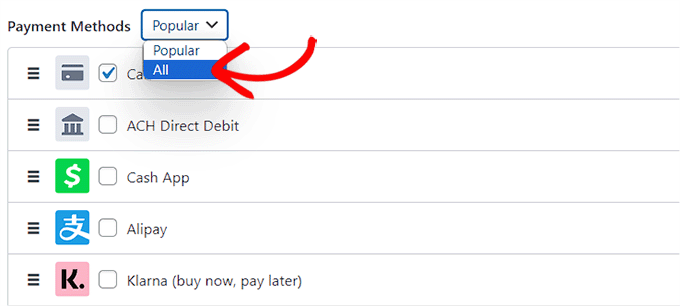
Next, scroll down to the ‘Payment Methods’ section and check the boxes for the gateways that you want to add.
WP Simple Pay also supports Klarna, Affirm, SEPA, and AliPay, but you will need the pro version to unlock them.
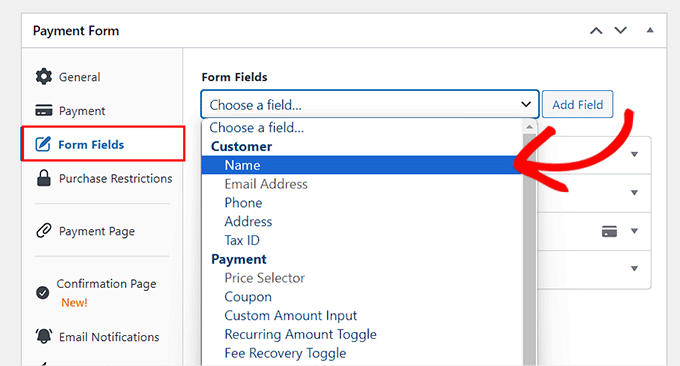
Then, switch to the ‘Form Fields’ tab. Here, the payment form has the email address, price selector, and payment methods as the default fields.
However, you can add other fields like address, phone number, and name from the dropdown menu at the top. For more details on this, see our tutorial on how to sell personal training services in WordPress.
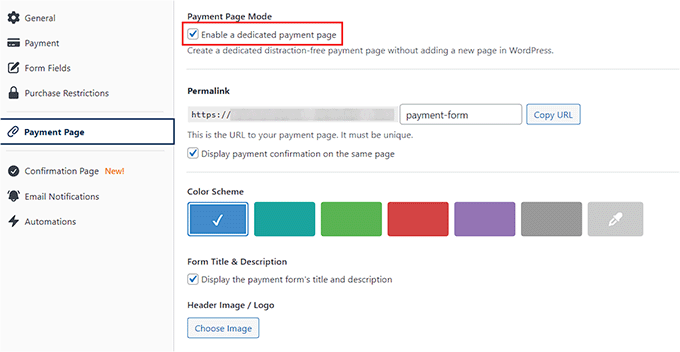
Finally, switch to the ‘Payment Page’ and check the ‘Enable a dedicated payment page’ box.
WP Simple Pay will now create a custom payment form page for you. You can customize the URL and choose a background color.
After that, just click the ‘Publish’ button to store your settings.
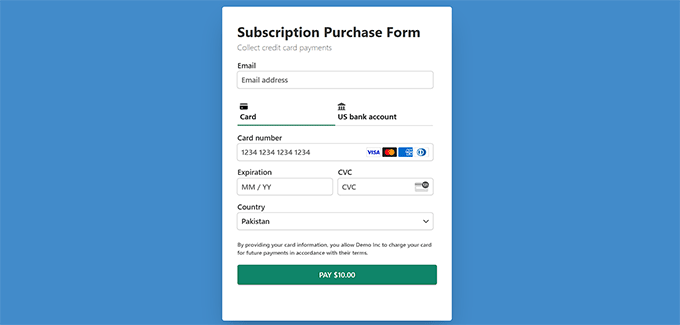
Now, visit your WordPress site to view the subscription payment form in action.
Method 3: How to Sell Limited Physical Products in WordPress
If you want to sell a few products on your website without creating a full-fledged online store, then this method is for you.
WPForms is the best WordPress contact form plugin that comes with 2000+ premade templates, a drag-and-drop builder, and complete spam protection. You can use it to sell gift cards, single products, memberships, personal services, and more.
Note: The plugin has a free plan, but upgrading to the paid version will give you access to more templates, customization, payment gateways, and more.
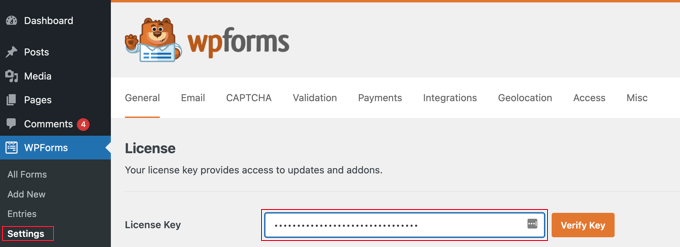
Upon activation, visit the WPForms » Settings page to enter your license key. You can get this information from your account on the WPForms website.
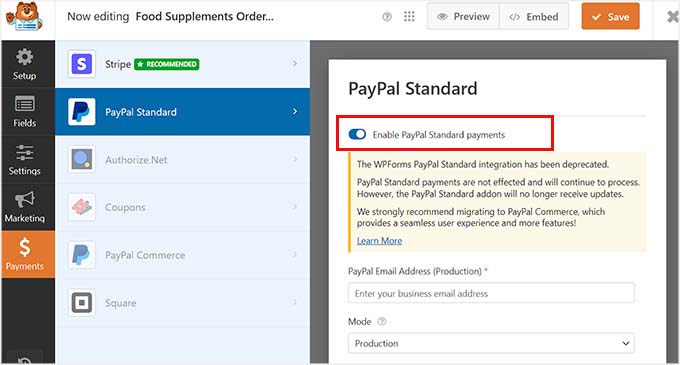
Then, go to the WPForms » Addons page and locate the ‘PayPal Standard’ addon. After that, click the ‘Install’ button under it.
Once you do that, the payment gateway will automatically be added to your form.
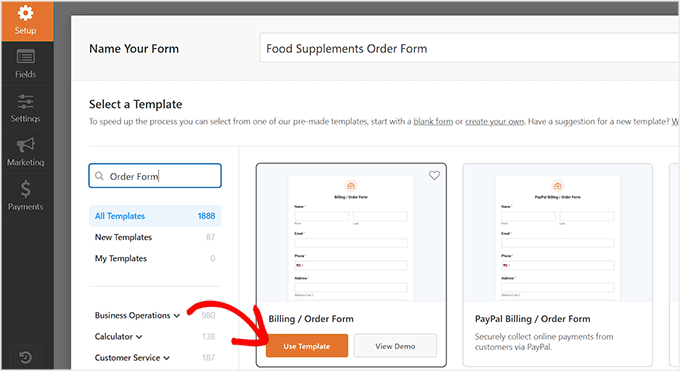
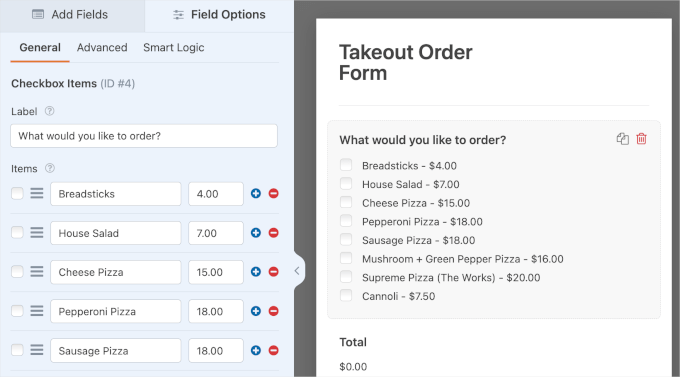
Next, head over to the WPForms » Add New page from the WordPress dashboard and add a name for the form.
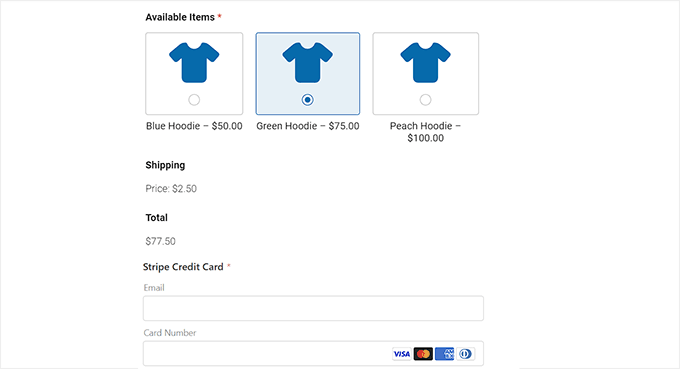
Then, click the ‘Use Template’ button for the template that you want to use. For instance, if you sell a few food supplements on your food blog, then you can choose the ‘Billing/Order Form’.
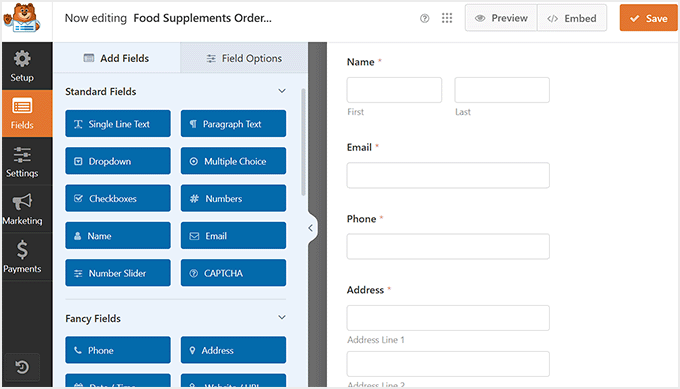
This will open the drag and drop builder where you will notice a form preview on the right with form fields in the left column. You can now add, delete, or rearrange these field options according to your liking.
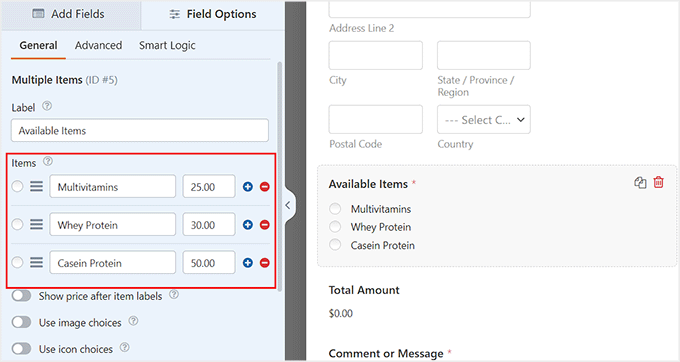
Now click on the ‘Available Items’ field to open its settings in the left column.
You can then add the names of the food supplements that you offer along with their pricing.
After that, switch to the ‘Payments’ tab and choose the ‘PayPal Standard’ option. Then, toggle the ‘Enable PayPal Standard payments’ switch.
Now, you need to add your payment gateway details to integrate with your form. Finally, click the ‘Save’ button at the top to store your settings.
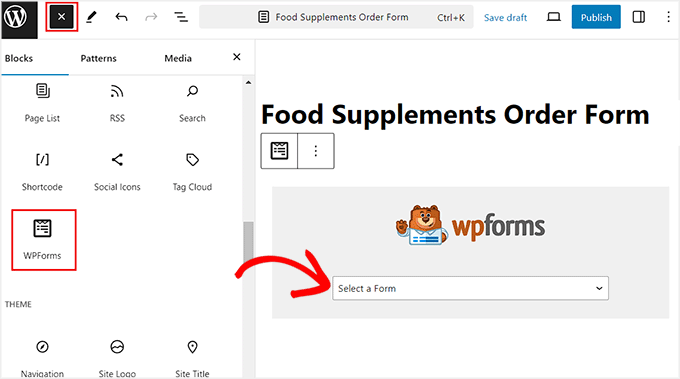
Once that’s done, open the WordPress page or post where you want to add your form. Here, click the ‘Add Block’ (+) button to open the block menu and add the ‘WPForms’ block.
Then, select the form you created from the dropdown menu within the block itself. After that, click the ‘Update’ or ‘Publish’ button to store your settings.
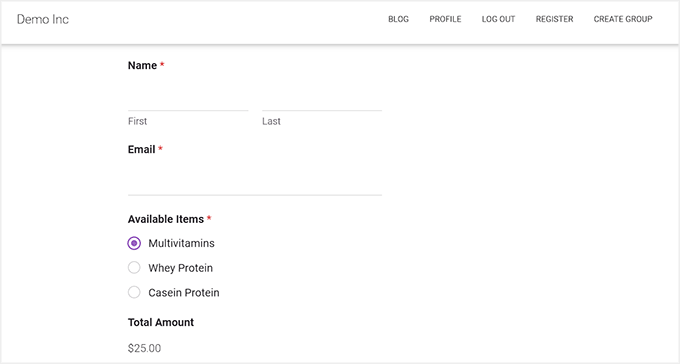
Now, visit your WordPress site to view the form in action.
Users can fill in this form to purchase your food supplements and pay using PayPal or any other gateway you added.
Keep in mind that WPForms also offers plenty of form templates for subscription plans.
So, if you want to sell memberships or recurring services alongside a small number of products, this tool may be the perfect choice.
Related Guides to Help You Set Up a Store in WordPress
If you’re interested in similar guides related to setting up a store in WordPress, just check out the following articles:
We use forms across all our WordPress websites and have seen how they can increase functionality and boost the user experience.
Whether you’re collecting feedback, managing registrations, or generating leads, forms serve as a critical communication tool between you and your visitors. They can make it easy to gather information, allow users to share their thoughts easily, or sign up for newsletters and events.
Additionally, well-designed forms can help you better understand your audience’s needs, ultimately improving your content and services.
We personally use WPForms for various tasks, such as our contact forms and our annual user surveys. This hands-on experience gives us confidence in recommending this tool, as we know its strengths and limitations firsthand. Plus, we have worked with other form builders to test out their pros and cons.
In this guide, we will explore everything you need to know about using WordPress forms effectively.
To help you out, we’ve created a table of contents for easy navigation through our ultimate guide on using WordPress forms:
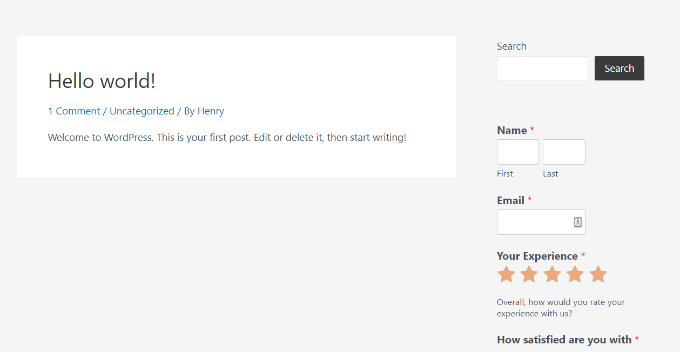
WordPress forms are interactive tools that allow your website visitors to submit information. They can be used for various purposes, such as gathering feedback and collecting contact information.
You can think of a WordPress form as an online version of a paper form you might fill out. Instead of writing on paper, users type their answers directly into fields on your WordPress website.
For example, if you have a contact form, visitors can enter their name, email address, and message before clicking ‘Send,’ ‘Submit,’ or something similar.
This information is then sent to you so you can respond.
If you run a small business website, adding online forms can really help with communication and make it easier for visitors to connect with you. These interactive tools let users quickly submit their information, making things simpler for both you and your customers.
For example, at WPBeginner, we use forms for various purposes, including:
Collecting inquiries through our contact forms
Managing website migration requests
Conducting annual user surveys for feedback
Offering free tools like our email signature generator, and more.
Why Are Forms Important for Your WordPress Site?
Using WordPress forms is a great way to engage with your visitors and gather valuable information. They’re easy to customize and can fit various needs.
Here are some popular types of forms and why they matter:
Contact Forms: These let visitors reach out with questions or comments. They help streamline communication and keep your inbox organized.
Registration Forms: If you have a membership site, then registration forms allow users to create accounts. This helps you build a community and manage user access to exclusive content.
Survey Forms: Gathering feedback is key to improving your site. Survey forms let you ask visitors about their experience or preferences, making them feel valued.
Payment Forms: If you sell products or services, payment forms enable secure transactions directly on your site, making the buying process smooth for customers.
In short, WordPress forms can boost user interaction and help you collect essential data. As a result, they help create a better experience for everyone on your site.
Choosing the Best WordPress Form Plugin
When it comes to picking the right WordPress form plugin, there are a few important factors to consider. You want something that’s easy to use, offers good value for your money, and integrates well with other tools you might need.
First, ease of use is important. You don’t want to spend hours trying to figure out how to create a simple form.
That’s why you should look for plugins with a user-friendly drag-and-drop interface. This makes it simple to add fields and customize your forms without any coding skills.
Next, you might want to consider the add-ons and integrations. The best plugins allow you to expand their functionality.
For example, you might want to let users upload files, make purchases, or connect with email marketing tools.
WPForms is a great choice for contact forms because it is super user-friendly and offers various add-ons to extend its capabilities. For more information, you can see our recommendations for the best contact forms in WordPress.
Value for money is another important factor. Some plugins charge a monthly fee, while others offer one-time purchases. Make sure to choose one that fits your budget and provides the features you need.
Keep in mind, too, that some free plugins can be hard to use. For example, Contact Form 7 is a popular option, but it lacks the user-friendliness and advanced features of other options.
Expert Recommendation: For the best solution, we recommend WPForms for your contact forms, OptinMonster for lead generation forms, and Charitable for fundraising efforts. These plugins offer powerful features and excellent support to help you achieve your goals.
If you’re looking for other form-building options, then you can check out our full list of the best online form builders.
How to Build WordPress Forms
Generally, building a WordPress form involves just a few simple steps.
After activating a form plugin, you’ll be able to access its form builder to select a template and customize it. Then, you will typically be able to set up custom email notifications and other settings for the form.
Finally, you can add the form to your post or page.
Let’s take a look at how this works for all kinds of different WordPress forms, including contact forms, surveys, and more.
Adding Contact Forms in WordPress
Adding a contact form to your WordPress site is easier and more effective than posting your email publicly, which can lead to tons of spam from bots.
A contact form adds a layer of security to keep unwanted emails out. It also allows you to ask for exactly the information you need, such as name, phone number, and email address.
While you will typically embed your contact form into a post or page, you can also make it floating.
This format is not as intrusive as pop-ups but still easy to spot, giving a subtle nudge for people to engage. This setup can also improve user experience as it lets users ask questions, get help, or leave feedback without leaving the page.
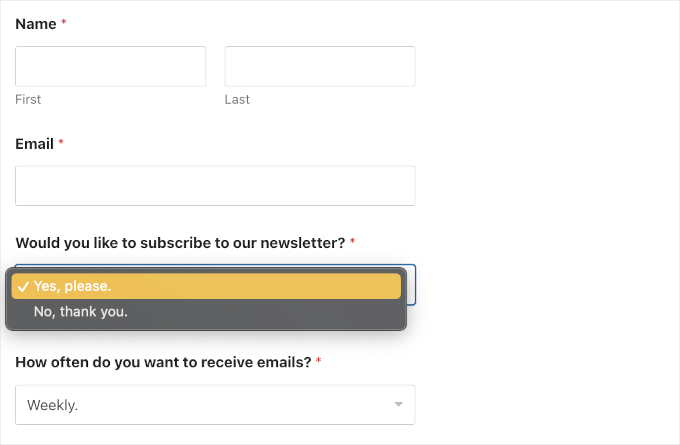
A dropdown field lets users pick one option from a list of choices by simply clicking on it. You can use dropdown fields in various web forms, like email newsletter signups, contact forms, event registrations, or product orders.
Using dropdown fields can make your forms more effective. They keep your data consistent by providing a set list of options, which prevents invalid entries and makes data analysis easier.
Plus, dropdown fields allow for dynamic features, letting you show additional questions based on user selections. They also help reduce the length of your forms, making them less intimidating and improving the overall user experience.
If you’re feeling overwhelmed by setting up an online store, don’t worry – many businesses don’t need a full eCommerce site.
For something simple, like a restaurant, you can just add an order form without all the extra shopping cart features. This makes it easier to take orders and payments, whether online or at pickup, and can help streamline your business.
If you’re only selling a few items or accepting custom payments, then a simple payment form might be a better option than a full eCommerce plugin.
For example, non-profits can accept donations on volunteer forms, or websites can offer ‘pay what you like’ for digital downloads. You can even give visitors free downloads with the option to pay for premium upgrades.
Luckily, many form builders now offer easy payment gateway integrations. This makes it easier to connect your form with popular gateways like Stripe and PayPal.
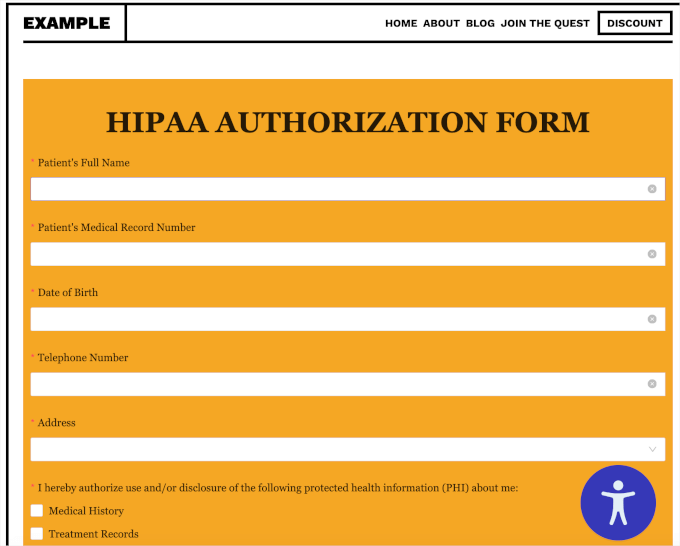
HIPAA, or the Health Insurance Portability and Accountability Act, is a US law that protects people’s private medical information.
If your WordPress website deals with patient data, like on healthcare provider sites or telehealth platforms, then it’s important to keep that information safe and secure.
When you use HIPAA-compliant forms, it helps build trust with your patients since they know their health information is protected. Plus, if you don’t follow these rules, you could end up facing hefty fines and penalties.
Adding a custom user registration form in WordPress comes with several key benefits. You can gather specific user details, making the signup process fit your site’s needs.
For example, you can add fields beyond basic info, like preferences, social media, or other data important to your business.
Are you planning a big event like a birthday party, fundraiser, or wedding? You’ll need an easy way to collect RSVPs from your guests.
If you have a WordPress website, then you can create and manage RSVP forms without any coding. This will save you time and help you keep track of who has replied since guests often respond in different ways, like through email, text messages, or even in person.
With an RSVP form, everyone can reply the same way, and all their responses will be saved in your WordPress database.
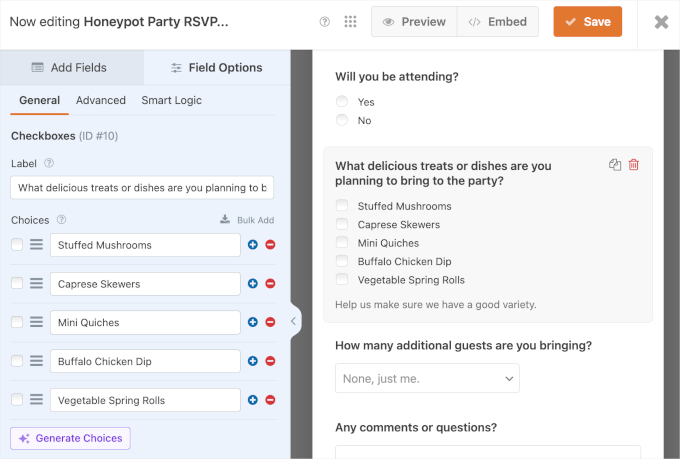
Note: WPForms now comes with AI Choices, which helps you generate options for checkboxes, dropdowns, and multiple-choice fields. Simply add the relevant field to the form and click the ‘Generate Choices’ to use the tool.
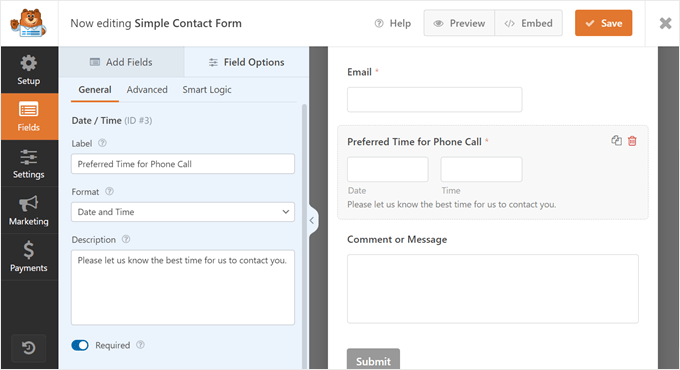
A date picker field in a WordPress form is super helpful for letting users easily enter dates. You might use it for registration forms where users provide their birthdates, order forms for selecting delivery dates, or rental forms for picking up items.
It’s also great for callback requests or leave requests, where users can specify when they want to be contacted or the dates they’ll be off.
Overall, using a date picker makes it easier for users to input dates correctly and helps keep everything consistent.
Traditional contact forms, which show all the questions at once, can make higher form completion rates harder to achieve.
That’s where conversational forms come in handy. They ask one question at a time, simulating a natural conversation, which makes the process more interactive and less intimidating for users.
A custom calculator lets users quickly figure things out without leaving your site.
For example, if you run a health and fitness blog, then adding a BMI calculator can help users decide on products or subscription plans.
Or, if you sell worldwide, then a metric-to-imperial converter can help customers check sizes, while a shipping calculator prevents surprises at checkout.
Plus, you can use calculators to generate leads by asking users for their email addresses to send them their results.
Note: A good calculator plugin can help you build a calculator in no time. Forrecommendations, you can go through our expert picks of the best calculator plugins for WordPress.
Adding Survey Forms in WordPress
An online survey is a great way to ask your visitors questions and get their feedback. You can learn what customers want from your products or services, such as which features to add or how to improve their experience.
If you have a WordPress blog, then surveys can help you learn if your content is helpful and what topics your audience wants to read about. You can even create surveys for your team to understand their concerns and find ways to improve teamwork.
Note: Having the right survey form builder makes things easier. If you don’t know where to look, you can see our expert picks of the best WordPress survey plugins.
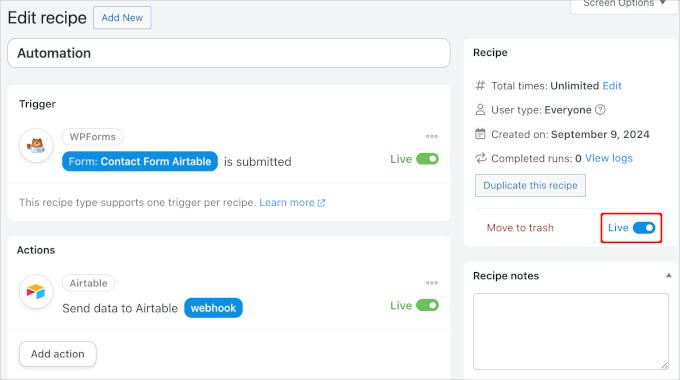
Creating a custom Airtable form in WordPress can help you manage all the data coming in from your website, like contact forms and surveys.
Instead of getting lost in a pile of emails and messy spreadsheets, Airtable lets you organize and visualize your data better. You can use it as a CRM to keep track of leads and contacts from your forms or store user survey data for easy access.
Plus, you can use Airtable to manage tasks by project, create a content calendar for your blog, or keep an inventory list for your online store.
Overall, it’s a smart way to stay organized and make the most of the information you gather.
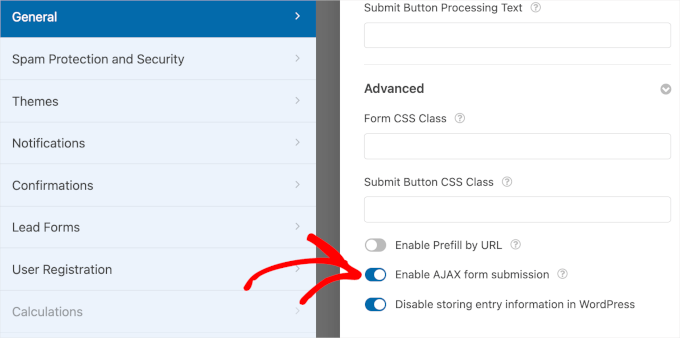
AJAX, which stands for Asynchronous Javascript and XML, is a technique that helps websites transfer data without having to reload the page.
Many popular sites like Gmail and Facebook use AJAX to keep users engaged without interruptions.
On your WordPress site, you can use AJAX for forms to collect feedback or allow user logins without reloading the page.
In other words, when you use AJAX forms, only the information from the form is sent to the server instead of refreshing the entire webpage. This means less work for the server and less data being transferred, which can make your website run faster.
Unlike regular forms, HTML forms are created using HTML code, which gives you full control over how they look and function. Some benefits of making your own HTML forms include faster loading times and the ability to customize them exactly to your needs.
While coding your own forms can be a great way to learn, it can also be tricky due to issues like compatibility across different web browsers.
Fortunately, there are tools you can use to add HTML forms to your WordPress site without having to code everything from scratch.
Customizing your WordPress forms is important to make them match your website’s look and feel. This helps your site look more professional and keeps things consistent, which can build trust with your visitors.
Plus, forms that fit your design are usually easier to use, leading to more people completing and submitting them.
Now, let’s see some key ways to tweak your forms and make them stand out.
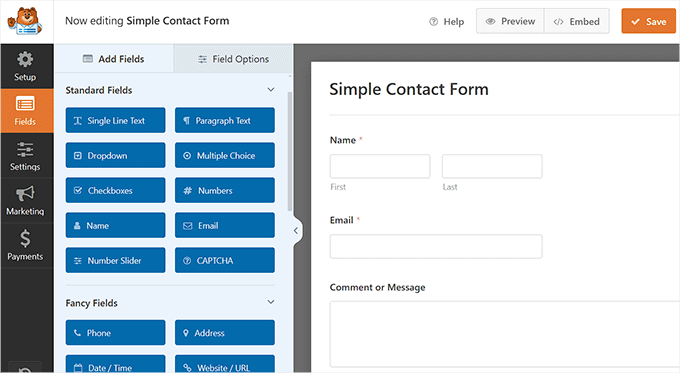
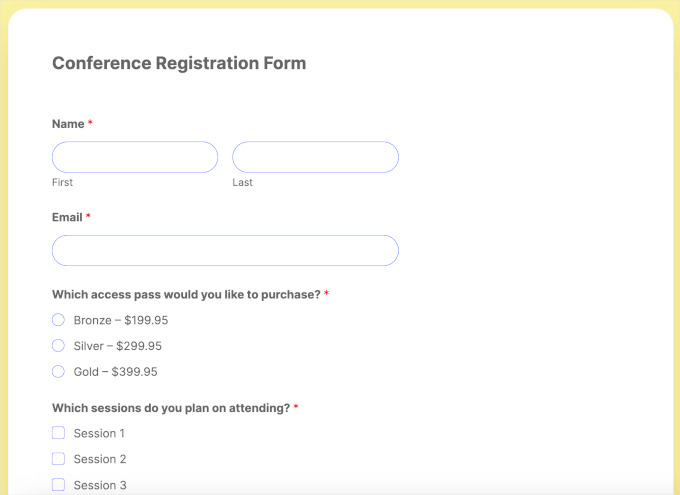
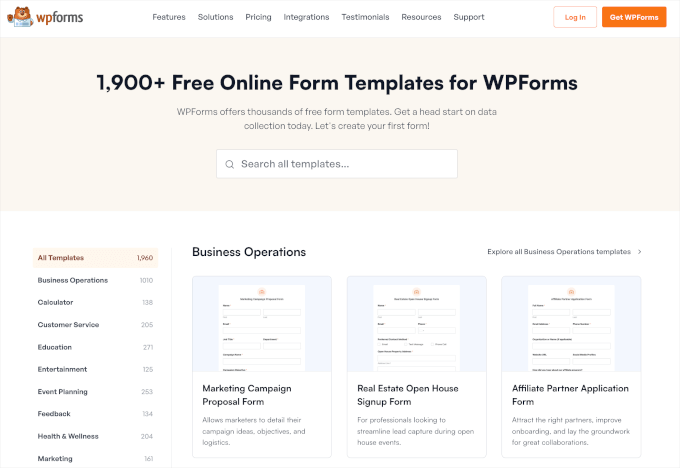
Choosing a Form Template for Your Needs
Many form plugins come with templates that you can use as a starting point.
These templates are designed to save you time and help you create forms quickly. You can choose a template that suits your needs and then quickly customize it to match your site’s branding and specific form needs.
For example, WPForms has a vast library of form templates – more than 1900 and counting.
Some of the most common ones include the ‘Simple Contact Form,’ ‘Newsletter Signup Form,’ ‘Billing / Order Form,’ ‘Survey Form’, and ‘Suggestion Form.’ Depending on which form builder you choose, you may have access to a wide variety of customizable form templates.
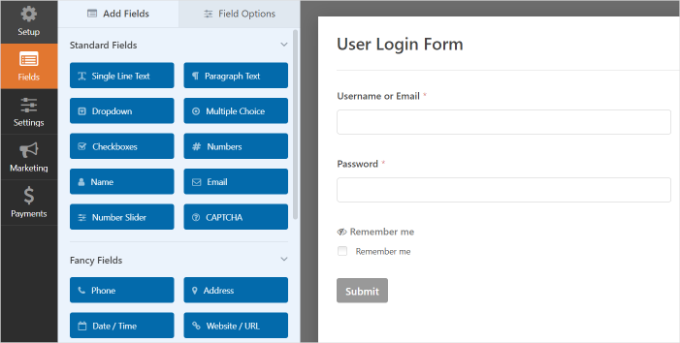
Using Drag-and-Drop Functionality to Personalize Your Form
A form builder’s interface usually has a drag-and-drop feature, which means you can easily add or remove fields without any coding. It often looks like a simple layout where you can click and drag elements to arrange them how you want.
Typically, the form builder will have a customization panel on one side and a preview on the other, like this:
This format makes form creation a breeze, even for beginners. You simply need to drag and drop the element that you want from the left column onto the form builder on the right.
Explore Customization Options for Further Adjustments
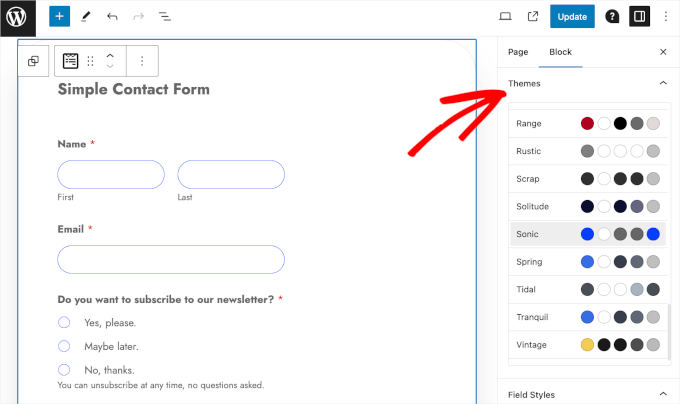
Now, modern form builders often have plenty of customization options.
First, you can adjust colors, fonts, and button styles to match your website’s theme. Then, they might even offer pre-set themes, allowing you to quickly apply a fantastic look to your forms.
For example, WPForms lets you choose a theme through the WordPress block editor.
With dozens of theme options, you can easily find a theme that matches your site’s look and feel, making customization quick. Just click on the theme you want to use, and your form will instantly take on that style.
Some plugins also let you choose between light and dark modes for a more tailored visual experience.
After someone submits a form on your WordPress site, there are a couple of important things to consider: redirecting users and sending confirmation emails.
First, you might want to redirect users to a thank-you page after they submit their form. This is a great way to let them know their submission was successful.
For example, you could direct them to a page that says, ‘Thanks for reaching out! We’ll get back to you soon.’ It gives visitors a sense of closure and lets them know what to expect next.
Next up is sending confirmation emails. This is an essential step for keeping your users informed.
After they fill out a form, you can automatically send the visitor an email that confirms their submission.
The email can say something like, ‘Thanks for your message! We’ve received your form and will respond shortly.’ In addition to reassuring users that their information went through, this keeps them engaged with your site. Plus, it gives them a record of their submission.
All in all, customizing your forms adds a personal touch and can improve engagement, so don’t skip this important step.
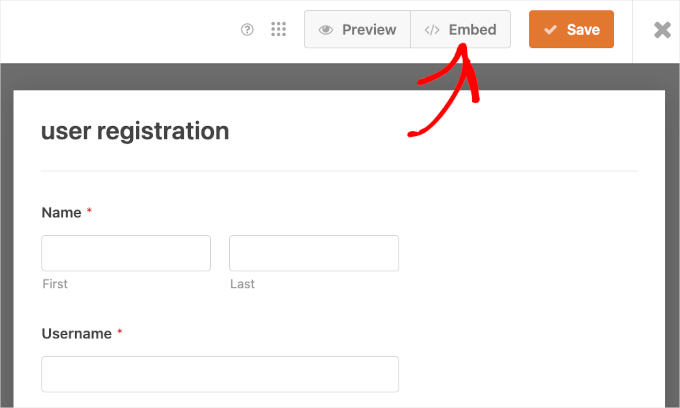
Embedding Forms into Your WordPress Site
There are a couple of easy ways to add forms to your WordPress site.
One common method is using the ‘Embed’ button right from the form builder. This button will usually redirect you to the WordPress content editor, where you can add the form using the block feature.
A shortcode is a small piece of code that you can insert into your WordPress editor. When you publish the page, WordPress will automatically replace it with your form.
Both methods are simple and let you get your forms up and running quickly!
Making your WordPress forms look and function better can help reduce form abandonment and improve overall performance.
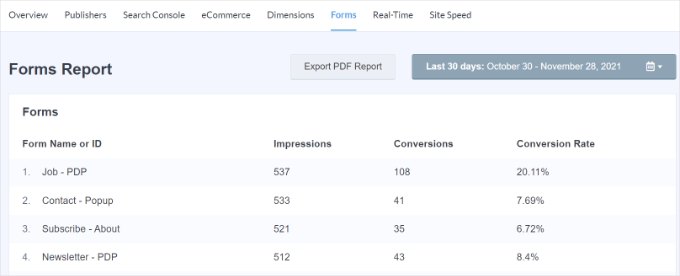
A great way to do this is by tracking how people interact with your forms. With tools like Google Analytics, you can see where users get stuck, which questions slow them down, and how many actually finish the form.
Google Analytics can be tricky to use for beginners, so that’s where MonsterInsights comes in. It’s the best and most popular Google Analytics plugin for WordPress.
MonsterInsights simplifies analytics by giving you the most important stats in a user-friendly way right from your WordPress dashboard.
This information helps you spot problems, like confusing questions or too many fields, so you can fix them and get more people to complete the form.
Long forms can scare people off, so try breaking them into smaller steps or only asking for the most important details.
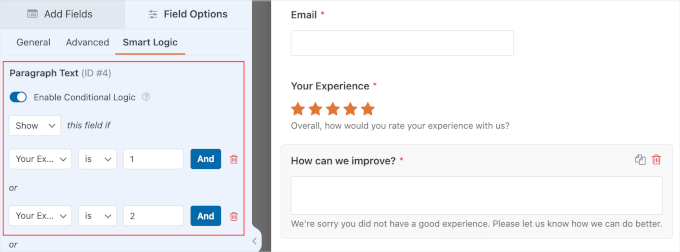
This is where conditional logic forms can be a massive help.
Conditional logic is a smart feature that lets your form fields change based on users’ answers, making the form cleaner and easier to fill out.
For example, if a customer rates their satisfaction as ‘Low,’ then additional questions about their issues will appear, while those who rate it as ‘High’ will see questions about what they liked.
This approach not only makes filling out forms more user-friendly but also helps you collect better data, leading to higher submission rates and more accurate follow-up actions.
Additionally, adding fun elements like progress bars or interactive questions can make filling out the form more enjoyable. You can see our guide on how to make WordPress forms more interactive for more tips.
WordPress Form Security and Troubleshooting Tips
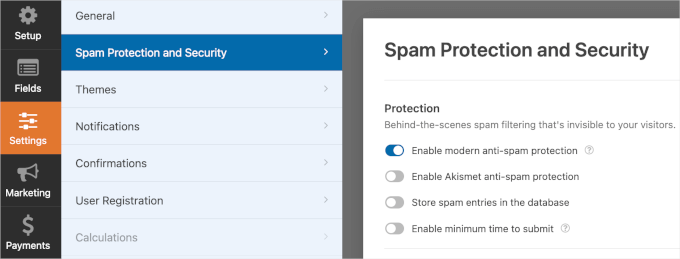
Keeping your WordPress forms secure is super important, especially when it comes to dealing with spam submissions.
While unchecked spam can flood your forms with useless entries, there are ways to prevent it.
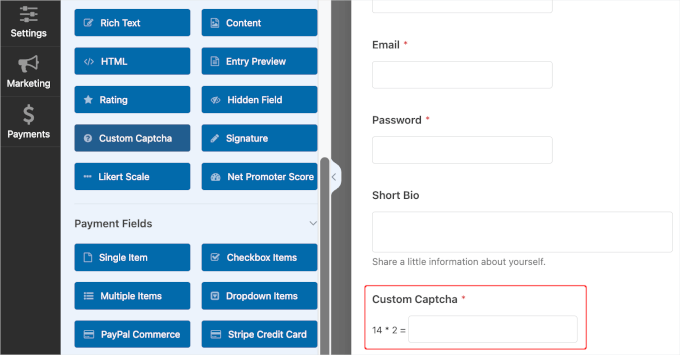
For instance, you can add CAPTCHA to your login and registration forms. This will protect your WordPress login and registration forms, which are often targets for spammers and brute-force attacks.
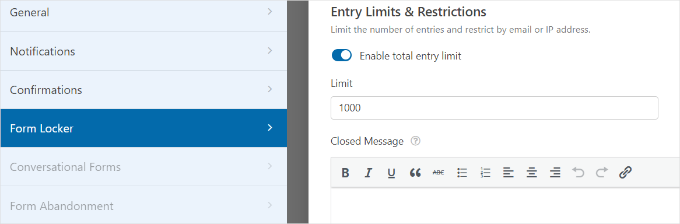
Limiting the number of form entries can also be really useful in various situations.
For example, you might want to restrict an RSVP form to a certain number of seats or only allow feedback from registered members. You can set limits based on total entries, deadlines, or even user login status.
However, the easiest and most basic method is to install a firewall plugin like Cloudflare to keep your site secure. If your plugin has an anti-spam filter, you can also enable it to block bots and suspicious activity automatically.
When it comes to form troubleshooting, you can sometimes run into issues like your form plugin not sending emails, displaying errors, or failing to load properly.
If something goes wrong, you can check your form plugin’s settings first. Make sure the email notifications are set up correctly, and if the form doesn’t display properly, see if it’s a theme conflict or a problem with other plugins.
Keeping everything updated and testing your forms regularly can help catch problems before they become bigger issues.
Get Expert Help with WordPress Emergency Support! Struggling with your WordPress forms? Our on-demand support team is here to troubleshoot and fix any issues quickly and reliably. Available 24/7, we ensure your forms are up and running in no time. Contact us today to learn more about our Premium WordPress Support Services!
FAQs About WordPress Forms
We’ve covered a lot of information about WordPress forms so far, but you may still have a few questions. Here are answers to some of the most common ones:
How do I use WPForms?
To use WPForms, you will need to first install and activate the plugin. Then, you can go to WPForms in your dashboard, create a new form using the drag-and-drop builder, and embed it on your site with a shortcode or block.
You can offer discounts with WPForms by using the coupon field. Just set up a pricing field and add a discount code option where users can enter their codes during checkout.
You can style a form in WordPress by using custom CSS. That said, some form plugins, including WPForms, allow you to add custom styles directly in their settings or on the WordPress block editor.
In this guide, we’ve covered everything you need to know about using WordPress forms. You’ve learned how to pick the right form builder and create different types of forms for your site. Plus, with tips on optimizing and securing your forms, you are all set to boost user engagement!