Friday, 29 March 2024

How to Restrict Content to Registered Users in WordPress (2 Ways)

Do you want to restrict some of your WordPress content to registered or paid users?

Often, bloggers use subscriptions or one-time payment models to monetize content on their websites. This is easy to set up if you have the right WordPress plugin.

In this article, we will show you how to restrict content to registered users in WordPress.
How to Restrict content to registered users in WordPress

Why Restrict Content to Registered Users?

If you are running a membership site or want to monetize your WordPress blog, then restricting content access is a great way to make money online.

You can lock specific pages and encourage users to subscribe to a premium plan to access the exclusive content.

For example, let’s say you have multiple guides on your site. You can turn them into an eBook and restrict that content to paying members only. Similarly, if you have a video section or online courses, then you can lock them for your paid subscribers.

Restricting content to registered users also helps build a community. You can set up a forum, a Facebook group, or a Discord server exclusively for members. This way, you can add more value for registered users.

That said, let’s look at how you can easily restrict content in WordPress for registered users. We will share 2 methods using a premium and a free plugin. You can click the links below to jump to your preferred method:

Method 1: Restrict Content to Registered Users Using MemberPress (Recommended)

The easiest way to lock content access is by creating memberships using the MemberPress plugin. It is the best membership plugin for WordPress and helps you make money by charging a one-time or recurring fee for exclusive content.
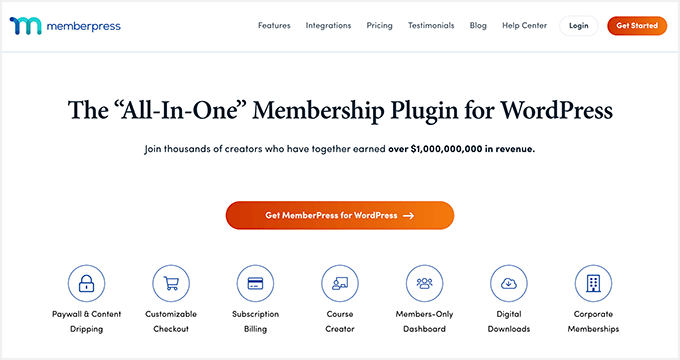
MemberPress

MemberPress is a premium plugin, and you will need at least the Basic plan to get started. WPBeginner users can enjoy up to 60% off by using our MemberPress coupon.

To learn more, see our detailed MemberPress review.

Step 1: Setting Up the MemberPress Plugin

First, you will need to download and install the MemberPress plugin. If you need help, then please see our guide on how to install a WordPress plugin.

Upon activation, you will need to head to MemberPress » Settings from the WordPress dashboard and head to the ‘License’ tab.
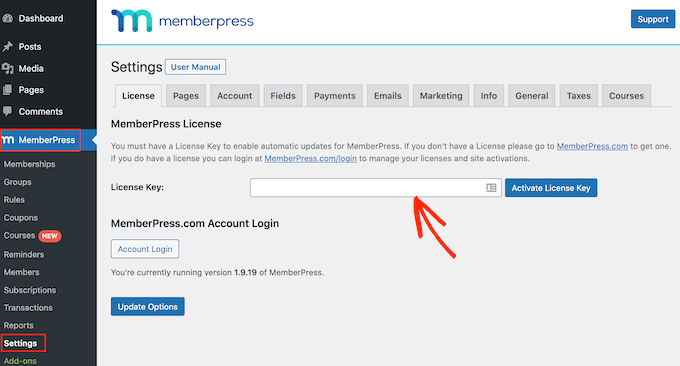
Adding a license key to your MemberPress plugin

From here, simply enter the license key and click the ‘Activate License Key’ button. You can find the key in your MemberPress account area.

After that, you will need to switch to the ‘Payments’ tab and add a payment gateway. Go ahead and click the ‘+ Add Payment Method’ button.
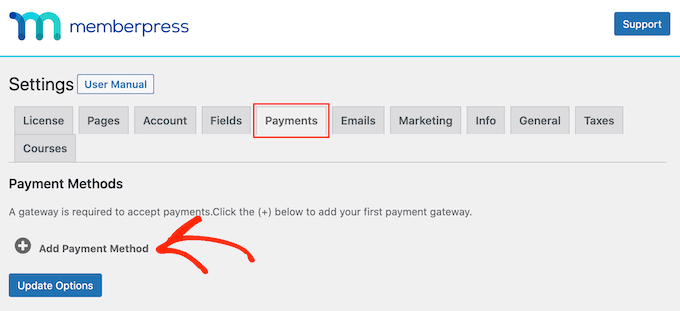
Adding payment methods to a pay-per-view website

MemberPress works with many top payment providers like PayPal, Stripe, and Authorize.net.

Simply enter a name for your payment option and click the ‘Gateway’ dropdown menu to select a service.
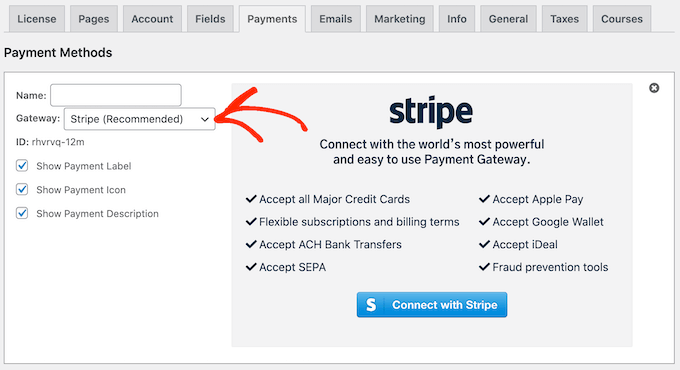
Configuring a Stripe payment gateway

Step 2: Create Membership Levels

Once you’ve connected a payment provider to MemberPress, the next step is to create different membership levels. With each membership, you can specify the level of access a user has for viewing restricted content.

To start, simply go to MemberPress » Memberships from the WordPress admin panel and click the ‘Add New’ button.
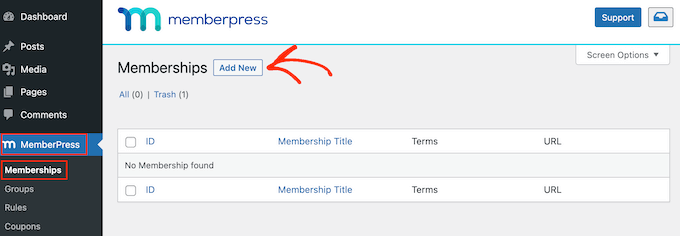
Adding a new membership subscription to WordPress

Next, you can enter a title for your new membership and add a description if you want.

In the right panel, you will see options for setting the price and expiration of your membership plan. For instance, you can select the billing type as recurring or one-time and choose the interval to be yearly, monthly, weekly, or custom.
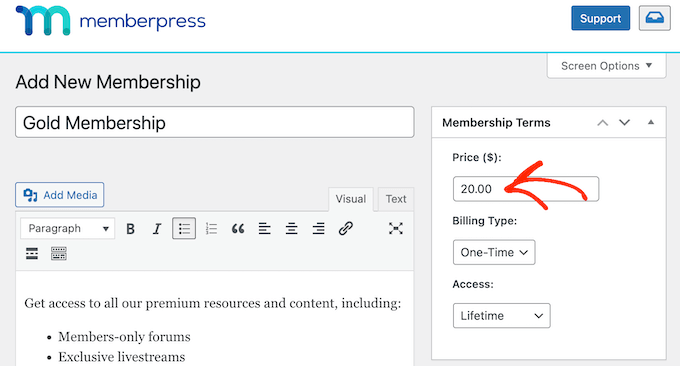
Creating a paid membership subscription using MemberPress

After that, you can scroll down to the Membership Options meta box.

Here, you will see different options for editing the registration button text, customizing permissions, and other membership options.
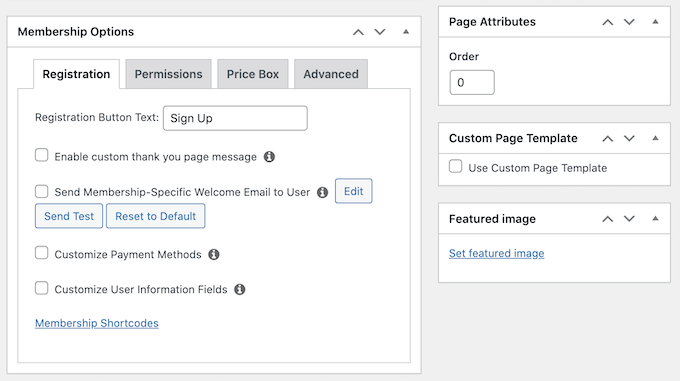
The Membership Options settings

Once you are satisfied with the membership level, simply click the ‘Publish’ button.

Now, go ahead and repeat these steps to create as many membership plans as you want.

Step 3: Restricting Content in WordPress for Registered Users

After setting up membership plans, the next step is to lock content on your site for registered users.

To start, you can head to the MemberPress » Rules page and then click the ‘Add New’ button.
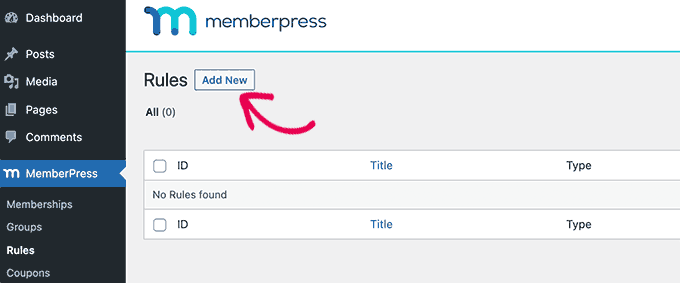
Adding a new rule to your WordPress membership site

On the next screen, you select the content to protect and set up conditions for accessing it.

First, you can click the dropdown menu under ‘Protected Content’ and pick the piece of content you want to restrict.

MemberPress offers multiple conditions to choose from. There is an option to protect all content, pages under certain categories or tags, a single post or page, and more.
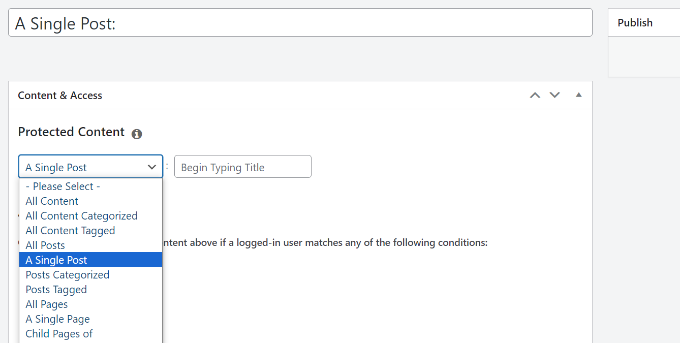
Choose how to restrict content

If you want to restrict multiple pages, then you can create a category on your site, pick the ‘All Content with Category’ option, and choose multiple pieces of content to restrict.

Similarly, you can also add tags to specific pages and use the ‘All Content with Tag’ option in MemberPress to restrict access.
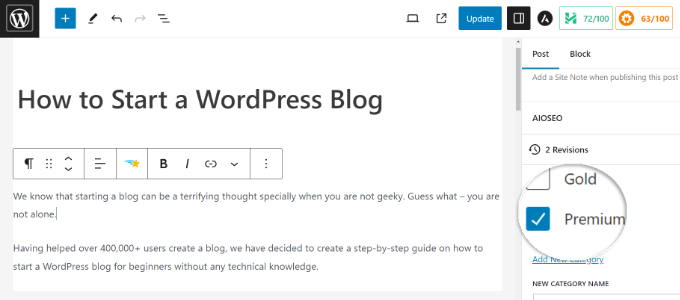
Choose a category for membership

For the sake of this tutorial, we choose to protect a ‘A Single Page’ and then enter the title of the page.

Next, you will need to click the dropdown menu under ‘Access Conditions’ and select the ‘Membership’ option.
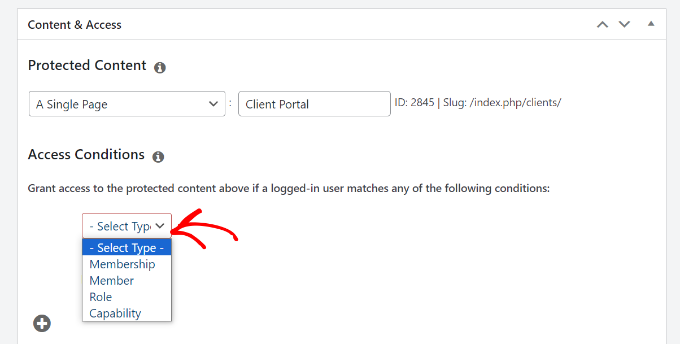
Select access control

From here, MemberPress will ask you to select a membership level to allow access to the content.

You can also add multiple membership levels by clicking the ‘+’ icon under Access Content and selecting the memberships that can view your content.
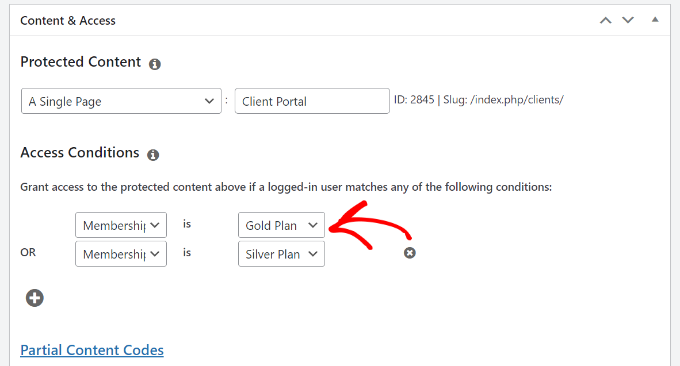
Choose membership level

Next, you can scroll down to the ‘MemberPress Unauthorized Access’ metabox.

Here, you will find options to show what logged-out or unregistered users will see when trying to view the content.

MemberPress unauthorized access section

When you are done, you can simply scroll to the top.

From here, click the ‘Save Rule’ button.
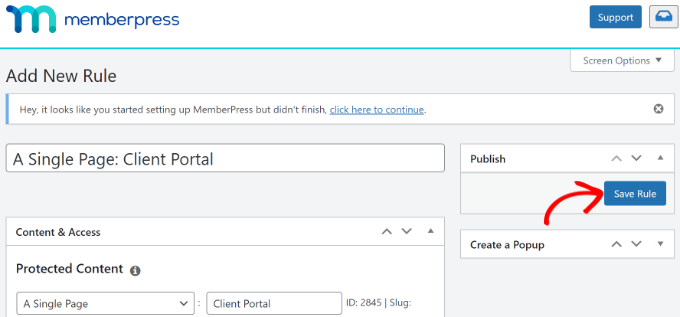
Save rule in MemberPress

You’ve now successfully restricted content for registered users on your WordPress website.

MemberPress also allows you to create a pricing page, redirect unregistered users to the pricing page, set up a login form, and much more.

Enter pricing page URL for unauthorized access

To learn more, please see our ultimate guide to creating a WordPress membership site.

Method 2: Lock Content to Registered Users Using Restrict Content (Free)

If you are looking for a free way to restrict content to registered users, then you can use the free plan of the Restrict Content Pro plugin.

To start, you will need to visit the Restrict Content Pro website and click the ‘Get Started’ button.
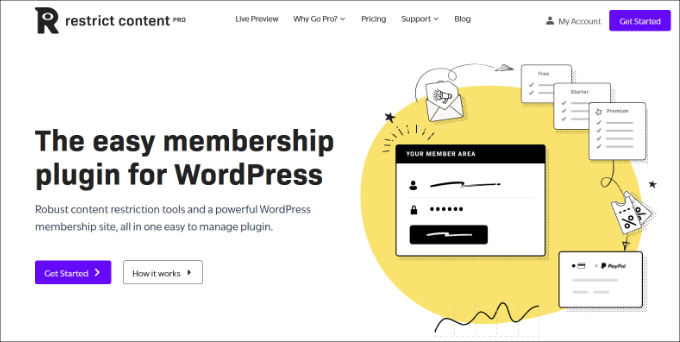
Restricted Content Pro

After that, you can sign up for a free account.

Simply click the ‘Get started’ button under the Free plan.
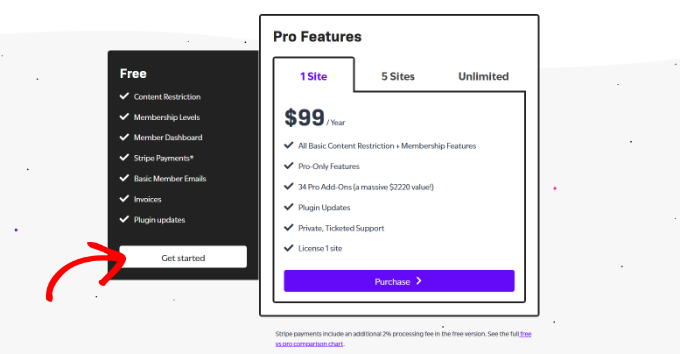
Create a free restrict content account

Next, you will see a popup window.

Go ahead and enter your email address and click the ‘Get Your Free Plugin’ button.
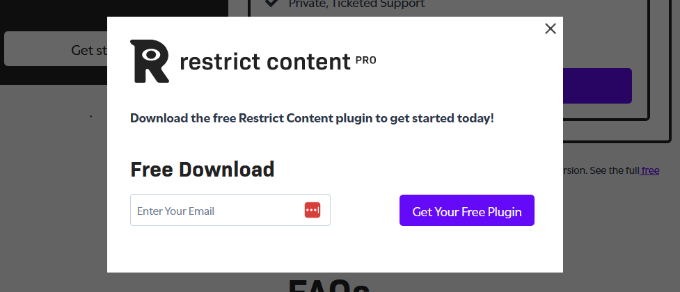
Sign up for a free restricted content pro account

Once you click the button, you will receive an email from Restrict Content Pro with the download link for the free plugin.

From here, you can download the plugin and then install and activate it. If you need help, then please see our guide on how to install a WordPress plugin.

Step 1: Set Up the Restrict Content Plugin

Upon activation, you can head to Restrict » Settings from the WordPress admin panel and go to the ‘General’ tab.
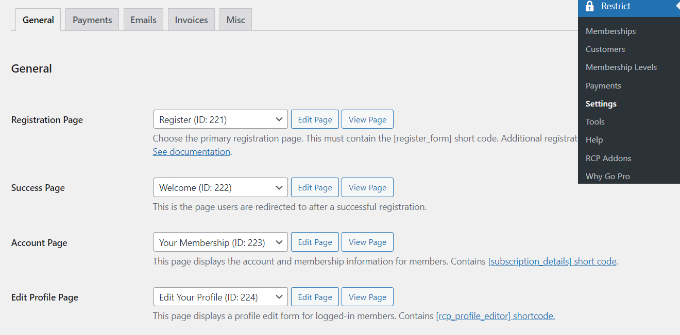
Edit general settings for restricted content pro

Next, you need to select your registration, success, account management, edit profile page, and billing update pages.

After that, you must click on the ‘Payments’ tab to configure your payment gateway. You will be asked to choose a currency and then select your payment gateways.
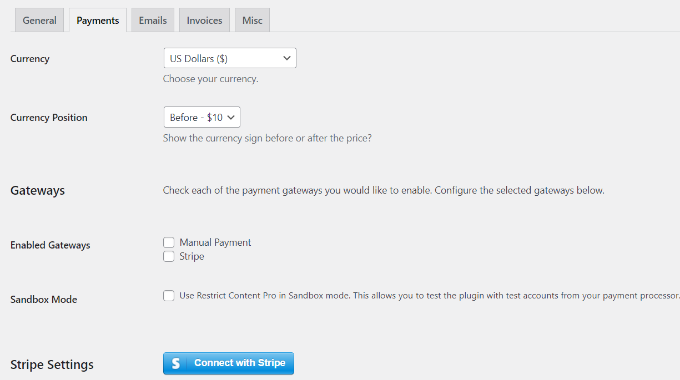
Enter payment details in restrict content pro

For instance, you can click the ‘Connect with Stripe’ button and follow the onscreen instructions to configure the payment service.

Next, you can switch to the ‘Misc’ tab.

There are some important options available in this tab. You can set up login page redirects, disable account sharing, control form CSS, send IPN emails, and set up reCAPTCHA for registration forms to prevent spam registrations.
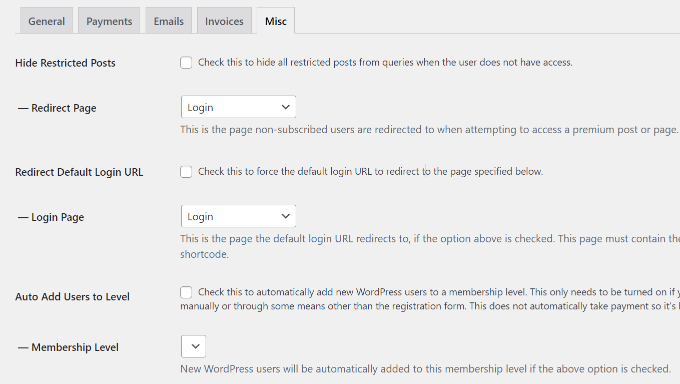
Configure Misc settings

Step 2: Create Subscription Levels for Restricted Content

Now, we are ready to create subscription levels for your restricted content.

For example, you can create a subscription level Premium and set a price for it. When you are restricting content on your website, you will be able to choose the subscription level a user must have in order to access that content.

To get started, you can head to Restrict » Memberships Levels from the WordPress dashboard.
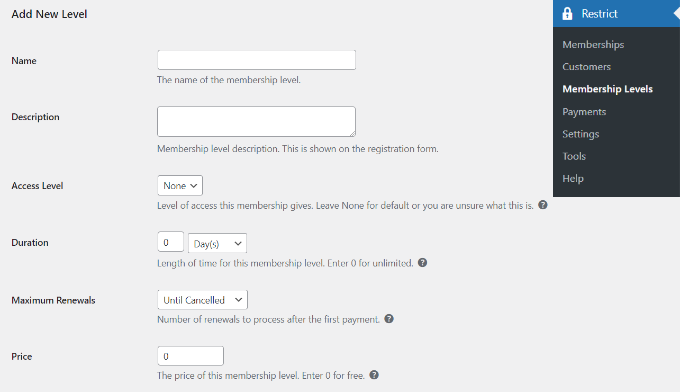
Create new membership levels

Creating a subscription level in Restrict Content Pro is simple. Simply give your subscription level a title, a description, and a price. You can set the price to zero if you want to create a subscription level for registered non-paying users.

You can choose the duration of a subscription level or set it to 0 to make the duration unlimited.

Lastly, you need to set the status to ‘Active’ and choose the ‘User Role‘ that will be assigned to people after signing up.
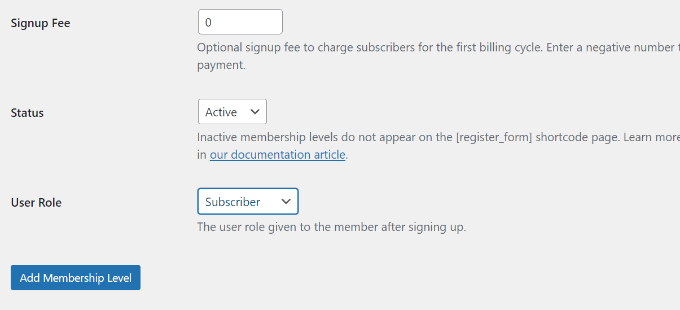
Select user role to add membership

Once you are done, simply click the ‘Add Membership Level’ button.

You can now repeat this step to add as many membership levels as you want on your website.

Step 3: Lock Content for Registered Users

Now, you are ready to lock content for registered users. Go ahead and edit any post or page on your website.

In the content editor, scroll down to the ‘Restrict this content’ meta box. From here, click the dropdown menu under ‘Member access options’ and pick the ‘Members of membership level(s)’ option.
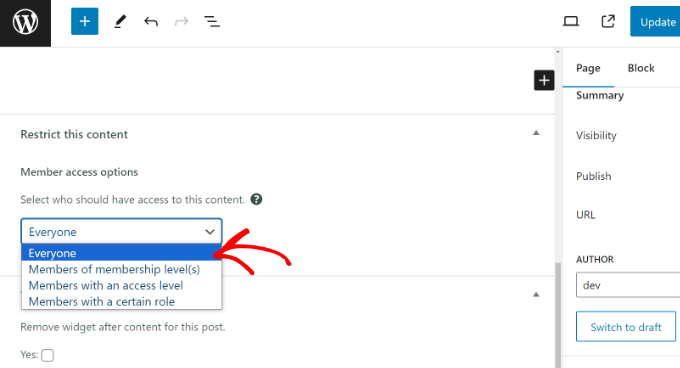
Select user role to restrict

After that, you will see multiple options.

Go ahead and choose the ‘Members of specific membership levels’ option and pick the membership level that can access this content.
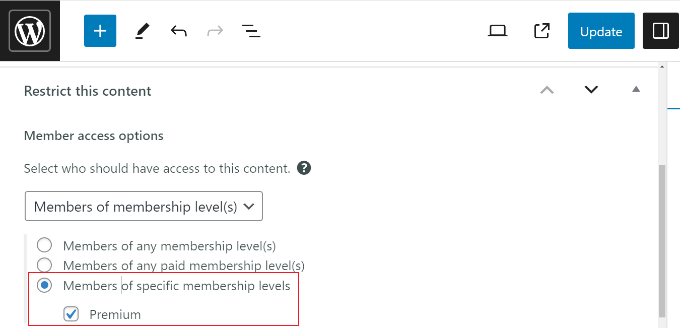
Choose which membership level can access content

The plugin also lets you restrict content based on user roles. When you are done, go ahead and update your page or post.

That’s it. You’ve successfully locked content for registered users using the Restrict Content Pro plugin.

Bonus: Set Up Content Locking to Grow Your Email List

Content locking is a technique where users must take an action to view content. For instance, you can lock specific pages or guides and encourage people to sign up for your email newsletter or pay a fee to view the content.

The easiest way of setting up content locking in WordPress is by using OptinMonster. It is the best lead generation and conversion optimization software that helps you boost sales, grow your email list, and get more conversions.

Content locking preview

OptinMonster offers prebuilt campaign templates and a drag-and-drop builder, making it super easy to customize your campaigns. It also has powerful display rules, which let you choose when and where the campaign will be displayed.

You can enable the Lock Content option from the Display Rules settings and choose whether to blur or remove the locked content.
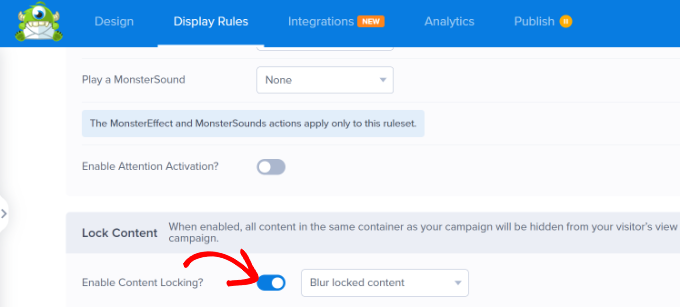
Enable content locking feature

Then, OptinMonster will restrict access to the blog post or landing page until a user performs the desired action, like entering their email address.

For more details, please see our guide on how to add content locking in WordPress.

We hope this article helped you restrict content to registered users in WordPress with MemberPress. You may also want to see our comparison of the best drag-and-drop page builders for WordPress and proven ways to make money online.

If you liked this article, then please subscribe to our YouTube Channel for WordPress video tutorials. You can also find us on Twitter and Facebook.

The post How to Restrict Content to Registered Users in WordPress (2 Ways) first appeared on WPBeginner.


from WPBeginner https://ift.tt/eHS1Piu
More links is https://mwktutor.com

WordPress for Enterprise – 6 Tips You Should Know

We are often asked about using WordPress for enterprise websites. Is WordPress a good choice for enterprise?

An enterprise website typically refers to a large website with millions of page views. It may also refer to websites run by big-name brands or corporations.

Normally, these organizations have slightly different requirements than small business websites. They need flexible scalability, better access controls, tighter security, and improved performance.

In this article, we’ll look at WordPress for enterprise and share our tips on using WordPress for large-scale enterprise projects.

Debunking myths about WordPress enterprise

Here is a break-down of the topics we’ll cover in this article:

Why Use WordPress for Enterprise?

WordPress is the world’s most popular website builder, powering more than 43% of all websites on the internet.

In terms of CMS (content management system) software, WordPress dominates the market with a 65% market share. (source: CMS Market Share Study)

The immense popularity of WordPress is due to its flexibility, freedom, and ease of use.

The same reasons that make WordPress a great choice for smaller and medium-sized businesses also make it an excellent option for enterprise clients.

  • Costs – As a free, open-source platform, WordPress makes it easier to control costs at the enterprise level with the freedom to choose between different providers for hosting, development, support, and administration.
  • Add-ons and Integrations – With over 59,000 free WordPress plugins, there are a ton of ready-to-use add-ons for WordPress. Want to use a third-party email marketing service or payment gateway? Chances are that there is already an integration available for WordPress.
  • Expertise – As the most popular platform, plenty of people with high levels of expertise are available for you to hire. Whether you want to hire a developer, SEO manager, or system administrator, you’ll find the best people with years of experience with WordPress.
  • Security – As open-source software, WordPress is heavily scrutinized for security best practices by the world’s leading security experts. This assures you that if a vulnerability is found, it will be quickly reported and almost immediately patched.

All of this sounds good, but what about the concerns regarding WordPress usage in the enterprise?

Let’s address some of those misconceptions.

Debunking Myths About WordPress in Enterprise

Anything as popular as WordPress often faces myths, stereotyping, and misconceptions.

Generally, such myths are fuelled by competing alternatives to sell their own products or services.

Let’s look at some of those misconceptions about WordPress and debunk them from an enterprise software point of view.

1. WordPress is For Blogs Only

If you look back at the history of WordPress, you’ll find out that it started to solve a blogging software requirement.

That was two decades ago.

Soon after its start, WordPress evolved into a CMS and a full-fledged platform to make any types of websites.

It powers more than 43% of all websites and is used by all sorts of businesses. This includes businesses, big-name brands, popular online stores, subscription-based businesses, software companies, and more.

2. If WordPress is That Great, Why is it Free?

A misconception about WordPress being free is that people think of free as in free coffee. Which WordPress is not.

Users still need to pay for hosting, buying domain name, pay for third-party tools, and more.

WordPress is free, as in ‘freedom.’ It is an open-source software, meaning anyone can download it freely and build whatever they need.

Enterprises widely use free software like WordPress because it helps them cut costs. The biggest tech companies in the world use free software, including Google, Meta, Microsoft, Amazon, and countless others.

Further reading: Why is WordPress Free?

3. WordPress is Not Secure

Another misconception is that WordPress is less secure than some other software.

Considering the size of WordPress’s market, it is significantly leaps and bounds ahead of any competing software available in terms of security.

Being open source and a crucial component of the Internet ecosystem, its code is consistently monitored, tested, and scrutinized by the world’s top security analysts.

With just some very basic WordPress security setup, it can be further strengthened. From an enterprise perspective, those common-sense security precautions are normal best practices.

Want to hear about more WordPress misconceptions? See our article debunking common WordPress myths.

Examples of WordPress for Enterprise

Now that we have covered the essential tips you need to consider when using WordPress for enterprise projects.

Let’s look at some real examples of WordPress in enterprise.

1. Nvidia

Nvidia Blogs

Nvidia is a tech giant known for inventing and manufacturing graphical processing units (GPUs). They use WordPress for their blog section.

Their website uses a custom WordPress theme with a magazine-style layout.

2. Tonal

Tonal

Popular gym equipment brand Tonal uses WordPress for its website and for selling gym equipment and subscriptions.

Their website utilizes several popular WordPress plugins, including WooCommerce for the shopping cart and eCommerce.

3. The Walt Disney Company

The Walt Disney Company

The Walt Disney Company uses WordPress for its corporate website.

Using a custom website design, the website features their company news, careers, mission statement, and investor relations information.

4. Meta

Meta Newsroom

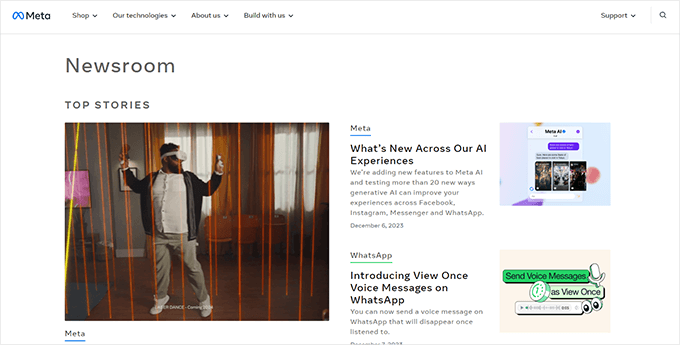
Meta, the parent company behind Facebook, WhatsApp, and Instagram, uses WordPress for its Newsroom website.

This is their news hub publishing articles about the company, its products, technology, and more.

5. Angry Birds

Angry Birds

The popular game Angry Birds uses WordPress for their website. They use it to make a highly interactive website showcasing videos, sliders, game stories, and more.

For more examples of WordPress in the enterprise, see our showcase of big-name brands using WordPress.

Tips on Using WordPress for Enterprise

With these successful examples in mind, what should you know before using WordPress for enterprise?

Whether you are an enterprise client considering hiring a WordPress agency or an agency taking on a new enterprise customer, the following essential tips will help you easily navigate those challenges.

1. Choose The Right WordPress Enterprise Hosting

One of the major concerns of enterprise clients is the scalability of the platform.

It should be able to handle very high traffic simultaneously, with little to no impact on performance.

This is why you must choose a WordPress hosting platform made specifically for enterprise-grade clients.

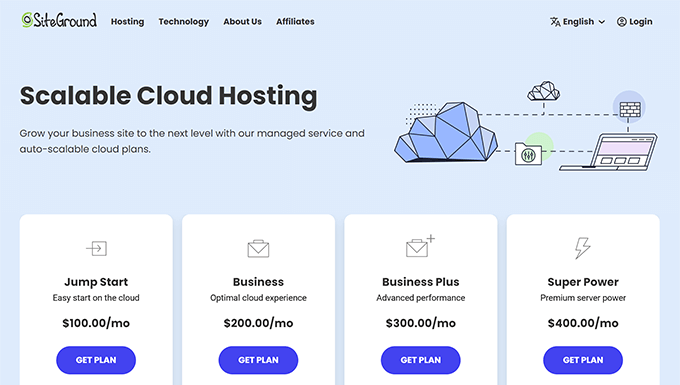
We recommend using SiteGround. Their scalable cloud hosting platform is the most flexible managed WordPress enterprise hosting on the market.

SiteGround cloud hosting

You can choose from different levels of server resources for your needs and easily increase them by adding more RAM and processing power as needed.

Related: How to Determine the Ideal Size of a Web Server for Your Website

You can also turn on auto-scaling, which automatically scales server resources in the event of a sudden traffic spike.

It includes daily backups, free CDN, built-in server-level caching, and enhanced security. Not to mention their incredibly outstanding support. Hosting with SiteGround Cloud is like having your own team of DevOps taking care of your hosting infrastructure.

WPBeginner is also hosted on SiteGround’s dedicated cloud cluster. Check out our case study of why we switched to SiteGround.

Need a SiteGround alternative? Take a look at WP Engine. They are the premium among the premium WordPress hosting platforms.

WP Engine Enterprise

WP Engine offers a rock-solid hosting infrastructure suitable for enterprise. Trusted by top WordPress agencies and several Fortune 500 companies, WP Engine provides unbeatable performance and security.

2. Set up Enterprise Level Security

Security is one of the major concerns for enterprise websites. Poor security could have devastating consequences for an organization’s finances and reputation.

You are halfway there if you follow our earlier advice and select the top enterprise-grade WordPress hosting.

These hosting companies follow the highest security standards to protect your website from malicious attacks.

The next step is to set up a website application firewall (WAF). Now, depending on your hosting provider, you may already have WAF available under your hosting plan.

For instance, SiteGround offers Cloudflare CDN, which provides dual advantages of a CDN and a Web Application Firewall.

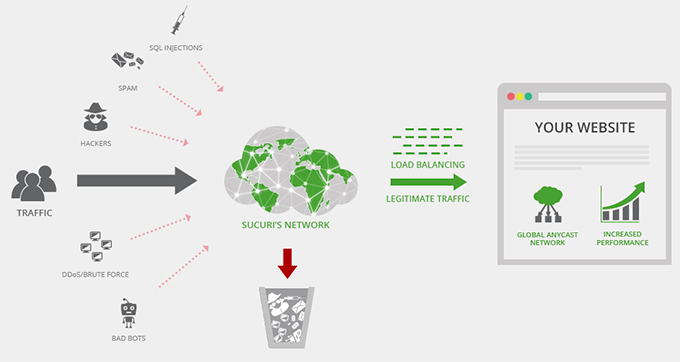
However, if your hosting provider doesn’t offer a built-in WAF, then we recommend using Sucuri. It is the best WordPress firewall on the market.

How website firewall blocks attacks

It blocks malicious requests, DDoS and Brute Force attacks, and other suspicious activities before they reach your hosting server.

It also comes with a CDN, which helps you further reduce load on your hosting server while providing faster page load times for your users.

That being said, no website security system is complete without preparing for the worst, which brings us to our next tip: backups.

3. Make Your Own Backups for Redundancy

Almost all enterprise-grade hosting providers offer daily backups and have redundancies built into their systems. This means you won’t lose all your data if something happens to one of their data centers.

This all sounds good on the paper. However, you must always ensure that you have your own backups stored safely as well.

This allows you to control all your website data instead of relying upon your hosting company.

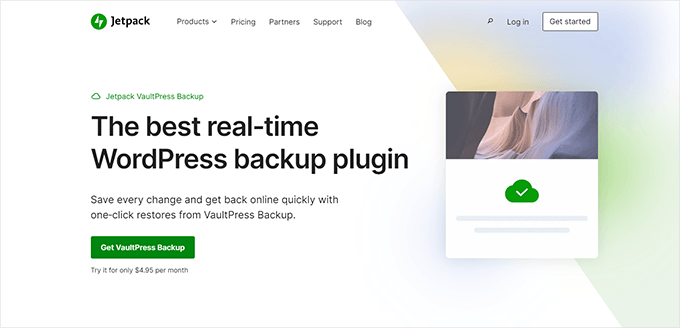
For enterprise-level WordPress backups, we recommend VaultPress by JetPack. You’ll need a paid JetPack plan that includes VaultPress backups.

JetPack backup

VaultPress makes incremental backups, which means your backups are always up-to-date. It offers easy 1-click restoration, a full archive of 30-day activity (depending on your site’s overall size), and 10GB of cloud storage.

For details, see our tutorial on creating WordPress backups using VaultPress by JetPack.

However, at the enterprise level, many websites may find 10GB of cloud storage and 30-day archives quite limiting.

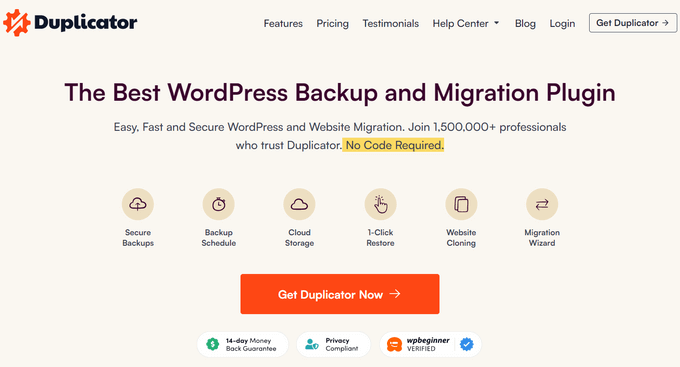
This is where Duplicator comes in. It is the best WordPress backup plugin on the market and allows you to set automatic schedules to make backups.

Duplicator

All Duplicator backup files are fully encrypted to ensure they are secure regardless of where you store them. You can keep as many backups as you want and choose which data to store.

As for storage, you can choose from any of the top cloud storage service providers, including Google Drive, Dropbox, Amazon S3, Microsoft Onedrive, or any Amazon S3-compatible storage provider. You can even store backups on separate servers using SFTP.

4. SEO for Enterprise Level Publications

In a recent study of WordPress for Enterprise, 34% of participating websites were in the Publishing / Media, and 12% were in the Marketing / Advertising industries.

WordPress is an SEO-friendly platform by design. However, at the enterprise level, you would need extra tools and controls to ensure that your content is highly optimized for SEO.

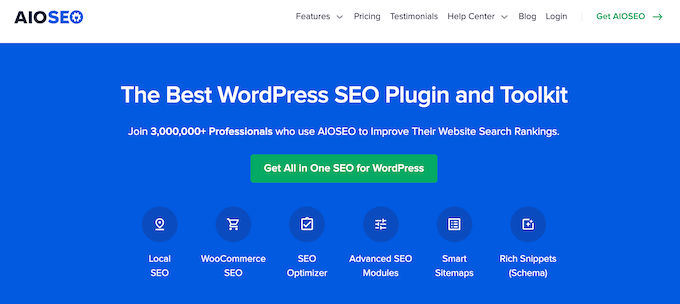
This is where you’ll need All in One SEO for WordPress. It is the best WordPress SEO plugin for businesses of all shapes and sizes.

The AIOSEO website

It comes with the most comprehensive set of SEO features you’ll need, including easy on-page optimization tools, advanced schema.org markup support, easy integration with Google Search Console and other webmaster tools, built-in content analysis, headline analyzer, and more.

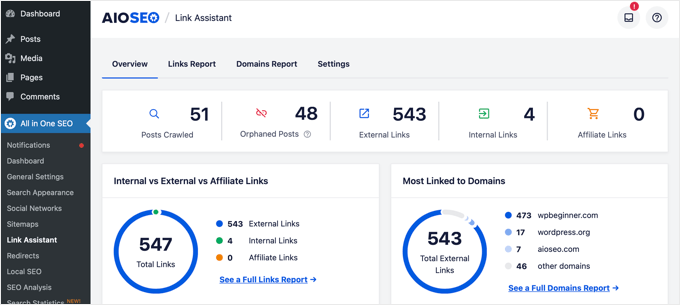
It allows you to leverage AI to generate SEO titles and descriptions or track internal links across your website.

AIOSEO Link Assistant Overview

Most importantly, it comes with SEO user roles that enable website administrators to manage access to crucial areas of the website properly.

Learn more about All in One SEO features that make it the most powerful SEO toolkit for enterprise websites.

We use All in One SEO for WordPress on WPBeginner. Read our case study of why we switched to All in One SEO for WordPress.

5. Setting up Enterprise Access Controls

For an enterprise project, you may need to give specific users access to different areas of the website to do their jobs.

For instance, you may want writers to be able to submit their articles and editors to review them. You may also want to set up permissions so only authorized users can publish content or change the website.

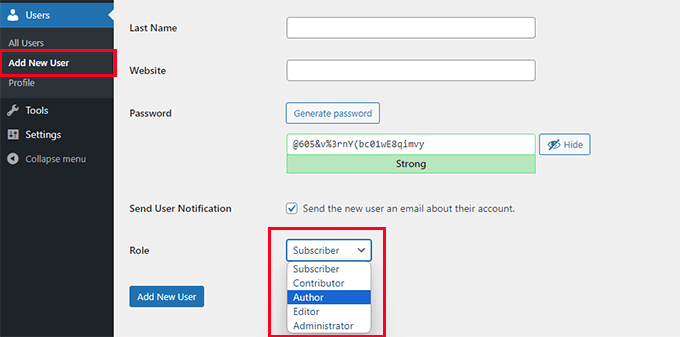
WordPress comes with a robust user roles and permissions management system out of the box. You can assign user roles that give them specific permissions on the website.

Default user roles in WordPress

For other things, like SEO, you can use All in One SEO to give your SEO team access to areas where they need to work.

You can even create custom user roles where you can combine different permissions.

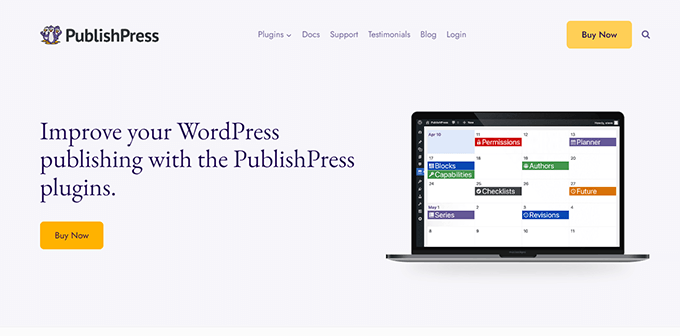
For better publishing tools, we recommend using PublishPress. It is a publishing suite for WordPress that gives you robust access control and editorial workflow tools.

PublishPress

It comes with several plugins to improve publishing workflows on a WordPress website. Whether you want to let multiple authors collaborate, add a checklist for writers, create custom user roles, or schedule content updates, PublishPress has you covered.

To learn more, see our guide on managing editorial workflow in WordPress.

6. Multilingual Enterprise WordPress

Many enterprise clients need to serve multilingual content for audiences in different regions.

WordPress does not support multilingual content out of the box. However, there are two excellent routes that enterprise clients take to manage multilingual websites.

The first one is to build a WordPress multisite network. This allows you to have a subdomain or directory for each language. Each subsite can use the same theme and plugins but localized content.

Making a WordPress multisite network

The downside of this method is that it can quickly get quite complicated to manage. Search Engines may consider sub-domains to be unique sites, and if you run an eCommerce store, this adds an extra layer of complexity.

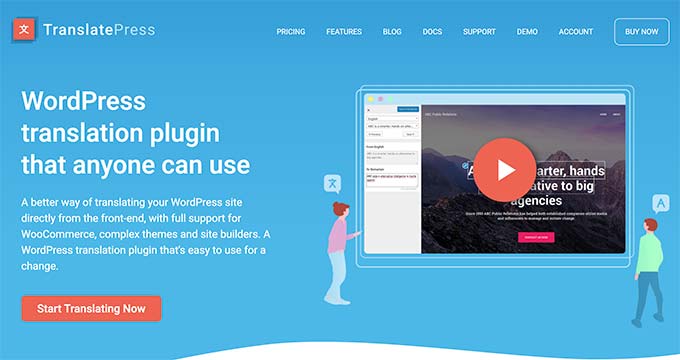
The second option is to use a WordPress multilingual plugin. We recommend using TranslatePress.

TranslatePress

TranslatePress allows you to easily translate any content on your WordPress website, including WordPress themes and plugins.

It has a robust translation management system that makes it super easy to manage all the languages you want to add to your site. It has an easy language switcher, allowing users to select a language.

Plus, with TranslatePress, you can easily add translator accounts and outsource translation tasks to third-party agencies.

Alternative solution: WPML is an equally capable WordPress multilingual plugin.

Frequently Asked Questions About WordPress for Enterprise

Following are some of the most commonly asked questions about WordPress for the enterprise that our users have asked us.

1. Is WordPress good at the enterprise level?

Yes. WordPress is excellent at the enterprise level. It is flexible and highly customizable for any enterprise-grade website. Plus, it is open-source, which gives enterprise clients more options to build upon it. This is why even the top tech companies like Microsoft, Meta, Nvidia, and many more prefer it as a CMS solution for their enterprise websites.

2. What does enterprise WordPress mean?

Enterprise WordPress means WordPress for large businesses, multinational companies, big publication companies, non-profits and government agencies, universities, and more. At the enterprise level, these organizations may need additional scalability, security, and customization features compared to regular WordPress websites.

3. How much a WordPress website costs at the enterprise level?

The costs of a WordPress website at the enterprise level usually end at the highest. WordPress needs a more robust hosting infrastructure at the enterprise level to ensure scalability, security, and redundancies. Costs are also associated with any custom development of plugins and themes, additional third-party integrations, system administration, maintenance, and ongoing support. Depending on a business’s need, it could cost thousands of dollars monthly.

We hope this article gave you a good understanding of WordPress for enterprise and busted common myths about WordPress at the enterprise level.

You may also want to take a look at our complete WordPress security guide, which talks more about securing WordPress websites, or take a look at our comprehensive list of essential WordPress plugins for all kinds of websites, including enterprise websites.

If you liked this article, then please subscribe to our YouTube Channel for WordPress video tutorials. You can also find us on Twitter and Facebook.

The post WordPress for Enterprise – 6 Tips You Should Know first appeared on WPBeginner.


from WPBeginner https://ift.tt/BsKmAhZ
More links is https://mwktutor.com
7 Call to Action (CTA) Best Practices for Guaranteed Landing Page Conversions

Did you know that up to 70% of businesses fail to include an effective CTA (call to action) in their marketing?

Unfortunately, when it comes to landing pages, most visitors won’t take action without a clear nudge in the right direction.

I’ve spent years helping businesses create landing pages that convert, and I’ve learned that a well-written CTA can make the biggest difference in turning someone from a casual visitor into a paying customer.

Since effective CTAs drive conversions on your WordPress website or online store, they need to be laser-focused and inspire immediate action.

In this article, I will list the CTA best practices to follow for guaranteed landing page conversions.

Note: This is a guest post by John Turner, the co-founder of SeedProd, the best landing page builder plugin. We publish an expert column on WPBeginner every Thursday. This is an invite-only column, meaning we don’t accept unsolicited guest post offers.

Call to Action (CTA) Best Practices for Guaranteed Landing Page Conversions

I will cover quite a few topics in this post. Here’s a handy list so you can jump to the section you are most interested in:

1. Add a Single CTA Per Page to Show the User a Clear Path Forward

Let’s start with the most important CTA best practice. Typically, you should only have only one call to action on a page.

If you want to move your WordPress website visitors to take action, then you need to be crystal clear on what that action is and state it clearly.

Avoid the temptation to add multiple calls to action to a landing page. This can confuse your readers, and they may have difficulty deciding between the options.

This is known as choice paralysis. When faced with multiple choices, a person may hesitate because they are not sure which option is best. The best way to move forward isn’t clear.

In my experience, only having one CTA per page will have more impact on increasing conversions than anything else. In fact, limiting your landing page to a single CTA can increase clicks by over 371% and grow sales by a huge 1,617%.

So, make sure you include a single, clear call to action. This presents a straightforward path for the user to move forward, resulting in more conversions. Or, if you have a long page and want to include multiple calls to action, then make sure that they have the same CTA message.

2. Use Strong and Compelling Language to Drive Action

If you want your visitors to act on your CTA, then you need to use actionable language that clearly tells them what they need to do next.

That means using strong action verbs, such as ‘get’, ‘start’, ‘shop’, ‘download’, and ‘subscribe’.

I find that action verbs convey a sense of confidence and authority. They tell users what you want them to do in a clear and assertive way.

Here are a few good examples of action-packed CTAs:

  • Get Exclusive Access
  • Start Saving Today
  • Shop New Arrivals
  • Download Your Free Guide
  • Subscribe for Free Updates

Make sure you keep your CTAs short and sweet so they are easy to scan and digest. ‘Get a free reader’ is a great example of a short, action-oriented CTA from Square.

Example of a CTA That Uses Action Language

Wherever possible, you should also use urgency or scarcity language. This offers a powerful incentive for the user to take action now:

  • Claim Your Discount Before It’s Gone
  • Hurry, Limited Time Offer!
  • Don’t Miss Out on This Deal!
  • Reserve Your Spot Now (limited availability)

Always be creative and customize your call to action to the specific campaign. Compared with vague, generic CTAs, customized CTAs convert 42% more visitors.

3. Use Benefit-Driven Language to Incentivize the User

Using benefit-driven CTAs with emotional language can create a desire that motivates the user to actually act.

When crafting your call to action, you will want to make sure you briefly highlight the benefits you are offering and explain what the users will gain by taking action. If they can see what’s in it for them, then they will be more motivated to click.

To do this well, you need to understand what motivates your target audience and you may want to use benefit-driven verbs like ‘unlock’, ‘discover’, ‘boost’, and ‘save’.

Let’s say that your current CTA simply says ‘Download Now’. This lets your users know what to do but doesn’t offer any motivation.

A better call to action would be ‘Download Your Free Guide Today’. This highlights the benefit and adds urgency.

Another example is Aura’s landing page. They use the benefit-driven CTA ‘Get Protection Now’.

Example of a Benefit-Driven CTA

Notice the words just above the call to action. They support the CTA by mentioning another benefit of saving 70% and the word ‘today’ adds urgency. I will show you how you can strengthen your CTA with supporting copy later in this article.

Here are some more examples of benefit-driven CTAs you can use as inspiration:

  • Unlock Exclusive Discounts
  • Boost Your Productivity
  • Save Big Today
  • Build Your Skills

When you incorporate benefit-driven language like this, you speak directly to the user’s needs and desires. This transforms your CTA from an instruction into a compelling invitation.

4. Place Your CTA on a Button for More Clicks

Placing your CTA on a button is a simple way to boost conversions. A button is highly noticeable, easy to customize, and clearly wants to be clicked.

Studies show that this works well. In fact, a company called Copyblogger reported a significant 45% increase in clicks when they switched to CTAs in the shape of a button.

You can easily add a call to action button to your landing pages using the WordPress block editor or a page builder plugin.

For example, SeedProd templates let you create landing pages easily and already contain a call to action button. It’s also super easy to customize its color, text, and appearance to match your campaign.

Before we move to my next point, I want to share my favorite tip about making your CTA buttons more effective. Studies show that buttons with an arrow icon at the end can increase conversions by a further 26%.

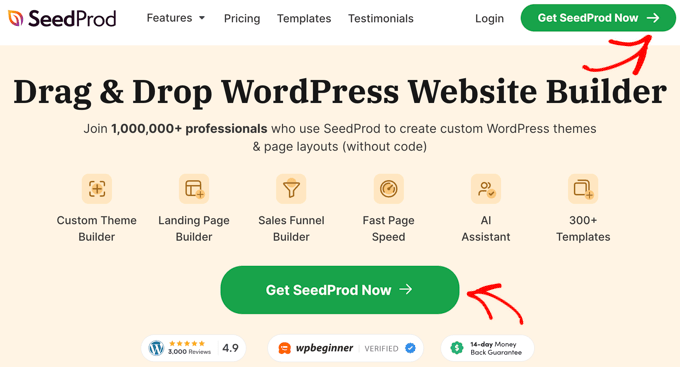
You can see in the screenshot below that we do this on our own website. We also add a sense of urgency by using the word ‘Now’.

Example of a CTA Button With an Arrow

Notice that we made the button more visible by using a contrasting color and placing it in multiple locations. That brings us to our next point.

5. Create Highly Visible CTA Buttons That Get Noticed

It goes without saying that no one will click a button they don’t see. Luckily, there are lots of ways to make your call to action unmissable.

The best way to make your CTA button stand out is to use a bright color that contrasts with the color scheme of your landing page. Make sure the button text is large and readable.

You will find simple settings to do this in the block editor and landing page plugins like SeedProd.

Customizing a CTA Button in SeedProd

Try different sizes and positions to see what looks best. Plus, make sure you place the button high enough on the page that your visitors don’t have to scroll before they see it.

If you created a long-form landing page, then it’s important to place your call to action at intervals throughout the page. This will make sure that your readers can always see the call to action as they scroll down the page and you will also reinforce its message.

I also like to get the maximum clicks from my CTA buttons by making them accessibility-friendly. You can add alt text to the CTA button to make it visible to people using screen readers. That’s 7 million users in the United States alone.

6. Support Your CTA With Extra Landing Page Copy

Because the copy of a good CTA button is short and focused, you will need to reinforce the value it offers with some extra text on the landing page.

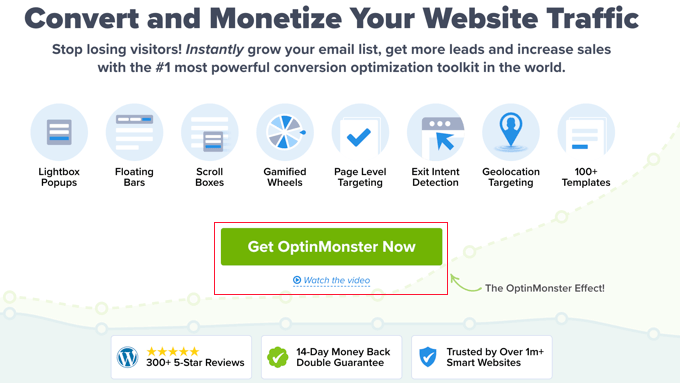
This shouldn’t be too long and should appear near the call to action. Here’s a great example from the OptinMonster website.

Example of Supporting Copy for a CTA

Notice their supporting copy ‘Watch the video’ appears right under the CTA button. Video content works well on landing pages because it provides helpful information without complicating the page with too much extra written content.

You will need to make sure that any supporting copy is consistent with the CTA. This will create a seamless user experience that reinforces the message of your call to action.

For example, let’s say you decided on this benefit-focused CTA button:

Then the supporting text could say ‘Claim your limited-time discount of 15% off’, and the page title might say ‘Black Friday Week 15% Off Everything’.

By keeping your landing page copy short and simple, you can keep the focus on your call to action and maximize conversions.

7. Use A/B Testing and Analytics to Improve Your CTA

Finally, I recommend testing different calls to action to discover the best variation for your website. You can try changing up the wording, using different colors and shapes, and experimenting with button placement.

To measure which CTA version works best, you will need to perform A/B split testing. This is where you create different versions of your call to action and other landing page elements to test how they affect user behavior.

Just remember to test only two versions of your CTA at a time to make sure the measurements are accurate and helpful. This will let you see clearly if one button style works better than the other or which CTA copy gets the most attention.

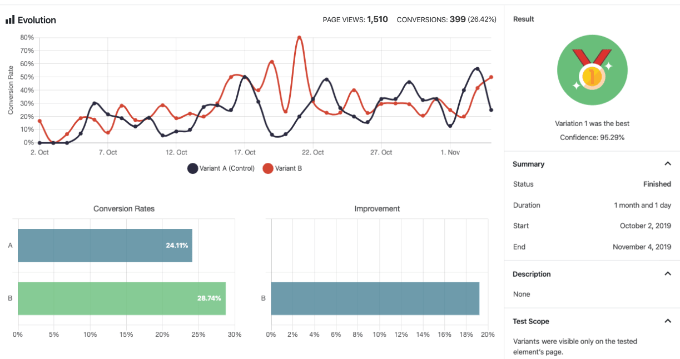
View test results

For example, a company called Unbounce did split testing on two very similar calls to action. The first said ‘Start your free 30-day trial’ and the second ‘Start my free 30-day trial’. They were surprised to learn there was a 90% increase in click-through rate with such a small change in the second version.

You can try similar experiments with different CTAs on your website. You may not see a 90% improvement, but you can test CTA variations to see which one works better.

I also like to use an analytics solution or heatmap tool to monitor the on-page behavior of my website visitors. This shows me what my users do before they click the CTA and gives me ideas on optimizing my landing page and call to action button.

I hope these insights help you understand some CTA best practices so you can grow your landing page conversions. You may also want to see these WPBeginner guides on how to create a WooCommerce popup to increase sales or the best social proof plugins for WordPress.

If you liked this article, then please subscribe to our YouTube Channel for WordPress video tutorials. You can also find us on Twitter and Facebook.

The post 7 Call to Action (CTA) Best Practices for Guaranteed Landing Page Conversions first appeared on WPBeginner.


from WPBeginner https://ift.tt/OH9v0YE
More links is https://mwktutor.com