Friday, 31 March 2023

How to Add No Right Click on WordPress Images

Do you want to add no right-click to your WordPress images?

If you’re a photographer, artist, or content creator, then you’re probably worried about people stealing your images. While it’s difficult to completely stop image theft, you can make it more difficult for people to steal pictures from your website.

In this article, we’ll show you how to add no right-click on WordPress images and galleries.

How to add no right click on WordPress images

Why Add No Right-Click on WordPress Images?

The Internet has made it easier to share your work with the world, but it’s also made it easier for people to steal your images.

These people might use your content to promote scams or fraudulent products. They might even sell your digital art and graphics online, making money from your hard work while you make none.

If you’re an online influencer or have a big social media following, then people might even steal your photos and impersonate you online. For example, they might pretend you’re an affiliate marketing partner.

Even if you simply write a WordPress blog, people might still use your personal photos as part of online scams like fake ads or reviews.

Scammers could even scrape your WordPress blog content and images, and then republish it on other websites. This duplicate content can damage your WordPress SEO.

While there’s no single solution that can completely prevent image theft, you can make your site a less attractive target.

With that being said, let’s see how you can add no right-click on WordPress images and galleries. Simply use the quick links below to jump straight to the method you want to use.

Method 1. How to Add No Right Click to All Your WordPress Images

The easiest way to protect your images is by using No Right Click Images. This free plugin allows you to disable right-clicking for images only, so users can still right-click on your other content including links.

You can also enable and disable right-click based on whether the visitor is logged into their account. This is perfect if you run a subscribers-only stock photo website or some other form of membership site.

First, you’ll need to install and activate the plugin. If you need help, then please see our guide on how to install a WordPress plugin.

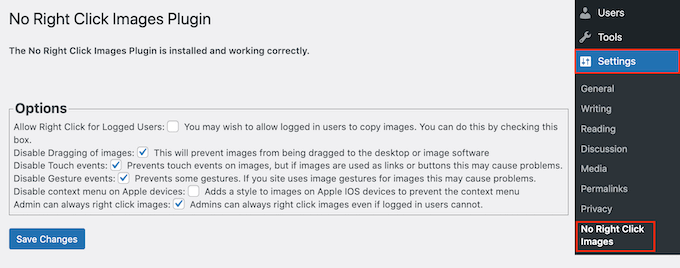
Upon activation, go to Settings » No Right Click Images to configure the plugin settings.
How to add no right-click on WordPress images

The default options should work for most users, but it’s still worth checking whether you need to make any changes. In particular, these settings can help you close any loopholes that people might use to get around the no right-click protection.

Out of the box, the plugin disables dragging images so users can’t copy an image by dragging it onto their desktop or another tab. With that in mind, we always recommend leaving ‘Disable Dragging of images’ checked.

No Right Click Images also disables touch and gesture events, which can stop people from stealing images on devices that make use of those sorts of actions. However, this can cause problems if you use images as links or buttons, or if your visitors interact with your pictures using gestures, such as before-and-after images.

If you do encounter problems, then you can re-enable support for touch events and gestures by unchecking the following boxes: ‘Disable Touch events’ and ‘Disable Gesture events.’

How to disable touch events and gestures on your WordPress website

By default, visitors can still open a context menu and save your images on Apple devices.

That said, you may want to check the box next to ‘Disable context menu on Apple devices.’ This adds a style to images on iPhones and iPads, which stops users from opening the Apple context menu and stealing your images.

How to disable the Apple context menu on your WordPress blog or website

When you’re happy with how the plugin is set up, don’t forget to click on ‘Save Changes’ to store your settings.

You can now log out of your WordPress admin account and visit your website. Then, simply right-click on any image to check the plugin is working.

Method 2. How to Add No Right Click to Image Galleries

If you want to protect individual images across your website, then the first method is a good choice. However, sometimes you may want to create an image gallery in WordPress, and then disable right-clicking for the entire gallery. For example, you might build a photography portfolio or display your most popular products in a nice gallery layout.

This is where Envira Gallery comes in.

It is one of the best WordPress gallery plugins on the market and comes with a protection addon that disables the ability to right-click on any galleries you create using the plugin.

How to disable right-click for a WordPress gallery

The first thing you need to do is install and activate the Envira Gallery plugin. For more details, see our step-by-step guide on how to install a WordPress plugin.

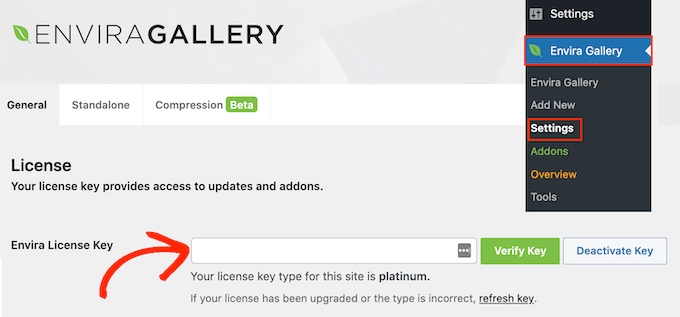
Upon activation, go to Envira Gallery » Settings and enter your license key.
Activating the Envira Gallery WordPress plugin

You can find this information under your account on the Envira Gallery website.

With that done, click on ‘Verify Key.’

Next, head over to the Envira Gallery » Addons page. Here, find the Protection addon and click on its ‘Install’ button.
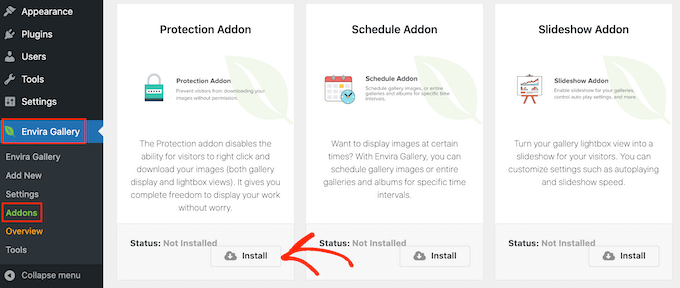
Activating the Protection addon for Envira Gallery

When you see the ‘Inactive’ slider, give it a click so it shows ‘Active’ instead.

After that, you’re ready to start creating protected image galleries.
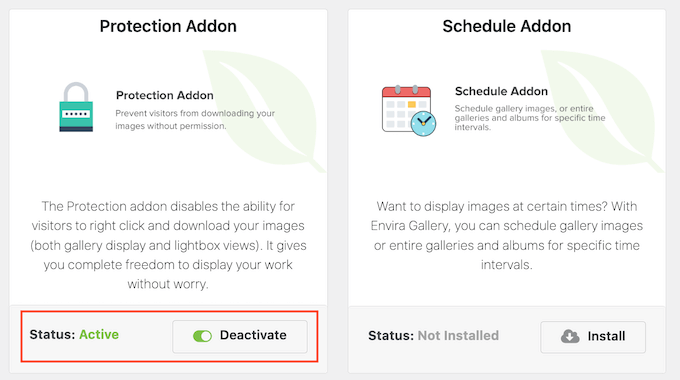
How to protect your galleries using the Protection addon

To get started, go to the Envira Gallery » Add New page and type in a name for your gallery.

This is just for your reference so you can use anything that helps you identify the gallery in your WordPress dashboard.
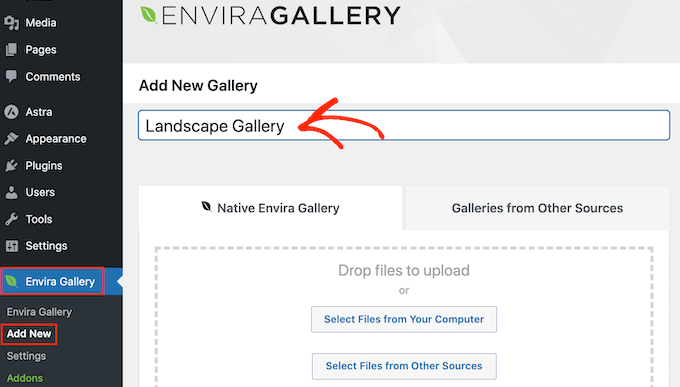
Creating a new gallery using a WordPress plugin

You’re now ready to add images to the gallery. You can click on ‘Select Files from Your Computer,’ or ‘Select Files from Other Sources’ and then choose images from the WordPress media library.

After that, scroll to the ‘Currently in your Gallery’ section and click on the ‘Misc’ tab.
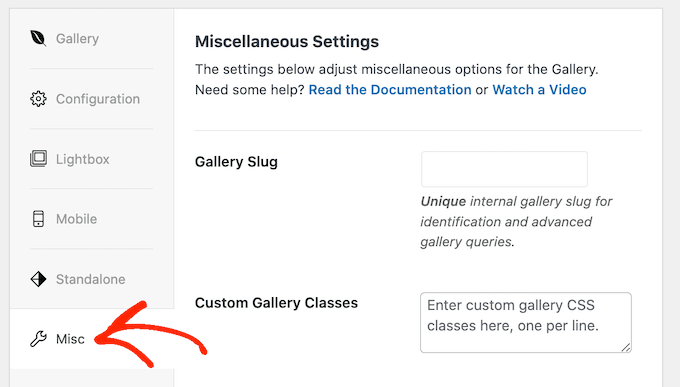
How to disable no right-click for your image gallery

Under ‘Image Protection Settings,’ check the box next to ‘Enable Image Protection.’

This disables the right-click action for all your Envira galleries.
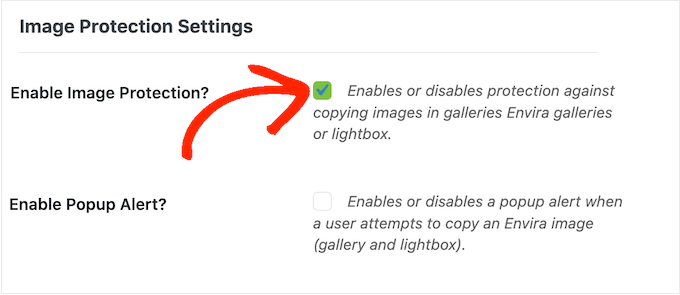
Enabling image protection for your image galleries

If a visitor tries to right-click a gallery, you may want to show a popup on your WordPress website. For example, you might let this person know your images are copyrighted, and can’t be downloaded without your permission.

If you’re selling your digital artwork or photos, then you can even use the popup to get more sales on your online store.
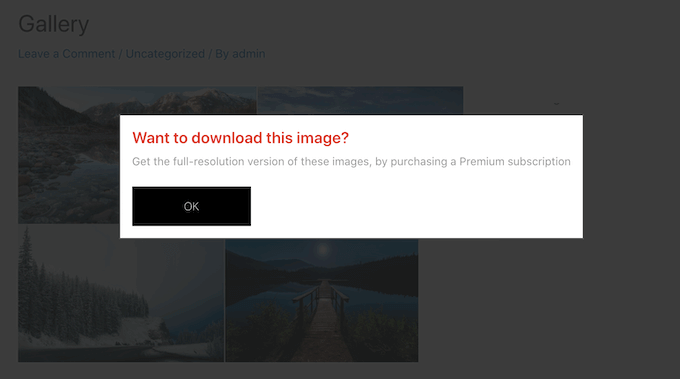
Showing a popup on right-click

To create a popup, check the box next to ‘Enable Popup Alert.’

You can then type in a title and message.
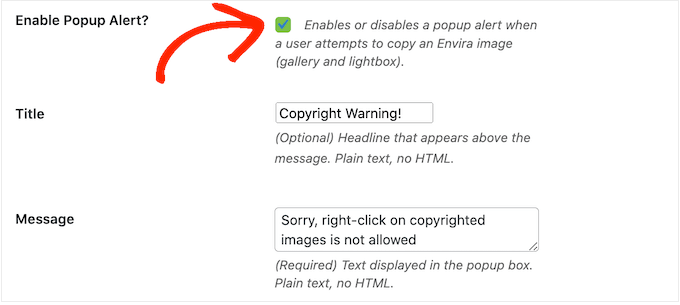
Show a popup when a visitor right-clicks an image

By default, visitors will click an ‘OK’ button to close the popup.

You can replace ‘OK’ with your own custom messaging by typing into the ‘Button Text’ field.
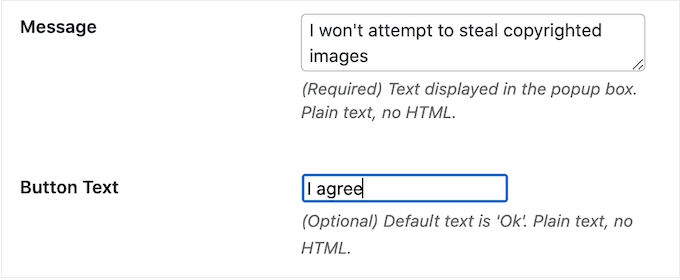
Adding a custom message to an image protection popup

When you’re happy with how the gallery is set up, click on ‘Publish’ to save your settings.

To add the gallery to your website, simply edit the post or page where you want to show the images and then click on the ‘+’ icon.

In the popup, type in ‘Envira Gallery’ and then click on the right block when it appears.
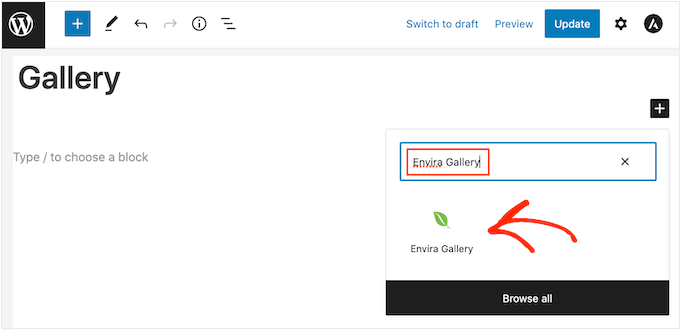
Add the Envira Gallery block to WordPress

This adds the Envira Gallery block to the page.

You can now open the dropdown menu and select the gallery you just created.
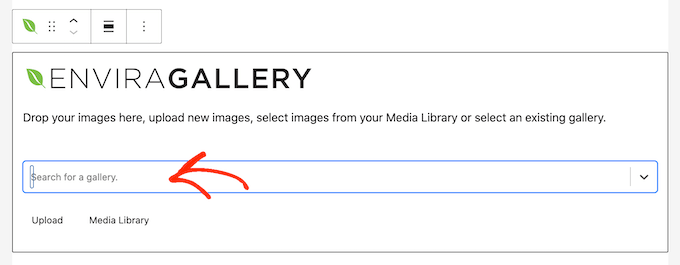
Publishing an image gallery to your website or blog

When you’re happy with how the page looks, either click on ‘Publish’ or ‘Update’ to make the protected gallery live.

Pros and Cons of Disabling Right-Click on WordPress Images

Disabling the right-click action makes it more difficult for people to steal your images. It also reminds users that they can’t simply download files without the owner’s permission.

Sometimes, this will be enough to stop people from stealing your photos. This is particularly true for scammers, who tend to look for easy ways to download as many images as possible. It can also discourage genuine visitors, who may assume they can download and use any online content.

However, there are still ways to get around a website’s no right-click protection. For example, users can still download an entire page.
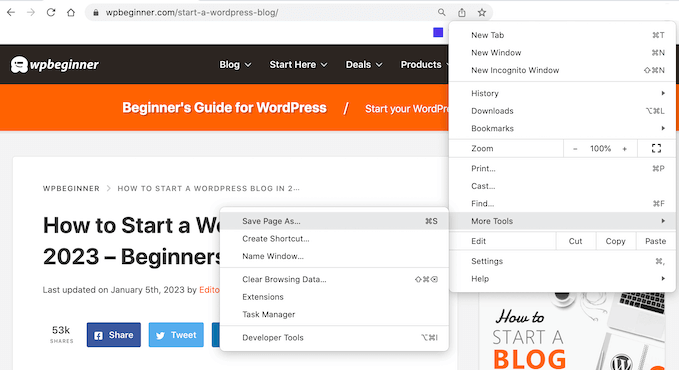
How to download images using the browser tools

This will copy the page’s content into a file, including all the images.

People can even use their browser’s view source or inspect tool to directly access an image file without right-clicking.

Inspecting an image using the built-in browser tool

With that in mind, you shouldn’t assume that disabling right-click is enough to keep your images safe.

On the other hand, some visitors may have a genuine reason why they need to download your images. For example, they may want to share your work with a potential future customer or post it on social media.

You might even allow people to reuse your images in specific ways, such as using your digital artwork on a non-profit website. In this case, disabling right-click can stop genuine users from accessing your images, which is a poor visitor experience.

If you do add no right-click to your website, then we recommend giving people an easy way to request access to your images. You can do this by adding a contact form to WordPress using a plugin such as WPForms.
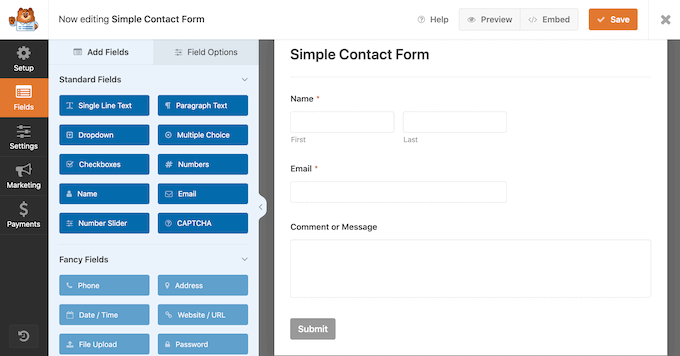
How to create a contact form using WPForms

If there’s a chance your visitors may need immediate access, then you can also add live chat to your site. This allows people to send their requests and get a response in real time, which is a great user experience.

Alternative Ways to Discourage Image Theft on Your Website

When it comes to protecting your images, disabling right-click is a good first step. However, if you really want to stop thieves then we recommend taking some extra measures.

With that in mind, here are some additional ways to stop people from downloading, reusing, and selling images without your consent.

1. Add a Copyright Notice Below Your Images

If you haven’t already, then you should add a copyright notice to your website. We recommend adding a dynamic copyright date to the WordPress footer so it appears on every page and always shows the current date.
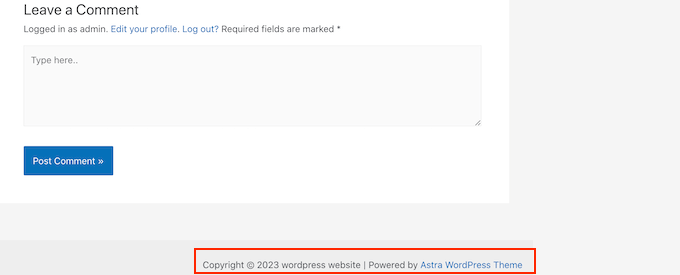
An example of a copyright notice, in a website footer

This is a great start, but it’s also a good idea to add a copyright notice below each image in plain text. This discourages people from stealing your photos, without affecting how that image looks on your website.

Some visitors simply assume they can download and re-use any images they see online. By adding a copyright notice, you can clear up any confusion and stop people from making this innocent mistake.

How to protect your photos with a copyright disclaimer

2. Add Watermarks to Your Images

Another option is adding a watermark to your images. This works great for stock photography websites where visitors expect to see a watermark, but your images might not look their best.
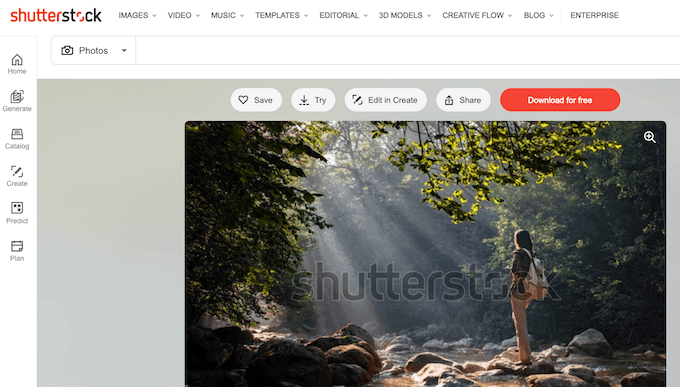
An example of a stock photography website with watermarks

This can be a problem for some websites, particularly if you’re a photographer or digital artist who’s promoting their work.

For that reason, we recommend positioning your watermarks carefully so they discourage people from stealing the image, without ruining how that image looks on your website.

To learn more, please see our guide on how to automatically add watermarks to images.

3. Set Up Automatic Content Theft Notifications

Sometimes, websites will mention your business or brand name next to the stolen images, particularly if they’ve scraped an entire page from your site.

With that in mind, it’s a good idea to set up brand name notifications using a service such as Google Alerts. Simply head over to the Google Alerts page and type in the name of your site, brand, products, or any other important text.

If there’s a specific phrase or call to action that you add to every post, then you may also want to type this into Google Alerts.
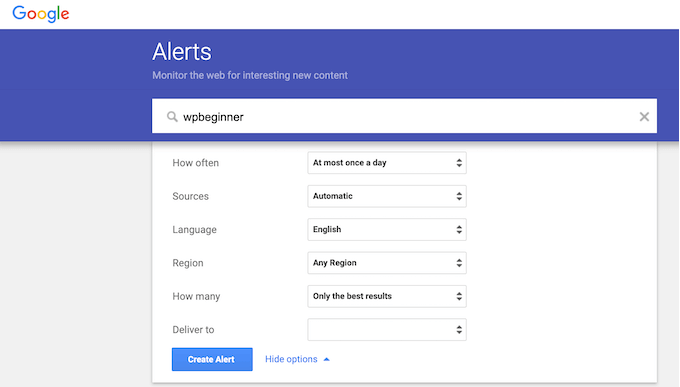
Set up content theft notifications using Google Alerts

After that, use the dropdown menus to configure the alert and type in the email address where you want to get the notifications.

When you’re happy with how the alert is set up, go ahead and click on ‘Create Alert.’

Now, when someone publishes scraped content of yours, you will get an email letting you know about it.

4. Reverse Image Search with Google

You can use Google image search to find all the places where a particular image is used online. Simply head over to the Google Images page and click on the small camera icon.

Protect your site against content theft

This will add a section where you can paste a direct link to the image or upload a copy from your computer.

After that, click on ‘Search.’
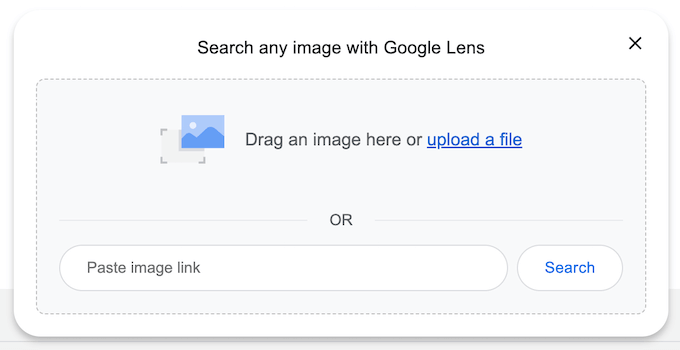
How to do a Google Reverse Image Search

Google will now show all the images that are similar to your picture. If you find the exact image on another website, then you can click through to see how that picture is being used.

If you have lots of photos, then checking each one manually can take a lot of time and effort. However, Google reverse image is a great way to uncover sites that re-using your images, so it’s smart to do a search from time to time.

Alternatively, you can use an advanced reverse image service such as Pixsy.

5. Contact the Website’s Host or Registrar

If someone has stolen and re-published your images, then we recommend contacting that person. There’s a chance they may be unaware they’re using copyrighted images illegally.

However, if it’s a spam website then you may struggle to find contact information. Instead, you can use the IsItWP lookup tool to find out where the domain and website are hosted.

The IsItWP lookup tool

The tool will pull up any available information, including the web hosting company.

Stealing content is an illegal activity and most web hosting companies don’t want to host sites that are breaking the law. With that in mind, you can contact the host and registrar directly to try and get the site taken down.

Most reputable web hosting companies take DMCA (Digital Millennium Copyright Act) complaints seriously, so this method usually gets good results.

We hope this article helped you add no right-click on WordPress images. You may also want to see our ultimate WordPress security guide or check out our expert pick of the best Instagram WordPress plugins.

If you liked this article, then please subscribe to our YouTube Channel for WordPress video tutorials. You can also find us on Twitter and Facebook.

The post How to Add No Right Click on WordPress Images first appeared on WPBeginner.


from WPBeginner https://ift.tt/dPnKaMf
More links is https://mwktutor.com

9 Best Front-End Posting Plugins for WordPress (2023)

Do you want to allow users to submit content and upload files on the front end?

Using a front-end posting plugin, you can allow people to upload different types of files without giving them access to the WordPress dashboard. They can submit documents, images, videos, PDFs, guest posts, and more.

In this article, we will show you the best front-end posting plugins for WordPress.

Best front end posting plugins for WordPress

Why Use a Front-End Posting Plugin for WordPress?

By default, WordPress doesn’t allow users to upload or submit content on the front end.

This means if you want to accept guest posts from a user, or want them to upload files on your site, then you would have to give them access to the admin area of your website.

This can be a time-consuming process and a security risk, as unknown users could then view your WordPress dashboard.

That’s where a front-end posting plugin can help. It allows you to collect user-generated content and accept all types of files without editing code or giving anyone access to the admin area.

For example, you can allow guest post submissions, real estate listing submissions, create a multi-vendor marketplace, collect testimonials from users, and more.

That being said, let’s look at the best front-end posting plugins for WordPress.

1. WPForms

The WPForms form builder plugin and signature addon

WPForms is the best WordPress form builder plugin in the market used by over 5 million websites. It offers a drag-and-drop interface that you can use to create any type of form.

They have a post-submission addon that lets you collect user-generated content without creating an account. Your visitors can easily submit content on the front end. Plus, you can accept payments for a post submission, like property listings or business directories.

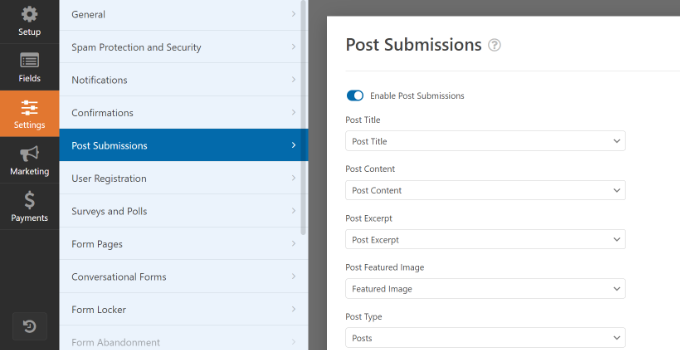
WPForms also gives you full control over which content to accept, and how you’d like to receive it. For example, you can map certain fields in your form to a new WordPress post such as Post Title, Content, and Featured Image.

Post submission settings in WPForms

You can also create a file upload form to collect user-generated content. It comes with a file upload form field that lets people submit guest posts, upload images, share presentations and documents, and more.

Besides that, WPForms offers other powerful features such as spam protection, conditional logic, form abandonment, online signatures, locking specific forms, tracking user journeys, and more.

WPForms also easily integrates with payment services like PayPal, email marketing tools like Constant Contact, and other third-party tools like Zapier, Google Sheets, and Uncanny Automator.

2. Formidable Forms

The Formidable Forms plugin and Signature addon

Formidable Forms is another powerful form builder plugin for WordPress that you can use to allow front-end posting.

It offers a user-submitted posts and pages feature that allows front-end publishing. Your visitors can create new posts using the plugin, and they don’t require admin access. This way, you can gather community content, guest posts, resources, databases, listings, and other user-generated content.

Formidable Forms also offers a file upload feature that lets users submit different files without the need to log in to the admin area.

When a user submits a file using the form, it is automatically stored in your WordPress media library. From here, you can easily browse, view, and filter different submissions.

With Formidable Forms, you can also create advanced forms, like mortgage calculators, payment forms, quote calculators, surveys, and more. The plugin offers a drag-and-drop form builder, pre-built templates, and powerful integrations.

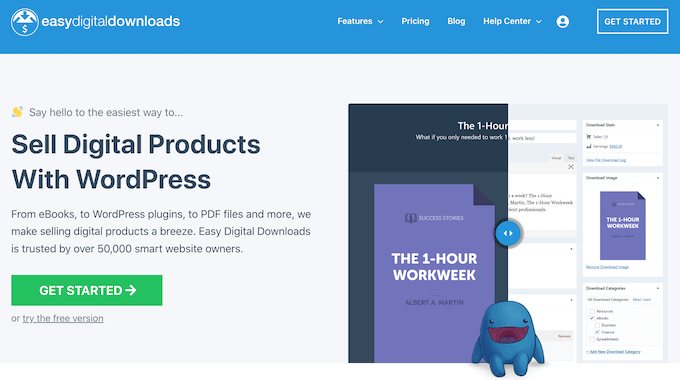
3. Easy Digital Downloads

The Easy Digital Downloads WordPress plugin

Easy Digital Downloads (EDD) is one of the best eCommerce plugins for WordPress. You can use it to sell digital products like ebooks, music, PDFs, spreadsheets, recipes, software, and more.

Easy Digital Downloads offers a frontend submissions extension that lets you create websites that work like Amazon, AirBnB, and eBay.

The EDD extension allows you to create a multi-vendor marketplace where users can register as vendors from the front end, and then they can use your site to upload and sell digital products.

Users can create new products, update existing products, access earning details, communicate with customers, and more from the front end.

Besides that, you can use Easy Digital Downloads to track and record vendor commissions, review new vendor registrations, and get email notifications when a vendor adds a new product.

The best part is that you get a drag-and-drop form builder to create forms for vendor registration, product submission, and vendor profiles.

On top of that, EDD also integrates with payment services like PayPal and Stripe. You can connect the plugin with email marketing tools and other third-party software.

4. MemberPress

MemberPress

MemberPress is the best membership plugin for WordPress that is super easy to use. You can create unlimited premium memberships and restrict access to pages, content, and files for subscribers only.

Using MemberPress, you can create a membership site to get user-generated content. For instance, you can set up members-only associations like Young Entrepreneur Council. This way, premium members submit guest posts for the site itself. In addition, they can get access to forum discussions, share other content, and more.

MemberPress offers a file upload option that you can show in the account area. This way, subscribers can share different content on your membership site.

The plugin also offers powerful content restrictions and access controls. You can lock premium forums and upload content for members only. Other than that, MemberPress easily integrates with different payment providers, email services, WordPress plugins, and third-party tools.

5. Thrive Ovation

Thrive Ovation

Thrive Ovation is a popular testimonial plugin for WordPress. You can use the plugin to collect user-generated content in the form of testimonials.

Testimonials are incredibly powerful for driving sales and getting new users, and this plugin makes it super easy to gather reviews and feedback from existing customers.

It has an autopilot feature that automates the process of asking for feedback from customers.

Besides that, you can use Thrive Ovation to convert WordPress comments into testimonials with a single click. It also helps convert social media comments into testimonials for your website.

The plugin offers a testimonial library where you can easily manage user-submitted content, WordPress comments, and other imported feedback from your WordPress dashboard.

6. WordPress File Upload

WordPress File Upload

WordPress File Upload is the next free front-end posting plugin on our list. It allows users to submit content from any page, post, or sidebar on your WordPress site.

You can simply use a shortcode to add a file upload form to your website or use the sidebar widget. The plugin also lets you manage the uploaded content from your WordPress dashboard. The uploaded files can be added to the media library or stored in an FTP location.

Besides that, you can set up file upload filters for multiple WordPress user roles, add file size limits, and control which file extensions users can upload.

WordPress File Upload also offers different customization options and lets you show an upload progress bar. However, if you’re looking for more options to edit your forms, then you can use other plugins on our list, like WPForms and Formidable Forms.

7. WP User Front-end

WP User Frontend

WP User Front-end is a flexible and beginner-friendly WordPress plugin for accepting front-end submissions.

The plugin comes with a drag-and-drop form builder and offers multiple customization options. You can place the form anywhere on your site to allow users to create a new post and submit guest posts, images, and other content.

It also lets users edit their profiles from the front end. This is great as you don’t have to give access to the main dashboard for users to set up a profile.

Besides that, you can use the WP User Front-end plugin to create subscriptions and membership packs. It lets you add pay-per-post, manage transactions, and easily receive payments.

8. User Submitted Posts

User submitted posts

User Submitted Posts is a simple and free WordPress plugin that you can use to allow file upload on the front end of your website.

It is a great solution to accept guest posts, customer reviews, testimonials, images, and other user-generated content. The plugin offers basic form fields like name, email, URL, post title, content, post category, post images, and agree to terms.

You can display the front-end posting form anywhere on your site using a shortcode. The User Submitted Posts plugin also offers a login and registration form, so users can create a profile without requiring access to your site’s dashboard.

That said, the plugin doesn’t offer a lot of customization options, form templates, and features to control file upload compared to other plugins like WPForms.

9. AccessPress Anonymous Post

AccessPress anonymous post

AccessPress Anonymous Post is another free WordPress plugin you can use to accept guest posts and allow front-end posting. It offers a responsive form that is easy to customize and place anywhere on your website.

Users can simply use the form to upload content, add a title, and enter tags, categories, URLs, images, and more. All the submitted content is stored in the WordPress database, and you can access it from your dashboard.

Besides that, you can also add a captcha for verification, receive emails when someone uploads a file, and make different form fields required.

Bonus: File Upload Types by WPForms

File Upload Types

File Upload Types by WPForms is a free WordPress plugin that lets you accept different file extensions on your WordPress site. By default, WordPress only allows a handful of file types that users can upload to the media library.

If someone is submitting a post for the site on the front end, but uploads a file that has an extension not supported by WordPress, then they’ll see a ‘Sorry, this file type is not permitted for security reasons’ error message.

This is where the File Upload Types by WPForms plugin comes in handy. It allows users to post any type of file. For instance, you can accept file extensions like .zip, .xml, .ai, .csv, .svg, and more.

An important thing to note is that the plugin will let you accept additional file types, but it doesn’t have a feature to accept front-end posting. That’s where you’ll need another plugin like WPForms or any other on our list.

Which is the Best Front-End Posting Plugin for WordPress?

In our research, we found that WPForms is the best front-end posting plugin. It allows you to allow file upload and accept guest posts, images, quotes, and other user-generated content.

On top of that, you get over 600+ pre-built from templates, a drag-and-drop form builder, and lots of customization options to edit your form. You can add a file upload form field and display your form anywhere on the website.

Plus, its field-mapping feature makes drafting and editing on the front-end a breeze and is perfect for sites that have user-submitted content like real-estate listings or guest posts.

If you want to create complex and advanced forms like mortgage calculators, then you can use Formidable Forms. It also comes with a file upload feature and allows easy front-end posting.

On the other hand, you can use Easy Digital Downloads if you’re selling digital products. The plugin offers an upload file extension that allows users to submit documents, images, and other content on the front end. And their front-end submissions extension allows you to create a multi-vendor marketplace.

We hope this article helped you find the best front-end posting plugin for WordPress. You can also see our guide to the best WooCommerce plugins for your store and how to increase your blog traffic.

If you liked this article, then please subscribe to our YouTube Channel for WordPress video tutorials. You can also find us on Twitter and Facebook.

The post 9 Best Front-End Posting Plugins for WordPress (2023) first appeared on WPBeginner.


from WPBeginner https://ift.tt/DG1Zf3O
More links is https://mwktutor.com
Thursday, 30 March 2023

Ultimate WordPress Migration Guide for Beginners (Step by Step)

Are you looking to move your website to WordPress, or thinking about migrating an existing WordPress site to a new domain or host?

WordPress is the most popular website builder powering over 43% of all websites on the internet. That’s because it’s easy to use and

gives you control over every aspect of your website.

In this article, we’ll show you how to migrate your blog or website to WordPress with little downtime and without losing SEO. We’ll also show you how to move your WordPress site to a new server or domain.

Ultimate WordPress Migration Guide for Beginners (Step by Step)

Why Migrate Your Website to WordPress?

Small businesses and individuals are starting websites all the time. They realize that having an online blog or website have significant benefits that help them grow their brand and keep in touch with clients.

However, many beginners choose a blogging platform other than WordPress. These platforms help them get started quickly, but as their websites grow, they begin to run into limitations.

For example, they may not be able to install plugins that add the features they need, there may be limited options in customizing the appearance of their site, or the platform may become too expensive as their requirements grow.

We believe that self-hosted WordPress outperforms all other blogging and website platforms. It is powerful, easy to use, affordable, and the most flexible of all available blogging platforms. Here are all the reasons why you should use WordPress.

Note: When we speak of self-hosted WordPress, we mean WordPress.org. This is different from WordPress.com, which is a hosting service. We show you how to migrate from WordPress.com to self-hosted WordPress at the end of this article.

The good news is, that you can migrate your blog to WordPress and begin to take advantage of its power and flexibility.

How to Migrate Your Blog to WordPress Yourself

Migrating a blog isn’t as simple as just moving information from one platform to another. However, that’s definitely something you need to get right, otherwise, you may lose content.

It’s also essential to choose a reputable WordPress hosting company that’s fast and reliable. Luckily, most hosting services will install WordPress for you automatically and free of charge.

You also need to make sure you don’t lose SEO so that your posts rank lower on Google. You should also set up

an SEO-friendly URL structure for your future posts.

Now you don’t want your visitors or search engines to lose track of your posts because the old URLs stop working. You need to take care of this by creating redirects.

Besides these, there may be some additional steps you need to take to migrate everything over and improve your blog.

That’s a lot to keep track of, so we created specific step-by-step guides on how to migrate from your specific blogging platform to WordPress:

1. Migrating Self-Hosted WordPress to a New Server or Domain

You may already be using a self-hosted WordPress website and decide to migrate it to a new hosting service or domain. For example, you may decide to upgrade to a more reliable web hosting company.

You will need to move your WordPress files and databases from the old provider to the new one. If you’re not careful, then you may lose data, or take your website down and lose sales.

That’s why we created a step-by-step tutorial that shows you how to safely migrate WordPress to a new host or server without any downtime.

However, if you are moving your website to a new domain name, then you have a little more work to do. This would be if you are changing the URL of your website from, say, johnsmith.com to smithconsultingservices.com.

In that case, you simply need to follow our detailed guide on how to easily move WordPress to a new domain.

Tip: Some hosting providers, such as SiteGroundHostingerWP Engine, and GreenGeeks offer a free migration service for WPBeginner users. It might not be listed on their website, so all you have to do is ask.

2. Migrating From Blogger to WordPress

Blogger is a free blogging service by Google. It offers a quick and easy way to create a blog for non-tech-savvy users. All you need is a Google account to start a free blog on Blogger.

However, as your website grows, you will be limited to basic blogging tools and won’t be able to add new features. There are also not many ways to customize the appearance of your blog.

WordPress, on the other hand, gives you complete ownership of your website and allows you to add the necessary features to grow and monetize your blog. We have created a detailed side-by-side comparison of WordPress vs Blogger.

The good news is that WordPress is set up to natively import your Blogger posts. However, you will need to follow our instructions carefully, or your new blog’s URLs might not match.

If you have a free Blogger account, then you will have a website address that looks like myblog.blogspot.com. In that case, you should follow our guide on how to switch from Blogger to WordPress without losing Google rankings.

However, Blogger also allows users to connect custom domain names to their blogs such as myblog.com. If you have a custom domain Blogger blog, then you will need to follow our guide on how to move a custom domain Blogger blog to WordPress.

3. Migrating From Ghost to WordPress

Ghost is a minimalist blogging platform with features entirely focused on writing blog posts. It is available as a hosted platform, and also as software that you can install, though many users find installing it difficult.

While a simplified user interface can be a good thing, it also means your options for customizing Ghost’s features and appearance are very limited. This can become frustrating.

On the other hand, WordPress allows you to customize your site by installing plugins and themes. It is also much easier to install yourself. You can learn more about the differences between these platforms in our side-by-side comparison of Ghost vs. WordPress.

Unfortunately, migrating from Ghost is difficult because the

default Ghost export file does not use a format supported by WordPress. So we decided to fix this issue and created the Ghost to WordPress Importer tool.

We show you how to use this free tool to migrate your blog in our guide on how to properly move from Ghost to WordPress.

4. Migrating From GoDaddy Website Builder to WordPress

GoDaddy is one of the biggest hosting and domain name companies in the world. To help their many users get started with building their website, they offer a basic website builder tool called GoDaddy Website Builder.

Many users choose this tool because it’s a convenient way to get started. However, it is missing many of the key features of more powerful blogging platforms, as you can see in our detailed comparison between GoDaddy Website Builder vs WordPress.

This means that users will quickly realize its many limitations and want to move their website to a more flexible and powerful platform like WordPress.

Unfortunately, there is no export tool to move your site from GoDaddy Website Builder to WordPress. That means that the process will be time-consuming and have a lot of manual steps, making it easy to make a mistake.

You’ll find every step clearly explained in our guide on how to move a GoDaddy Website Builder site to WordPress.

5. Migrating From Gumroad to WordPress

Gumroad

Gumroad is a popular eCommerce platform that allows users to sell digital goods online, such as games, music, courses, and videos. However, many users are looking to switch away from the platform because they have raised their fees to 10% for each transaction.

This fee does not include credit card processing or PayPal fees. Plus, an additional 10% fee is charged if a product is sold through the ‘Gumroad Discover’ feature or their ‘Global Affiliates’ program. That’s a lot of fees.

On the other hand, WordPress is free and doesn’t charge you any fee for the items you sell. Unlike Gumroad, it also lets you sell physical goods and you can use any payment gateway you want and promote your website freely.

You can easily install a plugin like Easy Digital Downloads to make WordPress the perfect platform for selling digital goods. We have even partnered with SiteGround, and they are offering special EDD hosting for our readers.

You can learn how to do this in around 30 minutes by following our guide on how to switch from Gumroad to WordPress.

6. Migrating From Joomla to WordPress

Joomla

Joomla is a good content management system that has a lot in common with WordPress. For example, they are both open-source software written in the PHP programming language and use a MySQL database.

They also have similar requirements, which means you won’t need to change hosting companies.

However, Joomla is more complicated to use. It is also not as powerful or flexible as WordPress because there are fewer extensions and designs available for you.

On the other hand, WordPress is easier to use and offers tons of extensions and design choices. See our comparison of Joomla vs WordPress for more details.

Luckily, there is a plugin you can use to easily import your Joomla content into WordPress. We carefully take you through every step you need in our guide on how to easily move your site from Joomla to WordPress.

7. Migrating From Medium to WordPress

Medium is a good blogging platform for new writers. It allows you to publish your posts with very little setup.

But because you don’t own the platform, content from other authors often gets displayed below your own story.

The platform is quite limited compared to WordPress. When you switch from Medium to WordPress, you will own your own blog and can add all the features you need using plugins.

Simply follow our complete step-by-step guide to help you properly move all your content from Medium to WordPress.

You can retain the look of your old blog by installing a Medium-style theme or go for a new blog design using one of the best and most popular WordPress themes.

Tip: If you’re not ready to completely migrate away from Medium, then you can learn how to embed Medium blog posts in WordPress.

8. Migrating From Shopify to WordPress

Shopify is an all-in-one

eCommerce solution that makes it easy for you to create an online store, accept payments, and manage your inventory, all from a single platform.

You don’t need to worry about the technical aspects of managing an eCommerce site, but it comes with slightly higher costs and limited control of your website.

On the other hand, you can turn WordPress into a full-featured online store by installing the WooCommerce plugin and customize every aspect of your store. You can compare the differences between the platforms in our comparison of Shopify vs WooCommerce.

Unfortunately, migrating away from Shopify is difficult because it doesn’t provide an easy way to export data to a WordPress-supported format. So we built an easy importer tool to help you do the Shopify to WooCommerce migration for free.

We take you through the entire migration process step-by-step in our guide on how to properly move from Shopify to WooCommerce.

Note: If you’re not ready to completely migrate away from Shopify, then you can learn how to easily integrate Shopify with WordPress.

9. Migrating From Squarespace to WordPress

Squarespace is a website-building service that focuses on small business owners. It allows you to create beautiful websites using easy drag-and-drop tools.

However, compared to WordPress, it costs more and offers less scope for design and flexibility. And while it does offer a limited set of extensions and integrations, they don’t compare with the power and breadth of the WordPress plugin ecosystem.

Unfortunately, it is difficult to migrate away from Squarespace because it offers limited export functionality. Depending on what content you have on your site, you may need to manually copy and paste some content from your Squarespace website.

In our guide on how to properly move from Squarespace to WordPress, we clearly list the content that can be automatically exported, and the content you will have to move manually to successfully migrate your site.

10. Migrating From Tumblr to WordPress

Tumblr is a little different than other blogging platforms. It is a microblogging platform with social networking features like following other blogs, reblogging, and built-in sharing tools.

The platform is easy to use and comes with its own audience. As a microblogging tool, Tumblr makes it easy to quickly blog videos, GIFs, images, and audio formats.

However, unlike WordPress, Tumblr’s features are limited and cannot be extended. To learn more about WordPress and what you can do with it, please see our complete WordPress review with pros and cons.

If you’re thinking about migrating from Tumblr to WordPress, then you will be glad to know that WordPress can natively import your Tumblr posts.

However, there is a lot involved in a website migration, and you’ll find all the steps in our comprehensive guide on how to properly move your blog from Tumblr to WordPress.

11. Migrating From Weebly to WordPress

Weebly is a well-known website builder platform owned by Square’s payment platform. It offers easy-to-use website-building tools for business websites and eCommerce stores along with free blog templates that you can add to your website.

However, that free plan has limited features and bandwidth, and upgrading to a paid subscription is expensive compared to top blogging websites. Besides that, Weebly’s blogging and SEO features are just not as powerful as other blogging platforms.

By contrast, WordPress can be hosted on any server and has all the features you can dream of like online stores, contact forms, galleries, portfolios, SEO, and more. When you compare Weebly vs WordPress you might start to think about switching.

The migration will take about an hour, and it’s worth it. Don’t worry, we’ve helped hundreds of people switch with the step-by-step directions in our guide on how to properly move from Weebly to WordPress.

12. Migrating From Wix to WordPress

Wix is a popular hosted platform that lets you quickly create simple websites using a drag-and-drop website builder. You can add a blog using the Wix Blog app.

However, when you compare Wix vs WordPress you see that Wix has incredibly limited options and adding extra features can become quite expensive.

For all but the simplest websites, WordPress is by far the better choice because it has a much larger range of themes and layouts, as well as a huge selection of plugins that add new features to your website.

Unfortunately, Wix makes it quite difficult to move your content away, but after reviewing various different ways to move from Wix to WordPress, we believe the easiest method is by importing your blog posts via RSS.

We show you how to do this step-by-step in our guide on how to properly switch from Wix to WordPress. On an average Wix blog, the migration takes around an hour.

13. Migrating From WordPress.com to Self-Hosted WordPress

WordPress.com is a blog hosting service offered by Automattic, a company created by WordPress.org co-founder Matt Mullenweg. Basic blog hosting is free and you can purchase additional options like a custom domain name, additional storage, and premium services.

This appeals to new users because no setup is required. However, compared with a self-hosted WordPress website, there are limited options to extend your blog. For example, you can’t use custom themes and plugins for customizing your blog.

You can learn more by viewing our comparison chart on WordPress.com vs WordPress.org.

If you’re ready to move from WordPress.com to a self-hosted WordPress blog, then see our guide on how to properly move your blog from WordPress.com to WordPress.org. Make sure you follow our steps carefully so you don’t lose data, visitors, or SEO.

After you migrate to a self-hosted WordPress blog, you may find you are missing some features you enjoyed on WordPress.com. Don’t worry, you can easily add those features by following our guide on how to get WordPress.com features on self-hosted WordPress blogs.

Special Offer: Our Team of Experts Can Move Your Blog for Free

Here’s a special offer. If you wish to migrate from Blogger, Medium, Weebly, or WordPress.com to a self-hosted WordPress website, then we can do it for you for free.

One of our expert team members will do the entire migration for you (100% free). Yes, you can literally switch from any of those specific platforms to WordPress without any risk.

There are just two conditions:

  • First, you need to sign up for your new web hosting service using our link. This will make sure you get the best price on hosting.
  • Second, your blog can’t have more than 1,000 posts. We can offer a migration service for larger blogs, but that will be a paid service.

Sound good? You can learn more on our Free WordPress Blog Setup page. We’ve already helped over 100,000 people, so get started now.

Free Blog Setup

We hope this tutorial helped you learn how to migrate your website to self-hosted WordPress. You may also want to see our guide on how to create an email newsletter the right way, or our expert pick on must have WordPress plugins to grow your site.

If you liked this article, then please subscribe to our YouTube Channel for WordPress video tutorials. You can also find us on Twitter and Facebook.

The post Ultimate WordPress Migration Guide for Beginners (Step by Step) first appeared on WPBeginner.


from WPBeginner https://ift.tt/gMwClAi
More links is https://mwktutor.com