Monday, 30 November 2020

How to Easily Fix the DNS_PROBE_FINISHED_NXDOMAIN Error

Recently, one of our readers asked what they could do to fix the DNS_PROBE-FINISHED_NXDOMAIN problem?

This error message appears in Chrome when your browser can’t connect to the website you’ve requested. Other browsers use different messages to display this error.

In this article, we’ll show you how to easily fix the DNS_PROBE_FINISHED_NXDOMAIN error, and how to avoid it in the future.
Fixing the DNS_PROBE_FINISHED_NXDOMAIN error

What Is the DNS_PROBE_FINISHED_NXDOMAIN Error?

The DNS_PROBE_FINISHED_NXDOMAIN error is a Google Chrome error message which appears when the browser is unable to find the website you are trying to access.
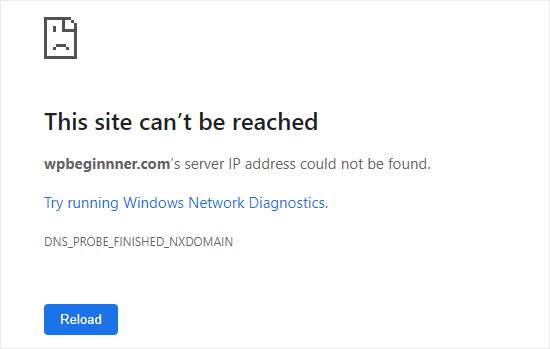
An example of the DNS_PROBE_FINISHED_NXDOMAIN error in Google Chrome

This error appears when the DNS (Domain Name System) cannot find or connect to the IP address for that website.

Your browser then assumes that the website domain name doesn’t exist. The NXDOMAIN part of the error stands for ‘non-existent domain.’

To understand more, please take a look at our guide on how domain name / DNS work (visual explanation).

The error looks different in other browsers. For instance, here’s how it looks in Firefox:
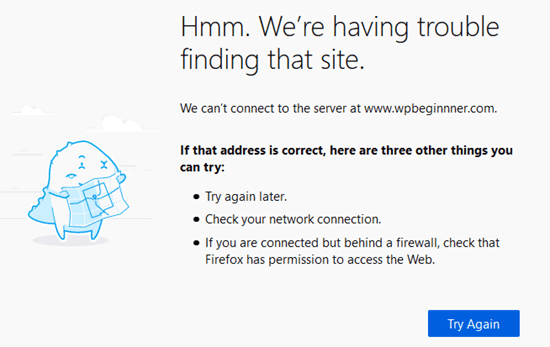
An example of the DNS_PROBE_FINISHED_NXDOMAIN error in Firefox

If you’re seeing this error when you try to access your own WordPress site, you may think there’s a problem with your site.

The good news is that your site is likely working fine. The problem is that your computer isn’t able to connect to it.

With that said, let’s see how to troubleshoot and fix this error.

How to Fix the DNS_PROBE_FINISHED_NXDOMAIN Error?

There are several ways to fix the DNS_PROBE_FINISHED_NXDOMAIN error. However, it’s important to first check that it really is an error.

Before doing anything else, you should check that you typed the domain name correctly.

For instance, if you accidentally typed incorrect spelling for a domain name, then your browser may not be able to find that domain and give this error.

Even if you clicked on a link, you should still check that the domain name is correct. It could have been mistyped by whoever created the link.

If you’re certain that the domain name is correct, then click the ‘Reload’ or ‘Try again’ button.
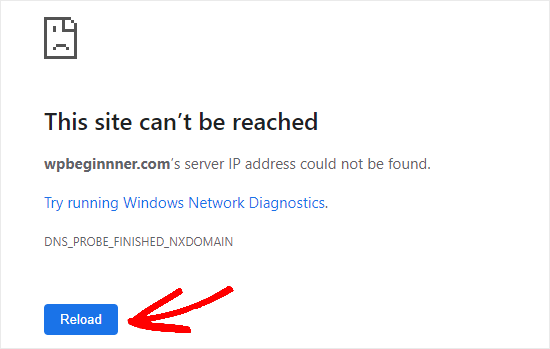
Clicking the button to reload the website

Next, you should try accessing the website from a mobile phone (4G network), so you can see whether the issue is with your device or WIFI connection.

If the website doesn’t load on your mobile phone either, then you need to immediately contact your WordPress hosting provider because this means that your website is down.

However if the website loads just fine on your mobile phone, then you know the issue is either with your computer or your WiFi connection.

Let’s try solving that.

The first thing you should try is restarting your computer. If that doesn’t help, turn your internet modem off and on. These steps may automatically clear DNS and network-related issues.

If the error is still appearing, then you may need to try the following methods. We recommend starting with the first one and working through them.

Clear Your Browser’s Cache

To clear your cache in Chrome, go to the page chrome://settings/clearBrowserData in your browser. This should give you a popup window where you are able to clear your cache.

First, set the time range to ‘All time’ then check just the ‘Cached images and files’ box. Next, click the ‘Clear data’ button.
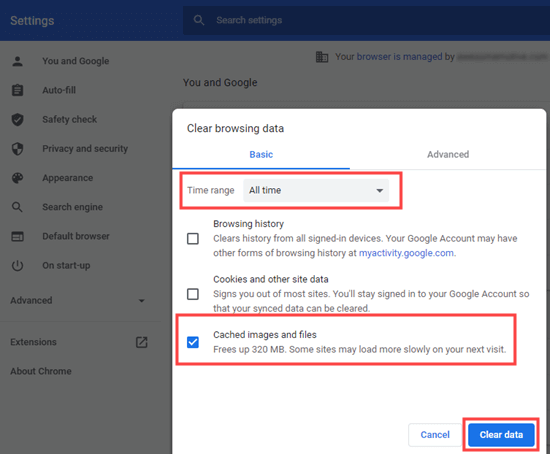
Clearing cached images and files in Chrome

If you aren’t using Chrome, check out our article on clearing your browser cache for instructions for all major browsers.

Now, try the website again. If it still shows the error message DNS_PROBE_FINISHED_NXDOMAIN, simply try the next solution.

Turn Off Experimental Chrome Features

If you’ve enabled any of Chrome’s experimental features, then these could be causing the DNS_PROBE_FINISHED_NXDOMAIN error.

To turn these off, go to chrome://flags/ in your browser then click the ‘Reset all’ button at the top.
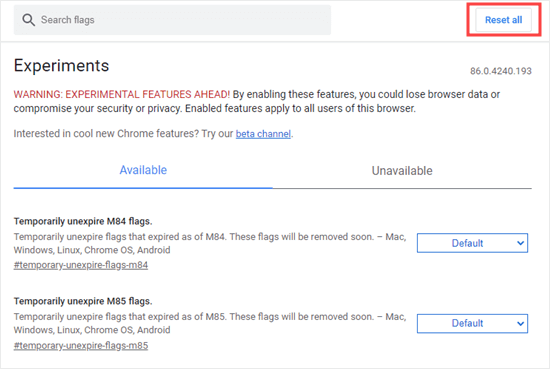
Resetting all experiments in Chrome

If the website you want to access still shows the error, try the next solution.

Flush Your Computer’s DNS Cache

Your computer often saves (caches) the IP addresses of websites that you’ve previously visited. If the website’s IP has changed, then that can cause the DNS_PROBE_FINISHED_NXDOMAIN error.

Here’s how to flush your DNS cache.

Note: These instructions are for Windows 10. For macOS instructions, check out our guide on clearing your DNS cache.

First, search for the Command Prompt app. Go ahead and open it up.

Tip: If you’re not logged in as an administrator, use the ‘Run as administrator’ option.
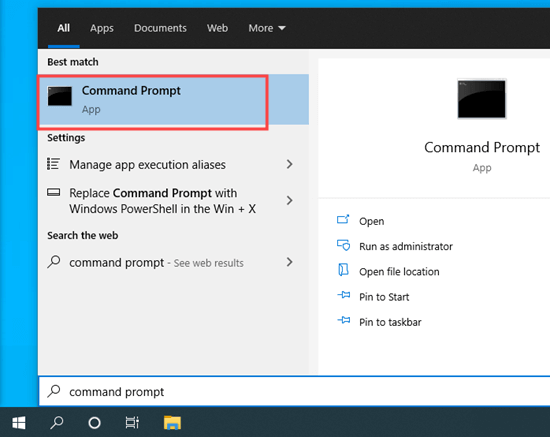
Opening the Command Prompt app

Next, type ipconfig/flushdns then press Enter on your keyboard. You should then see a success message.
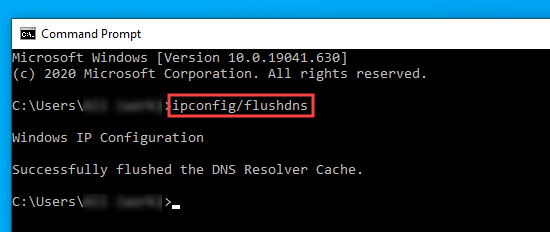
Typing the command into the Command Prompt window to flush the DNS cache

Now, try accessing the website again. If the error message DNS_PROBE_FINISHED_NXDOMAIN still appears, try the next solution.

Release and Renew Your IP Address

The next step is to renew your computer’s IP address on the internet.

Go ahead and open up the Command Prompt app, as shown in the previous step. Next, enter the following commands in this order. Press Enter after each one.

ipconfig /release

ipconfig /flushdns

ipconfig /renew

You will see quite a few lines of information after entering the first and third commands. This is normal.
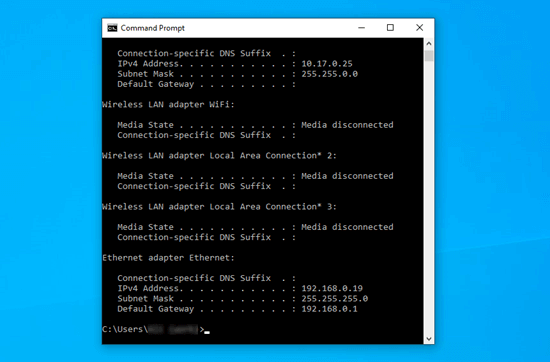
Renewing your computer's IP address

If the DNS_PROBE_FINISHED_NXDOMAIN error still appears after this, try the next solution.

Use Google’s Public DNS Servers

By default, your computer uses the DNS server from your internet service provider (ISP). You can change this to use Google’s public DNS server instead.

On Windows, open your Control Panel then go to Network and Internet » Network and Sharing Center. Then, click the ‘Change adapter settings’ link on the left hand side.
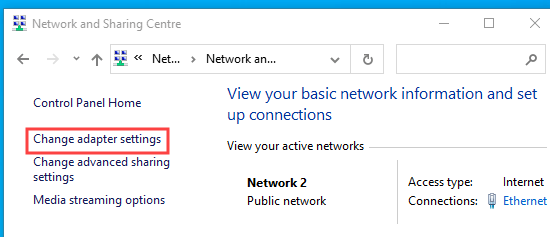
Clicking the Change adaptor settings link

You will see a list of connections. Right-click on your current connection and select the Properties option.
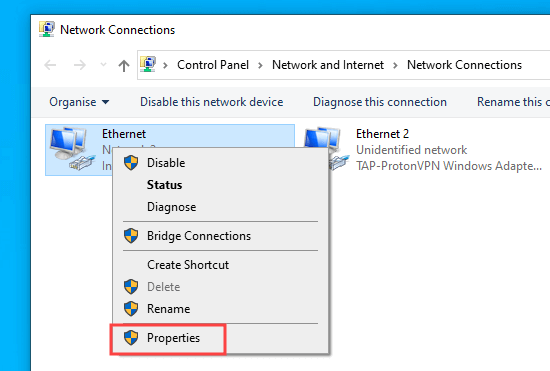
Click on the Properties for your active internet connection

Next, click on the Internet Protocol Version 4 (TCP/IPv4) and then click the Properties button.
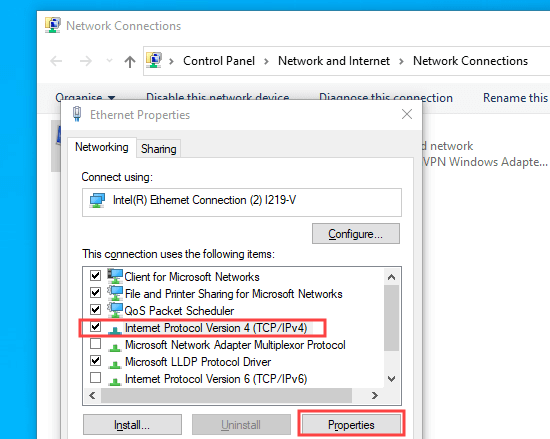
Selecting the Internet Protocol Version 4 (TCP/IPv4) option

After that, you need to click the ‘Use the following DNS server addresses’ option and enter these DNS servers:

Preferred DNS server: 8.8.8.8
Alternative DNS server: 8.8.4.4

Then, click the OK button to save your changes.
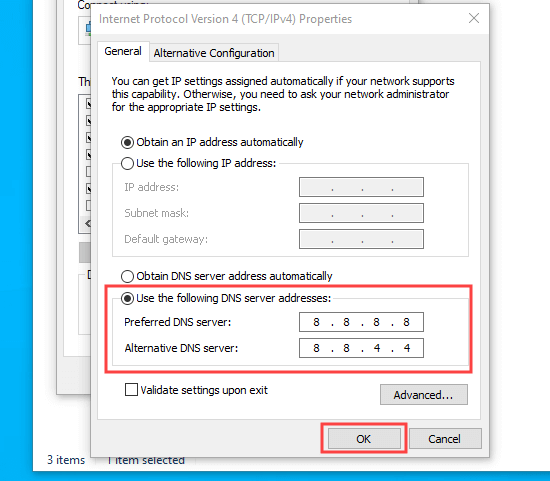
Using the details for Google's public DNS servers

Try the website again to see if the DNS_PROBE_FINISHED_NXDOMAIN error is fixed. If not, try the final method.

Check Your Computer’s ‘hosts’ File

The hosts file is a file that your computer uses to map domain names to IP addresses. If the website is incorrectly recorded in this file, that can be the cause of the DNS_PROBE_FINISHED_NXDOMAIN issue.

On Windows, you can find this file through File Explorer. First, open File Explorer, then find the Windows folder on your computer. It’s normally in the C:\ drive. Mac users can find the file under /private/etc/hosts/ folder.

Next, go to System32 » drivers » etc. Here, you need to locate the hosts file and double click on it to open it. If you’re prompted to choose an app, use Notepad.
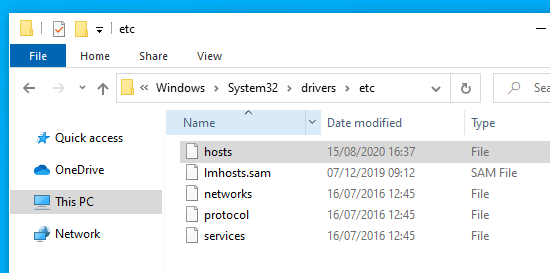
Finding the 'hosts' file on your computer

Now, check to see if the website’s address is in the hosts file. If it is, delete it along with the IP address next to it. Then, save the file.
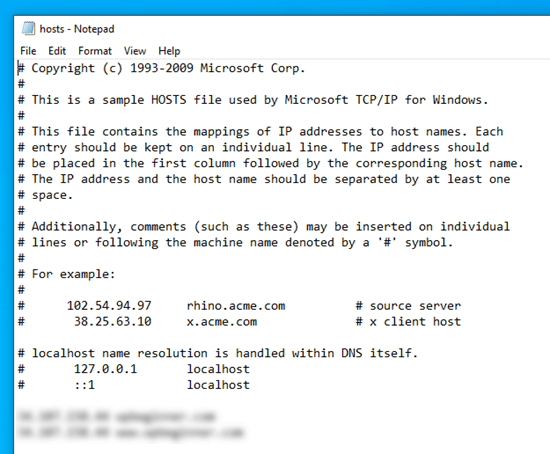
Checking the contents of the 'hosts' file on your computer

After doing this, the DNS_PROBE_FINISHED_NXDOMAIN error should hopefully no longer appear for that site.

We hope this article helped you learn how to fix the DNS_PROBE_FINISHED_NXDOMAIN error. You might also like our article on the most common WordPress errors and how to fix them.

If you liked this article, then please subscribe to our YouTube Channel for WordPress video tutorials. You can also find us on Twitter and Facebook.

The post How to Easily Fix the DNS_PROBE_FINISHED_NXDOMAIN Error appeared first on WPBeginner.


from WPBeginner https://ift.tt/36n2nq2
More links is https://mwktutor.com

WordPress 5.6 RC, WordPress.com vs Conservative Treehouse, Envato Earnings 🗞️ December 2020 WordPress News w/ CodeinWP

This is the December 2020 edition of “This Month in WordPress with CodeinWP.” The end of the year is near and, while all our hopes are heading towards a better 2021, let’s keep an eye on what’s happening in WordPress right now.

from CodeinWP https://ift.tt/3moewR4
More View at https://mwktutor.com

Friday, 27 November 2020

14 Best WordPress Testimonial Plugins (Compared)

Are you looking for the best testimonial plugins for your WordPress website?

Testimonials and reviews are a great way to add social proof to your website and help build trust among your users.

In this article, we have hand-picked the best testimonial plugins for WordPress that you can use on your website.

The best testimonial plugins for WordPress

Why Use a Testimonial Plugin for WordPress?

Using a testimonial plugin lets you easily add customer or client testimonials, reviews, or feedback to your WordPress website. This adds social proof to your site and helps you win new customers and boost sales.

You could add testimonials by manually copying them into your posts or pages. However, a testimonials plugin lets you display them attractively in a slider, carousel, grid, and other beautiful layouts.

Depending on the plugin you choose, you can show testimonials with photos, a short blurb, reviewer’s name, title, business, or star ratings.

That being said, let’s take a look at some of the best WordPress testimonial plugins that you can try.

1. Facebook Social Reviews Feed – Smash Balloon

Facebook Social Reviews Feed – Smash Balloon

Facebook Social Reviews Feed from Smash Balloon lets you display reviews from your Facebook Page on your site. This is a fantastic option if you already have some great reviews on Facebook. It means you don’t have to copy and paste any text or seek out fresh testimonials.

Facebook reviews boost user trust as they come from real Facebook profiles that can be looked up.

Custom Facebook Feed Pro itself is the most popular Facebook feed plugin out there and works with any WordPress theme. It makes it really easy to add a Facebook page feed to WordPress and boost engagement on your social profiles.

With the Reviews extension, you can display Facebook reviews as testimonials by entering the shortcode in any post or page, or even in a sidebar or footer widget. You can also display them anywhere on your landing pages or individual product pages.

Note: You will need to purchase the Custom Facebook Feed Pro plugin by Smash Balloon in order to use the Reviews extension.

2. Custom Twitter Review Feed – Smash Balloon

Custom Twitter Review Feed – Smash Balloon

Custom Twitter Review Feed from Smash Balloon is a great option for displaying Twitter testimonials on your site.

Like Facebook reviews, testimonials that are shared through tweets are a great way to show feedback from real individuals.

It’s easy to narrow your Twitter feed down to only show testimonials. You can do this by using hashtags or an advanced search to only display testimonials about you or your company.

The Custom Twitter Feeds Pro plugin has lots of other great features as well. For instance, you might create a curated list of Twitter accounts then display this as a feed on your website.

Plus, you can even automatically moderate tweets so that tweets containing specified words are hidden.

3. WPForms

The WPForms website

WPForms is the best WordPress form plugin in the market used by over 3 million users. It can be used to collect customer testimonials too. This helps you get all your testimonials in one place and one format.

WPForms’ special Form Templates Pack addon includes a Testimonial Form Template. This lets you get started quickly. You can modify the form and any form fields that you may need.

With WPForms, you could even add a file upload option to your testimonial form. This lets customers upload files, such as photos of themselves with your product or even a short video clip.

You can also use WPForms to run a survey with beautiful reports. You could use this to show data about how your customers use your products, what they like best, and how satisfied they are.

4. Site Reviews

Site Reviews

Site Reviews lets visitors submit reviews with a 1 to 5 star rating. With this plugin, you can pin your best reviews or testimonials so that they show up first.

It’s also possible to moderate new review submissions, approving them before they go live on your site. This helps you protect against unfairly bad reviews. Alternatively, you can require users to be logged into your site in order to leave a review.

Site Reviews lets you easily respond to reviews, display a summary, and more. The developers provide active support through the WordPress.org support forum for the plugin.

5. Easy Testimonials

Easy Testimonials

Easy Testimonials lets you enter testimonials from your WordPress admin area.

You can include a star rating, the person’s role, and the product or service they used, as well as the testimonial itself. If you enter their email address, Easy Testimonials will automatically use their Gravatar image if they have one.

The pro version of Easy Testimonials also allows you to add a customer feedback form on your website.

Easy Testimonials includes 5 blocks for the WordPress block editor (Gutenberg editor). You can also display testimonials using a simple shortcode.

For detailed instructions, see our guide on how to add a customer reviews page in WordPress.

6. Testimonials Widget

Testimonials widget

Testimonials Widget is another flexible WordPress testimonials plugin. Despite the name, it allows you to add testimonials anywhere on your website, not just in widgets.

It comes with a sidebar widget allowing you to easily display testimonials in sidebars. Testimonials are displayed in a carousel with beautiful slide-in and fade effects.

7. Strong Testimonials

Strong Testimonials

Strong Testimonials is one of the most customizable WordPress testimonial plugins. It comes with multiple display options. These include a testimonial slider, grid layout, masonry layout, single column layout, and more.

It also includes a form that allows your customers to easily add their reviews and testimonials. If you have been getting customer reviews on social media, then the pro version of this plugin can also embed reviews from Facebook, Google My Business, Yelp, and more.

8. Testimonial Basics

Testimonial Basics

Testimonial Basics is a complete testimonial management solution for your WordPress website. It includes multiple display styles, a sidebar widget, and a feedback form to collect user testimonials.

If a user submits a testimonial, this plugin will use Gravatar to fetch their photo. However, you can also manually upload photos directly from your WordPress admin area.

9. WP Testimonials with Rotator Widget

WP Testimonials with Rotator

WP Testimonials with Rotator Widget is a simple yet highly customizable testimonials plugin. It allows you to easily add testimonials and sort them into categories and tags.

After creating testimonials, you can display them using a shortcode. This shortcode comes with several parameters that let you customize the appearance of testimonials. The plugin also includes a widget with the same options as the shortcode.

10. BNE Testimonials

BNE Testimonials

BNE Testimonials is another easy to use option for adding testimonials to your WordPress site. It comes with a shortcode and a sidebar widget to easily display testimonials.

It has a slider and plain list layout for testimonials, which inherits your theme’s style for display.

11. Testimonial

Testimonial Builder

Testimonial Builder is a straightforward WordPress testimonials plugin. It has simple options and the ability to choose your own colors.

It has draggable box items and allows you to choose different fonts, font-sizes, text color, and featured photo. The plugin does not have a slider or rotator, so testimonials will be displayed in a grid or list style.

12. Testimonial Slider

Testimonial Slider

Testimonial Slider offers a modern WordPress testimonial slider with an improved user experience. It comes with a slider as well as the option for a plain list layout. You can also add a front-end contact form to collect customer testimonials.

You can add testimonials anywhere using the shortcode or sidebar widget. The testimonial slider is touch / mobile friendly and works well at all screen sizes.

Bonus Tools to Add Social Proof Beyond Testimonials

Testimonials show that users find your products/services good. However, you need to maximize social proof with other tools as well.

The following are a couple of tools that you can use to create the FOMO effect with social proof.

13. TrustPulse

The TrustPulse website

TrustPulse is a powerful social proof plugin for WordPress. It helps you boost conversions by showing real-time notifications of activity on your website.

For instance, TrustPulse can show notifications about sales, downloads, forms submitted, and more. It’s a powerful way to use the fear of FOMO to encourage potential customers to buy.

The TrustPulse notifications aren’t intrusive, but they are still highly effective. They can boost conversions up to 15% straight out of the box. You can customize the style, colors, text, image, and more for the notifications.

14. OptinMonster

OptinMonster displaying a testimonial popup

OptinMonster is the best conversion optimization tool on the market. It allows you to easily convert website visitors into paying customers.

It comes with beautiful popups, slide-in menus, countdown timers, floating headers, and other tools. All of them can be used to display social proof and customer testimonials.

It has powerful targeting features that allow you to show the right message at right time. For instance, you can show users a popup when they are about to leave.

It works with all top email marketing services, WordPress form plugins, and WooCommerce. This helps you boost your conversions several folds.

We hope this article helped you find the best testimonial plugin for your WordPress website. You may also want to see our complete list of must have WordPress plugins for business websites, and our proven tips to increase blog traffic.

If you liked this article, then please subscribe to our YouTube Channel for WordPress video tutorials. You can also find us on Twitter and Facebook.

The post 14 Best WordPress Testimonial Plugins (Compared) appeared first on WPBeginner.


from WPBeginner https://ift.tt/3laVRa0
More links is https://mwktutor.com

Thursday, 26 November 2020

[Mega Thread] Black Friday 2020 Discount For Bloggers

Black Friday is usually my favorite time for shopping because it offers deals that are one time, and hard to resist. Last year, I purchased Email marketing tool for the yearly plan, Bluehost 3 year hosting package, Few plugins, and other stuff, and saved over $1000 with the special discounted price on Black Friday. As …

[Mega Thread] Black Friday 2020 Discount For Bloggers Read More »

[Mega Thread] Black Friday 2020 Discount For Bloggers is a post from ShoutMeLoud - Shouters Who Inspires


from ShoutMeLoud https://ift.tt/2hK67I0
More View at https://mwktutor.com
$99.47 Premium WordPress Themes & Plugins: MyThemeShop Black Friday Deal

TLDR: Offer Status: Live Offer: $99.47 for all premium themes + plugins Coupon code: BFCM20 Claim offer here Offer Expires on : 2nd December 2020 When it comes to WordPress themes & plugins, MyThemeShop is a well known & popular name in the industry. Like every year, Black Friday & Cyber Monday are the two best …

$99.47 Premium WordPress Themes & Plugins: MyThemeShop Black Friday Deal Read More »

$99.47 Premium WordPress Themes & Plugins: MyThemeShop Black Friday Deal is a post from ShoutMeLoud - Shouters Who Inspires


from ShoutMeLoud https://ift.tt/2zhBsJh
More View at https://mwktutor.com
How to Add a PayPal Donate Button in WordPress

Are you looking to add a PayPal donate button on your WordPress site?

PayPal makes it super-easy to accept donations on your website. It is convenient, cost-effective, secure, and already used by millions of users around the world.

In this article, we will show you how to easily add a PayPal donate button on your WordPress site.

Adding a PayPal donate button in WordPress

Why Use a PayPal Donate Button in WordPress?

Many bloggers add PayPal donate buttons on their WordPress sites to help cover the website’s running costs.

Non-profit organizations also use their websites to fundraise for their causes. Paypal donate button provides them an easy way to accept donations.

Tip: If you want a more fully-featured fundraising solution, check out these best donation and fundraising plugins for WordPress.

Before you start, you will need to create a PayPal account or log in to your existing account.

Since this is a comprehensive guide, we have created a table of content, so you can easily jump to the section you need:

  1. How to Add PayPal Donate Button in WordPress (Free Plugin)
  2. How to Add a Smart PayPal Donation Form in WordPress (using WPForms)
  3. How to Manually Add a PayPal Donate Button in WordPress (Code Method)

1. How to Add PayPal Donate Button in WordPress (Free Plugin)

This method is recommended if you are looking for a free WordPress PayPal donation plugin. It is simpler but is very limited in terms of what you can do.

First, you need to install and activate the PayPal Donations plugin. For more details, see our step by step guide on how to install a WordPress plugin.

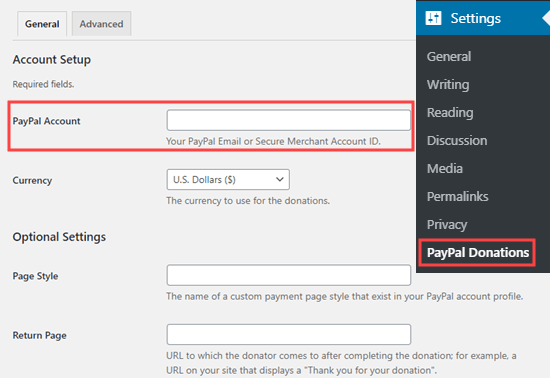
Upon activation, go to the Settings » PayPal Donations page to create your donation button.

Here, you need to enter your PayPal email address. This is the address you use to login to PayPal.

The donation currency will default to US dollars. To change this, simply select your preferred currency from the dropdown menu.

Add the email address for your PayPal account to the PayPal Donations plugin settings

You may want to create a thank you page on your site and set this up as the Return Page, in the Optional Settings section.

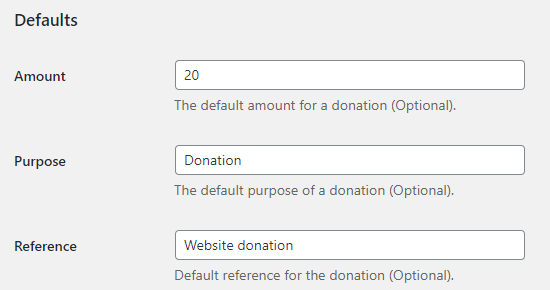
You can optionally add a default amount, purpose, and reference for your PayPal donations.

Set the defaults for your PayPal donations

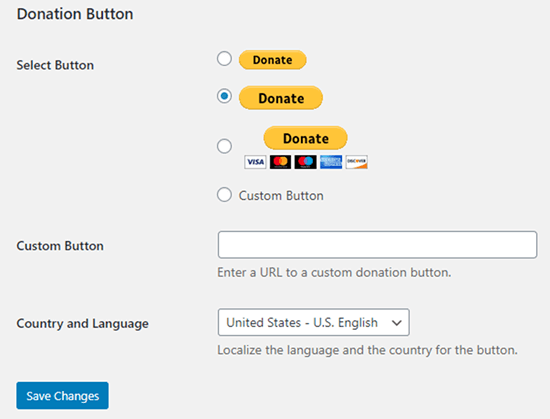
Next, you can select a PayPal button style, or enter a URL for a custom button image. You can also change the donation country and language, which defaults to the United States and US English.

Once you are done, don’t forget to press the ‘Save Changes’ button to store your settings.

Choose the style of donation button that you want to use on your site

Adding Your PayPal Donate Button to Your Website

The plugin allows you to easily display PayPal donate button anywhere on your WordPress website using a shortcode.

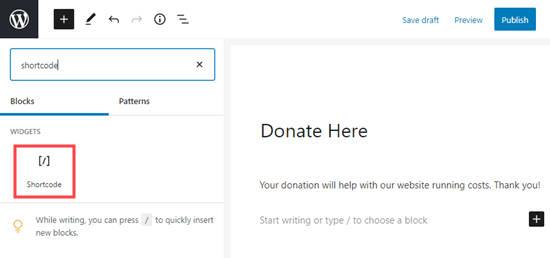
Simply edit the post or page where you want to display the donate button, and then add the shortcode block in the content editor.

Adding a shortcode block to your site to enter the PayPal Donations shortcode

Inside the settings, you need to add [paypal-donation] shortcode. You can now save your changes and preview your post or page.

Here’s the donate button live on our demo site.

The Donate button on our demo website

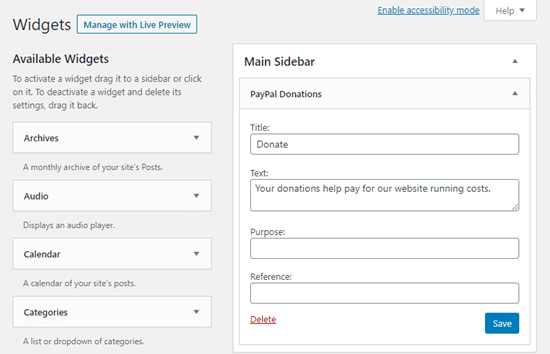
This plugin also let you add the PayPal donations button to a sidebar or footer widget area. Simply go to the Appearance » Widgets page and drag the PayPal Donations widget to your sidebar or footer.

Adding the PayPal donations widget to the sidebar

The widget has the same settings, so all you need to do is provide a title and text. Don’t forget to press the Save button to create your widget.

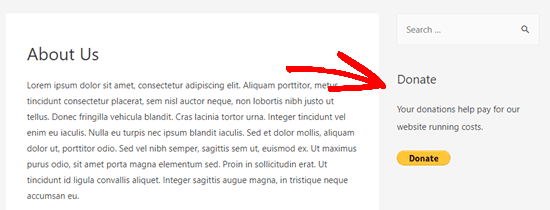
Here’s the donate widget in our demo website’s sidebar.

The Donate widget live in the sidebar on our demo website

2. How to Add a Smart PayPal Donation Form in WordPress (using WPForms)

Another great way to create a PayPal donation button is with WPForms. It is the best WordPress form builder plugin on the market used by over 3 million website owners.

WPForms allows you to easily create beautiful donation forms that lets you accept payments using credit card and/or PayPal.

This method gives you more flexibility.

You can collect donor information, add them to your email list (WPForms works with all top email marketing services), collect phone numbers, run surveys, polls, and more.

Basically, you can engage with users which helps you create a stronger community.

Note: You will need the Pro version of WPForms or higher in order to take PayPal payments.

First, you need to install and activate the WPForms plugin. For more details, see our step by step guide on how to install a WordPress plugin.

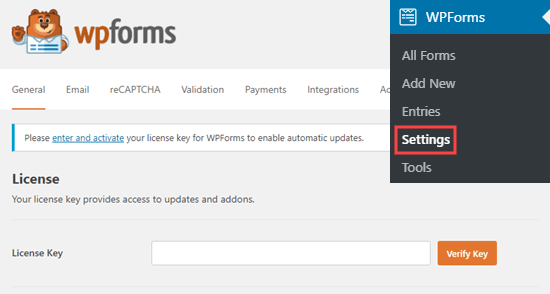
Upon activation, visit the WPForms » Settings page to enter your license key. You will find this information under your account on WPForms website.

Entering your WPForms license key on your site

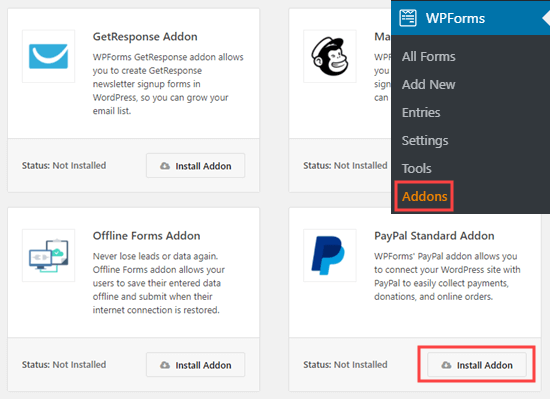
Next, go to the WPForms » Addons page. Here, you need to install the PayPal Standard addon. Simply find it in the list then click the Install Addon button below it.

The addon will be automatically installed and activated for you.

Installing the PayPal Standard addon in WPForms

Now, it’s time to create your donation form.

Simply go to the WPForms » Add New page in your WordPress admin area to launch the form buikder.

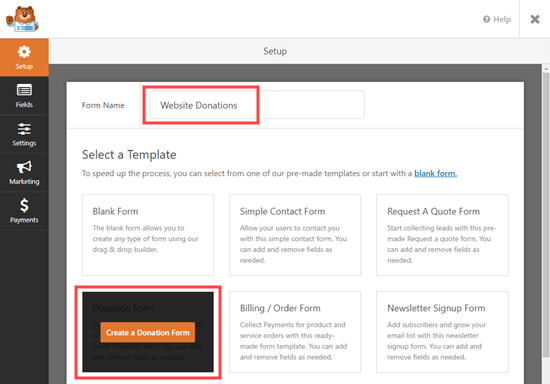
First, you need to provide a title for your form and then choose the Donation Form template.

Name your donation form and choose the Donation Form template

WPForms will now automatically load your form template in the WPForms builder. It’s easy to add, remove, or change the fields on your form.

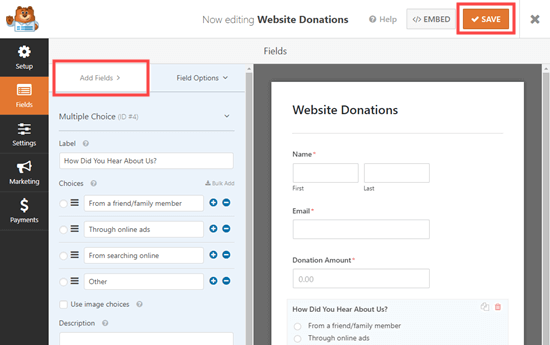
To add a field, simply click the Add Fields tab on the left-hand side. We’ve added a ‘How Did You Hear About Us?’ multiple choice field.

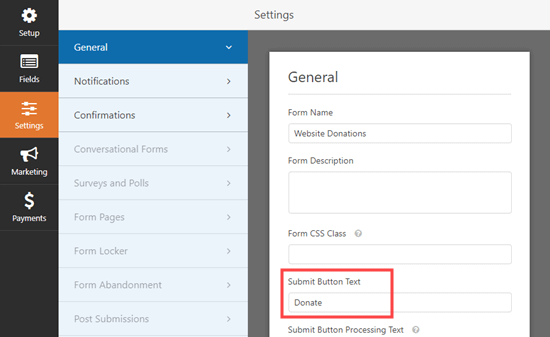
You might want to change the Submit button to read Donate instead. To do this, either click on the button or go to the Settings » General tab for your form.

Changing the text on the Submit button

Once you are happy with your form, click on the Save button at the top to save your changes.

Adding fields to your form and saving it

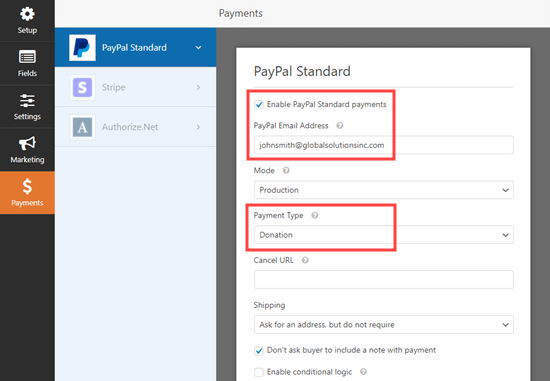
Next, you need to go to Payments » Paypal Standard to set up the payments for your form.

Simply check the ‘Enable PayPal Standard payments’ and enter your PayPal email address. Under Payment Type, select Donation.

Enabling PayPal payments for your form in WPForms

Once you’re done, click the Save button to store your settings.

Tip: You can send donors a receipt for their donation. Take a look at our instructions on creating a form with multiple recipients for help with this.

Adding Your Donation Form to Your Website

Once you’ve finished creating your PayPal donation form, it’s time to add it to your website.

WPForm makes it super easy to add forms anywhere on your website.

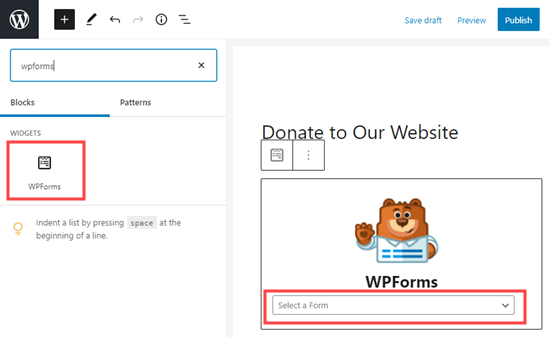
Simply create a new post or page, or edit an existing one. Then, add a WPForms block to the WordPress content editor and select the form you created earlier from the dropdown menu.

Creating a WPForms block and selecting your form from the dropdown list

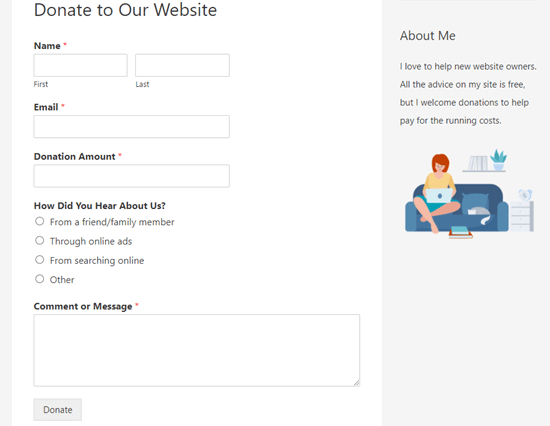
Once you’re ready, preview or publish your page to see your donation form live on your site.

Viewing the completed donations form on the website

Congratulations, you’ve now created a smart paypal donation form in WordPress.

3. How to Manually Add a PayPal Donate Button in WordPress (Code Method)

If you don’t want to install a plugin or if you’re using WordPress.com instead of WordPress.org, then you can manually add a PayPal donate button.
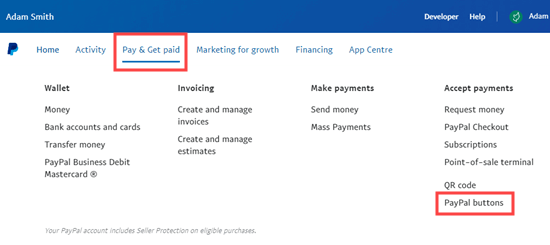
First, you need to log in to your PayPal account, and go to the Pay & Get Paid » PayPay Buttons page.

Selecting the PayPal Buttons menu option

On the next page, simply click the ‘Donate’ button option.

Select the Donate button type

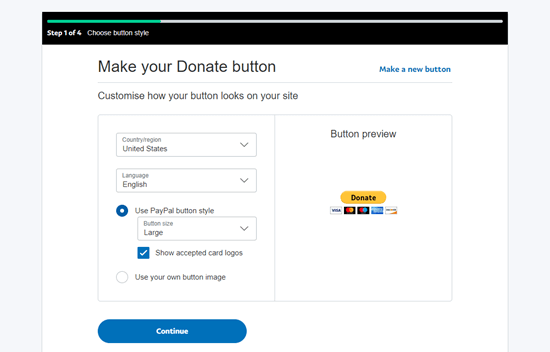
Now you can follow the on-screen instructions to create your button.

Following the on-screen steps to create the donation button

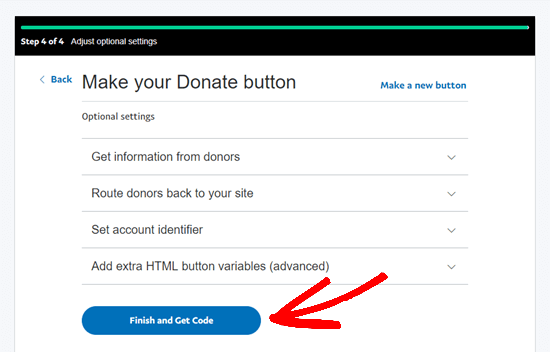
On the final screen of the button creation wizard, click the ‘Finish and Get Code’ button.

Finish creating your donation button and get the code for it

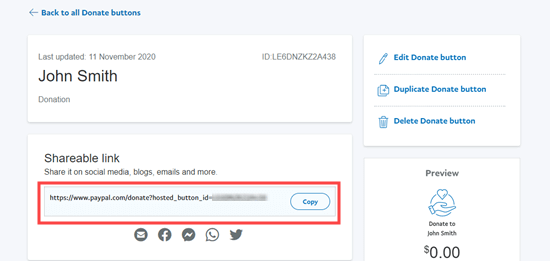
You will now see a page with a Shareable Link. This is the URL you need. Keep it open in this tab or save it in a safe place.

Getting the shareable link for your new PayPal donate button

Next, go to your WordPress admin area and edit a post or page where you want to add the PayPal donate button.

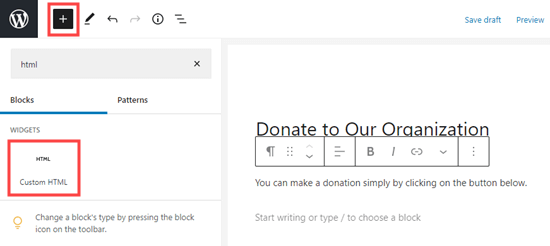
You need to add a new HTML block to your page, or use the Text mode if you’re using the Classic editor.

Adding an HTML block in the WordPress block editor

Paste the following code into your HTML block:

<a href="Your Shareable Link that you got from PayPal" target="_blank" rel="nofollow noopener"><img src="https://www.paypal.com/en_US/i/btn/x-click-but21.gif" alt="Click to Donate" /></a>
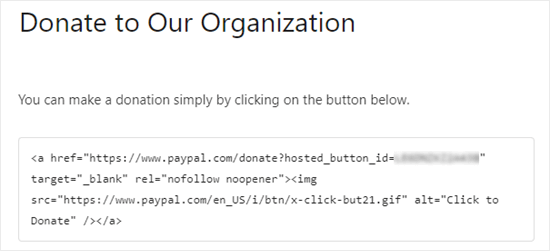
Make sure to replace the words ‘Your Shareable Link that you got from PayPal’ with the actual link from PayPal.

The PayPal button HTML code in the HTML block

Go ahead and publish your page. You now have a PayPal donate button on your WordPress site, without using a plugin.

Tip: You can also paste this HTML code inside a WordPress Custom HTML widget to add it to your sidebar.

Here’s a live example of the donate button:

Donate to WPBeginner

Feel free to click on it to see how it works. You can make a donation to help us if you found this article helpful. :)

Customization Options

The reason why we chose the shareable link instead of the full donate button code is so you can easily customize the donation image.

Below are some other official PayPal donate buttons. Simply copy the code and replace the image section in your main code above.

Option 1

Click to Donate

<img src="https://www.paypal.com/en_US/i/btn/btn_donate_LG.gif" alt="Click to Donate" />

Option 2

Click to Donate

<img src="https://www.paypal.com/en_US/i/btn/btn_donateCC_LG.gif" alt="Click to Donate" />

Option 3

Click to Donate

<img src="https://www.paypal.com/en_US/i/btn/btn_donate_SM.gif" alt="Click to Donate" />

Option 4

Click to Donate

<img src="https://www.paypal.com/en_US/i/btn/x-click-but21.gif" alt="Click to Donate" />

Option 5

Click to Donate

<img src="https://www.paypal.com/en_US/i/btn/x-click-but04.gif" alt="Click to Donate" />

Option 6

Click to Donate

<img src="https://www.paypal.com/en_US/i/btn/x-click-but11.gif" alt="Click to Donate" />

If you don’t like any of these images, then you can create your own. Simply upload that image into your WordPress media library and get the File Link. Next, add that link in the code below:

<a href="Your Sharable Link that you got from PayPal" target="_blank" rel="nofollow noopener"><img src="The Image URL" alt="Click to Donate" /></a>

Best PayPal Donation Plugins for WordPress

We recommend the PayPal Donations plugin as the easiest way to add a PayPal donation button to your site. It’s free and very straightforward to use.

If you want to gather information from your donors, then WPForms is the best option for you.

If you would like more options to choose from, then here are some other good PayPal donation plugins.

  • PayPal Donation – This plugin is owned by an official PayPal partner. It has support for all PayPal’s languages and currencies.
  • Seamless Donations – This plugin works with both Stripe and PayPal.
  • PayPal Donation Button – This plugin can send a donor confirmation email.

We hope this article helped you add a PayPal donate button in WordPress. You may also like our proven tips on how to make money online with WordPress, and our guide on how to increase your website traffic.

If you liked this article, then please subscribe to our YouTube Channel for WordPress video tutorials. You can also find us on Twitter and Facebook.

The post How to Add a PayPal Donate Button in WordPress appeared first on WPBeginner.


from WPBeginner https://ift.tt/3nZCEtG
More links is https://mwktutor.com