I used to ask people to email me their photos for my website. Profile pictures for membership sites, headshots for team pages, even simple ID verification images – and every single time, it turned into a back-and-forth mess.
People would forget to attach the file. Or they’d send a photo that was way too large. Sometimes they’d take a screenshot of a photo instead of sending the actual image, and the quality would be terrible.
Then I realized that I could let people take photos and record videos through my WordPress forms. They just need to click a button, snap a photo (or record a quick video), and that’s it.
In this guide, I’ll show you how to add this camera capture feature to your WordPress forms so you can skip all the headaches I went through.
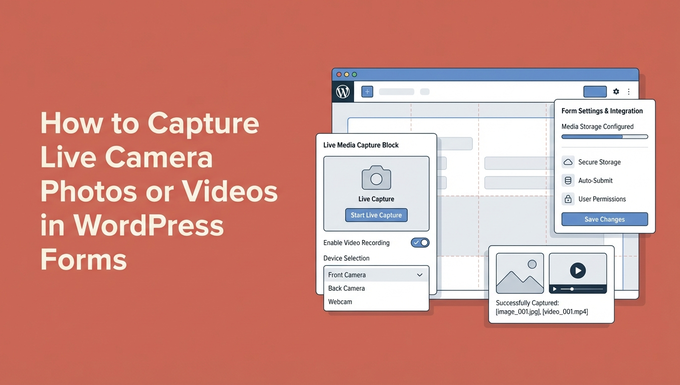
Why Add Live Camera Capture in WordPress Forms?
Live camera capture in your WordPress forms makes it much faster and easier for people to submit photos or videos. This can lead to more users actually completing your form.
Think about what happens when you ask someone to upload a photo to your contact form. They have to stop what they’re doing, open their camera app, take the photo, close the camera, find the photo in their gallery, and then come back to upload it.
That’s a lot of steps. And every extra step is another chance for someone to give up and abandon your form.
With a live camera capture field, people can take photos or record videos without ever leaving the form. They click one button, the camera opens right there in their browser, and they’re done in seconds.
This matters more than you might think. I’ve seen form completion rates jump significantly just by removing the friction of traditional file uploads.
Here are some real situations where camera capture makes a huge difference:
| Site Types | Use Cases |
|---|---|
| Customer Support Teams | Let people show their problem instead of trying to describe it in words. |
| Property/Real Estate Sites | Get tenants to document maintenance issues on the spot instead of texting photos back and forth. |
| Schools/eLearning Platforms | Collect student photos during online admissions without asking parents to email separate files. |
| Insurance Companies | Speed up claims by having customers photograph damage immediately. |
The best part about using a plugin for this purpose is that everything gets organized automatically.
When someone submits your form, their photo or video is attached to their entry along with all their other information. No more hunting through your email inbox trying to match photos with the right person. ✨
With that said, I’ll show you all the steps to add a camera capture feature to your WordPress forms. Here’s everything I’ll cover in this guide:
- Step 1: Install and Activate WPForms Pro
- Step 2: Add the Camera Field to Your Form
- Step 3: Configure Your Form's Camera Field
- Step 4: Set Up Button Style, Storage, and Access Settings
- Step 5: Set Up Form Notifications and Confirmations
- Step 6: Test and Embed Your Form
- FAQs About Capturing Live Camera Photos or Videos in WordPress Forms
- More Guides to Using WordPress Forms
Step 1: Install and Activate WPForms Pro
In this guide, I’m going to use WPForms, which is the best contact form plugin for WordPress. I picked this plugin because it has a camera capture field, which you can easily add with a simple drag-and-drop.
You can also use WPForms to create lots of different forms, including contact forms, online order forms with payments, polls and surveys, and newsletter signups.
At WPBeginner, we use WPForms for all our forms – contact forms, site migration requests, the annual readers’ survey, and more. We’re big fans of this tool, and you can learn more about it in our complete WPForms review.
First, head over to the WPForms website to create an account. Click the ‘Get WPForms Now’ button, choose a plan that fits your needs, and complete the signup.

💡 Note: You’ll need WPForms Pro to get access to the camera capture feature, plus extras like conditional logic and form themes. That said, you can still get started with the free WPForms version if you want to try out the plugin first.
After signing up, you should be able to find the plugin’s zip file and license key in your WPForms account dashboard. You can keep this tab open or store your file and key somewhere safe, like a password manager.
Now, let’s go to your WordPress dashboard and navigate to Plugins » Add New Plugin.
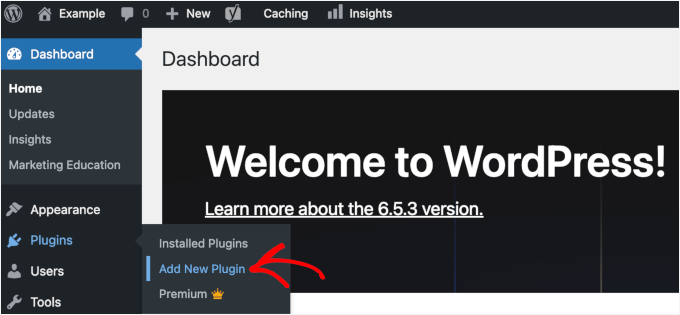
On the next screen, you can use the search bar to look for the WPForms plugin.
Click ‘Install Now’ in the search result and ‘Activate’ when it appears.

If you need help, see our step-by-step guide on how to install a WordPress plugin.
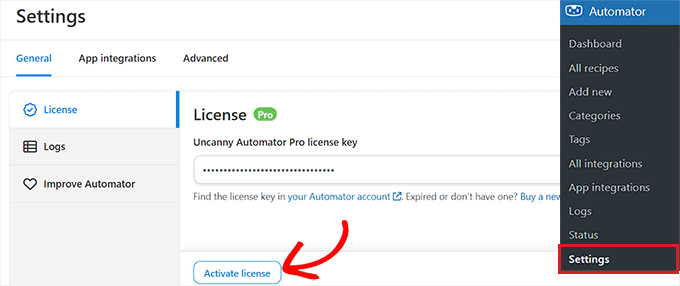
Upon activation, go to WPForms » Settings from your admin area to activate your WPForms Pro license.
Simply copy your license key and paste it into the box. Then click the ‘Verify Key’ button.
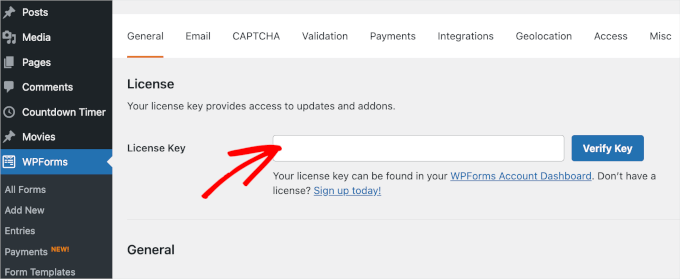
WPForms will confirm that your license is active. You’re now ready to start building forms with camera capture.
Step 2: Add the Camera Field to Your Form
In this step, you’ll create a form with the camera capture feature.
To start, you can navigate to WPForms » Add New in your WordPress admin dashboard.
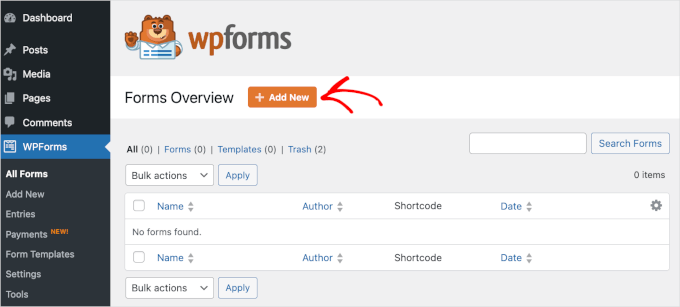
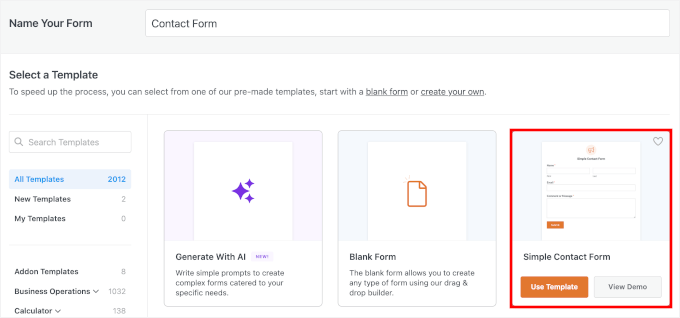
This will take you to the Setup page, where you can name your form.
This is for your reference only, but I recommend using a clear, descriptive name for easier organization as you create more WordPress forms.

Next, you’ll choose how you’ll build your form.
WPForms allows you to create forms using a blank canvas, an AI-powered form builder, or a ready-made template.
With WPForms AI, all you have to do is write a simple prompt. The AI form builder will generate it for you in a few seconds.
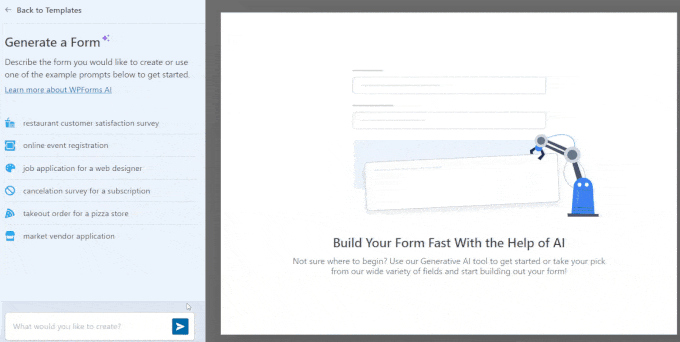
For this tutorial, though, I’m going to use the Simple Contact Form template.
WPForms comes with 2,000+ premade form templates, so it’s easy to find one that fits your needs.
If you want step-by-step instructions, see our guide on how to create a contact form in WordPress.
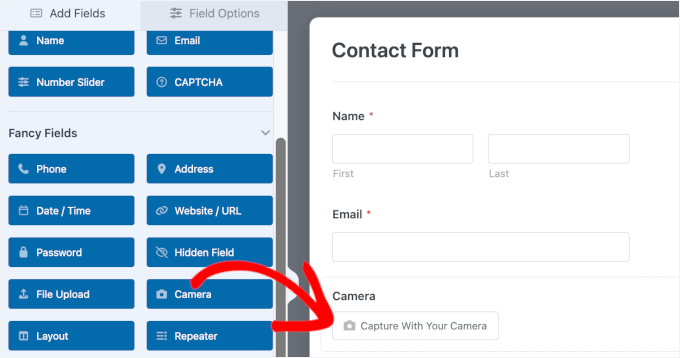
Once your form opens in the builder, look at the left sidebar where all the form fields are listed. Scroll down until you find the section labeled ‘Fancy Fields.’
Right there, next to the File Upload field, you’ll see the ‘Camera’ field. You can drag and drop it wherever you want it to appear on your form.
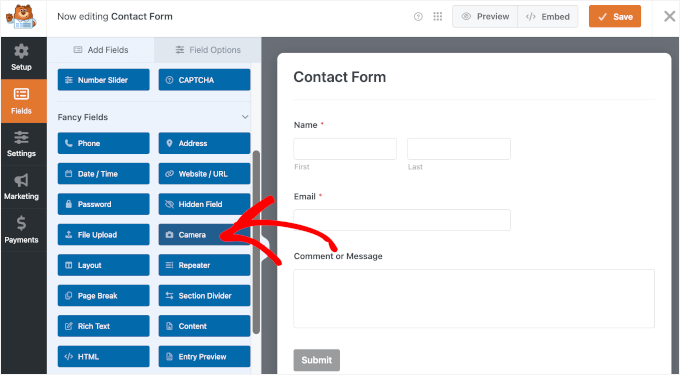
💡 Note: The File Upload field is best for collecting files users already have on their device, like saved photos or PDFs. For this tutorial, the Camera field works better because it lets users capture a photo or video on the spot without leaving the form.
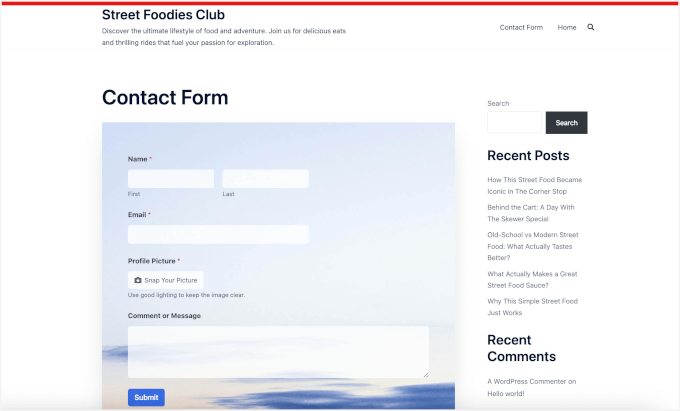
You’ll notice a small camera icon shows up in your form preview. That’s what your users will click to capture their photo or video.
One thing I found interesting with this feature is that when someone clicks the camera button on a laptop or desktop, they’ll see a friendly 3-second countdown before capture. This gives them just enough time to smile or adjust their angle.
Here’s what it might look like in the preview:
There you have it – I told you this part was quick!
Step 3: Configure Your Form’s Camera Field
From here, you can configure your Camera field.
Go ahead and click on the ‘Camera’ field you just added to open up the ‘Field Options’ panel on the left side. This is where you’ll customize how the camera capture works.

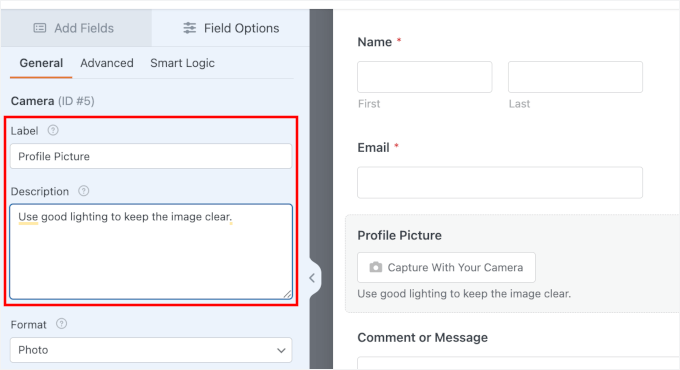
The first thing you’ll see is the ‘Label’ setting.
By default, the field is called Camera, but you can rename it to match what you’re collecting. For example: Profile Picture, Error Screenshot, or Damage Photo, depending on your use case.
In ‘Description,’ you can add a short note with any extra details or instructions, like what should be visible in the photo or any quality requirements.
For example:
- “Use good lighting to keep the image clear,” for profile pictures.
- “Make sure all text is readable,” for error screenshots.
- “Include the whole property in the frame,” for damage reports.
This keeps the label short and scannable, and uses the description only for helpful guidance.
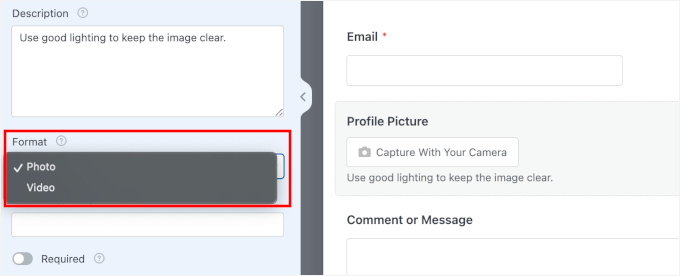
Then, there’s the ‘Format’ setting, where you’ll see two choices:
- Photo – works well for profile pictures, ID cards, or any situation where you need a quick snapshot.
- Video – perfect when you want people to record short introductions, testimonials, or explain something that’s easier to show than describe.
By default, WPForms sets it to ‘Photo,’ but you can switch between them at any time.
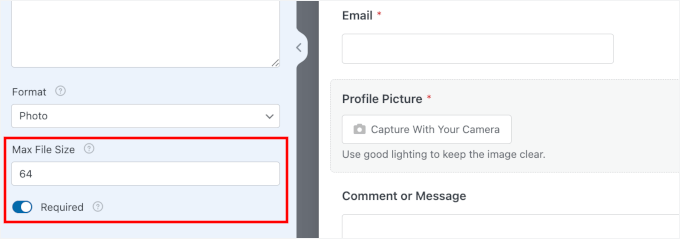
Now, you can scroll down to the ‘Max File Size’ setting, where you can control how large the user-submitted file can be.
You can enter any number of megabytes (MB) you want. If you leave this blank, WPForms will use your server’s default limit, which is usually around 64 MB. You can also increase your max file upload size if needed.
I recommend setting a reasonable limit based on what you actually need. Smaller file sizes help your forms load faster and save space on your server.
Don’t forget to toggle on the ‘Required’ button so users can’t skip this field.
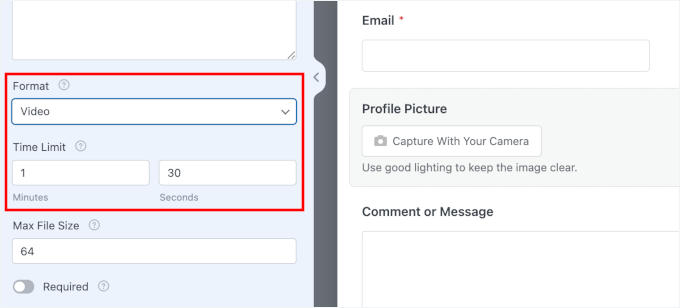
If you chose ‘Video’ as your format, you’ll also see a ‘Time Limit’ option. The default is 1 minute and 30 seconds, which works well for most situations.
🧑💻 Pro Tip: Video files can get large and hurt your WordPress performance. This field is fine for short clips (less than 30 seconds). But if you need users to submit long videos (5+ minutes), then it’s better to have them upload to a cloud service and share the link.
See our guide on why you should never upload a video to WordPress to learn more.
You can play with these settings to suit your needs.
Step 4: Set Up Button Style, Storage, and Access Settings
Here, I’ll walk you through the advanced settings for your Camera field. This is where you fine-tune how the camera feature looks and where your captured files are stored.
To get started, switch to the ‘Advanced’ tab at the top of the Field Options panel.
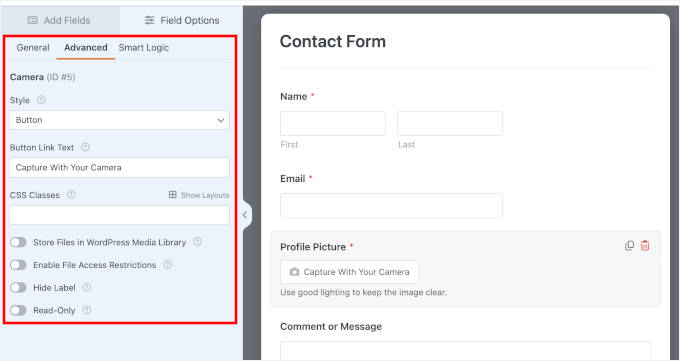
Let’s break down each of these configuration options.
Customize Camera Button Style and Text
First, find the ‘Style’ dropdown. You can choose to show a button icon or display it as a simple link.
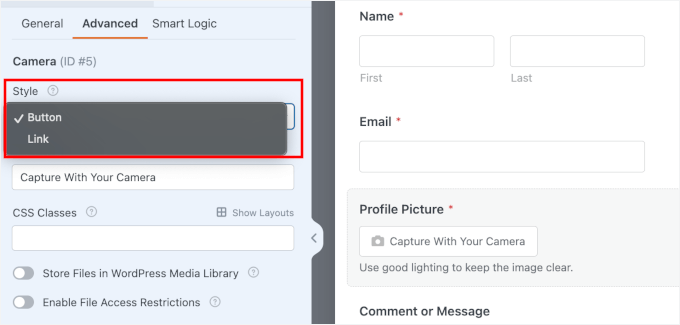
I usually stick with the button style because it’s more obvious and easier to click, but the link option works well if you want a cleaner, more minimal look.
Right below that, you’ll see the ‘Button Link Text’ field. This is your chance to make the camera button look more personal or on-brand.
Instead of the default text, you could write something like “Snap Your Picture” or “Record a Video.” I’ve even seen people use fun phrases like “Say Cheese!” for profile picture forms.
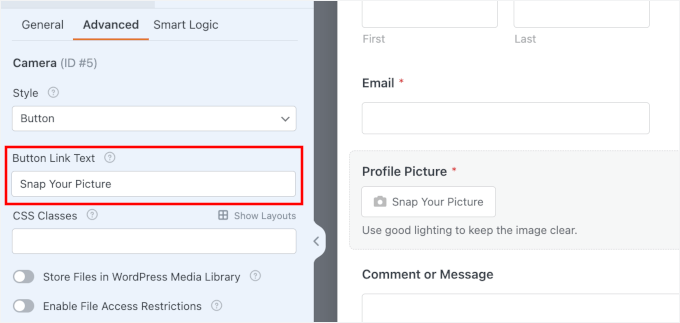
These small touches make your contact form feel more welcoming and less robotic.
Style Further with CSS Classes
Next, you’ll see the CSS Classes field. This lets you add a custom class name so you can style this camera field differently with CSS.
For example, you could add a class like custom-camera-btn here. This doesn’t automatically style the button, but it lets you (or a developer) add custom CSS in your theme settings to target this specific button later.
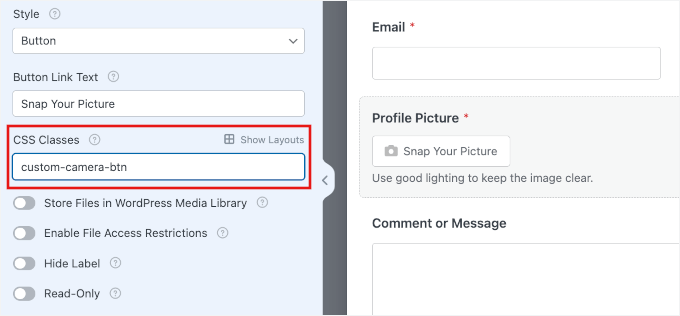
If you want to add more than one CSS Class, then you can separate them with spaces, like this:camera-field large-button.
I will leave this blank to keep the styling consistent with the rest of my form fields.
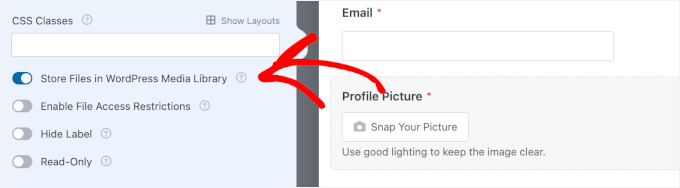
Choose Where to Store Captured Files
By default, WPForms saves all captured photos and videos in your site’s ‘Uploads’ folder, specifically inside the WPForms directory.
But if you prefer keeping all your media in one place, toggle on the option that says ‘Store file in WordPress Media Library.’
Just remember that files in the Media Library are often easier for the public to access, so keep this setting turned off if you are collecting sensitive documents.
🧑💻 Pro Tip: You can also connect WPForms with Dropbox or Google Drive if you want to store files externally. This is helpful if you’re worried about using up too much server space or if you want automatic cloud backups.
No matter where you store the files, you can always view them in your ‘Entries’ dashboard, attached right to each form submission.
Restrict Access to Uploaded Files
If your form collects sensitive information, such as ID photos or personal documents, you’ll want to lock down who can view these files. Scroll down and turn on ‘Enable File Access Restrictions.’
Once you enable this, you get two security options. The first one is that you can limit access so that only logged-in WordPress users can view the files.
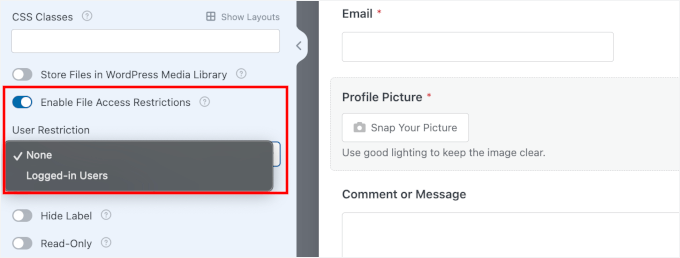
The other option is to add password protection to your form for an extra layer of security.
This is especially important for forms used in healthcare, legal services, or any other context where you’re handling private information.
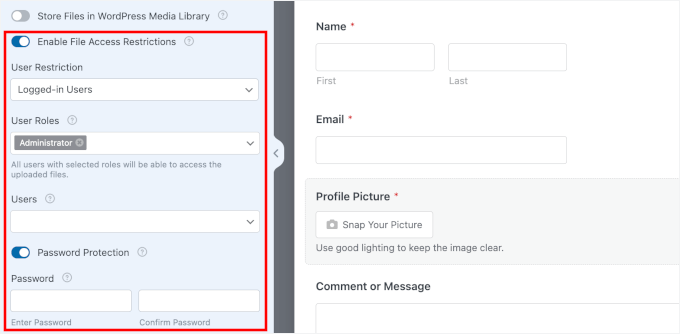
Without these restrictions, anyone with the file URL could potentially view the uploaded media.
You can take your time configuring these advanced options before moving on.
Step 5: Set Up Form Notifications and Confirmations
Now that your camera field is working, you need to make sure you actually get notified when someone submits your form.
To do this, you can head over to Settings » Notifications in the form builder.
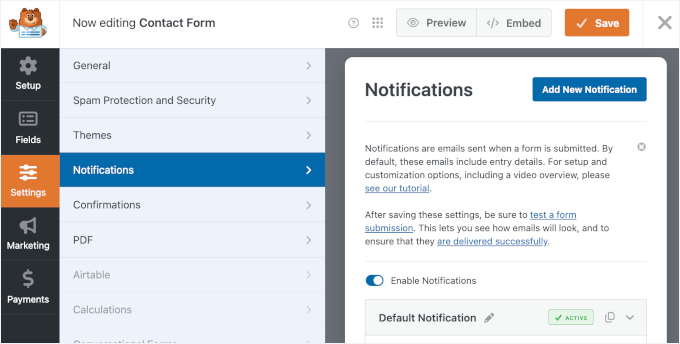
WPForms automatically sets up a basic email notification that gets sent to your WordPress admin email address. Every time someone submits your form with a captured photo or video, you’ll receive an email with all the details.
You can customize who receives these notifications by changing the ‘Send To Email Address’ field. If you want multiple people notified, just enter all the email addresses, separating them with commas.
You can also use a smart tag to send notifications dynamically, for example, to the email address submitted in the form.

See our guide on how to create a contact form with multiple recipients for details.
The notification email will include a direct link to view the captured photo or video. This allows you to preview the file immediately from your inbox without logging in to the WordPress dashboard first.
💡 Note: WordPress doesn’t always send emails reliably, and sometimes form notifications go to spam or don’t get sent at all. To fix this, I recommend using the WP Mail SMTP plugin. For details, see how to fix WordPress not sending emails.
After someone submits your form, they need to know it was successful.
Let’s go to the ‘Confirmations’ panel to decide what happens after someone submits the form:
- The Message confirmation – shows a simple text message right on the same page after submission, like “Thanks! We’ve received your submission.”
- The Show Page confirmation – redirects people to a different page on your site. This works well if you want to send them to a custom thank-you page with more information.
- The Redirect confirmation – sends people to any URL you want, even on a different website. I’ve used this to send people to a booking page or a special offer after they submit.
You can pick whichever option makes sense for your situation.
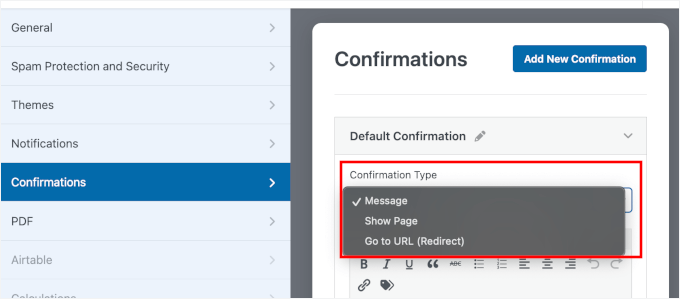
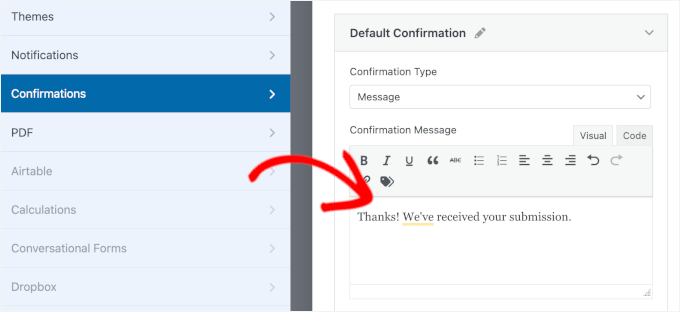
I usually stick with the ‘Message’ confirmation because it’s simple and people know immediately that their submission worked.
If you want to use it too, I recommend rewriting the default message so it matches your brand’s voice:
Step 6: Test and Embed Your Form
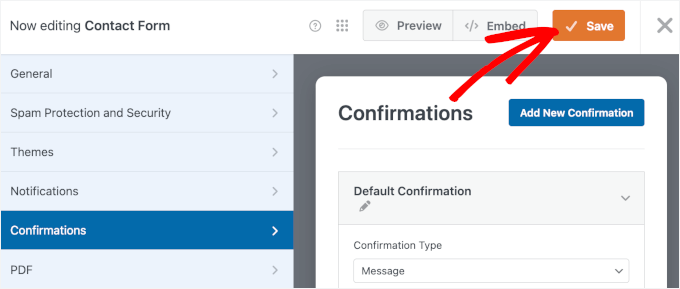
Before you share your form with the world, you need to make sure the camera capture actually works.
Start by clicking the ‘Save’ button at the top right of the form builder to save all your changes.
Now let’s preview this form on a page so you can test it.
Go ahead and click the ‘Preview’ button to open your form preview in a new tab.

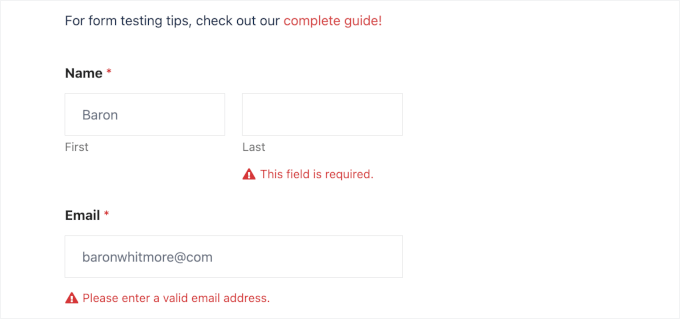
On the preview, you can fill out your form fields with dummy data.
To make sure validation is working, try entering a typo or leaving a required field blank.
Next, click on the camera button in your form.
Your browser will then ask for permission to access your camera. Go ahead and click ‘Allow this time’ or ‘Allow while visiting the site’ to grant permission.
Note: For security reasons, some browsers will block camera access if your site is not using HTTPS. Ensure an SSL certificate is installed, or else the camera button will not work.
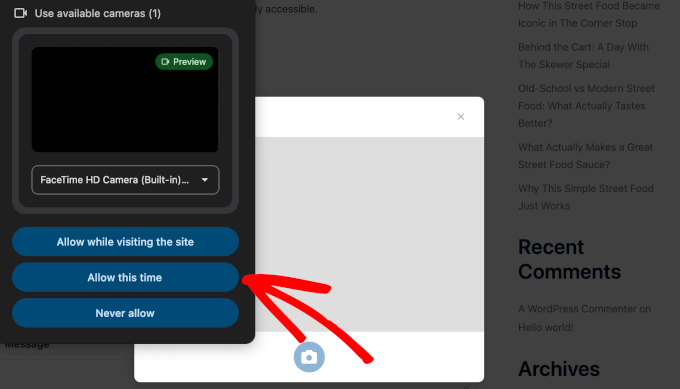
You should now see yourself on screen with a 3-second countdown. Smile and let it capture your photo or video.
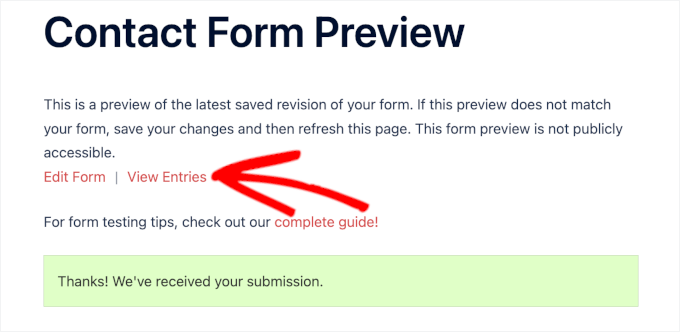
When you’ve filled out everything, hit ‘Submit’ and see if your confirmation message appears just right. You can then click the ‘View Entries’ link to see if the form submission went through.
On the next screen, you should see your submission test.
In the Actions column, click ‘View’ to see the entry.
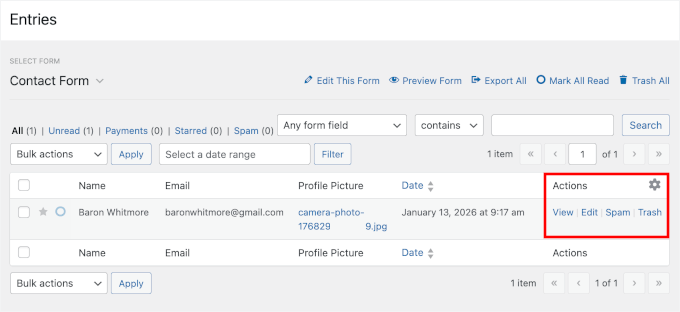
Now, you can scroll down to see your captured photo or video attached right there.
Here’s what it looks like on my screen:

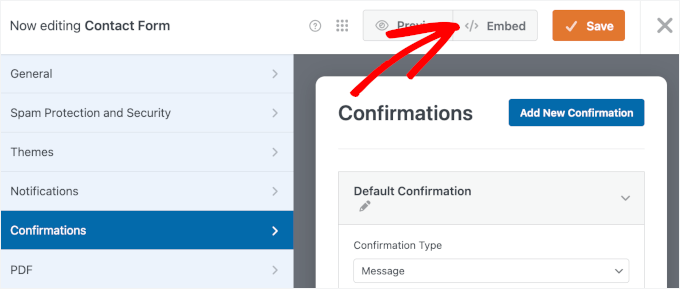
Once everything checks out, you can add this form to your WordPress website.
Click the ‘Embed’ button to launch the wizard.
This will open a popup where you can either pick an existing page or create a new one for your form.
- Select Existing Page: A dropdown will show all the pages on your WordPress site.
- Create New Page: A ‘Name Your Page’ field will appear for you to enter a title.
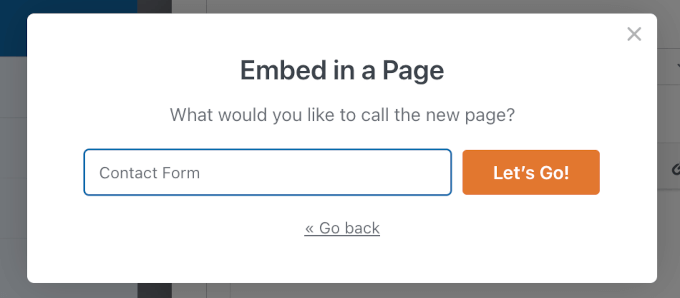
For this guide, I’ll choose ‘Create New Page’.

Next, enter a name for your new page, for example, I’m calling mine “Contact Form.”
Click ‘Let’s Go!’
You’ll then land on the page’s block editor with your form already loaded.
From here, you can tweak the ‘Form Settings’ in the right-hand panel.
By default, the form title is hidden, so you might want to turn it on to give visitors more context. You can also enable the description if you’ve added one.

To make it look even better, style the form to match your site’s theme.
Go ahead and choose a theme from the Themes section.
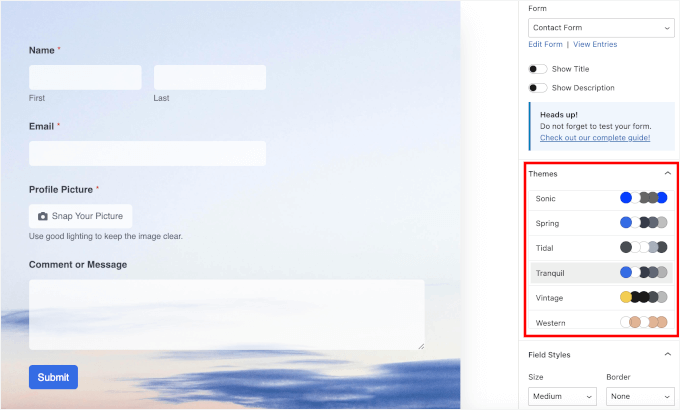
When you’re happy with how it looks, click ‘Save’.
With that done, publish or update your page and click ‘View Page’ to see the live version on your WordPress site:
For details, see our guide on how to embed forms in WordPress.
🧑💻 Pro Tip: Once you embed your form, make sure to open the page on your mobile device to make sure the camera opens smoothly and feels natural on a smaller screen.
FAQs About Capturing Live Camera Photos or Videos in WordPress Forms
Before we wrap up, here are answers to some common questions people have about using camera uploads and file fields in forms.
How do I collect photos in Google Forms?
Google Forms supports file uploads, but it lacks a dedicated Smart Camera field. While users can manually select a file, WPForms offers a seamless integration that triggers the camera directly, making it much faster for users to snap and submit.
Can WordPress forms have a camera?
Yes. Some WordPress form plugins, like WPForms, support a camera field that lets users take photos or record videos directly from their device and submit them with the form.
What is a file upload field?
A file upload field lets users attach files like images, PDFs, or videos when submitting a form. It’s useful for things like photo uploads, resumes, or documents.
How do I take a picture in WordPress forms?
You add a camera or file upload field to your form using a form plugin that supports it, like WPForms. When users open the form on a device with a camera, they can take a photo directly instead of uploading an existing file.
Can WordPress forms take webcam pictures?
Yes. If the form plugin supports live camera input, users can take photos using their webcam on a desktop or the camera on their phone and submit them right away.
More Guides to Using WordPress Forms
I hope this tutorial has helped you add a camera field to let users take live photos or videos directly in your WordPress forms.
Next, you might want to learn:
- How to Add Image Choices in WordPress Forms
- How to Show a Floating Contact Form in WordPress
- How to Use Contact Forms to Grow Your Email List in WordPress
- Ways to Use Conditional Logic in WordPress Forms
- Ultimate Guide to Using WordPress Forms (All You Need to Know)
If you liked this article, then please subscribe to our YouTube Channel for WordPress video tutorials. You can also find us on Twitter and Facebook.
The post How I Let Users Take Live Photos and Videos in My WordPress Forms first appeared on WPBeginner.
from WPBeginner https://ift.tt/badXEuf
More links is https://mwktutor.com